29.10.2019
| (Votes: 1, Rating: 5) |
Issues discussed in the material:
- How brake lights evolved
- How brake lights work today
- What to do if the brake light does not light up
- Why, according to car owners, the brake light bulb may not light up?
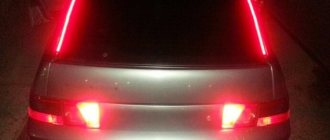
Car lighting equipment performs very important functions. In this case, we are talking not only about headlights, but also signal lights, which include turn signals, side lights and brake lights. Signal lights are necessary so that other road users can see the dimensions of the vehicle and respond in a timely manner to its maneuvers. For example, if a vehicle's brake light is not on, then when it stops or slows down, the vehicle behind may not have time to brake, which will lead to an accident. If such a malfunction is detected by the traffic police, the owner of the car will be fined. The problem should be fixed immediately after it is identified.
A little history of brake lights
Transportation history experts believe that the first brake lights appeared on self-propelled carriages in 1912. At that time they were not yet electric, but had a mechanical device. These were flags made of tin, which were driven using a system of cables or rods. This design turned out to be not very convenient, but since the traffic on the roads was low and the speeds were not yet high, it did not cause any particular complaints.
The first cars - just like horse-drawn carriages - had a simplified braking system that only locked the rear axle. In the twenties of the last century, automakers began to produce car models in which all four wheels were equipped with brake pads. This solution made it possible to significantly increase braking efficiency, so brake lights have become a mandatory element of traffic safety. Standards for brake warning lights were only established by the Vienna Convention on Road Signs and Signals in 1949 and have not changed for over 30 years. Only in the 80s was it adopted that a third auxiliary brake light was required, located in the center of the rear window or spoiler.
Russian car manufacturers first used electric brake lights in 1946 on the Pobeda GAZ-M20. This model was equipped with a stop light built into one unit with license plate illumination. It was located in the central part of the trunk lid and received the popular name “airplane” or “birdie”.
The brake light on the popular 21st Volga was unique. For this model, the same light bulbs served as “stops” and turn signals. When the driver engaged a turn while pressing the brake pedal, the brake light switched to blinking mode. In those days, such a stop algorithm did not surprise drivers, but for modern road users this is unusual. Today, owners of retro Volgas are converting brake lights to normal operation, so that drivers of cars behind can correctly understand the maneuvers of the car.
Quite often, the original design of brake lights became a memorable “calling card” of different car models. Examples include the double round feet of the iconic Nissan Skyline, Mini lights stylized under the flag of Great Britain, the “crosses” of the Jeep Renegade, the “snail’s eyes” peeking out from behind the spare tire of the Land Rover Freelander, etc.
Additional Tips
Before each trip, especially over long distances, you should check the functionality of all lighting equipment, including brake lights. In order to reduce the likelihood of breakdowns along the way, you need to periodically check the condition of the sockets and bases of the rear light bulbs, and periodically clean them of oxides and dirt.
In case a breakdown does occur, you should always have an additional set of light bulbs and 10 amp fuses in your car, as well as a multimeter to check them.
How brake lights work today
The design of brake lights, even in the most modern cars, is not complicated, but many drivers have difficulty troubleshooting this electrical equipment. Next, we will look in detail at the “stop” device.
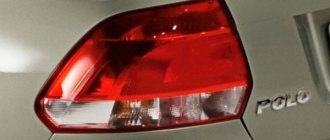
The brake lights have a characteristic red color. They are located in the rear of the car and light up when the brake pedal is depressed. Nowadays, automakers equip brake lights with both LED and conventional incandescent bulbs, but the operating principle of this equipment does not change.
The limit switch installed near the brake pedal controls the switching on/off of the stop lamp. When the brake pedal is released, it presses the button and the contacts inside the switch open. In such a situation, voltage is not supplied to the stop lamp and it does not light up. When you press the pedal, the button is retracted by a spring, the contacts of the limit switch close and the brake light bulbs light up. The lighting in the car interior works on the same principle, which turns on when the doors are opened.
The stop signal switch, mounted on the brake pedal bracket, is equipped with a special adjustment mechanism. By turning the fastening nut, the switch can move along its axis, which makes it possible to adjust the moment of closing the network.
The normal setting suggests free pedal travel until the brake lights turn on. The amount of this stroke differs for different car models, but on average ranges from 10 to 20 millimeters.
The simplest brake light connection diagram consists of a switch, electrical wiring, a fuse and lights with bulbs or LEDs. In the design of cars equipped with an automatic transmission, the brake light switch may contain an additional group of contacts operating in the opposite direction. An additional switch closes the circuit when the brake is pressed and opens it when the pedal is released. It is necessary to block gear shifting in an automatic transmission if the driver does not press the brake pedal.
Search principle
To find a fault in any vehicle on-board network system, you should use the method of sequential elimination of elements. The point is to consistently check electrical appliances and sections of the circuit, excluding elements from the list of reasons that could cause a breakdown. To do this, you need to clearly understand the design and operating principle of the system. When troubleshooting, you need to move from the components that require the least effort to check, to the most difficult to diagnose elements.
Electrical diagram
We immediately emphasize that the pinout of connectors and color markings of wires may differ not only between different models of the same automaker, but also among one model of different years of manufacture. Before you start searching for the cause of the breakdown, you need to find an electrical diagram specifically for your car model.
Should you use "improved" brake lights?
At the end of the last century, most automakers began to equip their car models with emergency braking alarm systems. With this equipment, when you sharply press the brake pedal, if the car speed exceeds 50-60 km/h, the brake lights operate in intense flashing mode (its frequency in this case will be several times higher than that of the emergency lights).
Tests conducted by specialists from the Mercedes concern and other automakers have shown that flashing brake lights attract the attention of drivers of cars driving behind them for about 0.2 seconds. faster than constantly burning "stops". This allows you to reduce the braking distance of a car traveling at a speed of 100 km/h by 5.5 meters.
We recommend
“The low beam light does not light up: the main causes and troubleshooting” Read more
The ESS system, which is not very technically complex, significantly increases road safety. Research shows that the attention of drivers of cars that follow a slowing car is dulled, which is why they do not always react in a timely manner to burning brake lights.
Manufacturers of additional equipment for vehicle equipment do not yet offer such devices. Chinese companies produce systems that are only vaguely reminiscent of ESS. Their products do not have devices that control the speed of the vehicle and the dynamics of braking. The brake lights simply flash several times when you press the brake, but if the pedal remains pressed, the lights begin to glow continuously.
As we noted earlier, tests have shown that flashing brake lights are more effective at attracting drivers' attention, but such a system must receive information from a speed sensor to flash only if the car is going faster than 50 km/h. In city traffic, flashing brake lights is a prohibited practice. Constant flashes of lights will irritate car drivers who are following behind. Such blinking becomes dangerous, since the reaction of traffic participants may not be entirely adequate. Drivers of cars driving behind each other in a traffic jam can make dangerous maneuvers to avoid the “flashing garland.”
Auto-assistance
In the diagram we presented, the elements are depicted as close as possible to how they look in reality. Don’t be alarmed if you only find a schematic diagram for your car with symbolic images of the elements. Schematic diagram of external lighting for VAZ 2114, 2115:
- 3 – mounting block;
- 8 – lamps for side lights and brake lights;
- 11 – brake light limit switch;
- K4 – relay for monitoring the serviceability of brake light lamps and side lights.
Fault localization Understanding the operating principle allows you to determine exactly why the brake lights may not light up:
What to do if the brake light does not light up
The procedure for troubleshooting is determined based on the signs of failure, which enable the technician to find the location of the damage. Let's consider the main scenarios when the brake light does not light up.
- One brake light does not work
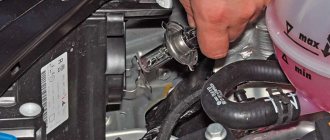
The cause of this malfunction may be a burnt-out light bulb or a lack of contact in the socket. To eliminate the breakdown, it is necessary to dismantle the trunk trim in the place where the brake light bulb does not light up. After this, you may have to remove the block of light bulbs, pull them out of the holders and inspect the contacts of the socket and base.If traces of rust or oxidation (white or greenish coating), soot, dust or moisture are detected, we can conclude that the brake light bulb does not light due to poor contact. In this case, you need to clean the contaminated area with a sharp object (for example, a screwdriver).
You can check the serviceability of the light bulb using a multimeter, or by connecting it with wires to the on-board network through a fuse. If the light does not light, it must be replaced with a product of a similar model.
- Additional brake light does not work
The cause of this malfunction is most often a broken wiring or poor connection of the wires. As a rule, an additional brake light is connected to one of the standard brake lights. You need to check the reliability of the wiring and make sure there are no traces of oxidation (if they are present, you should cut off the damaged end of the wire, clean it and connect it to the socket). If a break in the wiring is detected, it should be re-strung (to do this, it is worth using a thicker wire to prevent such a malfunction from occurring in the future).We recommend
“The oil light is on at idle: let’s look at the reasons” Read more
- All brake lights do not light up
If all the rear brake light bulbs do not light up, you need to look for a break in the wiring, check the serviceability of the limit switch and the functionality of the fuse. Diagnostics in this case begins with the fuse box, on the cover of which there is a table that allows you to determine which circuit a particular insert is installed on. If such a table is not available, information can be found in the machine's instruction manual.When identifying a blown fuse, before installing a new one, you need to find the reasons for what happened. As a rule, this malfunction is a consequence of a short circuit or broken wire insulation. Water that gets into the electrical connections can also cause the fuse to blow (in this case, you need to thoroughly dry the area with a hair dryer). After removing moisture from the wiring connections, you need to remove the fuse from the holder and check the entire circuit using a multimeter.
The wiring to which the brake light bulbs are connected may become frayed in the places where the wires pass from the body to the trunk lid. To detect such a malfunction, you will have to remove the casing. Such work requires some experience, and its implementation should be trusted to car service specialists. To restore damaged insulation, ordinary insulating tape is used.
Once the serviceability of the fuse has been established, you should proceed to diagnosing the limit switch. This element is located in the pedal assembly. You need to visually assess its condition and ring it with a multimeter, first squeezing the brake pedal. If the limit switch is working properly, the multimeter will show a resistance of less than 1 ohm. If the readings are higher or mechanical faults are detected during visual inspection, the part should be replaced. Such work should be performed by qualified technicians in a car service center.
If the fuse and limit switch are in working order, then the reason why the brake light bulbs do not light up is a broken wiring. To find its place, you will need to open the casing, so you will have to turn to specialists. After detecting a wire break in the damaged area, the insulation is stripped and the wiring is soldered. It is better to insulate the connection point using heat shrink tubing. If a broken terminal is detected, it must be removed from the plastic case and replaced (to do this, you need to crimp the stripped end of the wire into a new terminal).
Causes of malfunction
The main reasons for this malfunction are:
- defective or burnt out light bulb;
- break in electrical wiring or plug connections;
- fuse blown due to a short circuit or overload in the on-board network;
- limit switch malfunction;
- problems with electronic systems or units.
Such malfunctions can usually occur on high-mileage vehicles. However, there are exceptions.
Why, according to car owners, the brake light bulb may not light up?
- I just cleaned the contacts “I ran into a problem when the brake light bulbs stopped working. It’s interesting that I didn’t know about this for some time - the brake simply didn’t work when the auto start was on or when stopping with a turbo timer... When they started telling me that I was driving like a “freak”, I thought that the problem was in the alarm system, which I like I programmed it wrong. I also noticed that with this “glitch” the ECO indicator does not work (it goes out and that’s it, and after a while it lights up on its own). Sometimes after driving a certain distance the brake lights would come on and the ECO light would work. I fixed the problem by removing and cleaning the “frog”. Everything works as it should."
- Suggested on the forum
“The additional brake light has disappeared. I started looking for information on what could be causing this problem and found it on the forum. It turned out that the wire to the additional stop lamp in my model does not come from the main stops, but separately. I discovered that under the right footrest (they wrote on the forum that this is a sore spot) the wiring simply rotted due to moisture. It was not difficult to fix the problem.” - Simultaneously simple and complex
“I’m not good at electrics, but it was interesting to figure out the broken brake lights on my own. When I removed the left side of the trunk, I found the wiring that comes from the rear light, and it had a free connector. At the same time, I did not find any wires that go from the top of the brake light.After that, using a screwdriver, I removed the trim clips around the small windows in the luggage compartment and pulled out the headliner clips. When the side panels are unfastened, the headliner comes down and underneath I found the wiring that goes to the auxiliary brake light. The wires run from the top spoiler through its support and to the ceiling. The harness itself to the lanterns runs under the ceiling and is attached with chips to the stiffeners. It turned out that the plugs were not connected.
The Japanese assemblers firmly fixed everything, so in order to connect the plugs, you need to either dismantle the floor of the ceiling upholstery, or tear off the clip that secures the supply cable cable (the second option is simpler, so I did that). After this, the plug was visible, which was made in the form of a clip installed in the body hole. When I connected it, the brake light bulb came on. It turned out to be a simple solution, but its implementation was difficult!”
We recommend
“The airbag light is on: finding the causes and troubleshooting” Read more
- Wire replacement only
“Sometimes the reason that the brake lights don’t light up is where the wire is soldered to the chip. Moisture that gets into the wiring at the insulation cut destroys the wire and the contact is lost. The problem can only be solved after replacing the wire.” - It will take 10 minutes
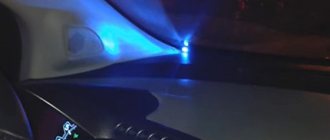
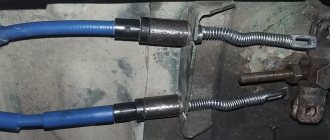
“I solved the problem with my feet myself, following the instructions. I will give it here in full. To troubleshoot the brake lights, you should take a flashlight and lie on the floor in the passenger compartment on the driver’s side so that the brake pedal axis is visible. The light from the flashlight must be directed upward to find the limit switch. It looks like a long black rod with a retractable rod at the end. When the driver presses the brake pedal, the rod extends and the contacts close. As a result, the brake lights come on. You need to take a wrench and unscrew the locknut. By turning out the limit switch, you should ensure that the stop lamps light up when you lightly press the brake pedal. If necessary, remove and reinstall the wires that go to the end switch. This simple procedure only takes about 10 minutes and can help you avoid a serious accident on the road.”
Car alternator malfunction
LED lamps are very sensitive to voltage surges in the on-board network (along with this, the current through the LEDs increases, which leads to their destruction). The voltage may increase if the generator components (namely the stabilizer) are faulty. This is especially common on domestic cars due to the lower quality of component production compared to more well-known brands.
Therefore, if the brake light on a VAZ 2114 or another model does not light up (provided that LED lamps are used), you should also check the generator and replace the damaged element, then change the lamp.
Such a malfunction can occur periodically and is associated with wear and tear of the entire generator. If the brake lights on the VAZ 2115 do not light up and other breakdowns often occur, you should also think about replacing it with a more reliable car (in some cases, this is more profitable than constantly investing money in endless repairs).
Design of pneumatic switches
Switches supplemented with pneumatics are usually installed on automotive vehicles that have a braking system with a pneumatic drive.
, as well as on trailers. In some cases, the device is responsible not only for the operation of brake lights, but also acts as a sensor that responds to changes in air pressure in the pneumatic system and connects certain electrical equipment according to the situation. Pneumatic brake light switches are based on the following elements:
- Housing with a pair of cameras;
- Diaphragm;
- Threaded fitting or channel;
- Contact Group.
The contact group itself can have two designs: fixed pins and a movable plate; a movable pin with a return spring and a fixed contact of any shape. Of interest is the housing of the pneumatic brake light. It is divided by a diaphragm into two chambers. The point is that as soon as the pressure in one of the chambers increases, it bends and the movable contact attached to it closes with the stationary one. Of course, an increase in pressure in the system is provoked by the activation of the brake system.
leon1193 › Blog › Decoding the fuse box VAZ 2109-2114
Decoding the fuse block VAZ 2109 F9 (7.5 A)
Right fog light and fog light warning lamp
F8 (7.5 A
) Left fog light fuse
F1 (10 A)
Headlight wiper motors (at the moment of switching on), headlight wiper switch relay (contacts) and headlight washer switch valve
F7 (30 A)
Electric motors headlight cleaners (in operating mode).
Relay for turning on headlight wipers (winding). Electric motor for heater fan, washer pump, rear window wiper. Rear window washer timing relay. Rear window washer activation valve. Relay for the electric radiator cooling fan (winding) and for turning on the rear window heating. Indicator lamp for turning on the heated rear window and glove compartment lighting F16 (15 A)
Turn indicators, relay-breaker for turn indicators and hazard warning lights (in turn indicator mode).
Indicator lamp for turning on the turn signal. Rear lights (high-speed running lights). Windshield wiper motor and relay. Generator excitation winding (when starting the engine) and brake fluid level warning lamp F16 (15 A)
Fuse VAZ 2109 warning lamps: emergency oil pressure, closing the carburetor air damper, turning on the handbrake.
“STOP” display. Coolant temperature and fuel level indicators. Indicator lamp for reserve fuel remaining. Voltmeter. “CHECK ENGINE” indicator light. “TEST” board. Warning lamps for the on-board monitoring system, seat belts not fastened and doors not closed. Power circuit for inertial door lock switch F3 (10 A)
Rear lights (brake signal lamps).
Interior lighting F6 (30 A)
Electric window motor, power window relay
F10 (7.5 A)
License plate lights.
Engine compartment lamp. Instrument lighting lamps. Indicator lamp for turning on the side light. Heater lever illumination display. Cigarette lighter lamp Left headlight (side light). Left rear light - side light F5 (20 A)
Radiator cooling fan electric motor and its activation relay (contacts).
Sound signal and relay for its activation F11 (7.5 A)
Right headlight (side light).
Right rear light (side light) F2 (10 A)
Direction indicators, relay-breaker for direction indicators and hazard warning lights (in hazard warning mode).
Hazard warning light F4 (20 A)
Rear window heating element.
Relay for turning on the heated rear window (contacts). Socket for connecting a portable lamp. Cigarette lighter F15 (7.5 A)
Right headlight (high beam)
F14 (7.5 A)
Left headlight (high beam).
Indicator lamp for high beam headlights F13 (7.5 A)
Left headlight (low beam)
F12 (7.5 A)
Right headlight (low beam)
1 (8 A)
Reserve fuse in the VAZ 2109 block
2 (8 A)
Reserve
3 (8 A)
Electric motors of headlight wipers at the moment of switching on).
Relay for turning on headlight wipers (contacts). Headlight washer activation valve 4 (16 A)
Headlight wiper motors (in operating mode).
Relay for turning on headlight wipers (winding). Heater fan motor. Electric motors for the rear window washer and wiper pump. Rear window washer timing relay. Valve for turning on the windshield and rear window washer. Relay for the electric radiator cooling fan (winding) and for turning on the rear window heating. Indicator lamp for turning on the heated rear window and glove compartment lighting 5 (8 A)
Turn indicators, relay-breaker for turn indicators and hazard warning lights (in turn indicator mode).
Indicator lamp for turning on the turn signal. Rear lights (high-speed running lights). Windshield wiper motor and relay. Generator excitation winding (when starting the engine). Brake fluid level warning lamp. Indicator lamp for emergency oil pressure. Indicator lamp for covering the carburetor air damper. Indicator lamp for turning on the hand brake. “STOP” display. Coolant temperature gauge. Fuel level indicator. Indicator lamp for reserve fuel remaining. Voltmeter 6 (8 A)
Fuse for rear lights (brake signal lamps) in block 2109. Interior lighting
7 (8 A)
License plate lights.
Engine compartment lamp. Instrument lighting lamps. Indicator lamp for external lighting. Heater lever illumination display. Cigarette lighter lamp 8 (16 A)
Radiator cooling fan electric motor and its activation relay (contacts).
Sound signal and relay for its activation 9 (8 A)
Left headlight (side light).
Left rear light (side light) 10 (8 A)
Right headlight (side light).
Right rear light (side light) 11 (8 A)
Direction indicators, hazard warning relay-breaker (in hazard warning mode).
Hazard warning light 12 (16 A)
Rear window heating element.
Relay for turning on the heated rear window (contacts). Cartridge for connecting a portable lamp. Cigarette lighter 13 (8 A)
Right headlight (high beam)
14 (8 A)
Left headlight (high beam).
Indicator lamp for high beam headlights 15 (8 A)
Left headlight (low beam)
16 (8 A)
Right headlight (low beam)
How to change the reverse sensor on a VAZ 2107
Before replacing the sensor, it is advisable to clean the gearbox of dirt. If this is not done, it may get into the oil, which is located in the crankcase. Replacement of the VAZ 2107 reverse sensor is carried out in the following sequence:
- disconnect the wire tips from the sensor contacts;
- Using a 22mm wrench, unscrew the old sensor from the gearbox, removing it along with the metal washer;
Note: if the sensor is “stuck” and cannot be unscrewed using a wrench, you can try to unscrew it using a chisel and hammer
However, this must be done with extreme caution so as not to damage the gearbox housing, which is made of a fragile aluminum alloy.
- clean the sensor seat;
- put a new washer on the new sensor and screw it into the gearbox using a 22mm wrench;
- Place the wire ends on the sensor contacts.
Now you know how to change the reverse sensor on a VAZ 2107
After installing the new sensor, pay attention to how tightly the wire tips fit on the sensor contacts. They should not dangle or fall off
If necessary, tighten the tips using pliers. It is a good idea to clean the tips before placing them on the sensor contacts. This way you can be sure of reliable contact on this connection.
What is needed for replacement
To change the part, you only need two things: a 22mm wrench and a new reverse sensor with a metal washer-spacer. It is advisable to use a socket wrench with a long wrench. But, if you don’t find one, you can get by with a cap or even a carob.