Often owners of VAZ 2106 - 2107 wonder why the battery indicator light does not light up when the ignition is turned on . This is a fairly common problem on classic. And almost everyone has encountered such a manifestation of a malfunction in the car’s energy system.
And it’s one thing if such a malfunction occurs in the summer and 100 meters from the house. Such a breakdown is much more dangerous in cold weather on a country road, especially at night. Therefore, you need to know the causes of the problem, as well as how to fix it. There are several reasons for a light bulb to fail. You'll have to check all the options, fortunately it's not difficult. Basic electrical knowledge is sufficient.
Why does the VAZ 2106 – 2107 battery charging light not light up?
Often owners of VAZ 2106 - 2107 wonder why the battery indicator light does not light up when the ignition is turned on .
This is a fairly common problem on classic. And almost everyone has encountered such a manifestation of a malfunction in the car’s energy system. And it’s one thing if such a malfunction occurs in the summer and 100 meters from the house. Such a breakdown is much more dangerous in cold weather on a country road, especially at night. Therefore, you need to know the causes of the problem, as well as how to fix it. There are several reasons for a light bulb to fail. You'll have to check all the options, fortunately it's not difficult. Basic electrical knowledge is sufficient.
Battery does not have enough charge
A common reason why the battery does not have time to charge is a large number of on-board equipment. The power supplied by the generator should slightly exceed the total consumption of the vehicle's electronics. The battery is charged due to this difference. If you installed new speakers, a navigator, a recorder, etc., and your battery immediately began to discharge, most likely the generator simply cannot cope.
After charging the battery, disconnect some of the consumers from the car's electrical network; if the light no longer lights up, the reason was an overload. The most reasonable thing would be to abandon some of the on-board electronics. If you cannot remove it completely, try disconnecting it from the network, connecting it only when necessary to use it.
Installing a more powerful generator is not advisable, but if absolutely necessary, this should be done by an electrician. Not all generators are interchangeable. When installing an incompatible one, the risk of serious damage to the car is high. It is important to take into account the difference, for example, between the VAZ 2107 and 2114. The electronics of the VAZ 2114 places higher demands on the choice of generator.
Burnt out battery indicator light
A fairly common cause of this problem is lamp failure. This is perhaps one of the simplest breakdowns, but it is not always harmless. It is advisable to replace the light bulb as quickly as possible. If there are problems with it, you will not be able to identify the problem with the generator in a timely manner. Which will lead to the battery being discharged at the most inopportune time. Thus, driving with a burnt-out lamp is highly not recommended.
Battery charge indicator light VAZ
You should also consider the design features of your car. Most generators have a built-in resistance. This allows you to generate energy even when the charge control lamp is burnt out. On some cars, the lamp itself plays the role of resistance.
This can be found on some modifications of the VAZ 2112, as well as many old foreign cars. In this case, when the light bulb burns out, the generator stops producing current. If your car has this structure, you should always have a spare lamp.
Theory “on fingers”: how everything works
On the VAZ 2107, devices can receive power from 2 sources. The first is the battery, the second is the generator. The battery supplies energy when the engine is turned off. It has a certain charge, consumed as needed. The generator produces electricity, but only if the rotor is spinning. That is, with the engine running.
Battery operation diagram: 1. Battery, 2. Negative diode, 3. Additional diode, 4. Generator, 5. Positive diode, 6. Stator winding, 7. Regulator, 8. Rotor winding, 9. Capacitor, 10. Mounting block, 11. Control lamp, 12. Voltmeter, 13. Ignition relay, 14. Lock.
The battery charge is used to start the engine. When the engine starts running, the battery energy is not consumed: the generator supplies all devices with it. A charge is also supplied to it to restore wasted energy. But if the battery is not charging, its own energy will be enough for a limited number of starts. The battery will then be completely discharged. And the car owner will have to solve the problem of how to start a VAZ 2107 if the battery is dead. After all, not everyone has “crocodiles” in their trunk, and not everyone will agree to share electricity with their battery.
Low battery
Another common reason why the battery warning light does not light up when the ignition is turned on in a VAZ 2106 - 2107 is a weak battery.
If, at the same time that the battery light does not light up, the dashboard instruments do not turn on or are dimly lit, then this is a clear sign of a low battery. The problem can be “cured” by simply charging the battery.
Good battery
However, not all so simple. The discharge of a car battery may not occur because the owner did not have time to charge it in time or forgot to turn off the headlights. A problem with a battery becomes dangerous if the cause lies in the generating device. As you know, the battery must be charged while the car is moving, otherwise it will discharge quite quickly. And this function falls on the generator. But if the latter is faulty, then problems arise.
Thus, a seemingly trivial reason may indicate a damaged car generator, which performs many useful functions. Obviously, a thorough diagnosis should be carried out, the cause should be found and eliminated.
Indicator light
As can be seen from the diagram, the charging system involves a large number of components and each of them can cause poor charging or its absence. To monitor the battery charging process, the car's dashboard is equipped with a control light.
If the system is in good working order, the control signal turns on after the factory. But when the engine enters operating mode, the VAZ 2107 battery charging light does not light up. This means that the battery's energy supply is replenished from the generator. At the same time, the needle on the voltmeter moves to the green sector.
Signs of a battery not charging:
- The VAZ 2107 battery charge arrow twitches.
- The control signal does not go out. In some cases, the VAZ 2107 battery light blinks.
- The voltmeter needle does not go to the green zone after starting the engine.
- When the engine is running, the voltage on the battery should remain around 13.9.
- The permissible deviation in any direction does not exceed 0.3 V. Undercharging of the VAZ 2107 battery within these limits is not yet dangerous.
Blown fuse
A failed dashboard light may be caused by a blown fuse. In this case, several devices usually fail at once. If such a symptom appears, you just need to check the fuse. It is located in the mounting block.
Mounting fuse block VAZ 2107
You can find it using the diagram on the block cover. To check, the fuse is removed from the mounting block. The easiest way is to install a known good fuse. If this is the reason, then the light should light up when the ignition is turned on. You can also check the fuse by measuring the resistance with a multimeter.
Generator jammed
If there is no rotation inside the generator, the unit must be replaced.
Problems with the generator will also manifest themselves through dim headlights. If the battery is working properly, the engine starts trouble-free when the ignition is turned on, and there are no external manifestations of generator malfunctions, you should not disassemble it for the sole reason that the light is on.
On a VAZ, it sometimes indicates a glitch in the light bulb itself, especially if the car is not new. The most rational option would be to contact a reliable electrician. An alternative is to regularly measure the voltage at the terminals and observe, especially when the ignition is turned on. In-depth diagnostics of the generator is advisable when external signs of its malfunction appear (dim light, low voltage at the terminals, burning smell).
A light bulb may burn out due to a faulty electrical circuit.
A problem with the circuit that powers the battery light can be caused by several things. Let's consider everything.
So, problems with contacts are becoming quite common. Usually this situation occurs in the spring, after cold weather. During the winter months, moisture accumulates on the connectors, causing the formation of oxides. This makes the contact much worse, as a result of which the indicator stops turning on.
Electrical circuit diagram of VAZ 2107
As a rule, this problem does not appear immediately and is not stable. In other words, the light bulb may light up one time and not another time. The solution to this problem is to clean all connectors. They should be treated with a grease specifically designed for this purpose.
The light bulb may burn out due to an open circuit. To make sure of this, you should arm yourself with a multimeter. The device checks the circuit to determine the faulty section.
How to identify generator malfunctions
If, after replacing the battery with a new one, the charging indicator does not go out, the cause of the failure is a malfunction of the generator. To determine the lack of voltage supply, you will need to carry out manipulations in the order below. Be sure to use personal protective equipment - each manipulation must be performed with rubber gloves to avoid electric shock. So, to identify the breakdown you will need:
Turn off the engine and disconnect the wires from the battery. Measure the voltage at the terminals using a multimeter. The optimal value should be between 12.5-12.7 V. Connect the wires, turn on the ignition and repeat the voltage measurement procedure again. The indicator should not exceed 13.5-14 V, and increase with increasing speed. If the voltage drops as the speed increases, this often indicates that the generator “brushes” have worn out or the diodes in the diode bridge have failed. Also, the reason for stopping the charge supply may be a loose or broken belt. You can verify this by performing a visual inspection. Press the belt with your fingers, and if it bends less than 1.5 centimeters, this directly indicates a weakening of the tension.
Visually, the driver can independently determine the oxidation of the terminals. To do this, you need to pay attention to the generator wires. If they have oxidized, this will be indicated only by their appearance, but also by the characteristic burning smell.
But also quite often there are global problems that even an experienced car enthusiast cannot cope with without qualified assistance from a specialist. It is worth noting that defects such as worn “brushes” or diodes can be completely eliminated, and more serious problems (open circuit or wear of rotor spare parts) can only be solved by replacing the generator.
Checking fuses of VAZ 2106 - 2107 with a multimeter
You also need to know how to check a fuse in a car with a multimeter because in some cases replacing it does not eliminate the malfunction; the circuit needs a more thorough check. Usually its failure is visible to the naked eye, but in some cases the break can be detected only after an instrumental check. To do this, use a car tester or even a simple voltmeter to measure direct current.
- We attach the probes to the fuse.
- Next, using simple manipulations, we melt the wiring inside the fuse. Therefore, we made a non-working fuse out of a working fuse. What won’t you do for a good article!? :-). Again we apply the probes to the fuse and look at the behavior of the multimeter.
- The resistance is infinitely large, we do not hear any sound signal like “peep”. The fuse is broken. It can be thrown into the trash bin.
Where to start checking
If the VAZ 2107 battery icon does not light up, the voltmeter gives normal readings, but the battery does not charge, which means there is no (or insufficient) contact at the terminals. Their severe oxidation can cause the voltage from the generator to the battery simply not to flow. Therefore, it is necessary to remove the terminals, thoroughly clean them, as well as the battery terminals, then reconnect the battery to the on-board network and check the functionality of the charging system.
In the case when the voltage on the VAZ 2107 battery is still below normal, you need to measure it at the output from the generator with the engine running. Is there a big difference between the readings on the terminal and on the battery? Try cleaning the contacts and checking the wire connecting the battery to the generator. Broken - requires replacement.
Reasons for the battery not charging
For proper operation of the ignition system and other electrical circuits of the VAZ 2107, the voltage in the on-board network must be constant. When the engines are not running, the battery maintains constant voltage. After starting the engine, the car's generator comes into operation, charges the battery and maintains the on-board voltage within 13.6-14.2 volts.
Regardless of the speed, the voltage on the generator must remain constant. This is ensured by a relay regulator, which, depending on the speed, changes the voltage of the generator circuit. If the voltage drops below the permissible level, the winding current increases, increasing the output voltage and vice versa.
If there is no charging on the VAZ 2107, possible reasons may be the following:
- poor contact or break in the excitation network of the generator output voltage;
- the relay regulator is faulty;
- broken generator belt.
Troubleshooting the generator should first begin by identifying the cause of the lack of battery charge.
Causes of generator malfunction on the VAZ-2107 (injector)
Experts suggest that on a VAZ-2107 with an injector, the standard generator is 5142.3771 (eight). It has one very important feature: it produces more current - not 55A per hour, like other generators, but about 80-90 A. This is due to the properties of the injector, which requires more electricity (but also has a higher power density).
Experts advise checking the generator for malfunctions in the following order:
- inspect the diodes that supply electricity to the excitation winding of the generator (if they are burned out, they should be replaced with new ones);
- use a tester to measure the voltage level in the current-carrying circuit (if its value is less than 12 V, then there may be a short circuit, which means the wiring is overheating).
If it is difficult for the car owner to carry out such diagnostics, he can contact the nearest car service center for help from qualified specialists.
How to find the reason for the battery not charging
The first sign of a lack of charging is the warning light on the instrument panel coming on or if the voltmeter needle is not in the green zone when the engine is running. You can more accurately check the voltage on the battery using a multimeter.
When the engine is running, the voltage on the battery should be – 13.9±0.3 V. If the battery is not charging, the voltage will be approximately 12 V.
Warning: to avoid damage to the ECU and regulator relay, do not remove the battery terminals while the engine is running.
Increased or decreased voltage of the on-board network harms the battery. In the first case, the electrolyte boils away, in the second, it is discharged, which leads to failure of the battery.
To find the problem and fix it, you will need the following tools and devices:
- control lamp 12 V;
- multimeter;
- knife;
- flat screwdriver;
- pliers;
- sandpaper.
Worn brushes or broken generator relay
A multimeter or voltmeter will help determine the malfunction of the relay and brushes. It is necessary to measure the voltage at the terminals with the engine running and off.
Standards:
- with the engine off – 12.7V;
- with the engine running – 13.6-14.6V.
If the voltage decreases when you turn on the motor instead of increasing, inspect the diode bridge and brushes. Replace if found faulty. The diode bridge can often be independently soldered.
Troubleshooting battery failure
The first step is to check the tension of the alternator belt - it is what drives the alternator and coolant pump, so this malfunction can also manifest itself as engine overheating.
If the VAZ 2107 battery charging lamp does not light up, and the voltmeter shows the normal voltage of the on-board network and the battery does not charge, the reason is obviously in the contacts at the terminals.
You need to remove the terminals from the battery and clean them with sandpaper. If charging does not appear, it is necessary to measure the voltage at output “30” of the generator with the engine running. If the voltage readings at this output and the battery are very different, you need to clean the contacts and check the wire running from the generator to the battery. If the wire is faulty, it must be replaced.
If the voltage in the on-board network is within the limits when the engine is running, but when the headlights are turned on, it drops, the reason is the weak tension of the alternator belt. Under increased load, a weak belt slips. The correct belt tension is when, with a force of 10 kgf, it should bend by 12-17 mm.
Another reason for the lack of charging may be a short circuit or break in the stator or rotor winding, as well as a broken rectifier diode on the generator.
Diodes can be tested using a test light or multimeter to check their resistance. To check the diodes using a test lamp, you need to remove the “+” terminal from the battery and connect the test lamp with one end to the positive terminal, and with the other you need to sequentially touch the three bolts shown in the figure below. Then do the same operation, only with the “-” terminal. If the control lamp lights up, then the diode being tested is broken.
If one of the diodes fails, it is necessary to replace the diode bridge assembly.
A malfunction of the stator winding can be determined with a multimeter by measuring the resistance between the rectifier unit mounting bolts. If there is no contact between them, then there is a winding break. In this case, the winding or generator assembly is changed.
Probably the most common cause of generator failure is brush wear. To check them, you need to remove the brush assembly. The length of the brushes must be more than 5 mm, otherwise they need to be replaced. Brushes can also become jammed or skewed in the wells.
Note: the injection generator is no different from the generator of the carburetor version of the VAZ 2107. All tips for repairing and checking the generator are relevant for both modifications of the car.
Troubleshooting
Before starting car repairs, you need to make sure that charging is not happening precisely because of a malfunction of the on-board equipment, and not, for example, because of a worn-out battery or severe oxidation of its terminals. Open the hood and carefully inspect the terminals. The tips on them should not dangle and be covered with a white coating similar to snow. If they are loose, we tighten them. If they are oxidized, remove and clean.
If the tips are loose, then we don’t just tighten them, but first remove and clean them. After all, in the place of poor contact they probably oxidized and burned.
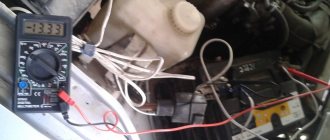
Now take a multimeter and set it to measure DC voltage up to 20V. We start the engine, set the speed to about 1,000 rpm. and measure the voltage at the battery terminals. If its value is within 13.5-14.5 V, then everything is in order, the battery is charging as expected. If it’s lower, you’ll have to find out why our VAZ 2107 doesn’t have a charger and fix the problem.
Below we will look at the most common faults that cause the battery to not charge, and methods for eliminating them. More detailed information about battery charging problems can be found in the article “why the car’s alternator does not charge the battery.”
Check belt tension
Regardless of whether a whistle is heard from under the hood or not, let's start by checking the belt tension. After all, it can slip without unnecessary noise. To do this, press the belt with a force of 10 kgf at two points: between the pulleys of the water pump and the generator and between the pulleys of the crankshaft and the water pump.
In the first case, the deflection should be within 10-15 mm, in the second - 12-17 mm. If this is not the case, adjust the tension. Loosen the fixing nut on the generator adjusting bracket and use a pry bar to move the generator in the desired direction. Tighten the nut and take another measurement.
Important! The belt tension must be within the specified limits. A tightened belt is no better than a loose belt. It will quickly wear out on its own, wear out the pulleys and break the bearings of the generator and pump.
Diagnostics and replacement of the relay regulator
The battery may not be charged or recharged due to a malfunction of the relay regulator. If the key transistor of the relay is broken, there will be an overcharge. If there is a break, the battery does not charge at all. On a VAZ 2107 with a G-222 generator, the voltage regulator, which many call “chocolate,” is located on the generator above the brush block.
On the VAZ 2107, the relay injector is a single unit with the rotor brushes and looks slightly different.
To check the relay, we will need a low-power car light bulb, for example, a side light or interior lighting lamp, and a direct current source capable of changing the output voltage from 12-13 V to 15-18 V. Let's start with the carburetor modification of the VAZ 2107. Remove the relay - regulator and assemble a simple circuit shown in the figure below.
We change the voltage of the power source and observe the light bulb. When the source voltage is below 14.2-14.5 V, the lamp should light. Above - go out. If the light bulb does not behave correctly, the regulator is faulty. Checking the regulator installed on the VAZ 2107 injector, the checking algorithm is exactly the same, and the diagram will look like this:
Breaks and short circuits in wiring - where to look and what to do
One of the weakest points in the power supply circuit of the VAZ 2107 (and any other car) is the connection of the power wire to the generator. The device is located low and is practically not protected from water and dirt. Even if this connection looks normal, it makes sense to disassemble it and inspect the contact point. We disassemble, inspect, clean if necessary, apply any thick lubricant, preferably a special one for contacts, but you can also use grease, technical petroleum jelly, etc., and assemble. Lubrication will prevent oxidation in the future, but will not interfere with the normal operation of electrical circuits.
Additionally, we inspect the generator power connection blocks. They are usually knife-type. Undocking, inspecting, and cleaning if necessary. The next weak point is all the connecting blocks that are present in the battery charging circuit. They can be located directly on the wiring harnesses. We also disconnect them, inspect them, and clean them, if necessary.
Otherwise, the wiring on the VAZ 2107 behaves quite correctly, but this does not mean that all this will last forever. Let’s not be lazy, inspect the connections and the wires themselves. If necessary, we call, focusing on the electrical diagram (see above). If somewhere we see traces of abrasion or cracking of the insulation, we insulate it with ordinary electrical tape or heat shrink and eliminate the cause of this very abrasion.
Problems with the generator
The generator is a mechanical unit and, naturally, it wears out over time. In addition, external factors can cause generator breakdown: overcurrent, water, dirt. Let us list the reasons why the VAZ 2107 generator does not charge:
- brush wear;
- wear of rotor contact rings;
- breakdown of rectifier bridge diodes;
- breakdown of additional diodes (injector on VAZ 2107);
- breakdown of the windings.
Brushes
To check the condition of the brushes, they will have to be removed. In this case, in the carburetor model, you will first have to dismantle the relay regulator. On the injector, the relay-regulator will be removed along with the brushes. Remove the protective rear cover of the generator, then the block. Carefully inspect the ends of the brushes. They must be smooth, without burrs or chips, and protrude from the body by at least 5 mm. Otherwise the block will have to be replaced.
Expert opinion
Alexey Bartosh
Specialist in repair and maintenance of electrical equipment and industrial electronics.
Ask a Question
A sign of brush wear can be a battery charge control lamp and a voltmeter. If the lamp blinks periodically and the voltmeter readings fluctuate, then most likely it is time to change the brushes, since due to their wear, contact with the slip rings is lost.
Slip rings
Over time, not only the brushes wear out, but also the rotor slip rings that supply power to the field winding. In order to check their condition, it is enough to remove the brush block and look into its seat. It is simply impossible not to notice the strong production of rings.
If the unit is in poor condition, it needs to be replaced. True, to do this you will have to disassemble the generator, but replacing it yourself is quite possible. You can see how to replace the generator slip rings in the video below.
Changing the slip rings of a car generator rotor
Rectifier
The generator rectifier of any VAZ 2107 model consists of six diodes mounted on a double horseshoe-shaped radiator, which is also a current conductor. The bridge is located under the rear cover of the generator. In order to check the diodes, it is necessary to disconnect the generator windings from them by unscrewing the screws and disconnecting the winding tips from the diodes.
We turn it off, arm ourselves with a multimeter turned on in diode testing mode, and ring each semiconductor. If we find a faulty one, we change the entire horseshoe, since qualitatively replacing a separate diode tightly pressed into the radiator is quite problematic.
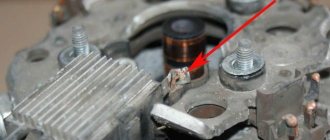
Additional diodes
These diodes can be found in generators installed on the VAZ 2107 injector. The task of semiconductors is to power the excitation winding. You can find them in the rectifier block soldered in a hinged way. In the photo above, one of the additional diodes is marked with a green arrow. In order to ring these diodes, you do not need to solder them, but you will have to disconnect the windings from the rectifier (see point above). If we find a faulty one, we simply unsolder it and replace it with a similar one.
Main reasons
- The battery is dead - the most common reason. When the on-board power supply is turned on and the key is turned in the ignition switch before the engine starts, the voltage drops to a critical level, the control light does not light up, the rest of the indications on the instrument panel are dim, and starting the power unit is impossible.
- Blown fuse – a failed fuse in the mounting block cuts off the power to the battery light. As a rule, in the general circuit it is responsible for the entire backlight of the instrument panel with a rating of 10 Amps.
- A malfunction of the electrical circuit - oxidation of the contacts on the connectors, or poorly secured terminals, a fuse in the socket or a break in the wiring section leads to failure of the battery indicator. The problem can also be caused by broken insulation - short circuits.
- The indicator has burned out - the LED (light bulb) has failed.
- The fuse relay is faulty - in domestic car models (VAZ classics), the fuse mounting block is equipped with a relay for each circuit separately. Failure of the relay in the area to the indicator turns off the power.
- Other reasons are a breakdown of the generator unit: the diode bridge or voltage relay does not work properly, voltage surges occur in the network with increasing engine speed, the battery is not charging (in such cases, the light may be on constantly or flicker and then turn off).
Warning lamp relay wiring diagram.
Consider the relay connection diagram below. When the ignition switch is turned on, power is supplied to the contact as well as to the relay coil. The second terminal of the coil is connected to the terminal of the stator winding. As can be seen from the diagram, there is no minus on this pin. Consequently, no current will pass through the coil and there will be no electromagnetic field, that is, the contacts will remain closed due to the spring. When the generator operates, an alternating voltage will be induced in the stator. As a result, a potential difference of approximately 5 - 6 V will appear at the terminals of the control lamp relay coil. Sufficient current will flow through the coil to attract the core. The contacts open and the control lamp goes out.
Diagnostics
The search for a faulty element begins with checking the battery charge level. To measure the voltage at the terminals, use a multimeter or voltmeter. It is necessary to take readings in two modes:
- No load with the ignition turned off and the negative terminal removed.
- Under load: by turning the key in the ignition and turning on any consumer (low beam headlights, air conditioning).
The multimeter probes in voltmeter mode are connected in series: the positive terminal is a red contact, the negative terminal is a black one. The normal value of the battery voltage at rest with a 100% charge is 12.05 - 12.6 Volts.
The test under load should be carried out carefully, observing safety precautions: when turning on the ignition, do not touch the power terminal and cable with your bare hands. The multimeter readings are taken twice: when the engine starts, and after 20-30 seconds. When starting the engine, the power current can reach a peak of up to 670 Amps, depending on the power of the unit. The battery supplies a significant part of the energy to the starter for the initial crankshaft rotation - at this moment the voltage at the terminals drops. A value of 8-9 V is considered normal; if the drop during startup is critical and reaches 6 V, then the battery is completely faulty.
After measuring under load, the voltage on a working battery is restored within 15-30 seconds. It is measured again, determining the charge capacity. Next, be sure to check the oxides on the terminals, the condition of the power cable for damage to the insulation, and the reliability of fastening the ground wire to ground.
A blown fuse in the mounting block is diagnosed by the condition of the fusible link. In order to determine which of them is responsible for the battery indicator light, you need to use the electrical diagram in the technical description of the car (the location differs depending on the brand of the power unit). The fuse is included in the common circuit and controls several consumers: all indications on the dashboard, cigarette lighter illumination, interior light. Typically this is socket F3, rated at 10 Amps.
The electrical circuit is first inspected, checking the contact fastenings and breaks. If no visible violations could be detected, then the multimeter is turned on in ohmmeter mode and each section is “ringed” separately: from the battery to the generator, from the rotor terminals to the fuse mounting block, the ignition coil and the instrument panel (contacts of the control light).
A faulty relay in the mounting block is tested for voltage with the on-board power supply turned on. The voltage at the relay output must be at least 9 Volts.
Additional information: the location diagram of the battery light relay in the circuit is indicated on the electrical diagram of the unit: in domestic cars (VAZ, GAZ) fuses and relays are mounted in two rows.
The diode bridge and the generator voltage regulator relay are checked with the engine running: at idle, the unit speed is increased to 4000 rpm and the voltage is measured with a multimeter at the rotor terminals. If the indicator is around 14.5 Volts, then the generator components are working properly.
Often the reason for the lack of battery indication is a minor reason: a burnt out light bulb or a poorly secured fuse in the socket. To eliminate the violation, it is enough to move the fallen fuse and put it in place in the socket until it stops.
If the failed element is not installed and the warning light does not light up, then computer diagnostics are carried out, reading error codes in the ECM. To do this, use the ODB-2 connector (under the steering column), a computer or laptop with the program installed, or a special scanner. All errors are recorded by the system in the ECU (electronic control unit) memory log; the structure of the codes is given in the technical description of the car - they are different for all models. Using a scanner or laptop, they decipher the system error and determine the cause of the failure. This diagnostic method provides a complete picture of the condition of all components over the entire period of their operation.
Where exactly is the charging relay located?
For those who have not found it, we inform you that this device is mounted directly on the body of the generator, VAZ-2107. Right on its back cover at the top there is a round object mounted on a small plastic platform. In most cases it is black. There is a yellow wire attached to it. Actually, it is this inconspicuous detail that is the required relay. Do not try to pull it out immediately, since it is attached to the surface of the generator with two screws.
To ensure that the entire electricity-producing unit does not have to be dismantled, it is necessary to proceed in the following order when replacing an element:
- disconnect the negative connector from the battery, otherwise there will be a risk of a short circuit;
- remove the previously mentioned yellow wire from the relay itself;
- unscrew both bolts holding it to the generator casing.
After this, the device can be easily removed. Next we perform an inspection. First of all, you need to make sure that the brushes on it are of sufficient length; if not, then the relay must be replaced.
What to do if there is no charge, weak charge (battery is discharged)?
If the battery of your VAZ 2107 is discharged, then one of three elements may be “to blame”: the generator, the voltage regulator, and the connections between them. Determining “who is to blame” can be very simple, even without additional devices. How this article will help.
We carry out testing using standard equipment
To monitor the operation of the generator on the “seven” there are two instruments: a voltmeter and a control light on the instrument panel. With their help, you can track the cause of your troubles.
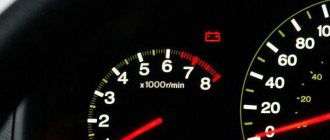
1) Turn on the ignition without turning on the starter
and look at the warning light. It should shine at full intensity, as in the photo. The voltmeter needle, normally, stands on the white part of the scale (photo). Let's say everything is OK - go to point 2 - start the engine.
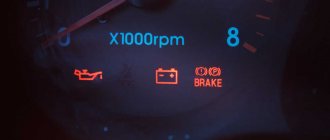
The battery charge control lamp is on
Position of the voltmeter needle before starting the engine (ignition on)
The lamp does not light, the voltmeter needle remains at zero when the ignition is turned on.
Check fuse No. 10 in the mounting block. 99% of the time it will be burnt out. In this case, all other lamps on the instrument panel will also be de-energized. Replace it with the same one and test again. If the fuse burns out again, you need to look for the cause, that is, a short circuit. We check whether the wires from the generator are disconnected, whether the insulation is frayed somewhere, etc. Diagram 3 at this link
The lamp does not light up, the voltmeter needle shows normal
We check the wires on the generator to see if the wire has come loose from terminal “61”. If everything is normal there, you need to check whether there is a “plus” on this wire using a test lamp, an indicator screwdriver or a multimeter.
Terminal “61” of the VAZ-2107 generator
If there is a “plus” , we check the “tablet” (aka “chocolate”) and the generator.
There is no “plus” - you will have to remove the instrument panel and check the lamp. Replace the burnt out one. How to remove the panel, watch the video
2) Start the engine
The control lamp should go out, the voltmeter needle goes into the green sector and is located from the middle to the right edge (photo). If everything is so, then most likely the generator is working normally .
The voltmeter shows normal voltage (charging is present)
The lamp remains on or dims slightly
If you give it gas, it goes out at high speeds and lights up again when they decrease. The voltmeter needle is in the white sector and goes to the edge of the green when the speed increases. The generator output is faulty . The same conclusion if the lamp continues to light at any speed, and the voltmeter needle is in the white sector and even goes to red.
Voltage too low (motor running). Weak charge
3) If the generator seems to be working, but the battery is gradually discharged
Let's do one more check. We start the engine, turn on the heater fan and low beam, take the key to “10” and, loosening the negative terminal of the battery, remove it. An idling engine (about 900 rpm) should not stall. If the engine stops, put the terminal back in place and start it again. While holding the speed at 1200-1500, remove the terminal again. Has the engine stalled again? Then turn off the headlights, leave the heater fan on and repeat the test. Now the engine with the negative terminal disconnected from the battery continues to run. output works, but does not produce the required current; it needs to be repaired.
Note! During such a check, it is better and safer to work together. You cannot disconnect the battery terminal without at least turning on the heater fan or other load. A voltage surge at the time of shutdown can “burn” the electronic elements of the ignition systems. You need to be especially careful on a car with an injection engine.
Video - Battery protection from theft
There were 3 cases during the winter. Frosts. In the morning a client calls and complains that there is no charger. I'm calling you to come over. He arrives and says that halfway through the journey the charging appeared. I checked everything: I rang and shook the wiring, tightened everything I could, measured all the voltages. I didn't find anything, everything is fine. He sent the client away with God, everyone remained with their own interests. On the 2nd car the same thing, except that I removed and shook (with a test on the stand) the generator to calm my conscience. I decided to figure out the 3rd car to the end and finally earn at least something. Leave the car in the cold - relax! About two hours later I start it on the street - no charger! There, on the street, I began to look at what was wrong - God forbid the malfunction disappears again. The charging lamp does not light up, there is no initial excitation. From the control (from the battery positive), the generator is excited, the wiring to the instrument panel is connected. Found what I was looking for! On the instrument panel, the connector contacts are riveted to the board (I didn’t discover America, everyone knows that). There was no contact from the charging indicator lamp in the connector. I soldered all the contacts in the connectors, because while the instrument panel was tinkering, other glitches appeared due to these rivets. It turns out that as the interior warmed up, the contact in the riveted connectors was restored. By the way, in 4 years I have never observed this in carburetor sevens; they knew how to rivet before! I called the first two cars, did the same thing, and never showed up again.
A typical problem for classics. The problem is most often in the tidy, you have to solder it.
Another solution to the problem
:
On my new 2107 (2010 model), when starting in cold weather, charging did not occur (GENERATOR - “EIGHT”). If we increased the engine speed to 2000, the battery began to charge. Everything would be fine, but sometimes the battery charging light did not light up at all when the ignition was turned on and it was necessary to warm up the engine without charging the battery, and then when the engine was restarted, charging began. What was done on the advice of auto electrician friends: changed the brush assembly with the tablet, tightened the alternator belt, pulled the + terminal on the alternator. Removing the generator for a full inspection was extremely lazy. But it didn't help. I assumed that in the cold there is not enough current in the excitation winding (again, the VAZ engineers did not take something into account). And to increase the current, I connected contact +15 (ignition) with contact 61 (excitation winding) through a series-connected diode and a 10 Ohm, 20 W resistor. I've been driving for a year - the flight is normal, no symptoms of old problems. A diode is needed so that when the engine is turned off, the current intended for the excitation winding does not flow back into the ignition circuit. However, the phenomenon of reverse current through the charging lamp can be easily noticed: when the engine is turned off, the lamp lights up for a short time. The resistor was connected under the glove compartment, in the harness passing through the engine shield. The ignition wire (+15) is thick blue with a black stripe, the excitation wire (61) is thin brown with a white stripe. Instead of a resistor, you can use a 10 W light bulb, but IMHO, a resistor is more reliable.
What to do if the battery is boiling
The lamp goes out, the voltmeter needle goes to the right into the red sector, and there is a sharp “chemical” smell in the cabin. At idle, the needle is in the green sector, but as soon as you accelerate, it goes all the way to the right. This indicates that the voltage regulator (chocolate) has failed . If this happens, moving on is more expensive! All the electrical equipment of the car may burn out, and the battery will get damaged, the electrolyte will “boil”, the plates may become warped. To get to the repair site, you can temporarily turn off the generator by removing the wire from terminal “61” of the generator. You can drive for quite a long time on a good battery, just don’t forget to turn off unnecessary electrical appliances - heater fan, heated rear window, radio, etc. Headlights or running lights will have to be left.
Voltage too high (overcharge)
This article describes a simple way to determine if the alternator, voltage regulator, or connections between them are faulty. How to repair all this in the next article .
Loose or damaged alternator belt
During diagnostics, it is imperative to check the condition of the alternator belt. Sometimes it happens that due to its long-term operation or under the influence of other factors, it becomes deformed, as a result of which the generator drive misfires. Pay attention to the belt tension. Its weakening leads to the same effect.
If the belt is not deformed and has no visible damage, it can simply be tightened. Otherwise, it must be replaced. The normal belt tension is such that it can be rotated around the horizontal axis by 85-90 degrees.
We prepare tools and fix external damage
When the inspection is completed, possible causes or problem areas are identified, then we stock up on tools:
- pointer voltmeter or multimeter;
- screwdrivers with Phillips and flat tips;
- incandescent control lamp 12 V no more than 3 W;
- pliers, sandpaper and knife.
In most cases, work has to be done with a generator. We take measurements with a voltmeter on the battery, which as a result should show values close to 12 V.
It is necessary to clean the large diameter cables through which the battery is charged. Next, we monitor the voltage at pin “30” connected to the generator. If the value is higher than the measurement result obtained on the battery, then we protect the terminal and change this cable.
The situation may be that the indicator light on the panel is not lit, but the voltmeter indicates the presence of charging. In this case, the battery is discharged, although normal voltage is present in the on-board network. We recommend turning on all electrical consumers that are in the car and looking at how the voltmeter behaves.