Nature of tensioner mechanism breakdowns
Since the tensioning mechanism consists of a damper, a shoe and a shoe fitting, any failure will be associated with the failure of one of these elements:
- The fitting may break due to corrosion processes or mechanical wear. The result is that the shoe no longer extends and puts pressure on the chain, which becomes unstable and too loose. In extreme cases, it can even break completely. Replacing the fitting is the only possible measure to eliminate the problem in question. Since the body of the part is non-separable, repair is impossible.
- The damper can fail as a result of metal fatigue failure or a weak chain that hits the bolts, weakens them and breaks the damper. Replacing the element in question is also the only option in this situation. The new part must be original, but not from a Chinese manufacturer.
- The tension shoe wears out, causing vibrations and impacts. The element should be replaced, since its polymer coating cannot be restored under domestic conditions.
- If the chain cannot be tensioned, the cap nut is not loosened enough or the fitting has not been discharged as a result of failure. Check the condition of the parts in question and correct any problems.
Briefly about the drive design
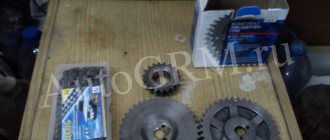
To change the chain and related elements yourself, you need to know the structure of this part of the power unit. The mechanism that drives the camshaft of the VAZ 2106 engine includes the following parts:
- a small drive sprocket is mounted on the crankshaft;
- large idler gear;
- the upper large gear is bolted to the end of the camshaft;
- double-row timing chain;
- tensioner shoe supported by a plunger rod;
- damper - a metal plate with a wear-resistant lining;
- pin - the chain runout limiter is installed next to the lower sprocket.
When rotating, the chain is held on both sides by the guide and tensioner pads
While the engine is running, the timing chain must be kept in tension, otherwise there will be beating, accelerated wear and the links jumping over the gear teeth. A semicircular shoe supporting the part on the left side is responsible for the tension.
After the camshaft sprocket (in the direction of rotation), a damper plate is installed, pressed against the chain drive. To prevent the element from jumping off the lower gear as a result of strong stretching, a limiter is installed nearby - a metal rod screwed into the cylinder block.
In the updated versions of the “six”, automatic tensioning devices were installed, powered by oil pressure
The drive mechanism is located at the front end of the engine and is covered by an aluminum cover in which the front crankshaft oil seal is installed. The lower plane of the cover is adjacent to the oil pan - this feature must be taken into account when disassembling the unit.
Signs of a poorly adjusted chain
We install a turbine on a VAZ 2106 ourselves.
When they talk about a poorly adjusted chain, they usually mean a weakened and sagging chain. Because a highly tensioned chain does not show any signs of breakage. She's just bursting. Here are the main signs that the timing chain has become loose:
- after starting the engine, a loud grinding and knocking noise is heard from under the hood, the frequency of which increases as the crankshaft speed increases. This occurs due to the fact that the slack chain continuously hits the damper and the tension shoe;
- the car reacts poorly to pressing the gas pedal: the engine begins to increase speed only one or two seconds after pressing. This is due to the fact that due to a sagging chain, the synchronism of rotation of the timing shaft and the crankshaft is disrupted;
- There are power failures in engine operation. Moreover, they can occur both when accelerating and when the engine is idling. Due to the desynchronization of the shafts, which was mentioned above, the operation of the cylinders in the engine is also disrupted. In this case, one cylinder either does not work at all, or works, but not at full strength;
- increase in fuel consumption. If the cylinder block is not working properly, this cannot but affect fuel consumption. It can increase by a third, and in especially severe cases - double.
If the driver notices one or more of the above signs, this only means one thing: it’s time to remove the timing chain and check for wear. If it turns out to be very worn, it will have to be replaced. If the wear is minor, the chain can simply be tightened slightly.
Drive chain tension
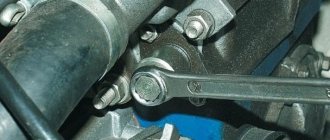
When installing the tensioner, you need to slightly loosen the nut and turn the crankshaft clockwise - this will tighten the chain. The nut is then tightened. If there are defects inside the clamp, a new mechanism must be installed. Before tensioning the chain on the VAZ-2106, make sure that all mechanisms in the gas distribution system are in good working order.
After loosening the nut, you need to carefully rotate the crankshaft. In this case, the shoe should move on the tensioner. If this does not happen, you need to apply a light blow directly to the tensioner - the plunger should move. The crankshaft must be turned until resistance is felt. But we must not allow kickback to occur.
If under the hood of a VAZ 2106 something suddenly begins to ring and grind, then this does not bode well. Neither the engine nor the driver. Most likely, the timing chain under the cylinder block cover became so loose and loose that it began to hit the tensioner shoe and damper. Is it possible to tighten a slack chain yourself? Yes. Let's figure out how this is done.
VAZ 2107 TIMING CHAIN DRIVE - DESCRIPTION
How to tension a bicycle chain
The VAZ 2107 timing chain transmission has a long service life, but someday it’s time to replace it. The need for this arises as a result of stretching of the links, when the chain tensioner can no longer cope with the functions assigned to it. In addition, the parts responsible for the normal operation of the timing drive also wear out over time.
The main elements of the VAZ 2107 timing drive are a chain, a damper, a shoe, a tensioner and sprockets
SOOTHER
In the chain drive of the VAZ 2107 gas distribution mechanism, a damper is used to dampen jerks and vibrations of the chain. Without this part, as the vibration amplitude increases, the chain may fly off the gears or break completely. A chain transmission break is most likely at maximum crankshaft speed, which happens instantly. At the moment of a break, the intake and exhaust valves fail. After such damage, the engine will at best require a major overhaul.
The chain damper is designed to dampen vibrations of the chain drive during engine operation.
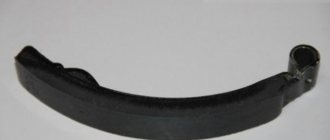
By its design, the damper is a plate made of high-carbon steel with two holes for fastening. Another element that is simultaneously responsible for calming and tensioning the chain is the shoe. Its rubbing surface is made of high-strength polymer material.
The tensioner shoe provides chain tension, eliminating sagging
TENSIONER
Based on the name, you can understand that the device is designed to prevent sagging of the timing chain while the engine is running. There are several types of such mechanisms:
- automatic;
- mechanical;
- hydraulic.
Automatic tensioners appeared not so long ago, but have already managed to show their positive and negative sides. The main advantage of the product is that there is no need to periodically adjust the chain tension, since the mechanism keeps it constantly taut. The disadvantages of the auto tensioner include quick failure, high cost, and poor tension, as evidenced by reviews from some car owners.
Hydraulic tensioners operate as a result of the action of oil under pressure, which is supplied from the engine lubrication system. This design does not require intervention from the driver in terms of adjusting the chain drive, but the mechanism can sometimes jam, which negates all its advantages.
The most common tensioner is mechanical. However, it has a significant drawback: the product becomes clogged with small particles, as a result of which the plunger jams and the mechanism is unable to perform its functions during tension adjustment.
The tensioner provides chain tension and allows for adjustments when needed.
CHAIN
The timing chain in the VAZ 2107 engine is designed to connect the crankshaft and camshaft: they have gears on which the chain is put. After starting the power unit, synchronous rotation of the indicated shafts is ensured through a chain transmission. If synchronization is disrupted for any reason, the timing mechanism malfunctions, resulting in the stable operation of the engine being disrupted. In such a situation, power failures, deterioration in dynamics, and increased fuel consumption are observed.
The timing chain in the VAZ 2107 engine is designed to connect the crankshaft and camshaft
As the vehicle is used, the chain stretches as high loads are placed on it. This indicates the need for periodic adjustment. Otherwise, the sagging will lead to the links on the gears jumping, which will disrupt the operation of the power unit. To prevent this from happening, the factory recommends adjusting the chain tension every 10 thousand km. mileage
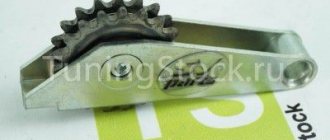
Let's consider a VAZ sprocket chain tensioner for a single-row chain
| On the left in the photo is a VAZ sprocket chain tensioner for a single-row chain. Installed instead of the factory one. Replacement is carried out independently or at any service station without modifications. Fits one to one instead of the original one |
| The VAZ sprocket chain tensioner for a single-row chain is shown in a top view. The tensioner sprocket is fixed in an all-metal housing. The case has high strength characteristics. Tests have shown high reliability and a high safety margin of the case |
| The VAZ sprocket chain tensioner for a single-row chain is shown on the bottom side. The location of the sprocket exactly corresponds to the center and any kind of inaccuracies are excluded. The Zvezda chain tensioner shoe has successfully passed a series of tests on dozens of cars. |
Let's consider a VAZ sprocket chain tensioner for a double-row chain
| On the left in the photo is a VAZ sprocket chain tensioner for a double-row chain. Installed instead of the factory one. Replacement is carried out independently or at any service station without modifications. Fits one to one instead of the original one |
| VAZ star chain tensioner for a double-row chain, top view shown. The tensioner sprocket is fixed in an all-metal housing. The case has high strength characteristics. |
| The VAZ sprocket chain tensioner for a double-row chain is shown on the bottom side. The location of the sprocket exactly corresponds to the center and any kind of inaccuracies are excluded. |
How much does the Zvezda chain tensioner shoe cost?
To provide a 1 year unlimited mileage warranty on the part, only high quality parts are used. In terms of price-quality ratio, there is a clear loss in the price of the product. The price of the Zvezda tensioner is lower than its quality. You are buying a quality part with a guarantee!
| Price 810 UAH. ONLY TO ORDER!!! The cost in other currencies will be shown when you click the “PLACE ORDER” button | Price 700 UAH. The cost in other currencies will be shown when you click the “PLACE ORDER” button |
| We provide a 12 month guarantee!!! If within 12 months any problem arises with the chain tensioner shoe, then under the terms of the warranty we undertake to replace the tensioner with a new one, and you send yours back to us. The warranty is valid without mileage limitation! If within 15 days from the moment you receive the goods in your hands, for any reason you remain dissatisfied with them and want to return your money for the goods back, then you can send the goods back to the warehouse in our city, and we We will return the money you paid for the product, minus the cost of delivery. In this case, it is necessary that the goods remain undamaged and then we are ready to accept the goods back and return you the paid price for the goods (minus delivery costs) |
Chain tensioner shoe “Zvezda”, payment - delivery!
You can order the “Star chain tensioner shoe” directly on our website. To do this, click on the button
order - and in a short time you will be able to receive a chain tensioner shoe.
Delivery throughout Ukraine is carried out from our warehouse using fast delivery services: “Novaya Poshta”, “Intime”, “Ukrposhta” - at your choice. We will send to the warehouse
selected delivery service - in your city.
Delivery to other countries is carried out using the state postal service “Ukrposhta”. Your order will arrive at the nearest government post office in your city.
Shipping on all days of the week, except weekends and holidays!
Delivery time in Ukraine
– usually ranges from 1 to 3 days
from the moment of dispatch, depends on the city/warehouse.
Delivery time to other countries
averages from 12 to 20 days, depending on the distance.
You can pay for the goods either in advance (before shipping) using one of the methods, or place an order by cash on delivery
(payment upon receipt). (Cash on delivery only in Ukraine.) Shipping to other countries is made upon prepayment!
If you choose cash on delivery, then you can place an order without paying anything and we will send you the goods. At the delivery service warehouse you will be able to pre -inspect the goods
- and if everything suits you, you transfer the amount to send to us and pick up the goods. If the product does not suit you, you are not obliged to pay for it, the product will be returned to us.
For all questions of delivery and payment, we are always ready to advise you by phone and Skype during business hours.
*"Delivery is carried out at postal service rates and is paid upon receipt of the goods. In most cases, this amount is from 20 to 40 UAH.”
Please tell your friends on social networks
Main elements of the timing chain tensioning system
At what mileage does the timing chain change?
The timing chain in the engine is supported not only by the three sprockets mentioned above. It is supported by several other important devices.
The timing chain tensioning system consists of several critical elements
Let's look at them in more detail.
Timing chain stop pin
The timing chain in the VAZ 2107 engine is supported by a complex tensioning system. One of the elements of this system is the limiting finger. This is a small cylindrical part screwed into the wall of the cylinder block. The pin is located next to the crankshaft sprocket. The purpose of the pin is as follows: if the timing chain tension suddenly weakens, the pin will prevent the chain from jumping off the crankshaft sprocket.
The design of the restrictive pin is extremely simple - it is a regular bolt with a head truncated on the sides
At the same time, the chain will begin to touch the limiter with a characteristic ringing sound, which will certainly attract the driver’s attention, since this sound will be heard even in the cabin. If the chain breaks, the limiter will not allow it to completely fly off the sprocket and break the nearby oil pump and timing shaft sprockets. If the timing chain is tensioned normally, it does not touch the limiting pin, since in this case there is a constant gap of about 1.5 cm between it and the pin
If the timing chain is tensioned normally, it does not touch the limiting pin, since in this case there is a constant gap of about 1.5 cm between it and the pin.
About timing chain tensioners
The purpose of the timing chain tensioner is easy to guess from its name. He must constantly tension the chain, preventing it from sagging. If the chain sags by even half a centimeter, it may fly off one of the sprockets (although this happens quite rarely, much more often there are situations when the chain remains on the sprocket, but at the same time jumps several teeth forward, as a result of which the uniformity of its tension is completely disrupted , and the sagging increases even more). At different times, different types of tensioners were installed on the VAZ 2107.
Mechanical tensioners
In a mechanical tensioner, the force required for the tension shoe to press on the chain is created by a conventional spring. It presses on the rod, it moves out of the body and presses on the shoe. And the shoe, in turn, puts pressure on the chain, constantly dampening its vibrations.
The main element of the mechanical tensioner is the plunger spring
The spring in such a tensioner is adjusted with a conventional plunger nut. If the driver needs to tighten the chain a little, he simply tightens the nut slightly, eliminating any slack.
Mechanical tensioners for VAZ 2107 are reliable and simple in design
Automatic tensioners
Automatic tensioners were installed on later models of the VAZ 2107. Unlike mechanical devices, the design of this tensioner includes a toothed bar with a ratchet.
The main element of the automatic timing chain tensioner is a toothed bar
The plunger spring presses on this bar, and the bar transmits this force to the shoe. The ratchet prevents the bar from returning to its original position. This keeps the timing chain tension constant.
Finding automatic tensioners for VAZ 2107 on sale has become increasingly difficult lately.
Hydraulic tensioners
These tensioners were installed in the latest VAZ 2107 models. The main difference between these devices is the principle of their operation. The force in the hydraulic tensioner is created not by a spring, but by oil pressure. It is supplied to the tensioner through a reinforced high-pressure hose.
Oil is supplied to the hydraulic tensioner through a special reinforced hose
Timing chain tensioner
The timing chain tensioner is another indispensable element of the tension system, without which uniform operation of the timing chain is impossible. The damper is a metal plate that is attached to the wall of the cylinder block.
The timing chain adjuster on the “seven” is a simple metal plate held on by two bolts
This plate is located opposite the tensioner, that is, the damper acts on the second half of the chain. Since the tensioner presses the chain very sharply, the opposite side of the chain inevitably begins to vibrate. To dampen this vibration, a damper is needed. The chain, touching the damper plate, loses some of its energy and the amplitude of its oscillations decreases significantly. Without the restraining effect of the guide, the chain will stretch much faster.
Adjusting chain tension
The need to tighten the chain may be necessary in different situations:
- engine repair;
- replacing the chain drive;
- chain stretching.
To work you will need the following tools:
- 13 and 38 mm keys;
- flat screwdriver;
- pliers.
Tensioning the chain consists of several steps:
- We place the car on a flat surface, turn on neutral, placing stops under the wheels.
- We unscrew the chain tensioner clamp, and a characteristic click will be heard.
- Use a 38 mm wrench to rotate the crankshaft, making several revolutions.
- Stop rotation at maximum force and tighten the tensioner nut.
If the valve cover is removed, you can determine the tension of the chain by pressing it with a screwdriver . If the chain is tensioned normally, it will be stiff.
How can you tighten the chain on a VAZ-2106 yourself?
First, let's look at why this procedure becomes necessary. During the operation of the car, the axles and rollers of the chain gradually wear out, causing it to stretch. In addition, the teeth present on the elements of the crank pulley, sprockets of the drive shaft of auxiliary components. As a result, wear of all elements associated with normal chain tension leads to its weakening. This, in turn, leads to a change in the ignition timing phase. It can, of course, be adjusted, but engine performance will still deteriorate.
So, a situation has arisen when the chain on your car needs to be tightened. To fix this problem, it is not at all necessary to contact a car service center.
You can do everything yourself – there’s nothing particularly complicated here.
In order to tighten the chain, you will need a minimum set of tools:
- pliers;
- wrench 13;
- flat screwdriver;
- ratchet wrench.
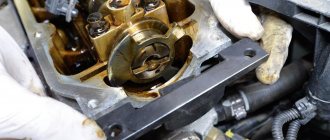
Now you can start working directly. The first thing to do is open the hood and unscrew the nuts holding the air filter. We remove this part and move on. We also need to remove the cylinder head cover. To do this, disconnect the hose from the carburetor fitting, which is used to ventilate the crankcase, and the control rod of the air damper. Next, unscrew the 8 nuts holding the cylinder head cover and remove it.
That's it, access to the circuit is obtained. Press the screwdriver, applying slight force, onto its driven and driven parts. These manipulations allow you to see the movement of the tensioner shoe. It is best, of course, to immediately replace it with an automatic one - if there is such a financial opportunity
The shoe should generally be given special attention. The fact is that the result of its damage may be a broken chain.
Also check the tranquilizer. If there are any problems here, it is better to replace it. The thing is that the failure of the damper while the car is in motion leads to an open circuit. Therefore, if you have the slightest doubt about its serviceability, immediately change this part. Believe me, dubious savings here may well result in more serious financial losses.
If everything is in order here, it’s time to begin the most important stage of our work. First, you should smoothly turn the crank pulley 1.5-2 turns. It is necessary to stop it at the moment when you clearly feel the greatest resistance. In this case, the position of the chain must coincide with the corresponding marks. This is a very important point. After all, if the chain is not set according to these marks, then soon new problems may well appear in the operation of the car. The crankshaft rotates either with the help of a starter, turning the key in the ignition switch literally for a split second, or with a wrench. The second option is more reliable, since the risk of negative consequences is minimal.
If everything was done normally, and the chain is aligned to the marks after turning the crankshaft, you can replace the tensioner cap nut and tighten it. In fact, the main part of the work is done. Now all that remains is to put all the previously removed parts back in place. Assembly here is carried out in reverse order. Don't forget to check if everything was done correctly. To do this, accelerate the car, then sharply press the accelerator pedal and release it sharply. That is, we use the same verification method. If the sound that previously annoyed you has disappeared, it means everything was done correctly. Otherwise, you will have to do all the work again.
As you can see, by and large there is really nothing complicated here. Minor difficulties may arise, perhaps when you get to the chain itself. There is no need to rush anywhere, and everything should be done quite carefully. But in the end, you will cope with the problem yourself, saving on a visit to a car service center. And this is an important positive moment in the current conditions.
Why does the chain fail?
The reasons are as follows:
- Tensioner discharge. If the shoe does not release when adjusting the chain, the plunger is stuck. You need to take a hammer and knock on the unit.
- Unscrew the cap nut with the 13th wrench.
- Turn the pulley a few turns.
- At maximum resistance, the crankshaft will stop. Conduct voltage.
- Hold the shaft so that it does not spin in the other direction. Tighten the cap nut.
- Install the cylinder head cover.
If the work done did not help, then you need to tighten the chain.
About malfunctions of the tensioning mechanism
The timing chain tensioning mechanism on the VAZ 2106 is a system consisting of three important elements:
- tension shoe fitting;
- tension shoe;
- timing chain damper.
All malfunctions of the tensioning mechanism are in one way or another related to wear or breakdown of one of the above elements:
- Breakage of the tension fitting. It can occur either due to mechanical wear of this part or due to its corrosion. Whatever the reason, the result is the same: the tension shoe stops extending and putting pressure on the timing chain. As a result, the chain loses stability, begins to dangle and hit the guide, and in especially severe cases it flies off the guide sprockets or breaks. There is only one solution: replace the tension fitting. This part cannot be repaired, since its body cannot be disassembled (and even if the body were dismountable, it is not possible to find spare parts for the tension fitting on sale);
- Timing chain guide failure. The damper breaks either due to fatigue failure of the metal, or due to a weakened timing chain, the impacts of which led to the loosening of the mounting bolts with subsequent breakage of the damper. The second case is the most dangerous, since broken bolts and damper parts can lead to a broken timing chain. And this, in turn, will lead to damage to the valves, cylinders and complete jamming of the engine. It is not always possible to eliminate such a breakdown even with the help of expensive major repairs. Solution: replacing the damper. The reason is simple: the damper is a very important part, and no one will restore it by welding, for example. There is only one condition: the new damper should not be Chinese, but real VAZ;
So, tensioning a slack timing chain does not require any special skills or knowledge. This task is quite within the capabilities of even a novice car enthusiast who has held a wrench in his hands at least once. All you need to do is follow the recommendations given above exactly.
When to adjust tension
The load on the chain is maximum, so it can withstand up to 70-80 thousand kilometers. Don't forget to adjust every 10-15 thousand km. If you notice that there is a rumble, then inspect the system earlier. Before adjusting the tension, check the operation of the timing belt. Check the tension after repairing the system on a VAZ car. The characteristic rustling sound produced by a fallen chain can be recognized immediately. Listen to how the engine idles under the hood. Add speed, and the extra sounds will disappear. This will be a signal that it is time to tighten the tension.
Prepare the engine before adjusting the chain. Place the VAZ car on a horizontal surface and leave it on the handbrake. Then we prepare the engine as follows:
- leave the lever in the neutral position (gear switch);
- use a wrench to remove the cover from the engine;
- replace the old gasket on the cover with a new one.
Having completed these steps, the timing parts, including the chain, will be clearly visible.
Adjusting the drive itself takes little time. But do it carefully and carefully. For work, prepare two wrenches: a 38th open-end wrench and a 13th socket wrench.
Timing chain on a VAZ 2106 car: originals, analogues, part numbers and price
Drive technical characteristics: length 1187 x number of links in the chain 116 x width 9.5 mm.
| Name/article | Price in rubles |
| VAZ 2103-1006040 116 stars. (CZ) | From 450 |
| –/– 21030-1006040-01 (Ditton) | From 550 |
| –/– 2103-1006549 | From 450 |
| –/– KZPC283789 | From 650 |
| –/– 2103-1006040-82 | From 450 |
| –/– 2103-1006154-82 | From 450 |
| –/– 2103-1006694-82 | From 450 |
| –/– 2103-1006671-82 | From 450 |
| –/– 2103-1006359-82 | From 450 |
| –/– 2103-1006898-82 | From 450 |
*check prices with an authorized dealer at the time of purchasing parts.
Before purchasing components, check with store managers about the compatibility of the part with the VAZ model. Check the article numbers with the data specified in the operating instructions.
When replacing the timing drive, do not forget to set marks on the crankshaft and camshaft. Do not neglect the rule, otherwise the engine will not start, it will operate unstably, and the ignition timing will shift.
Which manufacturer is better: domestic or imported? Russian analogues are not inferior in quality to foreign ones. Decide whether it’s worth overpaying individually, but still listen to the opinion of experts.
Causes of timing chain wear on VAZ 2106
- Duration of vehicle operation without intermediate prevention and diagnostics;
- Installation of non-original parts, poor workmanship;
- Inconsistency in length, width, number of links;
- Aggressive driving style, speed limits;
- Critically high (low) temperature conditions.
Signs of wear on the chain drive on the VAZ 2106
- Unstable engine starting: excessive wear or weak tension leads to malfunction of the ignition system;
- A large amount of smoke from the exhaust pipe due to the enrichment of the combustible mixture;
- The appearance of third-party sounds when the engine is running;
- The power unit does not start, the starter rotates.
Consequences of untimely replacement of the timing chain drive
- Wear of pistons, crankshaft liners, camshaft, valve mechanism;
- Increased engine oil consumption;
- Deformation of gears, cylinder head (cylinder head).
What happens if the chain length increases
It will not be possible to correctly adjust the idle speed of the car, the engine will be unstable and not in line with the stroke. Adjusting the valves and idle speed sensor will not give a positive result.
During operation, not all links wear out equally. This needs to be known and taken into account when diagnosing. When stretched, extraneous noise appears, the links overlap the star. The damper, limiter and shoe are also subject to load and deformed. The worst thing is when the chain links jump over the sprocket teeth. In practice, from 1 to 4, but this is quite enough to disable the timing mechanism and bend the valves.
Timing chain tension VAZ 2106
- Unscrew the cap nut and remove it;
- Using a ratchet wrench, turn the car’s crankshaft one and a half turns. At the moment of rotation, the spring on the shoe automatically adjusts the tension;
- We check the tensioner rod; it should go as deep as possible into the body. If this does not happen, additionally turn the crankshaft;
- We install the cap nut in its original place and tighten it.
Some motorists practice replacing a chain drive by disconnecting the links of the old one, tying them with wire, and pulling a new one.
This can be used when you are on the road and don’t have special equipment at hand. At home, follow the established rules.
Is it possible to shorten a stretched chain?
Theoretically, such an operation is quite possible - it is enough to knock out the cotter pin of one or several links and reconnect the chain. Why such repairs are very rarely practiced:
- It is difficult to estimate the degree of elongation of the element and the number of links removed.
- There is a high probability that after the operation the marks will no longer align by 5-10 mm.
- A worn chain will definitely continue to stretch and will soon begin to rattle again.
- Worn gear teeth will allow the links to skip easily when the chain is pulled back out.
Economic feasibility plays an important role. A set of spare parts is not so expensive that you waste time and effort trying to repair the part by shortening it.
Replacing the timing chain drive will take an experienced technician approximately 2-3 hours. An ordinary car enthusiast will need twice as much time without taking into account unforeseen breakdowns. Set aside part of the weekend for repairs and do the work without rushing. Before starting the engine, do not forget to compare the marks and make sure that the mechanism is assembled correctly.
Wear level study
Visually, no driver will be able to distinguish an old chain from a new one, but there are two ways based on measurements and comparisons.
- Place a 20cm piece of old chain horizontally and turn it in your hand so that the pins are perpendicular to the floor. Examine the chain overhang angle. If the deviation of the hanging edge from the horizontal is 10-20 degrees, there is no cause for concern. If this parameter exceeds 45 degrees, replacing the chain is a mandatory measure.
- The second method can be considered more accurate, but its implementation requires a caliper. Select 18 pins or 8 links anywhere on the chain. Use a caliper to determine the length between the first and last element on the selected segment. Repeat the measurements two more times, but in other random areas. Exceeding the length by more than 122.6 mm in one of the areas you measured indicates that the chain needs to be replaced or tightened.
When is it time to change the chain?
Replacement or adjustment of the chain is necessary if the following symptoms are present.
- Loud knocks and grinding noises in the hood area after starting the engine. As the crankshaft speed increases, the noise frequency also increases.
- Fuel consumption cannot be called economical if the cylinder block is not operating properly. The increase in consumption occurs by a third or even two times.
- Gaps form in the engine's power output, which can be noticed both at idle and when accelerating.
- The vehicle's reaction to activating the gas pedal is not good enough; the reaction may be delayed by a couple of seconds.
The presence of these signs indicates the need to remove the chain and examine the degree of its wear. Excessive wear requires replacing the chain, but if signs of wear are insignificant, it is enough to tighten it.
Be sure to read our specialist's detailed article, which talks about replacing the timing chain.
We also recommend that you carefully study our expert’s article, in which he talks in detail about replacing the timing belt.
Replacing the timing chain on a VAZ 2106
Replacing a timing chain, as well as replacing a timing belt, is not a very simple job, and is very responsible. For novice car enthusiasts, it is better to carry out this operation under the supervision of mechanics or simply people experienced in this matter. It is better not to carry out this procedure without minimal knowledge and experience. Moreover, when replacing the timing chain, it may be necessary to replace other elements, in particular, the alternator belt, tensioner shoe, sprockets and damper. Tools required for work:
Removing the air filter housing from the carburetor.
You will need 8 and 10 wrenches to unscrew the nuts. When working, you should be careful not to drop anything, because in this case it will have to be removed, including dismantling the intake manifold.
Disconnecting cables, pipelines, covers, etc.
First of all, the distributor cover and the fuel supply pipe are removed. To do this, you will have to unscrew the valve cover fastenings (eight nuts in total, plus washers with plates), after which the fuel supply pipe, choke cable, and throttle valve drive are disconnected.
After removing the valve cover and gasket, carefully inspect the latter: it may well be that it will also have to be replaced.
Removing protection and draining antifreeze.
Remove the protection from below and pour the antifreeze into a previously prepared container.
The next step is to loosen the generator (for this you will need a 19 mm wrench), as well as remove the clamps on the pipes and the clamp of the lower pipe of the water pump. All clamps are first loosened and then removed. We turn off the power to the temperature sensor on the radiator and the fan, then remove the radiator, including the thermostat and pipes.
Removing the generator belt.
The generator tensioner nut must be loosened and then moved forward using a pry bar. At this stage you can already remove the alternator belt.
Removing the crankshaft pulley.
Turning the crankshaft by the pulley, using a 36mm wrench, align the marks on the pulley and cover, on the bed casting and the camshaft sprocket. We unscrew the nut holding the crankshaft pulley to 36, lock the pulley (for this you need a special key or a complex combination of engaging fifth gear, pressing the brake pedal and unscrewing the nut). Once this nut is removed, the pulley can be removed and the camshaft cover can be removed. For the last operation you will need a 10mm wrench and a little patience (you need to unscrew three nuts and six bolts, plus three bolts at the bottom of the cover.
Removing the chain tensioner.
The chain tensioner is held in place by two fastening nuts. By unscrewing them, you can easily remove the tensioner.
Removing the camshaft sprocket mounting.
At this stage it is important to mark the position of the sprocket for alignment. Removing the sprocket is quite simple - just unscrew the fastening bolt
Removing the timing chain
Removing the timing chain.
The fuse, the bolt on which the auxiliary drive sprocket is attached, as well as the tensioner fastenings are unscrewed with a 10mm wrench. Before removing the sprockets and timing chain, leave marks corresponding to their position (the reverse steps will be much easier).
Installation of new sprockets, crankshaft and auxiliary units.
Before installing a new chain, it must be thoroughly lubricated - this way it will last longer. After installation, it is advisable to temporarily hold it with some tool so that it does not fall.
Installation of new sprockets, crankshaft and auxiliary units is carried out in the reverse order. The camshaft sprocket is installed in such a way that all marks match and the descending branch of the chain is tensioned. The camshaft must be turned counterclockwise. Now we go back behind the crankshaft and tighten the chain. At this stage, you should check that the labels are correct and match. If they do not match, the chain can be thrown over the tooth and the installation process repeated.
Installing the chain tensioner.
Returning the chain tensioner to its rightful place is only half the battle. It is also necessary to tighten the mounting bolts and lock them. To check for correct installation, turn the crankshaft two turns. If the valves do not rest against the pistons and the marks match, then everything is done correctly.
At this stage, you need to return the crankshaft cover to its place (after having lubricated it with sealant).
We return the pulley to its place. We check again that the marks match and only after that tighten it.
We unscrew the nut to 13, take it out, turn the slider towards the contact of the 4th cylinder and install the distributor in place. We turn on the ignition.
The remaining operations are performed similarly to disassembly, in reverse order.
Step-by-step instruction
Before starting troubleshooting, check that all timing components are free of mechanical defects. To do this, you need to remove the protective cover of the drive and perform a visual inspection of the parts: sprockets, damper, tensioner and shoe. If defects are found, these components should be replaced.
Tools
Before you start work, you need to prepare the necessary tools:
- keys to “13” and “38”;
- flat screwdriver;
- pliers.
To carry out work, the car should be placed on a convenient platform and supports should be placed under the wheels so that it does not roll. The gear shift lever must be set to neutral.
Engine compartment of VAZ 2101
Stages
- First you need to find the tensioning device; it is located under the pipes near the pump. Use the key to “13” to release the tensioner. Once the chain is loosened, the shoe should pop off.
- Next, you should take the key at “38” and throw it on the crankshaft pulley nut. Then you need to turn the crankshaft a couple of turns in a clockwise direction.
- Rotate the shaft until the marks on the camshaft sprocket and on the camshaft bearing housing coincide. In this case, the spring located inside the tensioning device, acting on the shoe, will automatically perform the necessary tension.
- It is advisable to additionally check the tension using a screwdriver. If everything is normal, then we return to the tensioner and tighten its head with a wrench.
Checking tension with a screwdriver
After tightening the chain drive, you should start the engine and check its operation. It should work without extraneous noise. If the noise remains after tensioning, then the reason may be in the damper. Then you need to check its serviceability and replace it if necessary. It may not be possible to tension the chain drive the first time, so this procedure will have to be repeated several times.
During the procedure, it is necessary to ensure that the marks match so that the valve timing does not go astray.
This operation should be carried out every time after any repair work. In addition, a preventive check should be performed after the 10 thousand kilometers mark. If you learn how to check and tension yourself, this will make it possible to extend its service life and save on car service costs.
How to check
It is impossible to determine the condition of the chain purely by eye - and neither experience nor skill will help here.
To objectively check such an important part of the 2106 engine, there are two methods
In the first case it is necessary:
- place the chain sideways on the edge of the table, so that its end (10 cm) is in the air;
- put a ruler on top and determine how much it sags.
The element does not require replacement if the named parameter is no more than 1 centimeter. When it reaches 2 cm, this means that the chain has completely lost its serviceability.
To use the second (more accurate) method, you need a caliper. Further:
- stretch the element on the table;
- count 8 links;
- measure the length of the segment;
- repeat the manipulations in two other randomly selected places;
- if the result is that the fragments have a length of more than 122.6 millimeters, then the chain is worn out.
Nature of tensioner mechanism breakdowns
Since the tensioning mechanism consists of a damper, a shoe and a shoe fitting, any failure will be associated with the failure of one of these elements:
- The fitting may break due to corrosion processes or mechanical wear. The result is that the shoe no longer extends and puts pressure on the chain, which becomes unstable and too loose. In extreme cases, it can even break completely. Replacing the fitting is the only possible measure to eliminate the problem in question. Since the body of the part is non-separable, repair is impossible.
- The damper can fail as a result of metal fatigue failure or a weak chain that hits the bolts, weakens them and breaks the damper. Replacing the element in question is also the only option in this situation. The new part must be original, but not from a Chinese manufacturer.
- The tension shoe wears out, causing vibrations and impacts. The element should be replaced, since its polymer coating cannot be restored under domestic conditions.
- If the chain cannot be tensioned, the cap nut is not loosened enough or the fitting has not been discharged as a result of failure. Check the condition of the parts in question and correct any problems.
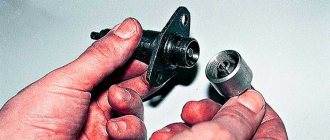
Replacing the tensioner
This element is necessary for tensioning the VAZ-2106 chain. Replacing it is very simple, just follow these steps:
- Remove the old tensioner; to do this, unscrew the two nuts that secure it.
- Unscrew the cap-type nut - this can be done conveniently using a vice.
- Clamp the tensioner in a vice and unscrew the nut. Inspect the collet located inside the nut.
- If this clamp has no defects, you can assemble the mechanism and “charge” it. To do this, you need to push the plunger inside the body, and then tighten the nut.