Like all domestic cars, Lada Priora has its drawbacks. During the release of the model, a list of the most frequent breakdowns and weak points of this machine was formed. For Lada Priora, repairs of engine spare parts and electrical equipment are common occurrences. There are also problems with the suspension struts and interior plastic.
In case of serious breakdowns that are beyond your competence, you need to undergo diagnostics at a service station. But if you are sure that you are able to identify a certain, not too serious breakdown, you can cope on your own. Repairing the Priora on your own will help you follow the operating and repair instructions for the VAZ 2170.
Engine problems
When a driver undergoes Priora maintenance, service station workers often discover faults in the engine systems. The most common causes of engine failure are as follows.
- Problems with the timing belt.
- Failure of fuel pump parts.
- Crankshaft position sensor failure.
Signs: loss of power, engine stability. The repair manual prescribes how to replace the timing belt, repair the fuel pump, and replace the crankshaft position sensor. Car repairs are performed with the ignition off.
First you need to remove the right engine protective shield, release the latch that holds the engine control system wiring harness block. Then you should disconnect the crankshaft position sensor from this block. The sensor is dismantled using a 10mm wrench. Unscrew the mounting bolt.
You need to check not only the sensor itself, but also its entire circuit. We do not turn on the ignition, the crankshaft is motionless. We connect one multimeter probe to the terminal of the block harness, the other to ground. The voltage on the tester should be approximately 2.5 V. Repeat the procedure with the other terminal of the harness. If the voltage is normal, you need to check the circuit for an open or short circuit: the section between harness pin 1 and controller pin 34, as well as the wire that connects harness pin 2 and controller pin 15.
If the voltage and circuit are OK, the controller may have failed. We test the sensor itself using a multimeter. Normal operation of the sensor occurs with a resistance of 550–570 Ohms. And in AC mode, when the steel rod is brought to the end of the sensor, a voltage surge should occur. Then the sensor is normal. If none of the conditions are met, replace the sensor and install it back on the oil pump cover.
Caring for the timing belt involves replacing it after 200 thousand kilometers. Checking is recommended every 45,000 km. After all, a broken belt, “licking” of teeth, the presence of folds, cracks, and fiber breaks lead to a violation of the phases of the camshaft and crankshaft. Consequences: jamming of pistons, valves, connecting rods. The presence of oil on the belt is also unacceptable. If such breakdowns are detected, we replace the timing belt. Repair and maintenance of the belt is carried out in accordance with the instruction manual. The main thing you need to know: before removing the belt, you need to set the shafts to the TDC (top dead center) position of the piston.
To check the pressure in the fuel rail, which depends on the fuel pump and filter, you will need a pressure gauge. You need to insert it instead of the spool, which is located under the fuel rail fitting. With the ignition on, take readings from the pressure gauge. The value should be between 3.6–4 bar.
We check the serviceability of the fuel pump by ear. If the pump makes unusual sounds or the pressure is not as specified, the parts must be replaced. The replacement process is described in the operating and repair instructions.
When repairing a car, if you do not have special skills, then it is better to turn to specialists. For example, repairing compressors involves lubrication, replacement of consumables, and in general, this repair process can take more than a day.
Motor 126 and 127: working life, differences
These engines on Priora had a displacement of 1.6 liters (or 1596 cm3). Optimal for city sedans, the engine size of the Lada Priora gave a good combination of dynamics and consumption: along with very decent acceleration, fuel consumption does not exceed sky-high numbers. Both engines received good marks, because the car behaved perfectly in the city and on the highway.
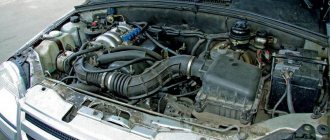
127 motor - looks like this
In fact, the 126 Priora engine became the first sixteen-valve engine for this model, and the 127 is a modified version, “overclocked” by AvtoVAZ designers. In addition to the same engine displacement, they have other identical characteristics. The in-line type of arrangement of four cylinders provides a simplified design that can be repaired on your own.
The distributed multipoint injection system is involved in creating a good, rich fuel-air mixture (a lean mixture can lead to breakdowns). The cylinder diameter is 82 mm, the piston stroke is 75.6 mm, the compression ratio is 11. The “engines” fall under the Euro 4 standard, they are powered by gasoline with an octane rating of 95.
The 126 engine for the Priora received the following characteristics: 98 hp. (72 kW at 5600 rpm), acceleration to 100 km/h in 11.5 seconds (with manual transmission), city consumption 9.1 l - 100 km (manual transmission), maximum torque - 145 Nm.
The 127 engine for the Priora was upgraded to the following figures: 106 hp. (78 kW at 5800 rpm), acceleration to 100 km/h in 11.5 seconds (with manual transmission), city consumption 8.9 liters per 100 km (with manual transmission), maximum torque – 148 Nm.
The difference may not seem so noticeable, but this is a very small but strong step in design on the part of AvtoVAZ (this is where the change to sixteen-valve “engines” with a volume of 1.6 liters ended). For a car of the Lada Priora class, the engine power was sufficient.
In the same block it is necessary to say about the operating temperature. An absolutely normal operating temperature is considered to be between 90 and 95 degrees Celsius. Further, when the car is being pushed in a traffic jam, is basking in the sun, or for some other reason, but can still work - from 97 to 110 degrees. The engine is slow in places and wears out a lot, but you can still get to your destination. A temperature below 90 degrees is a direct sign indicating that the car has not yet warmed up, and it is better to wait in place until the arrow points to the coveted 80-90 mark.
Operating a car at temperatures above 110 degrees is dangerous because the service life of the engine is noticeably reduced - hot parts undergo very severe wear, overcoming the force of friction.
In general, the service life of the Lada Priora engine with a normal driving style and careful treatment is 200,000 km - after this mark the time comes when the “engine” requires major repairs. AvtoVAZ mentioned the timing belt separately as a recommendation, saying that it needs to be checked every 100,000 km (many car enthusiasts talk about the figure of 50,000 km).
All Lada engines have a problem, and it is related to the valves, which will be discussed further.
Sometimes the Priora electrician fails
Electrical equipment often suffers from breakdowns:
- electric power steering;
- wiper drive;
- headlight lamps.
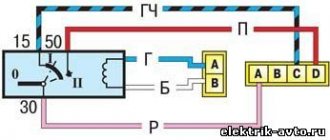
At the first stages of Lada Priora sales, problems arose with a new function - electric power steering. This was a trial step for AvtoVAZ, and it is logical that there were some disruptions. Jerks were observed when the steering wheel rotated, as well as jamming and stiff movement. The electrical diagram provided in the owner's manual helps to trace the steering drive circuit and identify faults. Sometimes the problem was solved by simply cleaning the contacts and strengthening the wiring. But often the breakdowns were much more serious, and only the service station workers could solve them.
Over time, the plant developed optimal assembly technology. Therefore, problems with the amplifier occur much less frequently. If the drive performance deteriorates, open the “Electrical equipment” section of the VAZ operating manual. We check the entire drive circuit for continuity and short circuit, and also clean the contacts.
On already “middle-aged” Priors, problems with the ignition coil can be traced. Also, over time, malfunctions in the operation of the windshield wiper drive occur, and headlight bulbs burn out. You can repair these parts yourself, following the instructions in the manual.
The standard battery on the Priora is not entirely successful. There are often complaints that the battery lasts for a year or a year and a half. Normal service life is up to three years. The battery on the Lada is a non-separable type, so you only have to replace it.
pros
- High engine efficiency;
- Consistently high power at both low and medium speeds.
- Increasing the number of valves had a positive effect on the efficiency of the system.
- Improved environmental friendliness due to complete combustion of waste fuel, minimizing carbon monoxide emissions into the atmosphere.
- Compliance with Euro4 requirements, which allows you to drive a car abroad.
- Increasing the car's mileage before the first engine failure.
Malfunctions in the suspension and interior
The front and rear suspension of the Lada Priora is equipped with hydraulic shock absorbers. The hydraulic fluid of the struts often begins to leak. In addition, other failures are possible.
| Problems | Your actions |
| A common problem with the Lada is a leak in the hydraulic cylinders of the strut shock absorber. | In this case, the stand may need to be replaced. The instructions describe how to remove the stand. You need to disconnect it from the fastenings under the hood, and on the other hand, disconnect the fastenings of the steering tip and steering cam. We remove the strut from the spring with a special puller and replace it with a new one. |
| A separate problem: the CV joint (angular velocity control joint) crunches. | This kind of malfunction happens even on new Priors. Drivers often note that external visibility does not help identify a defect. In this case, you should contact a service station. |
| The remaining problem areas of the Lada suspension are: wheel bearing, anti-roll bar. | You can replace them yourself. Detailed instructions are described in section 7 “Chassis”. See the subsections “Replacing stabilizer parts”, “Replacing the bearing”. |
Often, after a certain mileage, the plastic used in interior trim begins to rattle, knock, and creak. In this case, there can be only one repair - soundproofing the Lada's interior. In this case, four main materials are used: vibration insulation, noise absorber, sound reflector, squeak suppressor.
Removing a generator on a Priora for replacement or repair
In this material, we will consider in detail how you can remove the generator on Priors of various modifications, using various techniques. How the unit is repaired is a topic for another material. You can read about choosing a new generator to replace the standard one here. If you are looking for an answer to the question of directly performing dismantling according to instructions, then it is presented below.
Interesting! Alternator malfunctions on Priora are a popular topic, as evidenced by the large number of video instructions from car owners. However, most of these instructions are only superficial, and you often have to watch other videos to find the answer to your question. The material discusses in detail all stages of removing the generator, regardless of the chosen method.
First, let's see what instructions Avto-VAZ offers for removing the generator on a Priora. Below is a picture with a detailed description and photo.
The photo below shows that it can also be removed not only from below, but also through the engine compartment.
This manual is intended for Priora cars in a budget modification (without air conditioning and power steering). Dismantling the unit in such Prior modifications is not difficult. By following the instructions, you can implement the process quickly and correctly.
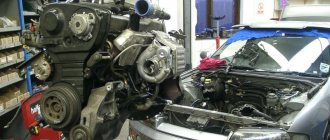
Now let's look at the instructions from Avto-VAZ for removing the generator on a Priora with air conditioning.
Experience shows that the instructions from the factory are not at all sufficient to be able to remove the generator on a Priora. That is why we will consider in detail the dismantling process for VAZ-2170 cars with and without air conditioning.
What kind of belt is used?
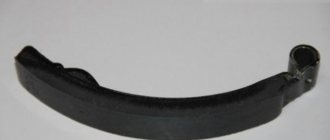
On Priora cars with a 16-valve engine 21126, a toothed rubber belt with a number of teeth of 137 pcs is used. The width of the belt is 22 mm.
The article number of this element is 137-22 HNBR
This is what the timing belt used on Priors looks like
Also, many owners speak well of Gates belts.
We set the timing marks of the Priora engine 16 valves VAZ 21126
The timing marks on the 126 16-valve engine of the Priora vehicle are set to ensure that the engine works perfectly. The order consists in the distribution of parts of the four-stroke engine of the Priora vehicle. The notches themselves are located on the rear casing, camshaft, and flywheel. They are used when changing the timing belt, which activates this entire complex gas distribution mechanism.
Lamp type
The lamps installed in the headlights of Priora 1 and 2 differ due to the DRLs in the newer Lada model. Below is a table with lamp types.
| Vehicle model year | Lamp type | |||
| Low beam | High beam | Turn signal | Dimensions | |
| Headlight Priora until 2013 | H7 | H1 | PY21W | W5W |
| Headlight Priora After 2013 (with DRL) | H7 | H15 | PY21W | W5W |
Checking the condition of the belt
The inspection regulations for this unit require an inspection in a cold engine state. Remove the outer protective casing to allow visual contact with the surface of the gas distribution unit parts. Having gained access directly to the timing belt, rotating its drive, inspect both sides of the consumable in detail for the presence of any kind of defects (wear, broken teeth, protruding cord, rubber delamination, etc.). Tensioner rollers are subject to careful inspection; in the presence of mechanical damage and large play, they contribute to increased wear of the consumables. The presence of oil stains on the surface of a rubber technical part, which contribute to the destruction of its structure, is not allowed. If found, immediately remove from surface.
External signs of the need to change the timing belt
- Changes in exhaust color. Typically, the exhaust in this case is black and accompanied by popping noises.
- Uneven operation of the motor or the motor does not start. There are dips in traction and an uncertain start.
- Additional noise and unnecessary sounds when the engine is turned on.
- A cracked timing belt causes a characteristic clicking and ticking noise inside the casing.
- An increase in sounds is observed with increasing engine speed.
- Side vibration of vehicles.
If dirt, oil and other elements get on the timing belt, the belt will need to be replaced before the time stated in the instructions. If the opposite occurs, the belt life will be significantly reduced. To begin with, if available, the causes of coolant leakage are eliminated.
The basis of the operation of the gas distribution mechanism
When the mixture is compressed, a spark enters the working cylinder and the mixture explodes, pushing the piston. He pushes the connecting rod, the connecting rod pushes the crankshaft. Everything is known. The valves, by timely opening and closing, ensure tightness in the cylinder at the right moment and free inlet and outlet in other cycles. The camshaft controls these devices by pressing the valve mechanism with its cams. The Priora engine has 16 valves. They are controlled by two camshafts. And the camshafts are driven by the crankshaft via a timing belt.
To ensure that the valve timing matches and the drive is installed correctly, special marks are applied.
Timing timing marking points
They are applied by the manufacturer in several places and are divided into movable and stationary:
- On the body of the Priora engine
- On camshaft gears.
- On the crankshaft gear.
- On the engine flywheel.
Now in more detail about these tags.
On the engine body of a VAZ 2170
Here the mating marks are installed in three places. They are immovable:
- On the lip of the oil pump housing.
- On the flywheel housing.
- Marks on the plastic protection of the Priora timing belt
The first two types of marks are intended for mating the crankshaft.
That is, the risks on the gear and on the flywheel must coincide with them. The crankshaft drive gear is located in the oil pressure pump housing. This is a slot in the metal skirt that half-encircles the gear from above. It is clearly visible in normal lighting. Sometimes it can be “bombarded” with oil and dust. Then you need to wipe this place with a rag, and everything will be visible.
There is a special arrow installed on the flywheel housing, in the viewing window in the starter area. It must be taken into account that the top dead center is determined only by the average of the three marks.