One of the important elements of vehicles, without which the engine simply will not start, is the timing chain. Those who are already familiar with the “anatomy” of mechanical engineering know that such a part is a kind of connecting link for synchronizing the operation of the camshaft and crankshaft. However, belts for the Nissan Almera n16 have a number of specific features that you need to be informed about when considering a possible replacement.
Timing belt components for replacement
What you need to know before starting work
Before starting the process called replacing Nissan Almera N16 belts, you should know that essentially this element is a chain. This solution prevents longer operation of vehicles, especially the operation of the gas distribution mechanism. And if previously the need arose after 50,000 km, now the car can easily cover a distance three times greater.
timing belt installed on the mechanism
Another obvious advantage of the chain will be the following:
- the element can only stretch or shift;
- made of dense material;
- If there is a malfunction, the valves will not be damaged.
Replacing belts on a Nissan Almera N16: rules to follow
However, all this does not simplify the process. If it is decided that the Nissan Almera timing belt will be replaced independently, then it is important to note the following aspects:
- As in the case when the Almera N16 generator belt needs to be replaced, the chain is changed only based on the manufacturer’s recommendations.
- When working to replace a Nissan Almera timing belt, it is very important to comply with the condition of 100% coincidence of all specified marks (otherwise the part may break).
- For the gas distribution mechanism, such a DIY replacement of Nissan Almera Classic belts can take about 4 hours.
- It is best to install the transport on an elevated surface or overpass.
What reasons lead to the need for such an event? In addition to the rules of technical regulations, this includes:
- errors 0330 and 0340, which will be shown by on-board equipment (possible displacement of the chain from the crankshaft and camshaft - most often due to stretching);
- a characteristic metallic grinding noise coming from under the hood;
- increase in fuel consumption.
In what cases is replacement necessary?
The big advantage of the Nissan Almera H16 is that they are equipped not with a timing belt, which needs to be changed after 50-60 thousand kilometers, but with a chain. It ensures reliable operation of the gas distribution mechanism until the car travels more than 150-200 thousand km. The chain can only shift and stretch, it will never break, so the valves will not be damaged.
The timing chain needs to be changed as well as the belt, according to the manufacturer's recommendations. But there are times when the on-board computer displays error 0330, 0340, which indicates the position sensors of two shafts: the crankshaft and the camshaft. The cause of the error is a phase shift from the sensor of these shafts. Accurate diagnosis can be done using an oscilloscope. But usually this indicates that the chain has stretched. In this case, the timing chain needs to be replaced. Signs of replacement may include metallic sounds from under the hood and increased fuel consumption.
Preparatory stage
Such a serious event requires careful preparation. First of all, this concerns the necessary preparations:
- hex key 6;
- heads size 12,13, 14;
- hammer;
- chisels;
- torque wrench;
- sealant;
- degreaser;
- rags or rags;
- containers for coolant and oil;
- adjustable wrench;
- wooden block;
- new part - timing chain.
Preparatory stage for replacing the Nissan Almera timing chain
Replacing a belt on a Nissan Almera Classic also concerns safety issues. They embody the following points :
- Disconnect the cable from the ignition coil. Turn off power.
- Unscrew and remove the coils.
- Label each with consecutive numbers for correct installation during installation.
- Disconnect the air pipes from the valve cover.
- Following the instructions, unscrew the fastening bolts on the valve cover around the perimeter. Take it off.
- Remove the right cushion (it may interfere with the subsequent removal of engine parts).
Spare parts and tools for replacing the timing chain on Almera H16 gasoline engines
Timing drive spare parts set QG18DE
The process of replacing the Nissan Almera N16 timing chain begins with preparing the necessary tools and materials. To work you will need:
- pulley and sprocket pullers;
- jack;
- set of socket heads with extension;
- adjustable and torque wrench;
- chisel, hammer;
- a set of open-end and hex keys;
- screwdrivers for flat and Phillips heads;
- pliers;
- containers for draining used cooling and lubricating materials;
- solvent;
- sealant;
- block of wood;
- rags.
Pulley and sprocket puller
When selecting spare parts, you need to take into account what engine is on your Nissan Almera N16. For the 1.8 engine you will need spare parts under the article numbers:
- 13028-4M51A – timing chain;
- 13070-95FOA – hydraulic tensioner;
- 13085-7J600 – guide bar;
- 13091-7J600 – damper;
- 13510-95FOA – crankshaft oil seal;
- 15066-5E510 – ring-type gaskets for oil and water pumps;
- 13270-95FOB - cylinder head gasket.
For one and a half liter engines it is necessary to prepare spare parts with the following articles:
- 13028-4M51A – timing chain;
- 13271-4M501 – gasket for the crankcase ventilation system;
- 13533-AU000 – oil pump spacer;
- 21049-4M500, 15066-95F0B – rubber seal rings;
- 13510-10Y10, 13021-4M501 – oil seal, crankshaft gear.
Crankshaft oil seal
Nissan Almera n16 - timing belt replacement: dismantling continues
On the way to the chain you will have to remove a lot of parts. Follow these instructions :
- Place the prepared container and begin draining the engine oil from the engine.
- Dismantle the filter (oil).
- Remove the clamp, which is located on the lowest radiator pipe. Here, the coolant is first drained into a container, and then what remains in the radiator is “dehydrated”.
- Remove the radiator.
- Remove the drive belts of the Nissan Almera N16 (first from the generator).
- The clamp from the hose, which performs supply functions, is loosened - it remains easy to remove it.
- Remove the head located on the cylinder block.
- Unscrew all 4 bolts and remove the cover along with the ventilation device located on it (and its coupling).
- Unscrew the 3 mounting bolts for the pan muffler. Now you can easily remove the oil pan.
- The mounting bolts on the pump pulley are loosened - this will help remove the drive belts for the air conditioner and power steering.
- Using a prepared wooden block, fix the side of the crankcase and the crankshaft - this will help remove the pulley from the latter (after unscrewing the mounting bolt using a socket).
- The water pump can be removed by completely unscrewing its pulley.
- After this, you can safely remove the metal gasket that was underneath.
- In the process, it was time to remove the oil pump.
Thus, the right engine cover was completely disassembled. This made it possible to create full access to the timing chain.
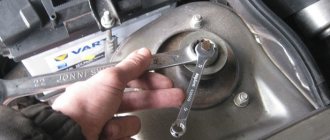
We dismantle the timing chain according to the attached instructions
Step-by-step replacement instructions
Replacing the timing chain on a Nissan Almera H16 classic with your own hands at home, like replacing the belt, takes 3-4 hours. It is advisable to carry out the procedure on an overpass, inspection groove or lift.
Tools
To work, you need to prepare the following tools and consumables:
- Hexagon at "6".
- Heads for “12”, “13” and “14”.
- Hammer.
- Chisel.
- Torque wrench.
- Degreaser.
- Sealant.
- Clean rags.
- Containers for draining oil and coolant.
- Adjustable wrench.
- Wooden block.
- New timing chain.
Stages
- At the first stage, it is necessary to disconnect the ignition coil from the power supply by disconnecting the cables.
Valve cover with ignition coils - We unscrew the coils, dismantle them and label them with numbers according to the removal sequence, so as not to confuse them during installation.
- Next, disconnect the air pipes from the valve cover.
- On the valve cover, unscrew all the fastening bolts around the perimeter according to the instructions and remove the cover.
- To ensure that the right airbag does not interfere with the removal of engine parts, it must be dismantled.
- At the next stage, place the prepared container under the drain hole, unscrew the plug and drain the engine oil from the engine.
- Then remove the oil filter.
- Remove the clamp from the lower radiator pipe of the Nissan Almera H16 and drain the coolant into the prepared container. Then unscrew the cap from the radiator and drain the remaining liquid.
- Now we dismantle the radiator and remove the generator drive belt.
- Having loosened the clamp of the supply hose, we dismantle it.
- Next, remove the cylinder head. Having unscrewed 4 bolts, we dismantle the head cover along with the fan and its coupling.
- Before removing the engine pan, you need to remove the muffler so that it does not interfere by unscrewing the three bolts that secure it. Now you can remove the oil pan.
- After loosening the pump pulley mounting bolts, you need to remove the drive belts for the air conditioner and power steering.
- By inserting a wooden block between the side of the crankcase and the crankshaft to secure it, remove the crankshaft pulley. The pulley mounting bolt is unscrewed using an extension and a socket.
- After unscrewing the water pump pulley, remove it from its seat. The metallized gasket under the water pump is removed.
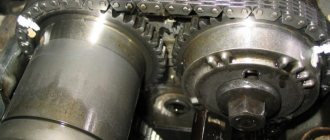
- Next, remove the oil pump. We disassembled and dismantled the right engine cover. The timing chain is now fully accessible.
Gas distribution mechanism with cover removed - To set the first piston to top dead center, you need to rotate the crankshaft until the desired position is reached. In this case, the marks on the gears must also match.
- In order to remove the old chain on a Nissan Almera H16, you need to unscrew the mounting bolts of the camshaft gears one by one. In this case, use an adjustable wrench to fix the camshaft.
- Next, remove the parts in the following sequence:
- upper level damper;
- hydraulic tensioner;
- damper tension bar;
- We put the bottom bar on a hairpin;
- remove the timing chain;
- pry the lower gear with a flat screwdriver and remove it.
Comparing the old and new chain, you can see that the removed chain is stretched and requires replacement.
Comparison of old and new timing chain
Reassemble in reverse order:
- Before starting, the side surface of the motor must be cleaned of old sealant and degreased.
- When installing a new timing chain, you need to make sure that all marks are set correctly.
The marks on the pulleys and chain must match - Next, you should replace all the rubber sealing rings at the oil pump installation site.
- Next, a new sealant that can withstand high temperatures must be applied to the side of the engine.
- Using a torque wrench, tighten each fastening bolt with a torque of 50 N.m.
- After attaching the side cover, you need to wait for the sealant to set.
- Next, install the pump and a new gasket, tightening everything with a torque of 40-50 N.m.
- We continue the assembly: install the crankshaft pulley, insert the block, and tighten the fastening bolt.
- We put the pulley on the water pump, put on all the drive belts.
- We return the pillow to its place.
- We are replacing a new gasket on the valve cover.
- Next, we install the pan and muffler in place.
- Tighten all bolts with a torque wrench according to the instructions.
During assembly, it is important to check that all marks match, otherwise the chain may break, which will lead to serious damage. This completes the replacement of the chain on the Nissan Almera H16 classic.
Loading …
Replacing the timing belt on a Nissan Almera classic: correct procedure
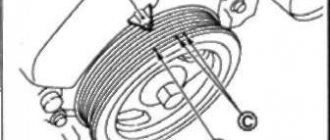
All subsequent work on the chain should be carried out with special care. The first piston is set at its upper limit - to do this, the crankshaft is rotated until the desired position is reached. The marks on the gears must also match.
The marks on the gears must match
To change belts on a Nissan Almera Classic (remove a failed chain), first all the camshaft mounting bolts are unscrewed one by one. Fixing the camshaft itself can be done using an adjustable wrench (or a special tool). All dismantling work proceeds in the following sequence:
- The top bar is removed from the damper.
- The hydraulic tensioner is removed.
- The tension bar from the damper is dismantled.
- The bottom bar should be put on a hairpin.
- Now you can remove the timing chain by prying up the lowest sample of its gear using a flat-head screwdriver.
Correct installation of new parts
If you compare the old and new chain part, you can see the stretch with the naked eye. In addition to the belt itself, the tensioner and roller are removed. The work goes like this:
- When installing a new tensioner, it is important to ensure that its protrusion fits into the groove on the engine jacket.
- The tension nut is installed, but under no circumstances is it tightened.
- Be sure to ensure that the crankshaft matches the position of the first cylinder. Visually it will look like this: its keys point upward, but it itself cannot be turned clockwise.
The first few steps of replacing a timing chain
This is how a new chain should be installed. It is put on strictly “clockwise” - this will eliminate sagging between the gears. But the crankshaft is in absolutely the same position. Now it’s time for the video:
- A new roller is installed.
- Its bolt is tightened.
- When installing the chain, the tensioner is placed so that the first flag is inside the groove itself.
- The nut is tightened.
Now you can remove the stop that holds the camshaft and start turning the crankshaft stop strictly clockwise (this loosens the spark plugs). In this case, both shafts should rotate without any effort. Is this not happening? This means the timing chain is installed incorrectly. The following indicators will indicate the correctness of the actions taken:
- The crankshaft can be easily turned with a key in a clockwise direction until the compression stroke of the first cylinder.
- In this case, the end slots of the camshafts will lie horizontally and slightly shifted downwards.
- The groove in the key gears “looks” at the top.
Stages 5 and 6 of replacing the timing chain
Replacing the belt on a Nissan Almera n16: reverse assembly
If you comply with all the above points, you can continue. Further actions will be as follows:
- Using mandrel tools specially designed for this purpose (Mot 1487-1488), new plug elements are installed into the camshafts.
- The lower cover is installed from the timing belt.
- The bolts themselves are tightened.
- Pulleys are installed in the crankshaft. For correct tightening, the setting for stroke compression must again be observed at the very first cylinder. You need to tighten it using a rod or a carbide screwdriver (if the car has a manual transmission, then simply engage the gear and press the brake).
- A new bolt is installed, which is intended for the crankshaft. Tightens and rotates 145 degrees.
- The stop SST Mot.1489 is turned out all the way.
- Now you can return the spark plugs to their “abode”. After tightening, you can connect the coils to them.
- All that remains is to install the upper timing cover and tighten the nuts and bolts.
In the question of how to change belts on a Nissan Almera Classic, it’s time to install a new automatic timing belt tensioner.
Installing a new timing tensioner Nissan Almera
The actions will depend on whether the car has air conditioning or not:
- In the first case, the torque when tightening the bolts after installing a new roller will be 21 N m (4.7 Kg-m).
- The force with which bolts are tightened in vehicles without air conditioning will be equal to 4.1 Kg-m.
Only then is the new chain installed. In this case, the tensioner will need to be turned with a suitable key.
Final chords in reverse assembly
Before completing the work, we check that the marks on the pulleys and chains match. Only after this can you continue:
- Before installing the oil pump, it is best to replace all o-rings.
- A new layer of high temperature sealing device is applied to the side of the engine.
- Use a torque wrench to tighten each mounting bolt (torque 50 Nm).
- After attaching, side work is paused to allow the sealant to set.
- A new gasket is installed, followed by the pump at a torque of 40-50 N.m.
- After the pulley is put on the pump (water), all the drive belts “return” there.
- After this, the pillow will also “move” to its legal home.
- The next step is to replace the valve cover gasket with a new one.
- The muffler and pan are installed.
- The remaining bolts can be tightened according to the instructions (it is better to use a torque wrench for this).
This is how the timing belt is replaced - cheaply and independently (the price at car services can be hundreds of dollars). In practice, nothing complicated - the main thing is to comply with the condition of the marks matching, otherwise the chain may break (and, therefore, there is a risk of engine damage). For those who need visual instructions, a video of replacing belts on a Nissan Almera N16 is provided:
Previous article: Nissan Almera windshield wipers Next article: Nissan Almera clutch bleeding
A quick way to change the chain
Replacing the chain using the pulling method occurs without removing the front cover, replacing the tensioner, or the shoes of the Almera N16 gas distribution mechanism.
This will require draining the oil and coolant, as well as removing the valve cover. The essence of the method is to rivet the old and new chains. After this, they are connected, with further pulling along all timing sprockets. To do this, you will need to rotate the crankshaft, having previously unscrewed the spark plugs.
Opening the circuit
After the end of the new chain has made a full revolution , it is disconnected from the old timing drive and fixed with the second end of the new chain . All that remains is to install the previously removed elements.
Before performing operations, you should set a mark on the crankshaft pulley, and also fix the position of the camshaft marks in order to ensure that the links do not jump when pulling a new chain.
Connecting the chain