Save article:
The article explains:
- What is an ABS light bulb and what is it for?
- Why is the ABS light on?
- Why the ABS light is on and what you should check right away
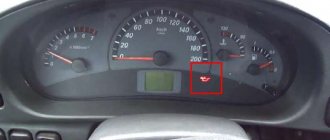
It happens that a suddenly illuminated ABS light makes some motorists shudder nervously. They believe the entire braking system has failed. The puzzled car owner begins to look on the Internet for a way out of this situation.
However, there is no need to panic. After all, the brakes may be normal, but malfunctions may occur only in the anti-lock braking system, which is not at all critical. The article discusses in detail the question of why the ABS light is on and what should be done to correct the situation.
Some reasons to disable anti-lock
The question of how to disable ABS worries motorists driving off-road. The device performed best only on smooth road surfaces. Russian road conditions are far from perfect: highways are bumpy, snowy, dirty - anti-lock is useless in such cases. Its presence, on the contrary, aggravates the situation, increasing the braking distance. No less annoying is the fact that even at low speeds the anti-lock braking system is activated.
Lada Vesta test video:
How does Vesta behave on ice using ABS and ESP?:
Cuvette test Lada Vesta with and without ESP:
Lada Vesta hill climb test:
Currently, all LADA models ( Lada XRAY , Vesta, Largus, Granta, Kalina, Priora, Niva 4×4) without exception are equipped with ABS (anti-lock braking system).
During the operation of the car, many owners notice that the ABS and ESC lamps (if this system is available) light up on the instrument panel. Let's figure out how to solve this problem and improve the design.
We advise you to read our articles
Is it possible to disconnect without consequences?
When thinking about how to disable ABS on a Grant, it is important to remember: “arbitrariness” will lead to some questions during maintenance, which will be visible to the on-board computer technicians. When contacting service during the warranty period, the fact that ABS is turned off is the reason for refusal of free repair.
How to carry out the procedure correctly?
- First, open the mounting block where the fuses are located. It is located near the battery. Sometimes you have to remove the 15-amp fuse, but the car's instructions will help clarify this issue.
- Then the ignition is turned on briefly, and it is important that the brake system and ABS lights do not go out. After the sound signal, the ignition must be turned off.
- Then comes the removal of the block with the bottom cover. The electrical wire from the fuse is cut lengthwise and its ends are stripped to about 2 cm.
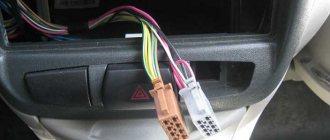
The problem of how to disable ABS can be easily solved: you will need a five-pin relay, which can be purchased at any auto store. A thorough study of the contact pattern will help carry out the procedure without negative results.
Work begins with winding contacts 86 and 85. It is necessary to connect the wire going to ground to them. The second wiring is responsible for supplying the signal. The contact marked “30” should connect to the wire coming from the fuse, while 88 should connect to the ABS. The shutdown button can be placed anywhere in the cabin.
How to repair wiring
We remove the wheel, and then the locker (for the front wheel, turning out the fastening screws) or the protective shield (for the rear wheel, turning out the two fastening nuts “10”). Press the latch and disconnect the block with wires from the ABS sensor. We inspect the connector and make sure there is no corrosion or damage. In case of damage, we restore the integrity of the wires:
We treat it with a special means for cleaning electrical contacts (for example, graphite grease) and clean the contacts from oxides. We clean the wheel speed sensor and the surface around the sensor from dirt.
Attention! Keep ABS sensors away from magnets as this may cause damage.
About temporary blocking of work
If the vehicle is used in urban infrastructure, this is not necessary. Under normal conditions, the use of technical know-how actually shortens the braking distance, allowing the driver to take control of the steering wheel in difficult situations. You can block ABS functionality for a while. If you need no time to turn off the system, you can resort to the following method.
Temporary blocking will be caused by sharply pulling the handbrake, blocking the rear wheel pair. The vehicle will stop without problems. Not everyone understands the feasibility of the device, so it’s worth understanding what ABS is on a car and whether it’s worth rushing to turn it off.
Briefly about the essence of the functioning of anti-locking
Loss of steering control is a common cause of car accidents. Activation of the brake discs occurs when the brake is pressed. Uncontrolled tire skidding leads to loss of vehicle control. The anti-lock design was invented to prevent this situation. When activated, the driver feels the brake pedal pulsate. The main thing here is to correctly use good engineering development.
Features of braking on vehicles with ABS
You can forget about intermittent, smooth braking. The driver does not need to constantly monitor wheel traction. The brake pedal must be pressed not weakly, without sparing any effort. In this case, there is no need to use the motor part. The installation prefers to work independently. In an emergency braking situation, we have to talk about simultaneously pressing the brake and clutch pedals. It is important to disconnect the engine from the transmission. You shouldn't place high hopes on electronics.
Rear wheel speed sensor
How to remove
:
- Raise the car to a height convenient for performing work. Remove the wheel.
- Unscrew screw 1, Figure 16-4, securing speed sensor 2 to rear brake shield 3 and remove the sensor (replaceable Torx T30 attachment, extension, ratchet wrench).
- Remove harness 1, Figure 16-5, of the speed sensor wires from the groove of the bracket 2 and the mounting bracket on the rear suspension arm, from the groove of the bracket 3 and the mounting bracket 4 on the body (flat-head screwdriver).
- Remove plug 5 of the speed sensor wiring harness from the hole in the rear wheel arch (flat-head screwdriver).
- Remove the rear wheel arch trim from the passenger compartment in accordance with the requirements of TI 3100.25100.2058.
- Disconnect connector 1, Figure 16-6, of the speed sensor harness from harness 2 of the rear wires and the body mounting clamp and remove the speed sensor.
How to install
:
- Insert connector 1, Figure 16-6, of the speed sensor wiring harness into the hole in the arch 3 of the rear wheel and connect it to the clamp on the body and connector 2 of the rear wiring harness.
- Install plug 5, Figure 16-5, of the speed sensor wiring harness into the hole in the rear wheel arch (flat-head screwdriver).
- Install the rear wheel arch trim on the interior side.
- Install the speed sensor 2, Figure 16-4, into the hole in the brake shield 3 and secure it with screw 1. The tightening torque of the screw is 6...7 N.m (0.6...0.7 kgf.m) (replaceable nozzle Torx T30, extension, ratchet wrench, torque wrench).
- Install harness 1, Figure 16-5, of the speed sensor wires into the groove of bracket 2 and the mounting bracket on the rear suspension arm, into the groove of bracket 3 and mounting bracket 4 on the body.
- Install the rear wheel.
About the most common causes of breakdowns
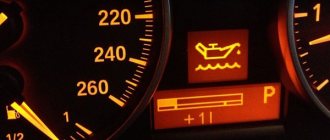
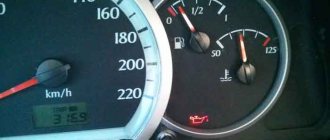
The ABS light comes on on the dashboard, extraneous noise is heard in the brake unit, the brake pedal has become too soft, which means there is a high probability of a serious malfunction. Initially, the car owner will have to make sure that there is no air in the brake system, that there is no oil leakage, and that the brake fluid level is normal. What “diseases” do you encounter at a service station?
- Wheel sensors don't want to work.
- Elements are damaged mechanically.
- The ABS pump has gone out of operating mode.
- The control unit has failed.
- This last difficulty raises many nuances.
Despite the difficulties, it is worth thinking carefully about whether disabling ABS is justified specifically for the car owner. When deciding to take such a step, you need to weigh the pros and cons and take a closer look at the driving conditions. The criteria are largely predetermined by the intricacies of the particular road along which the “steel horse” is often forced to travel.
Decoding fault codes Largus 8 and 16 valves
In the latest modifications, the instrument panels of the VAZ 21129 are practically no different. On the K4M engine, equipped with an 8-cylinder head, you can find the same errors as on the 16-valve modification of the internal combustion engine. This is due to the fact that the manufacturer uses a standard information encoding system adopted for the CIS and EU countries. Depending on the assembly and configuration of the vehicle, the diagnostic tool may display codes for additional faults associated with the installed units.
Errors Largus on methane
When driving on a gas mixture, the car’s on-board computer issues the usual codes that appear when running on gasoline.
C100F—error
The right front ABS sensor has failed. Check the sensor line and device for damage. The wiring contact group can play a role here. Oxidized parts may malfunction.
C101F— malfunctions
The general control of the front right speed sensor does not work correctly.
C10C3 - code
Critical fault of the ECU module. Check the system for damage.
ABS error C1046
A fault has been detected in the front left ABS sensor. The module may become dirty or the terminals of the wiring contact groups may be oxidized.
B2AAA—fault
Standard on-board network failure code. This means that one or more power wires have become frayed and are touching the car body.
DF124 - Largus breakdown
The engine valve clearances need to be adjusted. The car may jerk and run intermittently.
P0036 - breakdown
The oxygen sensor heater circuit after the converter is damaged. The device must be carefully diagnosed and replaced if necessary.
P0106: Largus - malfunction
The intake manifold absolute pressure sensor is reporting incorrect data. The device is not working correctly, check for dirt or damage.
P0130 - code
Error 0130 indicates a complete failure of the oxygen sensor before the converter. The problem is resolved by replacing the part.
Largus: error P0132
The same sensor – the signal is too high during operation.
P0140 - error
DK2 (oxygen sensor) loss of connection or open circuit. The line needs to be checked and, if necessary, restored.
Largus: fault P0141
Heater DK2 failed. The device needs to be replaced.
Breakdown P0133
DK1 response to changes in the load on the power plant is too slow. The sensor may malfunction due to clogging.
Malfunction P0135
DK1 heater circuit is faulty. Correcting the situation is similar to other problems.
Code P0136
DK2 signal loss. The wiring may be critically damaged or the sensor itself may have failed.
Error P0170
Problems with the fuel supply system. You need to adjust the throttle and fuel rail.
Malfunction P0171
Excessively lean fuel mixture. Check the lines for parasitic air suction and module settings.
P0300 - error
There are multiple misfires in the engine. Check the entire system and find the breakdown. The cause is faulty spark plugs.
Error P0301
A more specific representation of the problem. Misfires were noticed in the first cylinder.
P0304 - error
Likewise for the last cylinder in the row.
Error 032700
Low signal level of the knock sensor. It is necessary to diagnose and clean the part.
P0363 - Largus error
On Lada cars, the error indicates multiple misfires aimed at protecting the catalytic converter.
P0420 - error
Catalyst efficiency is below the specified limit. This indicates that the mesh is clogged or covered with carbon deposits.
Malfunction P0422
A similar problem, with the difference that the device is completely inoperable.
Breakdown 050039
Damage to the vehicle speed sensor. The system requires diagnostics.
Largus P0830 - malfunction
Broken clutch pedal switch. You need to get under the dashboard and replace the pressure sensor.
Code 1301
Code P1301 indicates misfire of the mixture to protect the converter in cylinder 1 of the power plant.
P1302 - error
Likewise for engine chamber 2.
P1303 - code
Identical problem in cylinder 3.
P1304 - code
Same as P 1301.
167013 - code
The code appears as a result of improper operation of the engine or gearbox. On Largus, this indicates a problem in the ignition system and ignition of the mixture.
P1602 error
A breakdown shows the driver that the problem is the lack of voltage on the on-board network. This is where the battery usually fails or its terminal terminals oxidize.
P2108 - malfunction
The encoding tells the driver about a breakdown of the throttle drive control system. The error is purely software and can be fixed by firmware changes.
Error P2119
The actual position of the remote control differs from the established one. The mechanical drive needs to be cleaned and its calibrations checked.
Code - 81402
The code is a designation of the Luxury car's firmware and does not indicate any breakdowns.
Engine errors on Largus
Due to the use of many sensors and gauges on a car, it will be problematic to list engine malfunctions in one heading. All of them are connected to the Check indicator on the dashboard.
Knock Sensor Errors
Largus: catalyst error
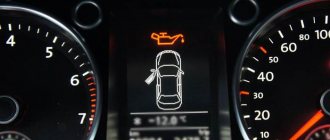
ABS error
The system indicates a power failure in one of the wheel sensors. Sensors operate in difficult conditions and are often exposed to road chemicals, dirt and dust, which negatively affects their durability.
Parking sensor errors
“Bringing to life” the control unit
Failure to operate the unit is a consequence of contact burnout, which is caused by increased voltage. The second reason that there is no contact is mechanical or chemical influence. With a thoughtful approach, repairing the ABS unit is simple. Having conveniently positioned the part on the workbench, you need to carefully open the body using a construction knife. You shouldn’t run it too deep, otherwise you can damage the electrical wires.
Having identified the break point, using a pulse soldering iron, the damaged wires are resoldered. You can use a Weller soldering station. It is not recommended to overheat the ceramic base to avoid damaging the board. A damaged board will require replacement. After this, all that remains is to assemble the block and install it back.
The problem is not always the block. Sometimes you have to change the sensors located on the rims. If you want to restore the functionality of the old device yourself, without resorting to installing a new one, it becomes necessary to rewind the coil built inside the sensor. The work of restoring the system is thankless, so it is recommended to contact service centers. This will save a lot of effort, nerves and money.
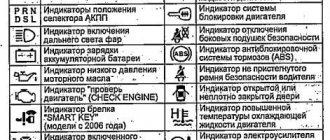
For those who don’t know what kind of animals these are: ABS and ESP.
The ABS system is an anti-lock braking system that can prevent wheel spin during braking maneuvers - this is necessary to ensure greater driving safety.
The ESP system is a solution to ensure directional stability, designed to prevent the car from skidding (the necessary wheels are braked, this is controlled by an electronic unit). By the way, ESP itself without ABS is absolutely useless, because it is, let’s say, an add-on to it.
Decoding Vesta errors related to the data bus (U)
- 0001 – pin failure at the physical level;
- 0002 – block wiring is damaged;
- 0009 – short circuit of lines touching the on-board circuit or body;
- 0073 – diagnostic output disabled;
- 0121 – there is no signal from the ABS unit;
- 0122 – ESP controller does not respond to the request;
- 0155 – open circuit of the control panel;
- 0167 – the immobilizer does not respond to the diagnostic scanner request;
- 0415 – standard error of ABS Vesta;
- 0416 – similar for the ESP system;
- 0426 – the immobilizer transmits incorrect information to the on-board computer system.
How does Vesta behave on ice using ABS and ESP?
We decided to test the Lada Vesta in the winter - it’s interesting how the operation of the above systems will behave. For testing, we chose an ice testing ground with a length of 700 m. It was important for us to find out in which cases the system would perform poorly and in which cases it would perform well. For greater stability, we equipped the sample we tested with Nokian tires.
Typically, such tests begin by turning off both systems. This is not surprising - after all, it is important for us to know how a “naked” car behaves on ice. To disable ABS+ESP, you will need to remove the voltage supply - namely, remove the fuse responsible for their operation. If you don’t pull it out, then no matter how much you poke your finger at the ESP switch off button, the on-board electronics will in any case force it to turn on at speeds over 50 km/h.
So, let's start, since good studded tires help us get off the ice. We see a turn, we try to fit into it, but at the same time we feel that the car is starting to skid. The front wheels confidently hold traction, but the rear is unstable - however, nothing critical.
An experienced driver will overcome such a small skid without any particular difficulties by pressing down on the accelerator pedal - fortunately, the test site allows this. The fact that the car drives very confidently even on icy surfaces is definitely encouraging - at the same time, the quality of control does not suffer, Vesta clearly responds to the slightest rotation of the steering wheel, turns smoothly, and does not fidget while moving in an arc.
Cuvette test Lada Vesta with and without ESP
The winter road promises many hidden dangers. Often the right side of the roadside looks like a snow-covered, flat surface. However, a very large number of motorists who, for one reason or another, have to drive onto it, annoyedly (and, alas, belatedly) end up in a real ditch, covered with a seemingly horizontal layer of snow.
Our new test of the Lada Vesta is designed to find out what advantages the ESP system provides, specifically designed to control the distribution of vehicle forces in difficult situations. For greater clarity, we decided to drive into a ditch and try to get out of it, first without the exchange rate stabilization system, and then using it.
Let's say right away that the car had to work hard. Almost in a dangling state, its two wheels balanced on the edges of the ditch - in this case, as a rule, it is almost impossible to do without outside help. But we dare to assure you that the factory electronics did not let us down. The on-board “brains” accurately dosed the injection of gasoline, allowing not only to let the car stand up straight, but also to climb onto the opposite side of the ditch, returning to the roadway.
Let us remind you that we performed all the above maneuvers with the ESP system engaged.
Next we disabled ESP. In this case, no attempts or tricks to move the car from an awkward position were successful. The wheels of the front axle only bit into the snow and ice harder and harder. In such a situation, leaving the ditch is possible only with great luck or with outside help.
The test results revealed a clear benefit provided by the ESP system on the Lada Vesta. This applies to both smooth road surfaces and roads with poor traffic. In general, the presence of an electronic stability control system will be an excellent help for both beginners and experienced drivers - after all, when they want to help you, is it worth refusing?
How to replace Grant rear brake pads without ABS
Let's look at the whole process step by step. To work you will need
- New pads (choose depending on whether the car has ABS or not);
- Keys 13: open-end and ratchet with long head;
- Wheel key;
- Head E-8;
- Head for 7;
- Screwdrivers for removing and installing springs;
- Pliers.
A long 13 socket will be needed if you are going to adjust the handbrake. It is not needed for simple pad replacement.
Delamination and severe wear of the rear pads = the handbrake does not work, noise and the car pulls to the sides when braking.
Preparing to replace pads
Getting ready to remove the brake pads. For this:
- We park the car on a flat surface
; - Remove the handbrake
and put it in neutral; - We support the wheels
with wheel chocks (you can use bricks, bars, etc.); - We pump out the brake fluid
to the MIN level - use a syringe or an enema bulb; - We remove the wheel bolts;
- We hang the rear wheel
(jack up the car) and remove it.
We support the wheels, remove the handbrake and wheel. There are Ladas with disc brakes all around. They are often changed as needed, but sometimes re-grooving the brake discs also helps. If you don’t know what to choose, ask a diagnostician for advice.
How to remove a brake drum on a Lada Granta
The drum on the Grant is removed like on any other VAZ model. To do this , unscrew the key to 7
guide pins and remove the drum.
If the drum is soured and cannot be removed, the same pins can be screwed into adjacent holes as shown in the photo - they are made for mechanical removal of the drum.
Unscrew the pins and remove the drum.
It is not recommended to knock the drum with a mallet or hammer - there is a risk of damaging it.
Replacing pads yourself
Attention
– from this moment on, you cannot press the brake pedal. Otherwise, the brake pistons will extend and removal/installation will be difficult.
Step 1
: To weaken the springs, press the pads inward. We press them out with a pry bar, focusing on the brake shield. Move the brake pads. Step 2
(based on the figure below) – remove:
- upper spring No. 5;
- expansion bar No. 6;
- lower spring No. 13;
- guide springs No. 7 (available on both pads).
At this stage we need springs 5, 13, 7 and bar 6. Step 3
: Freely remove the left block. The handbrake lever is attached to the right one - so we pull out the block itself and use pliers to remove the cotter pin securing its finger to the block. We remove the handbrake lever from the cable, remove the cotter pin and disconnect the handbrake lever from the block. Step 4
: Assembly with new pads is carried out in reverse order.
For ease of assembly: the retaining springs 7 can be put on using a thin wire or wire.
If new shoes make it difficult to put on the drum, they can also be tightened
inside using pry bars.
Lada_Vesta_9
In modern Western models, the complex of electronic driver assistants can include more than a dozen or two different systems. B-class budget employees are not yet entitled to such luxury due to their status, but in this area Vesta is ready to give a head start to its competitors. In addition to the usual set of ABS and EBD, VAZ’s new product is already equipped with an exchange rate stability system (ESC) as standard. Over the winter, I managed to study her behavior enough to give her settings the highest rating.
Firstly, it allows you to skid to your heart's content in first gear, allowing you to overcome a difficult section of the yard or an uncleared parking lot. The traction control system is in no hurry to intervene in this case - and it does the right thing. It behaves similarly when starting too quickly from a traffic light on slippery asphalt. I also like this: there is no hysterical help from electronics in situations where it is not required at all.
Secondly, the system does an excellent job of keeping the car on line when cornering. I have driven much more expensive models, where the ESC worked crudely and ingenuously: when drift appeared (we are talking about front-wheel drive), it simply “turned off” the gas pedal and then operated the brakes at its discretion. In particular, the products of the Peugeot Citroen alliance, including the Citroen C5, were guilty of this. It is a very unpleasant phenomenon when suddenly, in an emergency situation, a car deliberately deprives the driver of the ability to control the behavior of the vehicle. The right pedal was “turned on” only after a complete return to the trajectory.
Vesta does not limit you in anything and at the same time remains extremely obedient. Moreover, in response to outright provocation - pressing the accelerator when drift has already begun - the car somehow magically not only accelerates, but also “turns” its stern. Like all-wheel drive! The first time I attributed it to my own wrong feelings. But subsequent experiments (of course, not on public roads) confirmed the correctness of the impressions.
Thirdly, ESC on Vesta is disabled. If the intelligence of electronics is not enough, then a button on the center console is at your service. I used it a couple of times, also as an experiment. Even with the activated stabilization system, Vesta rows well in deep snow, but without it there is more confidence. By the way, AVTOVAZ listened to the opinion of journalists and potential buyers and, according to rumors, is going to introduce an “ESC OFF” button on the high Xray hatchback.
I note that over the past snowy winter the stabilization system never worked unexpectedly for me. I attribute this to good winter tires and the right choice of speed. But in safe places I experimented with it to my heart’s content.
What do you think, should ESC be made mandatory equipment for inexpensive models? Is there any real benefit from it, in your opinion, or is it just another way to rip off more money from the buyer?