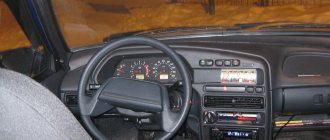
Having mastered the production of the Lada Granta in the liftback body, VAZ began supplying a standard radio (not touchscreen) in the Norma+ car configurations. Let us immediately note that the radio tape recorders intended for Kalina-2 and Granta look the same, but their mounting is different, so these devices are not interchangeable. Looking ahead, let's say that a review made by the owner of a car with a similar radio is presented on video. Now let’s talk about what exactly VAZ is offering today to owners of Kalin and Grant in the Norma+ configuration.
Standard audio preparation
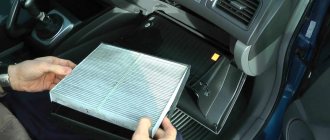
Using my station wagon as an example, I would like to write a little about the standard audio preparation of the Lada Kalina. As far as I know now, all cars, starting with the “norm” configuration, have audio preparation, which includes:
- Plugs for connecting the radio
- Wires for front speakers
- Wires for rear speakers
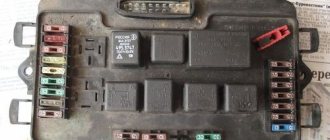
Now I will describe everything with photographs and in more detail below. So, the plugs for connecting the radio are located under the plug below the heater control unit. If you remove this plug, there will be two gray and brown connectors.
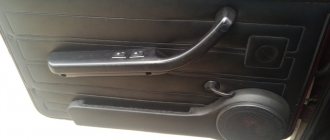
The radio is connected very simply, gray color is up, brown color is down. As for the wires in the front doors, to get to them you need to remove the front door trim. The example below shows the conclusions already in the door trim cut under the column:
But at first we had to search a little for the rear ones; on the left side the wire was quickly found, since it was located near the trunk light:
And the right one is located under the trunk trim, glued with tape to the metal of the rear arch, so you will first have to look for it with your hand under the trim or remove it altogether. Here is an example of the already routed wires:
Many potassium growers wrote that they don’t have any wires even at the “normal” level, but I was convinced of the opposite. For example, my 2011 Kalina Station Wagon. I tried to connect the rear wires to the speaker, everything works fine, the music flows. So installing music with standard audio preparation is as easy as shelling pears.
Source
Marking of wires and their connection diagram
Almost all car radio manufacturers adhere to the same standard for marking input wires:
- BAT/B+ – yellow wire to the permanent positive of the battery. When connecting, a 10-20A fuse is used;
- ACC/A+ – red wire to the ignition switch terminal;
- GROUND/GND – black wire indicating minus or ground;
- REM - blue or white-blue control wire, responsible for turning on the car amplifier or antenna;
- ILL – orange wire to the light switch terminal;
- MUTE is a yellow-black wire responsible for remote muting or completely turning off the sound. If it is not included in the kit, then there is no need to buy such a wire.
There is another connection scheme when the red wire is connected together with the red one. This allows the audio system to operate regardless of whether the ignition key is turned on or off. The only disadvantage of such a scheme is that the tape recorder will always be in standby mode, which has a detrimental effect on battery performance. Its discharge rate can increase significantly.
For the radio output, the following wires are used, going to the speakers. They always come in pairs:
- FL- and FL + – minus and plus of the rear speaker (white wires);
- FR- and FR+ – minus and plus of the front speaker (gray wires);
- RL- and RL+ – minus and plus of the left rear speaker (green wires);
- RR- and RR+ – minus and plus of the right rear speaker (purple wires).
In each pair, one wire will be plain, and the second will have a black stripe. Striped means minus. Carefully read the color scheme of your radio and follow the sequence of wires.
Tricks of audio preparation on Lada Kalina
Domestic Lada of the latest generation
Lada Kalina cars are produced from the factory in different configurations, which determines the price of the car. With a full configuration, the car has an audio system; with a standard configuration, only audio preparation is present.
Currently, it is difficult to imagine cars without additional devices: audio and video systems, air conditioning, parking sensors.
In most cases, Lada Kalina hatchback cars are equipped with a standard audio system at the factory. But cars are also produced with conventional audio preparation, which only involves connecting all the necessary wires to the audio system.
Other possible contacts
You may also encounter other markings on the product, so it will be useful to know them:
- AMP – contact responsible for turning on the power to the external amplifier;
- DATA IN/OUT – data input/output;
- LINE IN/OUT – linear input/output;
- ACP+/- – bus lines (most often used in Ford cars);
- AUDIO/R/L COM – common wire (ground), responsible for input/output for preamplifiers;
- SEC IN – additional input;
- ALARM – used to connect an alarm system (very often present in PIONEER radios);
- D2B-/D2B+ - optical communication lines.
What is audio preparation
This is equipping the car with wiring, with the help of which in the future the owner of the car will independently install the audio system chosen according to his taste and budget. The car owner installs a radio, speakers, and a subwoofer. An acoustic shelf is mounted as an alternative to standard preparation for speakers.
Such audio preparation is important for those who value high-quality sound and who care about how music sounds in the interior of their car. For those who do not want to waste money on a cheap standard audio system, but want to install high-quality musical equipment.
Preparing the door for installing the column
Audio preparation is carried out by those who prefer everything exclusive and individual. Real car audio requires a special professional approach and attention to detail. Needless to say, such high qualities cannot be achieved at a factory due to conveyor production.
Installing a high-quality audio system yourself does not always lead to excellent sound. This is all due to the fact that the interior of a car is not considered ideal for acoustics. Sound waves from the speakers are distortedly reflected from the windows and other surfaces of the car. And speakers are often installed in the wrong place, since during factory audio preparation, holes are drilled in standard, inconvenient places.
Sound reproduction is also affected by factors such as electrical interference, engine and external noise, and constant vibrations. Fortunately, now all interference can be easily eliminated and the system can be modified, you just need to know how to do it. If your own knowledge is not sufficient to install and modify the audio system, experienced car audio specialists will come to the rescue. The main requirements, after high-quality sound, remain reliability and ease of control of the system.
The ideal sound for a car enthusiast and for a music listener at home has significant differences.
The basis of a car audio system is a player, which must have certain characteristics.
- Supported media format. Ordinary audio cassettes have long since sunk into oblivion, and CDs are already outliving their last years and becoming less and less popular.
- Player output power. It varies from weak (25 watts) to strong, more than 55 watts. Moreover, the price of the system directly depends on the power.
But even the best player will not play music perfectly if it is paired with low-quality speakers. The best sound can be achieved from speakers that are optimally combined with the head unit, that is, the equipment must have the same power.
Connecting speakers
The process of connecting speakers requires special attention, so be sure to check the instructions. Usually there are plus and minus markings on the speaker terminals. Most often, the wide terminal is positive, and the narrow terminal is negative. If your car does not have such markings, use the simplest tester - a battery. Connect its + and – to the speaker terminals and if the cone moves outward, then you have determined the phasing correctly.
There is another way to determine phasing. To do this, transfer all audio to one of the front speakers and increase the volume to maximum until there is noticeable sound distortion. Balance the sound by evenly distributing the volume between the left and right speakers. If the phasing is done correctly, the overall volume will increase noticeably. If the sound does not become louder or the changes are barely noticeable, this indicates incorrect phasing and the need to swap the wires on one of the speakers. You can also check the rear speakers in the same way.
Important! Be sure to carry out a test, since if you connect incorrectly, you risk losing up to 80% of the sound quality or completely destroying the radio over time.
If your radio has low power, then it will only be equipped with positive wires for each speaker. In this case, the minus of the speakers is connected to the common minus of the audio installation.
You will know that the radio is connected incorrectly or in an “undesirable” way by the following signs:
- when parked, the battery will discharge very quickly, to such a state that it will be impossible to start the car;
- while listening to music, you will notice that the tape recorder constantly “stutters”, and when the volume increases, the car radio “turns off by itself”;
- When the power is turned off, all settings disappear.
If you notice such problems, it is better to check that all wires are connected correctly.
Nuances of installing an audio system
So, the factory audio preparation of the Lada Kalina has already determined the presence of wiring for the audio system and the places where the radio, speakers and subwoofer will be installed. What remains for the car owner to do is install the equipment. However, some audiophile drivers independently improve the car’s acoustics by performing noise and vibration insulation, altering and moving the holes for the speakers to more convenient places. Sometimes an acoustic shelf is installed and other work is done to furnish the car interior.
The car model is important. When installing a subwoofer, for example, the car body type is taken into account: hatchback, sedan or station wagon, since the Lada Kalina sedan is inconvenient for installing such equipment. In this case, the optimal places for the speakers would be a rear-mounted acoustic shelf or an armrest on the seat. This requires some changes to the interior, drilling holes and using additional materials.
In the interior of the Lada Kalina hatchback car, the bass sounds better. There is no need to install an endless acoustic screen system; the rest can be installed without problems.
Types and features of software changes
Based on their types, operating systems that control the computer brain of any device can be divided into two groups:
- Standard (stock) software made for a specific type of device by a company that develops computer programs. And installed at the factory by the car radio manufacturer under a license agreement.
- Custom or, more simply put, homemade. Made by a programmer independent of large companies/
Based on the opinion of people involved in the development and implementation of computer innovations, any program contains at least one error. It is precisely for this reason that during the operation of electronic equipment the need for its improvement arises. Which entails the emergence of new versions - firmware, standard operating system.
Before continuing on the topic - firmware for the standard radio of the Lada Kalina 2, I would like to warn owners of any brand of car about the consequences of the decision to reinstall the standard software.
Independent changes in the technical device and OS of the car radio automatically deprive you of the right to warranty service provided by the manufacturer when purchasing their equipment!
Installation of an acoustic shelf
The acoustic shelf is becoming fashionable among Russian car enthusiasts. This is due to the fact that the place where it is installed is optimal for placing the rear speakers of the car audio system.
To mount a shelf, you need to acquire materials such as a sheet of plywood, glue, a jigsaw, a drill, metal scissors, vibroplast and carpet.
Wooden shelf for speakers
First, the body panel is prepared, for which purpose the expected placement of the columns of the chosen shape is marked on a sheet of plywood and the same one is cut out of metal in accordance with the dimensions of the old car shelf. Then holes for the speakers are cut out in the metal blank. Next, the acoustic shelf is covered with vibroplast.
The next step is to cut two shelves from sheets of plywood. In the top sheet, the holes for the columns are cut one and a half centimeters larger. Next, the sheets are glued together and, after preliminary fitting, the speakers of the audio system are attached to them using self-tapping screws. To more securely attach the shelf to the car body, you can treat its lower part with macroflex.
At the last stage of work, the acoustic shelf is covered with any suitable dense material. Another important point is preventing rear window fogging. For this purpose, the acoustic shelf is additionally equipped with several fans.
For those who do not want or cannot make such a design for their car themselves, an acoustic shelf is sold at any large car dealership.
Why is an acoustic shelf installed:
- the sound quality of the speakers improves;
- there is no plastic rattling or squeaking;
- the sound becomes directional;
- the ability to hide all the wires allows you to create a more attractive and neat look for the interior;
- the acoustic shelf is more durable, which allows you to install speakers of any weight;
- You can install a subwoofer.
Return to contents
Types of procedure
New generation Kalina with full audio kit
Depending on the vehicle's configuration, audio preparation may vary.
The “Standard” package involves connecting wires only to the head unit, that is, you can only install the radio. At first glance, it appears that there are no wires on the doors, as well as for the rear of the audio system. In fact, there are wires, but only on the driver's side door, and they are not routed outside. The car owner will have to complete the wiring for the speakers on the doors himself and run the wires for the rear of the audio system.
The “Norma” package includes preparation for installing the head part of the audio system, and the wires in the doors are already completely routed. In this case, the car owner will only have to independently connect the car radio and speakers and cut a hole in the doors.
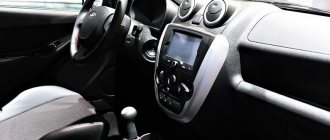
The “Lux” package differs from the previous ones in that the car already has a pre-installed audio system: a standard head unit and speakers. The radio has built-in Bluetooth, a USB connector with the ability to read information from a flash drive, a 5-inch touch display and a linear output.
Installation Features
Before starting work, you need to pay attention to the connectors of the car radio and the car. If they don't match, it's okay. Now on the market you can purchase any necessary adapter that allows you to switch from the original speakers to the generally accepted ISO standard. The best car stereo connector is ISO 10487, so if your vehicle has one, the installation process will be much easier.
Before installation, you must purchase a set of all the necessary wires to connect power and speakers. It is better to choose shorter wiring without unnecessary twists. Multicore wires with silicone insulation are considered the most reliable today. In addition, check whether you will need an adapter frame for a 2 DIN car radio.
Healthy! The diameter of the wiring should be 1.5-2 times thicker than that on the car radio connector. Experts recommend using special acoustic wires with a cross-section of 1.5-4 mm square.
After this, you can proceed to the connection.
Self-installation of a radio on a Lada Kalina
Improved car radio
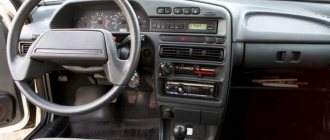
Even in the “Standard” configuration, where the audio preparation is minimal, installing the radio will not be difficult, since all the wires necessary for this are already routed into the connector. The only problem that a car owner may encounter is the order and correctness of connecting the wiring to the system itself.
The two connectors for the radio are covered with a cover, which must be removed before installing the system. One connector is for powering the radio, and the second is for running under the door speakers.
The black and pink wires are the main ones for power. It is important to know and use the correct wiring diagrams, otherwise you can simply short out all the terminals and burn the fuses. At best, you simply cannot achieve the desired sound result.
Be sure to insulate all wires connected directly. Even those wires that are not useful for connecting the radio must be insulated in order to avoid their contact and short circuit.
How to install a car radio
Installation of a car radio is most often carried out in a standard place on the front panel of the car. Otherwise, installation of the radio is done using a special mount that you can make yourself. Since 1 DIN radios are the most common, the seats have a height suitable for installing these devices. For 2 DIN sizes, additional modifications to the dashboard will be required to install a player in the car.
You should check the package contents of the device before installing the car radio to make sure you have all the necessary parts. Installation of the standard radio is done using a special frame that is included with the device. It is used to fix the radio in the car. First, the box for small items is removed, which is located in the standard place for installation. Then the metal frame is inserted.
Using the supplied special tool, pick up and bend the fixing tabs.
The next stage of installing a car radio with your own hands is securing it to the seat. Some devices have a threaded hole on the back wall. A pin is screwed into it, with which you can further secure the player. To do this, attach a special strip to the back of the dashboard.
To install a non-standard radio, you will need to check which mount is used and whether it fits the seat. If there are threaded holes on the side walls of the device, then installation of the radio on the car is carried out by screwing it to the dashboard with bolts.
Installing speakers on the door
Before installing the speakers, you need to remove the door panel and make a suitable hole in it, which must correspond to the size of the purchased speakers.
Attach the speaker to the door panel with screws by inserting it into the prepared hole. Then select the necessary wires and connect them to the speakers. As a rule, the outside of the speaker is covered with a special mesh.
Speakers from 5 to 13 cm are installed on the front doors of the car. Sometimes skilled craftsmen manage to install 16-inch speakers - this has a positive effect on the sound quality. But large speakers can create some inconvenience in the cabin, especially for the driver. They will prevent the glove compartment lid from opening or interfere with the driver while driving the vehicle.
After installing an audio system in a Lada Kalina car, you may encounter two problems.
- The radio does not turn on and there is no sound.
- A short circuit has occurred and the fuse has blown.
Both of these problems are the result of improperly connected wires. There is only one way out - carefully check all connections, following the instructions.
The question that worries many buyers of Lada Kalina cars with audio equipment without a standard radio and speakers is whether the warranty is still valid if you install the audio system yourself. The answer is pleasing: warranty service is maintained. But often dealership employees scare their customers by refusing warranty service if the audio system is not installed in their showroom. In fact, this is a standard way of extorting money from a client.
Installing an audio system justifies the money spent on it and improves the sound quality of music in the car. But you need to take into account that the equipment capabilities declared by the manufacturer may be significantly overestimated.
Source
How to properly connect a car radio
Connecting the car radio is done in several ways:
- Using an ISO connector.
- Without using chips by splicing wires.
- By directly connecting the power wires to the battery terminals.
- Via the ignition switch or a separate switch.
- Through a security alarm.
Car radio diagrams, which help with the correct connection, are printed on a label on the top cover of the device. They indicate the color marking of the wires established by the generally accepted standard:
- red - power management;
- yellow - power supply to memory and amplifier;
- black - mass;
- blue with a white stripe - power supply to the antenna with amplifier.
For reliable fixation, the wiring can be secured using cable ties.
Connection with and without chip
The first option for connecting the radio to the car is suitable if you have an ISO connector, which is built into recently released devices. If the tape recorder is equipped with a proprietary connector, then you need to purchase an adapter suitable for it, which may or may not be equipped with an additional feature. In the first case, if there is a mating part in the car wiring, the connectors are inserted into each other.
In the event that the proprietary adapter or the radio itself does not have a chip, the cable is connected by twisting or soldering the wires. The last connection option without a chip guarantees a more reliable connection. The car radio circuit determines the purpose of the wires by color and the presence of additional contacts. Some car video players have a parking line. It connects to the parking brake button. This feature allows you to watch movies in the car while the handbrake is on.
Direct to battery
This connection method is applicable for high-output radios equipped with a subwoofer, when the capacity of the ignition switch contacts becomes insufficient for reliable operation of the device. This method is also used in the case when, when passing through the “Off” position. The ignition switch de-energizes all consumers connected to it, as on domestic cars. The cable connected to the battery must have a thickness of at least 3 square meters. mm.
First, the cables are laid in the engine compartment away from hot and rotating parts. To install the wires under the dashboard of the car, use the existing hole, which, after installing the radio, is sealed to protect it from precipitation.
To connect to the battery terminals, a nut is unscrewed on each of them, after which the stripped end of the wire from the radio is inserted under the bolt, put in place and screwed.
The attachment point is treated with WD-40 to protect against corrosion.
In accordance with the connection diagram of the radio, the plus from the battery is connected to the red and yellow wires, the minus to the black. A fuse with a rating of at least 10 A is inserted into the positive wire. It provides additional protection against short circuits and overloads.
Through the ignition switch
Connecting the radio in the car through the ignition switch allows you to avoid premature battery discharge during long-term parking by disconnecting the yellow wire of the radio, which is responsible for power supply during operation of the device. The red wire of the radio is connected to a DC power source.
The yellow wire, according to the car radio connection diagram, is screwed to the ignition switch terminal, which is energized in the “Ignition on” key position. This can be determined by a control lamp. With this method, you can use the radio only when the ignition is on. Otherwise, the functionality of the device is limited to clock operation, CD ejection, etc.
Through a button instead of the ignition switch
You can also connect the radio in your car via a button. It can be used to turn off the power supply to the red wire if the audio device is not used for a long time to avoid quickly draining the battery - just like through the ignition switch. The button, which must be locked in the on position, is installed in the free space on the dashboard provided by the car manufacturer.
To connect the radio via a button, one of its terminals is connected to any wire in the on-board network that carries the “plus”, the other to the red wire of the device. For it to work, you need to press the button. When leaving the car for a long time, you should turn off the power using the toggle switch.
Speakers for viburnum, which ones to choose?
First, let's determine what size the standard speakers are in Kalina .
- The speakers in the front doors measure 13cm.
- The rear speakers on the Kalina sedan are 18cm, but you can manage to attach 17cm, or 9x6 pancakes.
- Rear speakers for Kalina station wagon 16″, you can attach other sizes, starting from 13cm.
- The rear speakers on the Kalina hatchback are installed in a shelf; the size for the “pancake” speakers is cut out as desired.
When choosing speakers for Kalina, keep in mind that the front speakers should be the main ones, and the rear ones should be secondary. Therefore, it is recommended to install 16cm instead of the standard front 13cm speakers. Learn more about which speakers to choose. Next, installing speakers in Kalina:
Front speakers Kalina
There is audio preparation in the front doors, but on new Kalinas, in the standard configuration, there is no wiring in the front doors.
Set 13cm. Speakers in the front doors of Kalina can be installed in various ways. 1) Quick and easy installation, no need to remove door trim. Just attach the ring from the speaker to the door trim and circle it with a marker. Use a sharp knife to cut a hole in the upholstery. It is worth considering that the standard audio wires are short, so it is best to install the speakers in the viburnum door with the connectors facing down, otherwise the wiring may break when the glass is released.
2) Installation of speakers through spacers. This method, together with noise insulation, gives better sound quality. You will need to remove the door trim and attach the spacer rings from the kit (or make them from plywood) in the car door.If you choose the second method, then it is recommended to consider 16cm. speakers. Depending on the model of speakers of this size, they can be installed without spacers and no modifications will be required, or you will have to cut the door iron or install spacers.
Standard sound reproduction equipment of Lada Kalina 2
As for the standard equipment of the Lada Kalina 2, the situation here is not clear-cut. Due to the fact that the manufacturer installs different types of audio systems on different models (Sport, Luxury).
It could be:
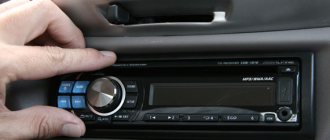
- Player with push-button control (no touch screen control).
- Double-din radio with touch controls.
- Multimedia system (MMS) with a full set of all options and functionality that meets the highest, modern requirements.
Since we are interested in the firmware of the Kalina 2 standard radio with the ability to use the navigation system, in the future we will only talk about the MMC Lada Kalina Sport.