Sometimes motorists are faced with situations where the headlights begin to shine insufficiently efficiently. Part of the road surface is not visible, or the high beam does not shine far enough, and when the low beam is turned on, it is barely possible to notice approaching objects in a timely manner.
There can be many reasons. But the main thing here is to solve the problem and restore full functionality of the lighting fixtures.
It is important to understand what is affected by correctly and efficiently working light and how dangerous it can be if the optics turn out to be faulty or simply too dim.
What does the technical regulation say?
Every vehicle operated on the territory of the Russian Federation must comply with the adopted technical regulations. It concerns many aspects of the vehicle, its design and design.
Separately, the technical regulations stipulate the requirements for the front and rear optics of the vehicle.
There are several reasons, since the car must fully comply with this technical regulation:
- good visibility on the road is ensured;
- possible accidents and collisions are prevented;
- the ability to notice the car in time in bad weather conditions increases;
- drivers in front and behind clearly understand the actions of other motorists;
- protection against glare from headlights of drivers of other cars, etc.
The technical regulations establish clear requirements regarding the color and intensity of the low beam, high beam headlights, turn signals, emergency stop signal, brake light, and so on.
It is important to comply with headlight regulations. Otherwise, violation of requirements leads to natural consequences. Usually this is a fine, as well as the need to correct the discrepancy. Without this, the car will not be allowed to operate on public roads.
It is worth saying that there are quite a lot of ways to improve the level of headlight illumination. But not all of them comply with the law and may be outside the permissible norms.
Therefore, only those methods of improving the performance of headlights will be considered that do not contradict current legislation and are also not capable of harming or creating discomfort for other road users.
Therefore, such an option as replacing halogen optics with xenon ones will not be considered. Yes, xenon has better glow quality. But at the same time, xenon optics greatly blinds drivers of oncoming cars. Even with the most correct installation.
Technical regulations prohibit the use of xenon optics for high and low beam.
A more rational solution may be to install LED headlights. But this is only allowed if the car is equipped with LED optics from the factory, but your equipment was more affordable and came standard with halogen lights.
The main task is not to install new headlights. Although in some cases there is simply no other option left. The thing is that the optics on the car usually work better from the factory. Over time, the situation changes and we have to look for solutions to restore the performance of factory headlights. We will work on this issue.
Is it possible to improve the light with your own hands?
Deterioration in performance does not always occur due to wear and tear of the headlights or their exhaustion. As a rule, you can carry out simple repairs and return the lighting quality to its original level or significantly improve it. Over time, many elements wear out or the system malfunctions, so some parts require attention.
It is very important to choose options that do not violate the law. For example, installing xenon lamps or lenses is a direct violation of traffic rules, which may result in a fine. In addition, non-standard xenon cannot be adjusted and it blinds oncoming drivers. Or the luminous flux is distributed in such a way that, at high brightness, it illuminates the road worse than a standard halogen lamp.
Ways to improve the performance of car headlights
Now directly to the question of how you can improve the low and high beam headlights on a car and what needs to be done in these situations.
Practice shows that the main directions are precisely improving the quality of light from short- and long-range headlights. There is little point in making the brake light or the same turn signals brighter.
In order to improve the performance of the low beam and the quality of the high beam headlights on the car, a number of measures can be taken. The question is what exactly caused the deterioration of the optics.
Practice shows that most often this is due to:
- glass;
- fogging of headlights;
- light bulbs;
- reflector;
- generator;
- the headlights themselves.
Depending on the specific situation, you can take certain actions. These issues should be considered separately.
Installing new headlights is a panacea, but not always
Often, having suffered fairly with poor-quality light, car owners decide to simply change the headlights to new ones. But don't think that this step will solve all your problems. For example, the problem may be due to incorrect connection of the equipment. First of all, this situation affects the quality of light from the bulbs. The lamps do not receive the required voltage and produce poor light. The following situation is quite possible:
- you select new factory-type headlights, pay a lot of money for their purchase, joyfully realize the impending improvement of headlights and solutions to problems;
- after this, the purchase is installed, all electrical contacts are connected and joyful anticipation of completely changed lighting characteristics;
- but in reality the light may remain the same, and you have not checked all the features and guesses about the operation of your car without looking at the electrical aspects;
- This is followed by disappointment and understanding of the unnecessary costs of purchasing new headlights (even for a domestic car, such costs will be quite serious).
So don’t rush into making serious investments; it’s better to try to correct the situation on your own or replace the light bulbs with more efficient ones. Most likely, you can get more efficiency from your optical equipment without purchasing new headlight sources. However, such a step is not excluded in very advanced cases. We invite you to watch a video describing methods for improving headlights with your own hands for cars older than 10 years:
Cloudy headlight glass
One of the most common solutions to improve dim low or high beam headlights is to polish the glass. If this is not possible, then you have to completely replace the glass.
Tarnished glass is a common and quite serious problem. The material becomes yellow or darkens from the inside. Usually these are indicators of malfunctions or a long service life.
If the glass has turned yellow or cloudy due to multiple scratches, you should try polishing the surface. Here you can use the following tools:
- buy a quality polish, choosing trusted brands;
- thoroughly wash the surface of the headlight glass, wipe with a dry, lint-free cloth;
- apply polishing paste in accordance with the manufacturer's instructions;
- rub the polish into the glass and observe whether any effect appears or not.
How to improve your headlights
There are several proven ways to solve the problem of bad light. Sometimes it is enough to do one of the work options, and sometimes you will have to use 2-3 methods to ensure a good effect. It is important to strictly follow the instructions, since any violations can lead to failure of the headlight or damage to electrical equipment, which will result in more expensive and complex repairs.
If the problem occurs on the road, dirt on the outside of the headlights may be to blame. You just need to wipe them down to restore the brightness. This happens when driving during precipitation, when splashes rise from the road, which, when dried on the glass, leave a coating that prevents the normal penetration of light from the light bulb.
Dried dirt worsens the light significantly.
It is worth inspecting the structure in the daytime. If dirt and dust have accumulated on the inside of the glass, you need to clean it. To do this, you have to disassemble the structure, cutting off the factory sealant. To make it come off easier, a hair dryer is used. They need to warm up section by section and carefully separate the glass from the body. If you do this without heating, you can damage the elements and then you will have to buy a new headlight.
Without heating, it will not be possible to separate the glass.
After disassembling and cleaning dust and dirt from the inside with a soap solution, you need to inspect the reflectors. If they are also dirty, you need to remove all connectors and elements from the headlight that are afraid of water and wash them. The reflector should not be rubbed; it should be washed in water with the addition of dishwashing detergent. Dip several times and shake vigorously. When the dirt is gone, rinse the body well to get rid of any remaining detergent, after which the element is left to dry completely.
If it turns out that the reflector is damaged or part of it has burned out due to constant heating, it needs to be repaired. In some cases, you can restore the element using reflective tape, special film or spray paint. If the surface is deformed, the reflector should be replaced with a new one. In this case, the main thing is to carefully remove it so as not to damage the connections on the body.
Polishing
Polishing makes the headlight almost the same as it left the factory.
Most modern headlights are made of polymer materials. Over time, the plastic becomes covered with small scratches or becomes dull from constant heating. This can have a major impact on lighting as light transmittance is reduced and the flow is not distributed correctly. The work is easy to do on your own, to improve the lighting, you need to follow simple instructions:
- Remove the headlights to ensure convenient operation. If this cannot be done, tape all the elements around so that they do not become dirty or damaged during polishing the surface. To do this, use a special masking tape for cars, which holds very well and does not leave any traces of glue after removal.
- For work it is recommended to use two compositions. One for initial processing and leveling the surface (rougher) and the second for polishing and giving the element perfect smoothness. You will also need a special polishing disc and a drill or grinder (better if it has a speed control).
- The work begins with the first paste, it is evenly distributed over the surface, after which the glass is ground. It is important to do the work carefully, without missing a single section. After drying, the element will be matte - this is normal, this is the effect that should be observed.
- The second paste is applied in the same way, polishing is carried out until the surface is perfectly smooth. It is necessary to thoroughly rub the composition until the element becomes transparent and dry. After this, you can put the headlights back in place or remove the protective covering.
By the way! After polishing, some people coat the surface with varnish to protect it. This option is not the most successful, since the varnish begins to be damaged after 1-2 years and if you polish the headlights again, you will have to spend time removing the coating, which complicates the work.
Voltage increase
The headlight power supply circuit consists of many elements and at each contact part of the voltage is lost. If in new cars this does not play a big role, then over the years the losses increase and instead of 14.2-14.4 V coming from the battery to the lamp, 11 V or even less comes. You can try cleaning all the contacts, updating the connections and treating them with a special compound to improve voltage transfer.
In older models, special attention should be paid to the steering column switch; over time, the contacts on it burn out, so often the problem with the light can be solved by replacing this element.
But the easiest and most reliable way is to install an additional relay in the low beam headlight circuit. This technique allows you to ensure normal voltage on the light bulbs and they will work with maximum efficiency. The process is not complicated:
- You can buy a ready-made kit for installation under the hood, it will cost about 1000 rubles. But you can purchase a relay, fuse and wires separately to assemble the system yourself. You will also need heat shrink tubing for this to work.
- One wire is connected to the positive on the battery and is fed through a fuse to the corresponding relay contact (the connection diagram is in the instructions for each model, it can also be found on the Internet).
- A convenient place for the relay is selected under the hood; usually it is placed near the headlights and attached to the body with a screw or small bolt. Don't just put it in a niche.
- The wire from the switch needs to be cut and connected not directly, but through a relay, this is what will ensure stable voltage on the light bulbs. The second piece from the relay is fed to the light bulb connector on the headlight and connected to the contact. All connections must be protected with heat shrink tubing of the appropriate size. For contacts, use ready-made chips, avoid twisting and using electrical tape.
The connection diagram is simple, understanding it will not be difficult.
After installing an additional relay, the brightness of the light bulbs usually increases by 15-20%, and in some cases even more.
Video example: What does an additional relay for low beam headlights provide?
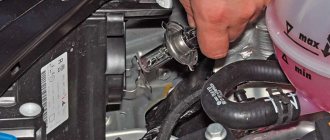
LED light bulbs
This option allows you to improve lighting without major alterations. Its essence is to replace standard halogen bulbs with LED ones. They consume little electricity, which reduces the load on electrical components; they heat up less, which extends the life of the reflector. But here it is important to remember a few tips:
- Choose LED lamps of the same design as halogen lamps. The main thing is that the light distribution matches, otherwise the light will not be reflected correctly, which can lead to dazzling oncoming drivers or ineffective lighting. It's worth reading reviews to find out which option is best for you.
- When installing, you often need to place the power supply inside; usually it is inserted into the case so that there are no unnecessary elements under the hood.
LED light is better than halogen light due to brightness and light distribution.
It is worth checking the size of the lamps; due to the radiator in the rear, they are larger and may not fit into the housing of some headlights.
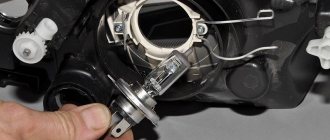
Bulbs with improved luminous efficiency
Many manufacturers have product lines with increased light output. Moreover, the difference can be from 20 to 100% and even more, it all depends on the model. This option is much better than installing lamps of higher power, since the headlight is designed for a certain heating and with constant overheating the reflector will deteriorate.
In addition, halogen versions are designed to last for 500 hours, over time the filament becomes thinner and the light deteriorates, even if the bulb is working. Therefore, a replacement may solve the problem, and the improved light output will provide light that is even better than originally.
Philips is a leader in the high luminous efficiency lamp segment.
Bulbs with a higher color temperature
If the car has conventional elements with yellow light, it is worth replacing them with lamps with white radiation. They will provide good color rendering and significantly improve visibility without much modification. And if you choose an option with improved light output, the effect will be even greater. The main thing is not to use too cold light; its temperature should not exceed 6000 K.
You should not install bi-xenon bulbs in standard lenses, as they get very hot and can melt the plastic. In this case, you should buy blocks assembled with a lens. But this solution cannot be implemented on all cars; if lenses were not installed at the factory, this is illegal and entails a fine.
Comparison of lamps with different glow temperatures.
In most cases, you can increase the brightness of the light in your car without replacing the headlights. It all depends on the nature of the malfunction and the condition of the elements. Sometimes a set of measures is required, for example, polishing the glass and replacing light bulbs or installing a relay.
Anti-fog
Sometimes the low and high beam headlights on cars begin to work worse because fogging occurs. Moreover, there are no problems with external fogging. All you have to do is go up and wipe the glass.
Much more serious is the situation with fogging from the inside. This indicates a violation of tightness and ventilation in automotive optics. And ordinary polish cannot solve the problem.
To begin with, it is recommended to remove the headlight unit, check the tightness of all elements, sealing rubber bands, etc.
Practice shows that headlights begin to sweat after microcracks and damage appear. Or these are the consequences of improper assembly of the optics, which were removed for repair or other purposes.
Another reason may be age. The rubber seals have lost their elasticity, the sealant has dried out and cracked.
First, you should try replacing the rubber bands, seals and applying a layer of new sealant, after drying the headlight from the inside. If fogging continues after this, the best solution would be to replace the headlight.
Moreover, it is important to add that when replacing one headlight, it is better to immediately replace the second one.
We polish optics
Over time, numerous micro-scratches and other damage may appear on the headlight glass, which leads to cloudy headlights. As a result, the light intensity deteriorates, and it is not possible to solve this problem simply by cleaning the headlight glass.
With such clouding of the headlights, it is necessary to replace the glass or polish the optics, which will return the glass to its original transparency. Such polishing is not particularly difficult, so every motorist can do it. This work can be done manually using fine sandpaper, or with special grinders that use working wheels of varying abrasiveness.
When performing such polishing manually, the car owner will need to purchase several sandpapers with coarse and fine grains. They begin work with coarse abrasive sandpaper, after which they move on to using fine-grained sandpaper. Such work will make it possible to remove the surface layer of glass or plastic, returning the original transparency of the optics and completely solving problems with reduced light intensity.
The problem is the power of the light bulb
A typical problem for domestic cars, as well as for some budget foreign cars. From the factory, they are equipped with light bulbs of the minimum power, which is permissible for use in accordance with the technical regulations. And such lamps usually do not differ in quality.
Consequently, their glow level is low, and their service life leaves much to be desired.
This is a case where there are no significant problems or malfunctions. But the headlights still don't shine bright enough.
The problem is solved extremely simply. You need to take a new light bulb with sufficient power that will meet the requirements of the car itself. It is better to take products from well-known brands such as Osram, Philips, Bosch and others.
You definitely shouldn’t rely on cheap Chinese light bulbs. Often the stated characteristics do not correspond to reality. Plus, they fail quickly, without using up even half of their required resource.
Installing xenon and bi-xenon
Many car owners are not satisfied with the intensity of the standard light. Indeed, in order to save money, automakers install the simplest lights on their cars, which do not provide high-quality illumination of the road at night. This problem can be solved by using xenon and bi-xenon, which can be easily installed in the basic optics of a car.
Bi-xenon and xenon provide high-quality illumination of the road surface, while the light bulbs themselves and the control units necessary for their operation are affordable. Replacing lamps is not particularly difficult. In specialized auto stores you can purchase ready-made kits of lamps and control units, the installation of which can be carried out independently.
If you doubt your abilities and have no idea about the structure of the car’s electrical network, then you can easily contact specialized workshops where you will be offered inexpensive and high-quality services. The cost of such headlight polishing today is not too high, which allows all car owners, without exception, to take advantage of the offer of specialized service stations and restore the performance of the car's head optics, without increasing the cost of operating the car.
Problem with the reflector in the headlights
Most cars have halogen headlights. Yes, now LED optics options are rapidly gaining popularity. But they are still far from halogen devices.
The design of halogen optics includes reflectors. This item has a reflective, shiny metallic finish. It is when the surface of the reflector burns out that the intensity of the headlights changes, and even powerful lamps do not provide the required level of illumination.
This happens under the influence of time. But more often the problem is associated with the installation of lamps that have a higher operating temperature than provided by standard optics. In simple words, it is impossible to install more powerful lamps in headlights that are not designed for such parameters. Otherwise, the reflector will quickly burn out.
As for restoring the reflector, this procedure can be carried out in several ways.
- Complete replacement. This is the best way out of the situation. But the difficulty is that the headlight will have to be disassembled and reassembled. Without certain skills and knowledge, an ordinary motorist will not be able to do this. Therefore, it is better to contact specialized specialists.
- Metallized tape. The idea is to cover the working surface of the reflector using metallized tape. But it is better from a trusted manufacturer. The solution is not the best. Rather, it is suitable as a temporary measure until it becomes possible to replace the reflector.
- Metal foil. Another option to improve headlight performance. An alternative to metallic tape. But the work requires increased accuracy. The foil should be laid in a perfectly even layer on the headlight reflector. Otherwise, the light will be refracted, which will negatively affect the operation of the optics.
- Chrome paint. Again, this is more of a temporary option. Even the highest quality paints do not provide the required level of reflection when applied manually. The problem is partially solved.
Mirror film. Quite a good way out of the situation. Mirror films are sold in specialized stores. You need to glue it carefully.
Installation of high power lamps
This is quite logical - the more powerful the lamps installed on the car, the better the lighting will be. But you shouldn’t change them thoughtlessly. This is not as simple as it might seem at first glance. It is imperative to take into account the optical capabilities of your car; they may be limited for such light.
In this case, there is a risk of rapid burnout of the reflector, melting of some elements and other troubles. In addition, it is worth considering the negative impact of such a stream of light on oncoming drivers.
There is also a way out: instead of devices with increased power, you can install lamps with higher light output. Of course, their cost is higher than average, but believe me, the effect is worth it! And this method is much better than the previous one.
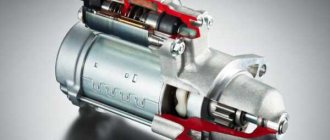
Generator
It cannot be ruled out that poor headlights on a car are due to problems with the generator. This is a device that generates electricity and powers various consumers in the car. These include car headlights.
When the driver notices that the optics are working worse, the light becomes dimmer, the awareness of the fault on the part of the electrical circuit does not immediately come.
Of course, you need to check the integrity of the wiring and contacts going to the car's headlights. Sometimes the contacts oxidize and accidental wire breaks occur. If everything is intact, then the main suspect becomes the generator.
You need to check what voltage the generator produces and whether it meets factory standards. If the generator provides insufficient voltage for the on-board network, then the headlights will not be able to shine at full power.
Here you should pay attention to the following points:
- all electrical consumers work poorly, some do not turn on at all due to lack of energy;
- the headlights do not receive the required 12 V, but only 8-9 V, which is checked by turning on the headlights with the engine stopped (if the light becomes normal, then the reason is in the generator);
- car fuel consumption increases;
- When you press the gas pedal, all devices, including optics, begin to work better and more intensely.
The latter situation is related to the fact that pressing the gas increases engine speed. And the generator is connected precisely to the motor and receives rotational energy, converted into electricity, precisely due to direct connection with the internal combustion engine.
If the generator is old or defective, then it is natural and logical to replace the device.
Remember that one of the reasons may also be the use of a standard generator, but with an increased load on it. For example, the car was equipped with powerful acoustics or several additional consumers that were not included in the factory equipment. Since the generator is not designed for such a number of energy consumers, its efficiency decreases. The unit begins to work at the limit, wears out quickly, and cannot distribute energy to all points. As a result, the headlights shine dimly.
The simplest method
Before changing, improving or improving anything, it is worth performing a few banal actions (this is especially true if the headlights used to shine perfectly, but recently the light has dimmed).
So, first of all, it’s worth checking whether the devices inside are dusty and whether the reflector is clean enough.
If the parts still need to be put in order, they are carefully removed and washed with water. Dry thoroughly before reinstalling.
Replacing the diffuser and glass in stock optics
Replacing the lens and damaged or cloudy headlight glass will solve problems with dim headlights. Such work is not particularly difficult and, with proper skill, every car owner can complete it. You just need to remove the headlights from the car, use an industrial or household hair dryer to warm up the original sealant, disassemble the optics, replace the lens, lamps and glass, and then reassemble the headlight using the sealant in the reverse order. Such work allows you to radically improve the headlights, while the costs for the car owner will be minimal.
If the contacts are damaged
So, let's say you figured out why the lamps are not working well or why one headlight is dim. This means that the problem can now be fixed.
If the headlight's contacts are loose or damaged, it may not be immediately obvious. A distinctive feature of this malfunction is that the headlights periodically begin to burn brighter. This happens, for example, after the car shakes due to hitting a bump, during a sharp turn or hitting the hood.
In such cases, the contacts temporarily change their position, clinging more tightly, and the lamps begin to work at full capacity.
However, we note that such a characteristic is only a sign, and not a way to repair lamps. In order to fix the problem, you need to fix the problem with the contacts.
The contacts may be damaged or clogged, or they may become loose. The easiest way to fix this problem is to contact a car service.
But you can also try to remove the headlights yourself, check the contact coils and, if they come off, weld them or cover them with epoxy glue.
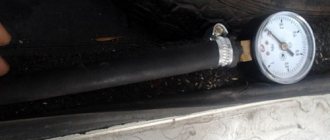
Voltage
Additionally, you need to check whether the voltage supplied to the lamps is sufficient for bright light. Low voltage can be caused not only by damaged contacts, but also by problems with the generator.
Some car owners make a grave mistake. When they realize that the reason for poor lighting lies in problems with the contacts, they change them to more powerful ones. But because of this, the contact area begins to overheat regularly.
To check the voltage level in the contacts, you need to use a multimeter. This device will help to effectively identify the section of the electrical circuit where problems arise.