Cars coming off the assembly line have strictly verified body dimensions. As a rule, no one pays much attention to this when buying a new car.
However, the need to measure and check the geometric dimensions of the VAZ 2110 body with the instruction manual may arise in the following cases:
- you buy a car second-hand and are not sure that it has not been in an accident. It is because of this that, as a rule, the geometry of the VAZ 2110 is most often violated;
- you yourself got into an accident, even ran into a stone, curb, etc., causing the car to receive a serious blow.
Basic reference dimensions of attachment points for components and assemblies
When to change the upper arm silent blocks
The service life of the upper silent blocks of the front suspension on the Niva is quite high. However, signs of wear may appear already after a mileage of 70-80 thousand km, or even earlier if the car is operated on a dirt road. The first sign of a worn silent block is a creaking and knocking sound when driving over uneven surfaces.
In the most advanced cases, a worn silent block will affect the car's handling and ability to keep a straight line; increased uneven tire wear and yaw along the road in a straight line are possible. The easiest way to determine the condition of the silent block is visually - there should be no cracks or chips on the surface of the rubber, and there should be no delamination or play.
Technical characteristics of the car
The five-door Granta model with a liftback body absorbed the best qualities of its classmates, retaining the strong body of a sedan and the large trunk volume of a hatchback. At the same time, she has a swift, dynamic appearance. To enhance the strength of the body, additional stiffening ribs were used, located between the trunk floor and the wheel arches, and the thickness of the floor and side members was also increased. The raised window line, sloping roof and new body kit, front and rear bumpers added originality to the design. Improved aerodynamics of the car made it possible to reduce hydrodynamic resistance, reduce fuel consumption and eliminate contamination of the rear window.
The Granta liftback is available in standard, classic, comfort and luxury trim levels. To designate a particular configuration, indices are added to the main model number. For example, VAZ 219110 is standard, VAZ 219170 is classic start, and so on.
The geometric dimensions of the Lada Granta liftback are shown in the figure.
The main technical and dynamic characteristics of the Grants in the liftback body are given in tables 1 and 2.
Table 1. Car parameters depending on the type of engine and gearbox
Units and parameters
Indicators
Table 2. Characteristics of the Lada Granta liftback depending on the configuration
Equipment
Number of valves
Since the release of the first batch of Lada Granta liftback, several crash tests have been carried out. The first one was made in the Czech Republic with one airbag, the result was 8.4 points out of 16. Not bad for a car in this class, considering the performance of such cars as Hyundai Solaris (8.5 points), Hyundai Accent (8.9 points), Chevrolet Lanos (8.1 points) and Fiat Albea (7.5 points). The geometric dimensions of the passenger compartment remained almost unchanged upon impact, and the driver, if this had happened, would not have received any damage other than fright.
Add a comment Cancel reply
You must be logged in to post a comment.
The 16-valve VAZ-2112 engine was at one time the most dynamic and responsive engine in the VAZ lineup, which made it both the most popular and difficult to repair and maintain. In this article we will tell you in detail about the design of this engine, its advantages and disadvantages.
Body dimensions of Lada Kalina hatchback
Rice. 1. Control dimensions of door openings. Rice. 2. Body control points in the engine compartment.
Lada Kalina, the body of which is of great interest to motorists today, is considered one of the best creations of the Togliatti plant. Kalina is not a separate model, but a whole family of Russian small-class cars produced since 2004.
VAZ (Lada) Kalina II 2022 - present Got into an accident, the body was in the trash. I want to repair it with my own hands. Tell me, where can I find the geometric (repair) body dimensions of Kalina 2, station wagon, VAZ 219410? Thanks in advance.
Lada Kalina geometric dimensions of the body. Full dimensions with descriptions and drawings. Model: VAZ 1117, 1118, 1119 Kalina.
VAZ body dimensions, body control points, body work instructions.
Tags: body geometry, geometric dimensions, car manuals, car detailing. Hi all! And just a quick correction - PLEASE DO NOT DM ME WITH QUESTIONS ABOUT
Possible sizes of VAZ Kalina bodies: VAZ Kalina (Lada Kalina) is a family of small-class cars in sedan, hatchback and station wagon bodies, which were assembled in Russia from 2004 to 2022. The model was produced in two.
Do the body control points on Kalina 2 coincide with the grant?
Kalina is not a separate model, but a whole family of Russian small-class cars produced since 2004.
Stories from our readers
“Fucking basin. "
Hi all! My name is Mikhail, now I’ll tell you a story about how I managed to exchange my two-wheeler for a 2010 Camry. It all started with the fact that I began to be wildly irritated by the breakdowns of the two-wheeler, it seemed like nothing serious was broken, but damn it, there were so many little things that really started to irritate me. This is where the idea arose that it was time to change the car to a foreign car. The choice fell on the melting Camry of the tenth years.
Yes, I had matured morally, but financially I just couldn’t handle it. I’ll say right away that I am against loans and taking a car, especially not a new one, on credit is unreasonable. My salary is 24k a month, so collecting 600-700 thousand is almost impossible for me. I started looking for different ways to make money on the Internet. You can’t imagine how many scams there are, what I haven’t tried: sports betting, network marketing, and even the volcano casino, where I successfully lost about 10 thousand ((The only direction in which it seemed to me that I could make money was currency trading on the stock exchange, they call it Forex. But when I started delving into it, I realized that it was very difficult for me. I continued to dig further and came across binary options. The essence is the same as in Forex, but it’s much easier to understand. I started reading forums, studying trading strategies. I tried it on a demo account, then opened a real account. To be honest, I didn’t manage to start earning money right away, until I understood all the mechanics of options, I lost about 3,000 rubles, but as it turned out, it was a precious experience. Now I earn 5-7 thousand rubles a day. I managed to get the car buy after half a year, but in my opinion this is a good result, and it’s not about the car, my life has changed, I naturally quit my job, I have more free time for myself and my family. You’ll laugh, but I work directly on the phone)) If If you want to change your life like me, then here’s what I advise you to do right now: 1. Register on the site 2. Practice on a Demo account (it’s free). 3. As soon as you get something on the Demo account, top up your REAL ACCOUNT and go to REAL MONEY! I also advise you to download the application to your phone, it’s much more convenient to work from your phone. Download here.
Deformed areas of panels are straightened, as a rule, manually using special tools (metal, plastic, wooden hammers and various mandrels) and devices. Straightening with heating is used for upsetting (pulling) highly stretched surfaces of panels. To prevent sudden swelling and deterioration of mechanical properties, the panels are heated to 600-650°C (cherry-red color). The diameter of the heated spot should be no more than 20-30 mm.
Additionally, you can download the electronic document in PDF format “LADA CAR BODIES, technical requirements for acceptance for repair, repair and release from repair by enterprises of the service and sales network of JSC AvtoVAZ” (Password for the archive: lada2111.ru).
In this guide you can find:
- Dimensions of openings and clearances of mating body parts of VAZ 2110, 2111, 2112 and 21123
- Engine and suspension mounting points on VAZ 2110, 2111, 2112 bodies
- Requirements for the painted surface of a repaired body
- Classification of body distortions
- and much more
By the way, the geometry of the VAZ 2110 and Priora bodies is the same. After restoring the geometry of the body, it must be painted. Read how to do it yourself.
Have you ever used the geometric dimensions of a VAZ body?
Source
The first signs of a violation
More than half of drivers do not carry out regular measurements between technological holes, even on their own after body repairs. When purchasing a car on the secondary market, you need to go to a specialized service station to check it; often information about the factory dimensions of a particular brand is not available. There is a fee for the inspection, but cost savings can result in major repairs in just a few months. Signs that the body geometry is broken:
- The doors to the cabin, the hood, and the trunk are hard to close.
- 80% of subsidence of parts is associated with deformation of the racks, and not with breakdowns in fasteners.
- At a speed of more than 80 km/h, the car “throws” from side to side, and body vibration appears. When inspecting the components, all units are working properly, there is no body vibration.
- Frequent breakdowns in the chassis are a sign of deformation of the cups and side members.
Equipment and tools
Replacing rear side members on a VAZ 2110
Repair work to replace the spar must be carried out in an equipped and spacious garage. It is necessary to prepare equipment and tools:
- welding machine or gas welding;
- rear side members complete with rear suspension;
- two jacks, hydraulic racks;
- drill;
- Bulgarian;
- chisel;
- plumber's hammer;
- disc on a grinder for stripping metal where the old part was cut.
Before starting repairs, you must remove the battery and drain all remaining gasoline from the gas tank. If possible, cover the gas tank with fireproof material. To prevent spontaneous combustion from remaining gasoline vapors in the gas tank. Since the repair will be carried out using a power tool that produces a spark.
VAZ body geometry, fret control points, VAZ body dimensions
This section shows the body dimensions of the VAZ, provides drawings, shows the geometric distances between control points, a table with the geometric dimensions of the openings of LADA/Zhiguli cars, provides data for checking the geometry of door, window and other openings, control dimensions of the VAZ and standards for adjusting the camber/toe.
The most well-known way to determine the quality of the load-bearing part of a car is to measure the distances between control points and compare them with factory parameters. More detailed information about the magnitude of measurements and the location of control points can be obtained by selecting the appropriate model.
Typically the geometry of the following body elements is checked:
1) Diagonals. Before measuring body dimensions using reference points, you can take just two measurements that will help clarify the picture. Drive the car onto an overpass or pit and use a tape measure from below to measure the body diagonally. The diagonals must match.
2) Racks. You definitely need to check the racks. At the beginning - from the unbroken side of the body (if such is known), then - from the bat. In principle, in this case you can choose any body points (the main thing is the same data on both sides). For example, from the pillar to the edge of the bend on the rear doors. Also on the front ones. If the data matches, great. Let's move on;
3) Roof. To make sure that the car’s roof does not “sag”, you need to measure the door diagonals - from the lower rear corner diagonally to the upper front corner. Naturally, the result on both sides should be the same. In addition to this, it is advisable to measure the diagonals of the roof itself;
4) Front and rear glass. For some reason, many people believe that if the windshield “fits” normally, then control measurements are not needed, they say, the geometry of the VAZ body is fine. This is mistake. You need to measure - moreover, diagonally, and choosing points at the same distance on both sides.
5) Visual inspection of a stationary vehicle from all sides
Particular attention should be paid to gaps. On VAZ cars they are quite noticeable
But the main thing is that the gap sizes must be the same on both sides of the machine.
Factory dimensions
All linear dimensions of the VAZ 2110 body can be found by looking through the instruction book or rummaging around on the Internet.
But the main dimensions are:
Length:
- if we take the end points of the front and rear bumpers, then here we have 4265 mm;
- length between the centers of the front and rear wheels, the so-called. wheelbase is 2492 mm;
- from the center of the front wheel to the extreme point of the front bumper - 829 mm;
- from the center of the rear wheel to the end point of the rear bumper - 944 mm.
The details of dismantling the bumper on a VAZ 2110-2112 can be found in this material:
The height of VAZ 2110 is 1420 mm.
Factory dimensions for length and width
Width:
- in front at the extreme points of the “factory” mirrors – 1875;
- front excluding mirrors (purely hardware) – 1680 mm;
- distance between the centers of the front wheels – 1400 mm;
- the rear of the car has a width between wheel centers of 1370 mm.
How to determine spring stiffness
The manufacturer applies markings to the suspension springs that correspond to four stiffness groups:
| Group number | Load, kN (kgf) | Number of marks |
| I | 5,83..5,93 (595..605) | One risk |
| II | 5,93..6,03 (605..615) | Two risks |
| III | 6,03..6,13 (615..625) | Three risks |
| IV | 5,73..5,83 (585..595) | Four risks |
There is also a color coding for springs:
| Car make, VAZ | Spring color | Marking color | |
| Class A (standard, rigid) | Class B (soft) | ||
| Front | |||
| 2101 | Black | Green | Yellow |
| 2101 lane step | Metallic blue | Green | Yellow |
| 2108 | Black | Green | Yellow |
| 2110 | Black | Green | Yellow |
| 2108 per. step | Metallic blue | Green | Yellow |
| 2121 | Black | No markings | White |
| 1111 | Black | Green | White |
| 2112 | Black | No markings | White |
| 2123 | Black | No markings | White |
| Rear | |||
| 2101 | White | Green | Yellow |
| 2101 lane step | Metallic blue | Green | Yellow |
| 2102 | White | Blue | Red |
| 2102 lane step | Metallic blue | Green | Yellow |
| 2108 | White | Green | Yellow |
| 2108 per. step | Metallic blue | Green | Yellow |
| 21099 | White | Blue | Red |
| 2121 | White | Black | No markings |
| 2121 per. step | Metallic blue | Green | Yellow |
| 2110 | White | Black | No markings |
| 2110 per. step | Metallic blue | Green | Yellow |
| 2123 | White | Black | No markings |
| 2111 | White | Blue | Orange |
| 1111 | White | Green | No markings |
It is recommended to install springs of the same class in the front and rear suspension. In some cases, it is allowed to install class A springs forward and class B springs backward, but not vice versa. If you often have to transport heavy loads in the trunk, you can install reinforced springs (more rigid) back.
Important! They need to be selected in pairs based on stiffness for the front and rear suspension. This wish accounts for 95% of all requirements for springs
↑ Salon VAZ-2110
↑ Features of seats and possible equipment
The front seats are separate, with adjustable longitudinal movement and backrest tilt. Headrests are removable and height adjustable. The rear seat has a one-piece folding cushion. The backrest is divided into two parts by a folding armrest. Behind the armrest there is a hatch with a lid. By folding the armrest and lid, you can transport long items in the trunk, partially placing them in the cabin. The front and rear outboard seats are equipped with seat belts with inertia reels, while the middle seat has only a lap belt.
Reasons for violation
The correct distance between all specific technological holes on the car body is called body geometry. The distance is determined by the manufacturer. Its constancy ensures optimal operation of all components and assemblies of the vehicle installed on the body. Check locations:
- Diagonal of doorways.
- The distance between the support points of the body to which the engine and chassis are attached.
- Diagonal between spars and cups.
- Diagonal of the hood, luggage compartment.
- Distance between reference point on roof and front bumper.
Any damage to the vehicle, annual operation leads to a violation of the geometry of the body. The distances change, deforming the size of the wheelbase, displacing internal parts.
The geometry is violated in the following cases:
- Accident. Sometimes it is enough to hit the fence with the bumper.
- Frequent driving over potholes, crossing railway tracks at high speed.
- Factory defects - bolts not tightened tightly enough.
In the last two cases, 70% of the load is taken by the car's suspension, but the driver is faced with such problems as stretched springs and broken shock absorbers. In this case, the body geometry changes gradually.
After an accident, the body bears 100% of the load, the geometry changes instantly, it is necessary to carry out diagnostics on a slipway in a service station or with a level (possibly in a garage).
Editing a damaged body
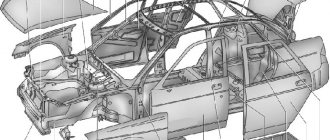
It will not be a secret to anyone that in any accident, it is the body of the car that suffers the most. Since damage can be very different, VAZ 2110 body repairs are carried out in different ways. But there is one thing in common in this matter: it all comes down to checking the geometry of the attachment points of units and groups of cars. The image below shows these points with all the main dimensions.
X, Y, Z – main axes;
- upper radiator support;
- front suspension cross member to radiator frame;
- front suspension arms;
- right power unit support;
- left power unit support;
- base points;
- upper suspension rod of the power unit;
- base holes;
- rear suspension of the power unit;
- Transmission;
- brake regulator;
- rear suspension arm;
- upper mounting points for rear suspension struts;
- base holes
When repairing the body of a VAZ 2110, try not to use heat treatment, as this can protect the body from corrosion and try not to tear the factory seams. If the damage to the body is quite complex, it is worth removing all facing materials to make it easier to take measurements and installing hydraulic or screw jacks, which will eliminate unevenness in the body.
Body repair Lada Largus. Geometric dimensions of the Lada Largus body
| Openings | front side doors | ||
| Symbol | Name | 0 holes, mm | |
| ,Ah, a | Joint between A-pillar and roof panel | ||
| in,b | Joint between A-pillar and hood panel | ||
| With, with | Front side door hinge nut | 8 | |
| D, d | Front side door hinge nut | 8 | |
| Her | Assembly mark of the front pillar, | ||
| F, f | A-pillar assembly mark | ||
| G, g | Door threshold assembly mark | ||
| H, h | Door threshold assembly mark | ||
| L i | Roof panel assembly mark | ||
| ■J. j | B-pillar assembly mark | ||
| K, k | B-pillar assembly mark | ||
| UI | Rear side door hinge mounting hole | 13 | |
| M,m | Rear side door hinge mounting hole | 13 | |
| Symbols | Distance, mm | Symbol | Distance, im |
| Ee | 1,172 | E-f or e-F | 1,487 |
| Ff | 1,406 | E - h or e - N | 1,555 |
| Gg | -1,444 | E-j or e-J | 1,337 |
| Hh | 1,444 | Fj^nf-J | 1,740 |
| 1-i | 1,062; | F-kilig-K | 1,648 |
| JJ | 1,266 | H-i or h -1 | 1,594 |
| Kk | 1,426 | —J-knnnj-K" | 1,442 |
xn--44-6kchdmw3bgiawoo4b.xn--p1ai
How to restore geometry
Restoring geometry in the garage comes down to straightening the body elements and tightening all the bolts, if the car was not involved in an accident. The measurements between the technological holes are checked with a tape measure. If the geometry is slightly damaged due to long-term use, it is recommended to check all body fasteners and welds.
It is almost impossible to thoroughly restore the body after an accident on your own, without special equipment. Even if measurements are taken with millimeter accuracy, it is often impossible to align body elements; it is necessary to replace them with new ones. If the frame is deformed, you will need to install the car on a stand and carry out stretching.
Subtleties of body repair
Body repairs are most often carried out after an accident, but also if some parts are rusty. But you should still try to avoid welding and other work that involves thermal heating of the metal.
Small scratches and chips can become a source of corrosion in the future. In order to avoid this, it is best to tint small defects. Details: https://vazweb.ru/desyatka/obschee/kak-podkrasit-skolyi-na-mashine-samomu.html
If possible, try not to remove bezels. This can also lead to changes in body geometry. And after any repair work related to the body, be sure to check its linear dimensions.
Source
The first signs of a violation
More than half of drivers do not carry out regular measurements between technological holes, even on their own after body repairs. When purchasing a car on the secondary market, you need to go to a specialized service station to check it; often information about the factory dimensions of a particular brand is not available. There is a fee for the inspection, but cost savings can result in major repairs in just a few months. Signs that the body geometry is broken:
- The doors to the cabin, the hood, and the trunk are hard to close.
- 80% of subsidence of parts is associated with deformation of the racks, and not with breakdowns in fasteners.
- At a speed of more than 80 km/h, the car “throws” from side to side, and body vibration appears. When inspecting the components, all units are working properly, there is no body vibration.
- Frequent breakdowns in the chassis are a sign of deformation of the cups and side members.
Grounds for inspection
Nowadays, a body geometry check is most often carried out before purchasing a used car. This procedure helps the buyer determine whether the car has been in an accident, how it was repaired, and how it was generally used.
Less often, measurements are taken between body control points to determine the quality of body repairs carried out by specialists. Often, after restoration work, the owner does not pay much attention to this issue. It looks beautiful, and that's good. But in vain: after an accident, not every body can be restored by simply returning the geometry by pulling parts back. Some parts require replacement, some are cold drawn, others are heated. And if you do not attach importance to this, then you can soon pay seriously for it.
The most responsible car owners regularly measure the distances between body control points. Some experts recommend doing this at least once a year. The fastest service stations recommend carrying out these measurements twice a year.
Perhaps they are right, if we take into account the state of the modern road surface
Body parts most susceptible to deformation
Sharp braking or untimely start provoke, first of all, damage to the bumper. If it is insignificant, then during repairs it is possible to achieve the performance of standard geometry. In the presence of complex deformations, this cannot be done, so it is easier to replace the damaged body part with a new one.
If the owner of the car does not take enough care of the condition of the body, then those parts that have close contact with the road surface are quickly eaten away by corrosion. And repairing the hood, doors and hidden body parts instead of timely prevention is already more difficult and expensive.
Step-by-step construction instructions
The construction of any home-made structures begins with the design stage. You need to make a slipway that is convenient to use
It is important that it does not take up too much space, blocking free movement
Drawings and dimensions
First you need to make suitable drawings. Ready-made options can be found below. The markings are made according to the dimensions of the vehicle. Afterwards the stage of preparation and selection of tools and materials begins. We will also need to make a mounting system large enough to fit our vehicle. It would be nice to cook it with the ability to change the height.
- Once all the drawings are ready and the materials have been selected, you can start working. First you will have to remove moisture from the materials and coat them with a primer. You can paint them right away, or you can leave this step for last.
- Now weld the metal corners to the base profile.
- Weld the profile (this will be the stand). It is secured with bolts.
- Now the chains, hooks and retractable devices are welded.
Frame making
The frame is responsible for fixing the car. Therefore, you need to be careful when creating it.
- Before creating the frame, you need to create the outer frame. It is to this that the frame will be mounted.
- A metal profile is suitable as a material. A stand and grips are attached to it (they are needed to fix the car threshold).
- Now the thresholds are being made. They are created from metal corners.
- Thresholds are installed on beams and secured with bolts.
- After installation, all elements will have to be secured by welding.
Fastening the body to the slipway
Clamps are required for fastening. If you can't buy them, make your own. You will need railway platforms (what the rails are attached to the sleepers). Each of the platforms is cut in half, and metal is welded onto the inside. It is cut into diamonds using a grinder.
You don't need to do anything to the outside. A plate 4 millimeters thick is also welded to the inside. It is important that the clamping device fixes the threshold and does not bend during use.
Installation of rack and pulling devices
Factory hydraulic attachments are suitable for racks and devices. If they cannot be purchased, a homemade mechanism will do. The power of the device should be from 1 to 2 tons. To attach the pulling devices, you need a pad. It is made from a channel and installed in the frame of the slipway. To place the tightening mechanism and chains in any place, it is necessary to make holes in the frame along the entire slipway.
Description of design
Front suspension
| 1 – ball joint 2 – hub 3 – brake disc 4 – protective cover 5 – swing arm 6 – lower support cup 7 – suspension spring 8 – telescopic strut protective cover 9 – compression buffer 10 – upper support cup 11 – upper support bearing 12 – upper rack support | 13 – rod nut 14 – rod 15 – compression buffer support 16 – telescopic stand 17 – nut 18 – eccentric bolt 19 – steering knuckle 20 – front wheel drive shaft 21 – joint protective cover 22 – outer shaft joint 23 – lower arm |
The front suspension is independent with telescopic hydraulic shock absorbers, coil springs, lower wishbones with braces and a stabilizer bar. The basis of the suspension is a telescopic hydraulic shock absorber strut 16. Its lower part is connected to the steering knuckle 19 with two bolts. The upper bolt 18, passing through the hole in the rack bracket, has an eccentric collar and an eccentric washer. By turning this bolt, the camber of the front wheel is adjusted. The telescopic strut is equipped with: a coil spring 7, a polyurethane foam compression stroke buffer 9, as well as an upper strut support 12 assembled with a bearing 11.
Front suspension (bottom view)
| 1 – suspension arm extension 2 – anti-roll bar 3 – suspension arm |
The upper support is secured with three self-locking nuts to the body mudguard strut. Due to its elasticity, the support allows the strut to swing during suspension movements and dampens high-frequency vibrations of the body. A bearing pressed into it allows the rack to turn along with the steered wheels.
Parts of a telescopic hydraulic shock absorber are mounted in the strut housing. If it fails, you can install a cartridge in the rack housing. Please note that the strut body of the VAZ-2110 is slightly shorter than that of the VAZ-2108, so using a cartridge that looks similar from the VAZ-2108 is impossible.
The lower part of the steering knuckle 19 is connected to the lower suspension arm 23 through a ball joint 1. The support is secured with two “blind” bolts (the hole in the steering knuckle is not through). When unscrewing these bolts, be careful: with significant force they often break, so before disassembling, tap their heads in the axial direction.
Braking and traction forces when the car is moving are perceived by longitudinal braces connected through silent blocks to the lower arms and the front suspension beam. At the connection points (at both ends of the brace) washers are installed to adjust the longitudinal inclination of the turning axis.
A double-row angular contact ball bearing of a closed type is secured in the steering knuckle with two retaining rings. The wheel hub is installed in the inner rings with tension. The bearing is tightened with a nut on the shank of the outer wheel drive joint housing and is not adjusted during operation. The wheel hub nuts are the same, with right-hand threads.
The anti-roll bar is a spring steel bar. In its middle part there is a bend to accommodate the exhaust pipe. The ends of the stabilizer are connected to the lower suspension arms through struts with rubber and rubber-metal hinges. The rod in its middle part is attached to the body with brackets through rubber pads.
| » previous page 12. Front suspension | next page « 12.2. Front wheel alignment angles |
Station wagon version
The Kalina station wagon is, in fact, a full-fledged class B hatchback. AvtoVAZ is also produced. Sales of the model began in 2007, although orders were received based on individual requests long before that.
The versatility of this version is the main advantage of the hatchback over others. Sufficient maneuverability, despite its large size, and enviable dynamics for confident passage of city and country roads cannot leave the buyer indifferent.
The Kalina station wagon also has good cross-country ability. This makes the car popular among a wide range of car enthusiasts. So, with this station wagon you can safely go into nature, outside the city, even if there are very rough roads along the way.
As for the flat track, there is nothing to blame the car for here either. Handling is excellent, the car handles well, long trips are not tiring.
Kalina station wagon is practically unpretentious in terms of operating conditions and maintenance.
Control dimensions of the VAZ body
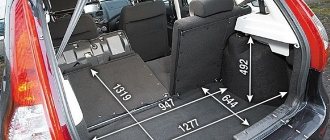
The salon is thought out to the smallest detail. Everything is done competently so that the driver and passengers feel comfortable. Five people can easily fit inside, and there is still room for luggage.
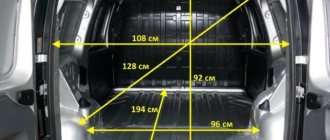
The cargo compartment is generally a separate matter. It holds all 380 liters of volume, and if you fold the back, the trunk can be transformed into a carrier.
Lada Kalina body dimensions
The length of the station wagon body is 428 cm, the height without roof rails is 146 cm, and the width from one edge of the front wheels to the other is 168 cm. Now let’s compare it with a hatchback: the 1st indicator of the latter is 20 cm shorter, the 2nd indicator is 4 cm higher , and the 3rd indicator is 2 cm wider.
Getting to know the “twelve”
ATTENTION! A completely simple way to reduce fuel consumption has been found! Don't believe me? An auto mechanic with 15 years of experience also didn’t believe it until he tried it. And now he saves 35,000 rubles a year on gasoline! Read more"
The VAZ 2112 or “two-piece” car was produced, like its analogues, at the Volzhsky Automobile Plant. It is a 5-door hatchback body, reminiscent of the VAZ 2110 sedan in shape.
Production of the “twelve” began in the 99th year of the last century. The car body was copied from the VAZ 2110, but shortened to 4170 mm. The volume of the luggage compartment is 400 liters. Due to the shortening of the body, the car, compared to the “ten”, began to respond better to turning the steering wheel.
And in general, the model has a sportier character than the VAZ 2110. Combining all the advantages of the “ten”, the VAZ 2112 is also equipped with the rear seat of the 2111 station wagon.
The clear improvements over previous models are as follows:
- Despite the small length of the body, you can increase the small volume of the hatchback by transforming the rear seat;
- Better handling, especially when entering corners.
Like most VAZ models, the “dvenashka” was produced in several modifications and designs. In particular, we note the VAZ 21123 in the coupe body type. This modification even went through 3 body restylings and initially had a unique, original hood and bumper. Subsequently, the model was equipped with a grille and a standard hood.
Body features and the importance of geometric dimensions
In general, the “dvenashka” model is almost the most popular car in the domestic automobile industry, it is cheap and has a good design and a wide variety of body styles.
When developing this model, the manufacturer took into account many factors, including compliance with the individual tastes of each customer. In this regard, several body versions of the VAZ 2112 were produced, each of which had different targets.
Coupe, station wagon, sedan, hatchback - the “two-piece” was equipped with all these body types. The coupe is more correctly called a 3-door hatchback. This is the most rarely seen modification of the VAZ 2112. Its sporty design distinguishes it from other versions of the family, which are generally made quite monotonously.
Experts believe that the VAZ 2112 coupe has the right to be called the best in terms of body design features and design. In total, about 10 thousand cars of this type were produced, after which production was discontinued.
Dimensions and dimensions also, along with the type of body structure, play a big role in convenience for passengers and good handling. Some modifications of the VAZ 2112 were even equipped with a sunroof, which increases the ease of use of the car.
So, here are the body dimensions of the VAZ 2112:
- Body – hatchback;
- Length, mm – 4170;
- Height, mm – 1435;
- Width without rear view mirrors, mm – 1680;
- Width with rear view mirrors, mm – 1875.
They, as we see from the table, better meet modern requirements and help the machine cope with a greater number of functions. The good spaciousness of the interior and trunk of the “two-wheeler” is a clear confirmation of this. Passengers feel very comfortable inside; the car can carry a lot of cargo if you are planning a long-distance family trip.
Features of the bodies of “Ladovo” models
Since we started with QOL, let’s continue this topic. For the frame of Ladovsky models without glued glass, the quality of life is 14 thousand N*m/degree, which is a very good mark. And with glass this figure is even higher.
The testing of the Lada body in the rear turned out to be especially good. Thus, in the rear door opening, after a tough diagonal pressure test, the changes were recorded as only 1.5 mm, whereas on most foreign cars the same figure was 5-6 mm.
The body design of the Lada Largus and other similar models fundamentally complies with current European standards in terms of protecting passengers and the driver. The front subframe on Ladovsky models is one of the most important body elements responsible for this indicator. It is even considered an auxiliary spar, significantly increasing the strength of the body, as well as absorbing impact force.
VAZ overall body dimensions
The high quality of life of the Ladovsky body also has a beneficial effect on obtaining high-quality sound comfort in a car showroom. The frame does not twist over bumps and bumps, no deformations or anomalies occur between the interior and body elements, which ultimately has a positive effect on the absence of squeaks.
Note. Of course, in addition to the quality of life indicator, the quality of interior elements also affects the high level of sound comfort. They were obtained through proper calculation so as not to come into contact with the body in places where squeaking might occur. This was achieved by fixing the plastic components with special fasteners and minimizing the various gaps that arise one way or another between them and the body.
VAZ 2113 body dimensions
A lot of original parts, interchangeability of interior elements between Ladovsky models, enlargement of some parts of the body - all this was only a plus. In particular, the increase in some body elements led to a decrease in their number, which reduced production time and had a positive effect on performance.
Some tips for underbody repair
- When preparing the iron for patches, it is necessary to take into account its thickness - metal that is too thin will be brittle, and a thick sheet will not weld well and is more difficult to work with.
- Although electric welding is cheaper to use, it is better to weld metal with a semi-automatic one - it is easier to use, and the welding is smoother and more accurate.
- When cutting metal parts and installing patches, the part being installed must fit exactly.
- When replacing the bottom, the weld bead cannot be continuous, since it has high rigidity, and insufficient elasticity negatively affects the strength of the body.
And if you undertake body repairs with your own hands, you should be patient, careful, deliberate, carry out all the necessary operations, without saving time and effort when processing the metal, and clean it of rust. Poor preparation and poor anti-corrosion treatment lead to the rapid appearance of corrosion, which negatively affects the service life of body elements.
Identification of violations
Checking body geometry is a fairly simple matter. It is usually necessary when purchasing a used car or when checking the results of a body repair.
- First you need to open and close all the doors, the hood and the trunk lid one by one. However, you don’t have to put in a lot of effort. If the doors do not close tightly the first time, it means the pillars are bent. If the hood and trunk lid do not close the first time, it means the side members are bent. The deformation may amount to millimeters, but this is already a reason for making claims or bargaining, since the damaged body geometry reduces passive safety.
- Next, you need to squat down and look along the side of the car. In this position, you will immediately notice all the irregularities and increased gaps.
- Next, you should inspect the windshield and rear window for cracks. Vertical cracks located on one side indicate displacement of the racks.
- You can check whether the geometry of the chassis is broken using measurements. To do this, you need to have a tape measure and know the exact dimensions of the wheelbase.
If for some reason you cannot measure the chassis geometry, try to find a smooth, straight road without heavy traffic. Accelerate it to a speed of 50 kilometers per hour and release the steering wheel for a couple of moments. If after this the car moves to the right or left, it means that it was hit in that direction. If the car continues to move in a straight line, increase the speed to 90 kilometers per hour and repeat the experiment.
Be extremely careful! If the car continues to move straight even at high speed, then the geometry of the chassis is normal. This does not mean that the car was not damaged; perhaps it was simply well repaired. Before carrying out the experiment, make sure that the pressure in the right and left tires is symmetrical.
see also
Comments 18
I also need sizes to check, so which ones to use!
I made it approximately according to my measurements
You probably haven’t been here for a long time) I’ve already done and sold the car! I won’t edit the blog anyway!
Yes, I already made mine too. But this recording will still be useful to someone
Wow, I should try to measure it)
Didn't take any measurements? Otherwise, in just a week I’ll go on vacation, and I’ll start doing shamanism a little
Not yet, I won’t get around to it, but I’ll definitely write back if I intend to)
I would be very grateful 
Vitaly Kakhovka on YouTube did the 10th family in the video everything is there
Thank you. Let's take a look too
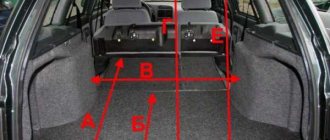
A1=119.5 A2=119.5 B=127 B1=46 B2=46 D1=49.5 D2=49.5 D=96))) my TV is further welded
Thanks Slav. We will still wait for at least a couple of measurements to choose the “golden mean”, so to speak.
Thank you for your quick help in measurements pandaaaaaaaaaaa And so here are his measurements: A1=118.5 A2=118.5 B=127 B1=44 C2=44 D1=48.5 D2=48.5 D=95.5 Thanks to him It seems that the dots are not seriously gone, ± 0.5 cm
Thanks for the sizes, I couldn't find them anywhere. According to these dimensions, they are one to one ±5 mm (as they measured with a tape measure) But between the glasses (shock absorber rod), according to the book there should be 1103 mm, but for me it is 1003 mm. I don’t understand how this happens((
I won't even give you a hint.
Thank you for your quick help in measurements pandaaaaaaaaaaa And so here are his measurements: A1=118.5 A2=118.5 B=127 B1=44 C2=44 D1=48.5 D2=48.5 D=95.5 Thanks to him It seems that the dots are not seriously gone, ± 0.5 cm
Is this the exact size?
Depends on what. You can choose a middle ground. There is generally little information about the VAZ-2110
I'll write first. My sizes may differ radically from yours, since I measured the points as I currently have them. And so: A: I couldn’t measure it because of the installed 3 liter receiver. B: 126.5 cm. B: left - 45 cm, right - 45 cm. (right and left, as look at the picture) D: L - 48 cm, R - 48.5 cm. D: 95.5 see. Feel free to write measurements, I really need them. It took me a maximum of 1 minute of my time. Thanks everyone for your help
Cars coming off the assembly line have strictly verified body dimensions. As a rule, no one pays much attention to this when buying a new car.
However, the need to measure and check the geometric dimensions of the VAZ 2110 body with the instruction manual may arise in the following cases:
- you buy a car second-hand and are not sure that it has not been in an accident. It is because of this that, as a rule, the geometry of the VAZ 2110 is most often violated;
- you yourself got into an accident, even ran into a stone, curb, etc., causing the car to receive a serious blow.
Reasons for violation
The correct distance between all specific technological holes on the car body is called body geometry. The distance is determined by the manufacturer. Its constancy ensures optimal operation of all components and assemblies of the vehicle installed on the body. Check locations:
- Diagonal of doorways.
- The distance between the support points of the body to which the engine and chassis are attached.
- Diagonal between spars and cups.
- Diagonal of the hood, luggage compartment.
- Distance between reference point on roof and front bumper.
Any damage to the vehicle, annual operation leads to a violation of the geometry of the body. The distances change, deforming the size of the wheelbase, displacing internal parts.
The geometry is violated in the following cases:
- Accident. Sometimes it is enough to hit the fence with the bumper.
- Frequent driving over potholes, crossing railway tracks at high speed.
- Factory defects - bolts not tightened tightly enough.
In the last two cases, 70% of the load is taken by the car's suspension, but the driver is faced with such problems as stretched springs and broken shock absorbers. In this case, the body geometry changes gradually.
After an accident, the body bears 100% of the load, the geometry changes instantly, it is necessary to carry out diagnostics on a slipway in a service station or with a level (possibly in a garage).
Body geometry and its diagnostics
ATTENTION! A completely simple way to reduce fuel consumption has been found! Don't believe me? An auto mechanic with 15 years of experience also didn’t believe it until he tried it. And now he saves 35,000 rubles a year on gasoline! Read more"
The most important components of body geometry are called control points. It is the knowledge of their location and the ability to correctly measure the distances between them that determines the structure of checking the body for deformation. You can learn more about control points from the technical documentation for each car model.
After identifying damage, the integrity of the body is usually restored in special workshops. Experienced straighteners bring the body back to normal in the shortest possible time, if only the deformations are of moderate or minor severity. A body that has been in a serious accident and has received a lot of deformation is usually easier to replace with a new one.
What deformations can occur on the VAZ 2110?
The “Ten” involved in the accident will have certain deviations from the standard positions marked at the factory. And destruction in this case means the following:
- Deviations in terms of the standard wheel arrangement, as evidenced by poor vehicle stability and increased tire wear;
- The diagonals, again, standardly installed at the factory, are violated. Doorways, pillars and other areas of the body, one way or another, associated with the impact zone are especially often affected.
In most cases, the destruction of functional elements is associated with the appearance of folds in the floor or other components of the body. In addition, external impacts cause a significant increase in the part in areas far from the point of impact.
Note. Such structurally weak areas include empty spaces between welds, side members and other elements where free mutual movement of metal sheets is observed.
Several ways to check the body for deformation
You can determine the deformation of a body that has been in a moderate accident at first glance. On the contrary, if the blow was weak, then it can be extremely difficult to determine the damage by eye. In this case, you have to carefully carry out diagnostics, measure compliance, and so on.
A hydraulic jack helps to carry out an initial inspection of the car. Thanks to the lift, you can examine the condition of the floor, feel those parts of the body that are inaccessible for inspection with the normal position of the car, for the presence of folds. After detecting the latter, as a rule, they are marked with a marker, which makes it possible to easily find deformed areas during subsequent stages of work.
If such a check does not give any results, proceed to the next stage of the examination, which involves checking the wheels. It is no longer a jack, but a special stand that helps carry out the check. Using such equipment, it is easy and faster to carry out the second stage of diagnostics. Check the front and rear wheels of the car at control points using calipers with a special profile shape.
Checking the compliance of the control points of the “shoes” of the car involves verification (comparing) the wheel coordinates located on one side of the car with the coordinates on the other side. Body deformation becomes obvious if measurements show significant deviations from specified standards.
Another method of diagnosing damage to the “tens” body is to compare the diagonals. The exact coordinates of the main diagonals are given in the table below. This diagnosis is considered the most correct, since it is carried out using a symmetry check.
Modern technologies make it possible to check body geometry using various tools. A computer on which appropriate measurements are carried out helps a lot in this matter. The option of checking using template tools and mechanical measurements is also used.
As a rule, at home on a VAZ 2110 you can remove the geometric dimensions of the body yourself using a standard tape measure. But at the service station, a special telescopic ruler is already used for the same purpose, which gives more accurate results.
But both of these measurement methods have a significant drawback. Thus, they do not make it possible to measure spatial deformations. The latter can only be diagnosed using template or computer methods. This will give a complete picture of the deformations, which will allow the damage to be eliminated most effectively. Although, the price of such a check will be many times higher.
The car body is an intricate and complex structure that has a number of values required for normal operation. Their violation causes significant deviations, the configuration of the entire body changes. By measuring the geometry of the body, the car owner has the opportunity to detect even the most minor defects, which can lead to big problems in the future.