Steering rack - simplicity and reliability
The steering mechanism of a car is designed to change the direction of its movement. It has been tested and tested for more than a hundred years, but meticulous designers still find new solutions to improve its performance.
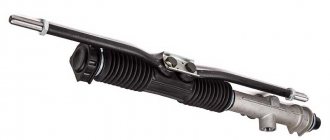
The steering rack is no exception - a relatively simple and reliable mechanism, the operating principle of which is based on the interaction of the “rack-and-pinion steering shaft worm” pair, which converts the rotational movement of the steering shaft into the reciprocating movement of the steering rods.
Signs that your steering rack needs to be tightened
First, you need to turn down the radio volume and listen to the suspension work. If at low speeds there is a knocking sound over small irregularities, there may, of course, be several reasons, but the most likely is a loose steering rack. Secondly, you need to constantly monitor the steering play; its presence also indicates that the steering rack is not working in normal mode.
Moreover, the presence of play is an unpleasant signal; it makes the steering wheel’s reaction unpredictability in response to your actions, and even with a play of 10 degrees you will not pass the state inspection.
Checking the technical condition of the steering
1. Visually check the condition of the protective covers of the tie rod ends and steering mechanism.
Damaged covers (torn, cracked) must be replaced.
2. Make sure that the steering column locking lever is raised all the way.
Trying to move the steering wheel in a vertical plane, we check that the steering column is securely fastened with the locking mechanism.
If the steering column moves, remove the steering column pads, use a 10 mm wrench to loosen the lever fastening bolt (left thread) and use a 17 mm wrench to tighten the steering column fixing lever axle nut.
After this, tighten the bolt.
3. Trying to move the steering wheel along the axis of the steering shaft, we make sure that there is no play in the steering wheel on the splines of the shaft and shaft in the steering column.
4. To check the play in the steering, turn the steering wheel to the position corresponding to straight movement.
We place a slotted screwdriver on the instrument panel so that its blade is located next to the rim of the steering wheel (for reliability, it can be secured with masking tape).
Turning the steering wheel to the right until the wheels begin to turn (selecting play), and then to the left and using the blade of a screwdriver as a guide, use chalk, pieces of wire, or otherwise mark these positions on the rim.
The play should not be more than 5° (or 18 mm) when measured along the outside of the rim.
Increased play indicates the need to troubleshoot and fix the problem. As a rule, the first thing to fail in the steering system is the tie rod ends.
5. To check that there is no play in the tie rod ends, an assistant slightly rocks the steering wheel from side to side.
We place our hand at the junction of the steering rod with the swing arm of the suspension strut so that the palm touches them at the same time.
When play appears in the tie rod end, a displacement of the steering arm relative to the rod will be felt.
6. Check the tightness of the nuts on the steering column universal joint bolts.
7. Repeat the check on the other side of the car. We replace faulty hinges.
8. When rocking the steering wheel from side to side, listen to the operation of the steering mechanism.
A knocking sound from the right edge of the steering gear indicates wear of the support sleeve.
We remove the faulty steering mechanism and repair or replace it.
9. Turn on the ignition - the electric power steering fault warning lamp on the instrument panel should light up.
Let's start the engine.
The warning light should go out and the steering wheel should turn easily with one hand.
If the lamp lights up while the engine is running, it indicates a malfunction of the electric amplifier and the need for repair.
| Tightening torques for steering wheel connections | ||
| Name of nodes | Thread | Torque, Nm (kgcm) |
| Steering gear nut | M8 | 15—18,6(1,5—1,9) |
| Steering column nut | M8 | 15—18,6(1,5—1,9) |
| Nuts for coupling bolts securing intermediate shaft flanges | M8 | 23—27,4 (2,3—2,8) |
| Tie rod pinch bolt | M10x1 | 19—30,9 (2,0—3,2) |
| Steering wheel nut | M16x1.5 | 31,4—51 (3,2—5.2) |
| Ball stud fastening nut | M12x1.25 | 27,1—33,4 (2,8—3,4) |
| Bolt securing the steering linkage to the steering mechanism | M10x1 | 70—86 (7,1—8,6) |
| Steering gear bearing nut | M38x1.5 | 45—55 (4,6—5,6) |
Tightening process, video
There are several ways to tighten. One of them is the method of removing the slats. The removed rail is clamped in a vice and then, using a special wrench, the nut is tightened 10-15 degrees by turning it counterclockwise.
This is followed by a check for backlash and, if necessary, the procedure is repeated, since the backlash can be more or less. It is not advisable to overtighten, it will be difficult to rotate the steering wheel. The advantage of this method is the ease of adjustment, but the disadvantage is that you have to remove and then put the steering rack back in place, and this requires time, certain knowledge and skills.
The second method is simpler, it does not require removing the steering rack, you just need to remove the battery and the platform under it with four bolts, but it is much easier and faster than removing and installing the steering rack. This way we gain access to the steering rack and steering rods.
We take hold of the rod with our hand and begin to shake it with force. A characteristic knock will immediately indicate the presence of play. The stop nut is located on the rack behind the left link from the bottom; you need to feel it with your finger. Now the task is to get the wrench into the nut and then turn it counterclockwise. We check for play and, if necessary, tighten it further.
But in the video there is another tightening option, even without removing the battery:
Steering wheel tuning on Lada Granta
There are few options for upgrading the steering wheel on the Lada Granta. The most popular of them is installing a sports version. Such a steering wheel will not only make the interior more attractive, but will also increase the comfort of control, especially if it is selected correctly. You can install a multi-steering wheel, but only if the configuration is maximum, in other cases there will be nothing to control with its help.
The sports version must be injury-proof, that is, in the event of an accident it must be deformed without causing damage to the driver. Among the shortcomings, it can be noted that although there is an airbag in the standard steering wheel, the sports one does not have it. You can also modify the steering wheel by installing braid. More advanced ones install a heating thread under it.
To install the sports steering wheel, you will need to carry out the following operations.
- Align the front wheels straight (you can drive a little forward and back so that the trajectory is straight).
- Disconnect the battery terminals by de-energizing the vehicle's on-board network.
- The airbag control module must be disabled (if the Granta equipment is equipped with it). If you do not turn it off when removing the factory steering wheel, it may shoot out.
- Remove the steering wheel and install a horn on the adapter. The wiring must be stored in the adapter; to do this, carefully inspect all contacts.
- Connect the adapter to the shaft, but do not secure it with a nut.
- A sports steering wheel is installed on the adapter and secured with special screws.
Repair, price
A lift is a fairly simple and quick way, but often it is only a partial, temporary solution to the problem. After all, the appearance of play can be caused by various reasons - the boot may be damaged, gaskets may leak and who knows what else, that is, there is a high probability that the steering rack is running dry. In this case, there is a risk that a short time after tightening it may simply jam. Therefore, troubleshooting the rack will be very useful, at least an external inspection, it will make sure that the anthers and corrugated casing are not damaged.
If you suspect the need for repairs, consider whether you can handle it yourself. Get ready for the fact that you will have to spend the whole day in interesting positions, and you will also need an assistant to perform some operations. Do you know how to install the rack so that the steering wheel is level? If not, you risk having to do the installation again.
An alternative is a service station. They will charge you around 3,500 rubles for repairs, 200 rubles and another 200 will be spent on anthers and so on.
How to change the steering cardan
- It is better to roll the car into a pit (at least raise it in front of the car).
- Fix the steering wheel and steering wheel at a right angle. You should also not move or touch the wheels during repairs.
- Remove the front wheel, then unscrew the mounting bolt through the interior. If all operations are carried out correctly, the shaft should come off the steering wheel on its own.
- Remove both casings (top and bottom), make sure there is a boot on the steering shaft. If it is not there, it is better to install it after repair; the part costs no more than 200 rubles.
- Unscrew the bolt on the crosspiece, then the shaft will come off the steering rack on its own.
- Pull down and pull out the shaft. Before repairing, it is better to wash it from dirt and rust; it also affects the quality of movement.
- Secure the shaft in a vice. When it is secured, take the head and knock out the cross on one side to remove the bearing cup. Repeat the same action from the other end.
- Insert a new cross in the same order (one at a time on each side).
- Press in a new crosspiece with a vice (do not overpress).
- Align the cups and roll them with a hammer and chisel.
- Install the new part on the car in reverse order.
Many car owners note when they are looking for where and how to change the steering joint on a Toyota that steering crosses from the VAZ-2015 are very suitable for this brand. This greatly simplifies the process of finding parts and reduces the overall cost of repairs.
If we are talking about repairing a “workhorse”, a vehicle engaged in transportation or cargo transportation, repairs or replacements have to be made more often than once every 100 thousand km (due to the condition of most of the roads). Experienced craftsmen who give advice on how to change the driveshaft on the steering wheel of a gazelle note that it is better to install two boots at once so that the sound from the engine is quieter. At the same time, the anthers themselves can also be sealed with foam rubber rings, this significantly reduces squeaks and noise in the car interior.
The driveshaft part itself will cost from 650 rubles for domestic cars and higher for foreign cars. Plus - consumables in the form of boots and nuts.
A little theory: front suspension design
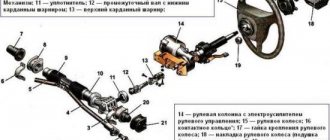
Before attempting to fix any problem, there is a tendency to look at the blueprints or repair manual. It is known that the VAZ-2192 parts catalog contains the following object:
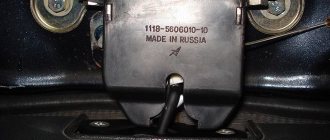
This is what the steering rack looks like in the drawing
Whether the knock will remain in the steering rack of Kalina-2 depends on the following: how accurately element “14” is adjusted. The adjusting nut, marked “14”, looks almost invisible here. But first impressions are deceiving. In the catalog, by the way, the element is called “Stop Nut”.
It is important to know that the thrust nut has external threads. And it spins clockwise. And the words “tighten the rack” mean screwing in the specified nut, and nothing more.
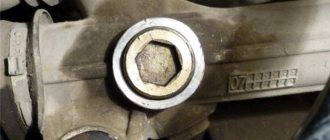
Now let's move on to practice and see what the node in question looks like in reality:
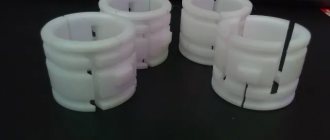
If you remove the rail, it looks like this
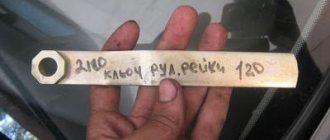
The nut has a non-standard notch, and it can only be rotated with a special tool. By the way, the recess will be closed with a cap. In the catalog it is designated by the number “15”, and now, let’s look at the appearance of the special key:
Rack adjustment key
The thrust nut is turned at small angles. We are talking about values of 10-15 degrees. What happens if you overdo it with tightening the rack? The knocking noise will disappear, but the steering wheel will turn with difficulty. Therefore, if necessary, the nut can be pulled back.
Lyrical digression
In Lada Kalina, the steering rack never makes a knock when we are talking about a new car. This is also true for the break-in period. Let's say in your case this is not done. Then, do not try to repair anything, but go straight to the dealer. According to reviews, the defect in question is covered under warranty, and most car dealers do this: the steering rack assembly is replaced with a new one.
This is what the replacement unit looks like, the rack assembly
There is a logic here. At the factory, adjustments are made correctly (this is true in 99.9% of cases). If a defect appears, the dealer replaces the assembly without expecting that adjustment will solve the problem. The owner does not need to hope for this either. The choice is yours.
We change other details
We also pay attention to how the steering rack looks externally. “Kalina” can keep many secrets regarding maintenance, so if there is the slightest doubt about the serviceability of the rack elements, we replace them with new ones. Otherwise, you will have to remove this part again. The components themselves can be purchased in a repair kit. This will not pose much difficulty for the modern car enthusiast. Having replaced and adjusted all the necessary components, we assemble the rack in the reverse order. That's it, the repair has been successfully completed.
Making adjustments yourself
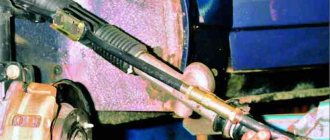
You can access the adjusting nut from the engine compartment, but to do this you will need to remove the battery, as well as the battery mounting pad. It is better to drive the car into a pit and then remove the crankcase protection (engine mudguard). If you look from under the bottom, the required element is immediately visible:
You need to turn this nut
And when you open the hood, you can feel the nut, but not see it. Its location is marked in the figure:
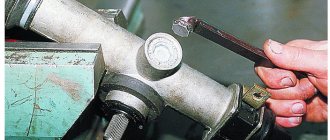
To make adjustments, place the key here
Before adjustment, remove the rubber cap from the recess. Its appearance is shown in the photo:
Remove the cap and install the key
If it is not entirely clear what exactly needs to be done, it is better to contact the service. The key is installed in the recess and then rotated 10-15 degrees.
When looking at the rack from above, turning the key clockwise corresponds to unscrewing it. The handle of the key comes from the center of the car - which means tightening is being done. By the way, the latter is true provided that the handle faces forward.
Preparatory actions, dismantling unnecessary parts
To remove the crankcase protection, you need to unscrew 4 screws located in one row near the bumper. Also, unscrew two screws having a standard size of M6x16. In some configurations, the protection consists of two parts, but in this case they are attached only with self-tapping screws. These words are illustrated by the following photo:
This is how the crankcase protection works in different configurations
First, unscrew the “10” screws, and then the two “18” screws. In the second case, there will be more screws (eight).
Now let's look at how to remove the battery. First of all, disconnect its terminals. Then, you need to move the additional fuse box to the side. In general, actions are performed according to the photo:
You also need to remove the mounting platform itself, for which you unscrew 4 screws. You will need a 13mm wrench, as well as a 10mm spanner. We will repeat the entire sequence again:
- Unscrew the nuts holding the battery terminals using a wrench 10;
- Remove both terminals;
- Move the fuse box to the side by unscrewing 2 fastening screws;
- Unscrew the nuts with a 10mm wrench and remove the battery;
- Unscrew the screws with a 13mm and remove the metal plate.
Just in case, here is a look at the fuse box mountings:
Mounting screws are located under the casing
Manuals usually recommend removing the negative terminal first. But when it comes to dismantling both terminals, the order in which they are disconnected is not important.
It turns out that the steering rack can be repaired (video example)
According to the manufacturer of the domestic Lada Kalina, its steering rack should last at least 10 years with proper use. But we all understand perfectly well that difficult road conditions in our country make their own adjustments to the duration of operation of all elements and components of the car without breakdowns. Because of this, car owners need to know how to tighten the steering rack.
In general, on the Lada Kalina, the so-called steering system, if it fails, is mostly caused by driving on bad roads with potholes and pits. All this forces vehicle owners to spend additional money on repairs, especially when the steering rack requires tightening, but this procedure can be performed independently, which we will talk about today.
How the control system works in Kalina
In the model of the domestic automobile industry we are considering today, the steering rack, if disassembled from a technical point of view, is a mechanism that structurally looks like a gear, which in turn is installed on a shaft and is associated with special rods and a rack. Thanks to these elements, the car turns when moving the steering wheel in a certain direction allows the front wheels to move in the same direction.
Modern cars have 3 variations of the rack and pinion mechanism:
- Electric steering mechanism;
- Hydraulic modern mechanism;
- Mechanical mechanism.
So, the car control system is an electric drive. This is what helps reduce the load on the driver. In this case, the increase in turning force is carried out due to a special electric motor built into the column, so to speak. This device is used exclusively on premium and, accordingly, luxury cars. For example, in our Lada Kalina, the electric mechanism can be obtained as an additional option for an additional payment for the TOP configuration.
The next option is a hydraulic mechanism. Viburnums of the first and second generation are equipped with this mechanism. Owners of such cars receive sharpness and lightness of the steering wheel. And not only Russian cars, but also many modern foreign models are equipped with the popular and most convenient hydraulic drive.
The mechanical mechanism is the simplest in its design and is also found on many machines. In this case, as you understand, the rods will be turned only through the use of the driver’s physical force. It is clear that such a car is extremely difficult to drive.
In addition to the above mechanisms, there is also a mixed version - electrohydromechanical. It combines all the best qualities of an electric and hydraulic amplifier. You can find it on the Kalina Sport model.
Let us note that each of the systems we have listed has its own advantages, and to some extent disadvantages, but they all break down with the same frequency. If a breakdown of a mechanical control rack will lead to insignificant costs for repair work, then electrical and hydraulic breakdowns will force you to spend a fair amount of money on repairs. It follows that it would be nice to know how to tighten the steering rack on the car we are considering with your own hands.
Electrical faults of the electric booster
When troubleshooting electrical problems, be sure to remove the terminal from the battery. This procedure must be performed during any electrical work in the car.
Operation failure
It happens that when you turn the key in the ignition switch, the icon indicating a malfunction in the EUR turns on again. A possible malfunction is a breakdown of the amplifier drive motor. It is possible to fix such a malfunction yourself if you have electrical knowledge. If you are unable to repair the electric motor, it is recommended to replace it with another one.
Operation failure may also occur in the following cases:
- The fuse has blown. However, it is recommended to replace the fuse only after eliminating the cause of its blown. The fuse is designed to protect the electrical circuit from short circuits. When the wires are shorted, they heat up and the fuse link melts, breaking the electrical circuit. There is probably an overlap of wires in the circuit and their further short circuit. Eliminate the cause and only then change the fuse.
- Poor contact at the connections, resulting in a lack of power in the amplifier circuit. Correct the contacts or clean the wire connections.
Speed sensor
One of the most vulnerable elements of the system is the speed sensor. This is an electrical device that is designed to control the electric drive of the amplifier at various speeds.
The fact is that using ESD at high speed can cause an accident, since the slightest rotation of the steering wheel will lead to the car being driven off the road. This sensor reads the speedometer and, as speed increases, weakens the power steering effect. Thus, it turns out that at high speed the power steering operates in the same way as when using a mechanical amplifier.
The main malfunction of the sensor is its failure. If the sensor fails, the amplifier circuit does not receive speedometer readings and the amplifier is turned off. After this, a special icon on the instrument panel lights up (steering wheel with an exclamation mark). In this mode, the amplifier operates without an electric drive and does not interfere with the steering. In this case, you just need to remove fuse F31 in the block to the left of the steering wheel to completely disconnect the circuit before replacing the speed sensor.
Ultimately, to fix this problem, you just need to change the speed sensor.
Mechanical problems
Mechanical failures of the power steering include various damage to the amplifier structure, jamming, deformation and fracture. In cases with mechanical faults, the electric amplifier must only be replaced.
When is it necessary to adjust the steering mechanism in Kalina of all years of manufacture?
How to repair the steering mechanism? All that is required is to adjust the steering rack. On a regular Lada Kalina you can adjust the rack yourself without any problems, but on the sports version of the car it’s not so simple, and you’ll probably have to turn to specialists.
Reasons that may prompt you to repair the steering mechanism:
- When the bushing is heavily worn in the place where it connects to the steering rods and the rack itself;
- The steering rack fastener is loose;
- The pair's engagements are poorly adjusted;
- Severe gear wear;
- The steering racks are heavily worn.
Direct tightening of the steering rack is most often required in order to remove or at least reduce the backlash present in the car's directional control system.
This manipulation will significantly help improve vehicle control in a variety of weather and even road conditions. In some cases, tightening the rack is required if it was initially adjusted incorrectly. In this case, you need to loosen the screw that makes the adjustment. After this manipulation, the steering wheel begins to move easier, and driving becomes normal.
In addition to adjustment, when difficulties in the operation of the mechanism are identified, it can be lubricated. The Russian Lada Kalina, like any other car, has an instruction manual, which indicates how to properly lubricate and how to tighten the steering rack. In this official manual you will find a description of the structure of the rack itself, as well as the type of lubricant used recommended by the factory.
Important! Adjustment is carried out in 2 ways:
• On the car itself;
• When the rack is removed.
When the rail is removed, the damage is significant. In this case, it is always necessary to replace worn parts of the LADA Kalina steering mechanism, therefore, not every car owner can do everything on their own without certain knowledge and experience and the proper tools.
But everyone can independently eliminate knocks and even play, and, if necessary, loosen or tighten the rack. In this case, you do not need to dismantle the steering mechanism. However, if you understand that you cannot cope, then it is better to consult a specialist. Or follow strictly the instructions we provide below.
Causes of extraneous noise and knocking
In order to carry out an independent inspection, and, if necessary, repairs, you will need a lift or inspection hole.
Support stand
For comparison: old and new support strut on Logan
Before you begin inspecting the suspension under the car, first assess the condition of the front strut supports. To do this, you need to open the hood and evaluate the gap on the spring stop cup.
If the gap exceeds 1 cm or it differs relative to the opposite side, this indicates that the supports have sagged and they do not absorb impacts on small bumps, therefore, they need to be replaced.
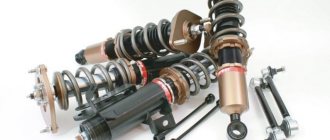
Shock absorber struts
The presence of a dull knock in parts of the front suspension may indicate defects in one of the shock absorber struts. The easiest way to diagnose is to alternately rock the car on the left and right sides. If there are working shock absorbers, the car will smoothly return to its original position, already on the first or second free play.
The presence of smudges and unsatisfactory condition of the bumpers will also indicate that the rack should be replaced.
Anti-roll bar link
This chassis element is checked when the vehicle is under load.
By rocking the car, you should pay attention to the movement of the cup relative to the lever itself. If this element malfunctions, it will jump and make a characteristic knock, which in turn, undoubtedly, is observed when driving on an uneven road
Inspection and replacement of the stabilizer bar link
The same goes for the anti-roll bar bushings. When they wear out, play and free movement will be felt in the places of contact with the rod itself. Diagnostics and replacement of stabilizer bushings can be carried out both on the ground and with the car suspended.
Silent blocks
The arrow marks the silent block
After the car has been raised, you should check the silent blocks in the suspension arms. In order to determine the degree of their wear, you will need a mount, with the help of which, by moving the lever on the subframe in the longitudinal and transverse directions, you can determine their play, as well as identify rubber defects.
On Renault Logan, the silent blocks are attached to the front suspension arm, so their replacement should be carried out on a removed element.
Spherical bearing
Diagnostics of a ball joint is diagnosed in the same way as silent blocks. By turning and pushing movements (left - right) you should influence the front suspension lever, and if the ball joint is faulty (there is play), moving it will not be difficult.
Ball boot diagnostics
The support on the Renault Logan is pressed into the front suspension arm. Therefore, before dismantling it, the lever must first be removed, and the replacement itself must be carried out using a press. Read more in the material: replacing and diagnosing a ball joint on a Renault Logan.
If the ball joint is sentenced to replacement, then it is important to know which ball joints are better!
How to independently adjust the steering rack on Kalina
For self-adjustment you will need only 15-20 minutes. All you need to have with you: a 13th wrench, a special wrench and a 10th socket with a wrench. The procedure at first glance seems quite simple, but you will still have to remove some nodes. So, nothing can be done if you do not remove the battery from the LADA Kalina car. You also need to remove the special platform on which the battery is installed.
After this, you get access to the desired mechanism. And feel free to start solving the problem. The only thing is that it will not be very convenient for you to make adjustments, because you have to crawl under the very bottom of the rail, where the plug is installed, in order to remove it.
After this, place the special key on the nut located inside the mechanism. It is this nut that needs to be either loosened or tightened. To begin with, it will be enough to turn the key half a turn. Remember that all manipulations are done carefully, without effort, so as not to overtighten anything. Next, you can test it by driving the car a little to find out if you have done everything to the level required.
When everything is ready, you need to put everything back in reverse order.
Removing the Kalina electric power steering column
- Medium Phillips screwdriver
- Large flat screwdriver
- Marker
- Open-end wrench 10 mm
- Open-end wrench 13 mm
- Driver for socket attachment
- High nozzle on the wrench 13 mm
- Knob attachment 13 mm
- Knob attachment 24 mm
1. Set the wheels to the straight-line position of the car.
2. Disconnect the wire terminal from the negative terminal of the battery.
3. Remove the steering wheel as described here. We remove the steering column switches as described here. Disconnect the ignition switch wire connectors from the instrument panel wiring harness connectors. If necessary, remove the ignition switch from the steering column.
4. Using a Phillips screwdriver, unscrew the three screws.
5. Then remove the lower cross member of the instrument panel.
6. Pressing the latches, disconnect the two wiring harness blocks from the power steering control unit. Disconnect the wiring harness connector from the steering column switch connector as described here.
7. Using a high “13” head, unscrew the four nuts securing the bracket (the fourth nut is not visible in the photo).
8. Lower the steering column to the floor.
9. If necessary, remove the connector for the steering column switches, as described here. Using a 13mm socket, unscrew the nut of the bolt securing the lower cardan joint to the steering gear shaft. If the bolt turns, hold it with a 13mm wrench.
10. Remove the bolt.
11. Using a powerful slotted screwdriver, release the terminal connection of the hinge.
12. Remove the intermediate propeller shaft from the steering gear shaft.
13. Before disconnecting the intermediate propeller shaft from the steering shaft, use a marker to mark the relative position of the upper joint of the propeller shaft relative to the steering shaft. Using a 13mm wrench, unscrew the nut of the hinge coupling bolt. If the bolt turns, hold it with a 13mm wrench. We take out the bolt.
14. Using a screwdriver, open the terminal connection of the hinge.
15. Remove the intermediate driveshaft from the steering shaft.
Intermediate cardan shaft
16. Install the intermediate driveshaft in the reverse order. When connecting the upper joint of the intermediate propeller shaft to the steering shaft, it is necessary to align the previously made marks. Install the steering column in the reverse order. Installation this way is best done with an assistant.
However, it is more convenient to install the column when the lower hinge of the intermediate propeller shaft is installed on the steering gear shaft in advance. To do this, after connecting the intermediate propeller shaft to the steering shaft, use a 13mm wrench to unscrew the nut of the intermediate shaft coupling bolt.