No one will deny that a working steering wheel is one of the factors influencing the guarantee of the safety of the driver and passengers. Regardless of the type of steering gear, they all need to be serviced periodically. All second-generation cars, including the VAZ-2114, have a reliable and easy-to-repair and adjust steering mechanism. It is not equipped with a hydraulic power steering, which allows you to tighten and service the steering rack without any problems.
Before tightening the steering rack on a VAZ-2114, you need to consider the prerequisites indicating the need for its tightening or repair.
AvtoVAZ provides a ten-year warranty. This is a fairly long service life of the steering mechanism. But do not forget that the guarantee is given for ideal conditions of use of the mechanism. The basis for calculating the service life is normal roads and constant high-quality lubrication located in the rack housing and a moderate driving style.
Lifting and adjustment
As the practice and experience of VAZ 2114 owners shows, in case of problems with the struts, they can most often be repaired. The only condition. the presence of an inspection hole at your disposal.
First step. tighten the rail. But how is this done? To do this, simply turn the adjusting bolt. Adjustment is carried out with a 17 mm key.
When tightening the bolt, go into the car and drive a few kilometers to see if there is any knocking or play. If these symptoms of the problem disappear after you have raised and adjusted the steering rack, the repair is complete.
But this doesn't always happen. The knock may remain and the game may disappear, or vice versa. In any case, if at least one sign remains, you will have to begin a full-fledged repair yourself. Now you can find a number of useful ones that detail the procedure for restoring this node. Listen, it will be useful for you.
Preparatory activities
Many experts advise taking certain steps to prepare for the replacement so that everything goes easier and faster. These actions include the following.
- Treat all nuts and fasteners with penetrating liquid. WD40 works great.
- If the tips last longer than one winter, to remove their fist you will need to use a 17 socket to unscrew the nuts.
- If the nuts stick, try heating them with a hair dryer. A gas burner is also suitable, but you need to be as careful as possible with it.
- Prepare tools for removing tips.
Today, two methods are used to dismantle steering tips - modern and traditional. The first involves the use of a special puller, and the second - a sledgehammer.
Jack and WD40 at the ready
The traditional dismantling method involves the following actions:
- The steering wheel is turned all the way;
- Several strong blows are applied to the steering knuckle;
- Vibration causes the tip to pop out.
But the method has two serious drawbacks.
- It will take special skill to deliver precise, but at the same time accurate and strong blows.
- This method can reduce the service life of steering racks.
Therefore, the best option is a puller. You can literally buy it for 200-300 rubles, but it will be useful in the future and will significantly preserve the integrity of the remaining parts when replacing the launch vehicle.
Dismantling works
Replacement
The replacement procedure is quite simple. Especially if you have prepared the connecting elements in advance and acquired a puller.
- Using a jack, lift one of the sides where you will begin to change the tips.
- Turn the steering wheel to such an extent that it is convenient for you to replace damaged elements.
- Treat the elements again with a penetrating liquid.
- Unscrew the fastening nut.
- Remove the tip from the steering knuckle hole. Here you just need a puller or the traditional old-fashioned method using a sledgehammer.
- Check the condition of the steering rods. Sometimes it is better to replace them in the first couple of wears. Besides, you still got into this knot.
- Replace damaged tips with new ones.
- Perform the reassembly procedure.
Assembly
- Do the same with the second wheel.
- We recommend that you think additionally about protecting threaded fasteners from moisture and dirt. To do this, the threads can be lubricated with lithol, graphite grease, a tube of a suitable diameter can be put on, or heat shrink can be used.
- After completing the replacement of the steering tips, visit a service station to adjust the wheel alignment.
- If you don’t want to go to a service station, then count in advance the number of revolutions when removing the old tip. The new one is twisted by the same number of revolutions.
- Drive onto a straight road and check whether the car does not skid to the sides when driving in a straight line.
One of the main conditions for a successful replacement is the choice of quality parts.
New part
What to choose
Finally, we will present several options for the most popular steering tips, which are used today when replacing a VAZ 2114. So you can decide for yourself what to choose and which ones are better.
| Manufacturer | Price |
| AvtoVAZ | 620 rubles |
| TRACK | 620 rubles |
| VIS | 730 rubles |
| Lemfoerder | 830 rubles |
| Finwhale | 860 rubles |
The last two tips are foreign made. This makes their price higher. But the quality is somewhat higher than AvtoVAZ products.
Replacing a LV is not so difficult that you need to go to a service station and pay 500-1000 rubles for the work of the craftsmen. You can easily cope with this task yourself, relying on the video and instructions provided.
VAZ 2114: adjustment and tightening of the steering rack. Replacing tie rod ends
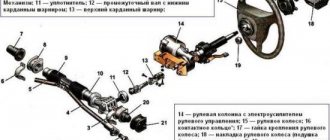
coupling
Now is the most difficult and labor-intensive moment. On the interior side, the ends of the control shaft are aligned with the gear shaft. It is best to do this together, because you will spend a lot of time on a similar event alone. Don’t forget about the special flat on the shaft - the coupling bolt must “climb” onto it.
The latter is planted using a hammer (the blows are applied smoothly and very carefully). Finding the correct order of work is painfully simple - to do this, connect the removed battery terminal and press the horn. If the element does not make a sound, it means that the part that suits us is not put on one hundred percent. In this case, we continue to tap it with a hammer.
How to install the control rack (VAZ-2114) next? A bolt is inserted into the “ears” of the coupling and clamped tightly with an open-end wrench. Self-locking nuts are tightened on the clamps of the spare part, and the studs are treated with Movil. Now all that's left to do is to connect the rack arms to the ends and tighten all the fasteners. That's it, the replacement of the VAZ-2114 control rack is successfully completed. All that remains is to put on the negative terminal, fasten the wheels, check the brakes and do the wheel alignment. Typically, dismantling and installing this part takes up to 3-4 hours of free time. Yes, you have to tinker. But after that, the knock of the VAZ-2114 control rack will definitely not bother you. In terms of mileage, this is approximately 100-150 thousand km.
So, we found out how you can tighten the steering rack of a VAZ-2114 with your own hands. Success!
Is it possible to adjust the steering rack with your own hands? Tightening technology
Hello, dear car owners! From time to time, a feeling of “white” envy suddenly creeps in when in the manuals of foreign automakers we read the words that the service life of the worm on another rack in the control rack of a car is designed for 14-15 years.
It’s designed and... that’s essentially how it is: the control rack doesn’t burn out. Than, subject to certain conditions, such as: recommended maintenance periods for the control rack, use of recommended and high-quality oils, and operation of the vehicle on appropriate roads.
When the first two points are completely achievable for strangers to the owner of the car, then the third, as annoying as it may sound, remains a fairy-tale dream for us. Therefore, now we will look at the question of what it really is, how to tighten the control rack in makeshift conditions.
Product delivery options
Note! Below are the shipping methods available specifically for this product. Payment options may vary depending on the shipping method. Detailed information can be found on the “Delivery and Payment” page.
Parcel by Russian Post
Available payment methods:
- Cash on delivery (payment upon receipt)
- Using cards Sberbank, VTB, Post Bank, Tinkoff
- Yandex money
- QIWI
- ROBOKASSA
Shipping throughout Russia. Delivery time is from 5 to 12 days.
Parcel by Russian Post 1st class
Available payment methods:
- Cash on delivery (payment upon receipt)
- Using cards Sberbank, VTB, Post Bank, Tinkoff
- Yandex money
- QIWI
- ROBOKASSA
Shipping throughout Russia. Delivery time is from 2 to 5 days. More expensive than regular delivery by Russian Post, approximately 50%. Parcel weight up to 2.5 kg
Express Parcel EMS
Available payment methods:
- Cash on delivery (payment upon receipt)
- Using cards Sberbank, VTB, Post Bank, Tinkoff
- Yandex money
- QIWI
- ROBOKASSA
Shipping throughout Russia. Delivery time is from 3 to 7 days. More expensive than regular delivery by Russian Post, approximately 100%.
Transport companies
Available payment methods:
- Using cards Sberbank, VTB, Post Bank, Tinkoff
- Yandex money
- QIWI
- ROBOKASSA
Delivery is possible to any locality where there is a representative office of the transport company. Delivery time is from 2 to 10 days. Sending large parcels is approximately 50% more profitable than by Russian Post.
Pickup from our warehouse
Available payment methods:
- Cash upon receipt
- Credit, installments
- Using cards Sberbank, VTB, Post Bank, Tinkoff
- Yandex money
- QIWI
- ROBOKASSA
Pickup times must coincide with store opening hours.
Symptoms of malfunction
To understand that the struts need repair, you need to monitor the behavior of the car and know the characteristic signs of failure of this element.
Is it possible to tell if a complete replacement is required or if you can do a simple repair? This is described in the table below.
When you turn the steering wheel you hear a knock, there is a gap
If the situation occurs when the car is moving, it is enough to carry out repair measures, use a repair kit
Knocking and play occur when the steering wheel is turned while the vehicle is stationary
This is a clear indication of a critical state of Reiki. The problem can only be solved by completely replacing it.
Replacing the steering rack on a VAZ-2113, 2114, 2115
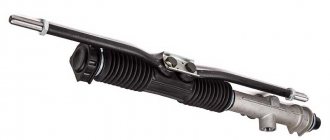
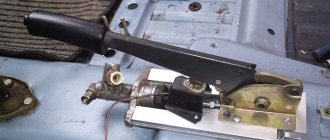
The control rack serves to transmit the turning force from the steering wheel to the front wheels of the machine. In VAZ 2114 cars it is not equipped with either a hydraulic or electric booster, and has only a mechanical design.
The principle of this design is that the force from the steering wheel is transmitted through a control shaft with a drive gear at the bottom to a rack with a gear drive.
When the control wheel is turned, the rack moves horizontally in a certain direction and turns the wheels by means of control rods.
The control rack is located under the hood on the rear side of the engine, and is attached to the partition between it and the passenger compartment using clamps.
We repair it ourselves
To get started, you will need a set of tools and repair kits.
Replacement kit
Be sure to include the following in your list of tools and materials:
- Repair kit for one of three configurations (more about them below);
- Bearings;
- Lubrication;
- Set of keys and screwdrivers.
Selecting a repair kit
Spare parts
As for repair kits, the standard minimum set includes four elements:
- Washers;
- Nuts;
- Bearings;
- Bushings made of fluoroplastic.
But is it enough for your specific steering rack situation? Let's try to understand the purpose and configuration of each of the three types of repair kits.
- The cheapest repair kit, the contents of which you are already familiar with, allows you to solve the most minor problems that have arisen with your slats.
- The middle kit additionally includes other bearings and shafts. Designed for more serious repair work.
- The most expensive repair kit may consist of whole new slats, that is, it involves not a repair, but a simple replacement of units.
When choosing a repair kit, it is important to make sure that it is suitable not just for repairing steering racks, but also for your specific VAZ 2114 car. Plus, it is important to know which rack is currently on the car. If this is not an original part, which happens quite often, then the repair kit for the “fourteenth” model will no longer be suitable. You need a kit that matches the vehicle the steering system part was taken from.
Repair work on the rack itself
While the car remains disassembled, we work on the part itself. First, the rail is clamped in a vice and thoroughly cleaned with a wire brush. Next, its surface is treated with a strong White Spirit solvent and wiped with a piece of rag. After this, the so-called mustache bolts are unscrewed. At this time, it is recommended to check the silent blocks - if there is play or their condition is very unsatisfactory (microcracks are present), we replace the parts with new ones.
Using a chisel, the plate is bent, the bolts are unscrewed and the “whiskers” are removed. The plugs and cover are pulled off from the end of the part and the rubber bands are removed from the shaft. Everything except the cover is thoroughly washed and then dried (just not in the sun). Using a minus screwdriver, remove the bearing lock washer. The nut is unscrewed with the same wrench.
Parsing the elements
The gear rack is also pulled out from the housing. It also needs to be treated with white spirit. After the surface has dried, re-coat the part with lubricant. The plastic insert is pulled out through the slot in the housing and the clamping nut is unscrewed. Usually it gives in very hard, but this is not terrible - the repair kit contains a brand new spare part. We take out the stop, change the O-ring and look at the “whiskers” of the rack. As a standard, the tips should be in good condition, without any play. The “fingers” should move with normal effort. The same goes for covers - they should not have any flaws. If one of the listed parts (or several) does not meet these characteristics, only replacement will help the situation. When performing similar work, experts advise treating the threads with Movil to protect them from rust.
Main malfunctions and their symptoms
If the following symptoms occur, you should diagnose the steering rack:
- The steering wheel gets jammed while the car is moving, causing difficulties in steering – the steering shaft is damaged or displaced; among auto mechanics this phenomenon is called “biting”.
- A knocking sound appears in the chassis - this requires repair of the rack elements.
- The car pulling to the side, the car wobbling at high speed are signs of play in the steering mechanism. Because of this defect, it is impossible to perform a wheel alignment.
Symptoms of a problem
Complete disassembly of the steering rack in a VAZ 2114
Competent drivers know that power is transmitted to the wheels through a spur or helical gear, which interacts with the gear rack. Backlash in the rack is eliminated using pressure springs. When there is a knocking sound from the steering mechanism, which is noticeable when hitting an obstacle or driving over uneven surfaces, it is necessary to adjust the rack.
Some VAZ 2114 drivers do not know that play and creaking in the rack can be eliminated; they believe that it is impossible to tighten the steering rack in a VAZ 2114 car. Adjustment helps to get rid of backlash and ensure high-quality control of the machine. It should be understood that incorrect adjustment of the VAZ rack can lead to poor steering rotation. This is caused by overtightening of the adjusting screw.
When replacement is required
If you encounter one of the above signs of malfunction, the rack must be repaired or replaced. By ignoring this need, you risk losing control at any moment. While on the road and driving at high speed, losing control of the car can lead to the most dire consequences.
There are three ways to solve the problem of faulty steering racks.
| Way | When is it relevant? |
| Adjust the rack | If diagnostics show that the unit does not require repair or replacement |
| Repair | If diagnostics allows for partial replacement of elements. Replacement is provided using a repair kit |
| Replacing the unit | If the test shows a complete failure of the node. Installation can be carried out with new rods or old ones, depending on their condition. |
Let us add that if the old steering racks on your VAZ 2114 have covered more than 100 thousand kilometers, their malfunction is unlikely to be corrected with the help of a repair kit. The best option in this case is a complete replacement of the unit.
Removing the boot
Final stages
Next, the gear and bearing are pressed in until they stop (the shaft and housing are clamped in a vice). Then the stop, spring and nut are inserted. The hole in the latter is closed with plasticine. The rubber ring from the repair kit is installed on the shaft side and tightened with another nut. Then the cover and lock washer are put on.
Afterwards the “whiskers” of the slats are installed. With quite a bit of effort, the locking plate is tightened and bent. Next, rubber plugs are installed. The left side of the cover should rest here.
That's it, our set is assembled. Now the control rack (VAZ-2114 will soon be ready for use) is being installed back into the car. The part is installed in its original place, and the shaft must fit into the body hole. Then clamps are put on and nuts and washers are attached.
Adjustment
The adjustment is performed in this way: you can remove the rack from the vehicle or adjust it on it. The first method is used after repairing the machine, before installation. To simply adjust the rack, the work is done directly on the machine.
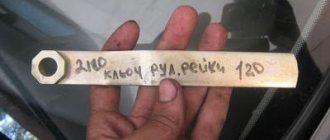
To carry out the work, you must have a 17 mm universal octagon and an adjustable wrench. All work related to troubleshooting is carried out on a lift or inspection pit:
- First, the car must be put on the handbrake, some kind of support must be placed on the rear wheels;
- Then you need to lock the steering wheel and turn off the power to the car’s on-board network (remove the negative terminal from the battery);
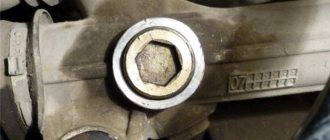
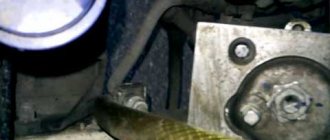
- Then you need to find the nut with which the steering rack is adjusted. It is located on the opposite side, facing the body, of the rack mounting side. Sometimes it is mistaken for another part;
- First you should wash the bottom of the car. In this case, use a suitable device (Kärcher, for example). This is done in order to clean the nut from a layer of dirt. After cleaning the part from contamination, a wrench is inserted into it to tighten the rack and its position is adjusted. The tool rotates clockwise.
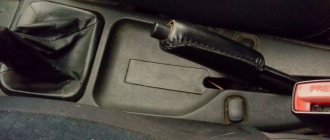
Self-tightening of the steering rack on a VAZ-2114
In most cases, all work to tighten the play comes down to adjusting the steering wheel and selecting the play in the engagement.
If the wear of parts is significant, then major repairs and installation of new spare parts cannot be avoided. The easiest way to check this is to tighten the steering wheel without removing it from the vehicle. To adjust the rack, you need a special key, which is inserted into the adjustment nut located on the steering mechanism housing. It is possible to make a key yourself, but it is better to purchase it, since its cost is low, and you can find it in almost any spare parts store. Having your own wrench in your arsenal will make adjustments easier, and will be essential when disassembling the rack.
Adjusting the steering rack on a VAZ-2114: instructions for action
- The car is installed on an overpass or lift. You can, of course, adjust from the hood side, but in this case you will have to work almost blindly.
- The mudguard and crankcase protection are removed from the bottom of the engine.
- The steering rack is cleaned of dirt and visually inspected. There should be no traces of leaked lubricant on it, and no damage on the anthers.
- You should check that the rack is tightly attached to the engine shield; the steering rods at the point of attachment to the rack should not have any play.
- Next, you need to find the steering rack adjustment nut and clean it of dirt. There is a plastic plug installed on it that needs to be removed.
- Using a special wrench, tighten the adjusting nut. In some cases, it is fixed with a core, so after adjustment you need to return the lock to its original position.
- The adjustment is made by tightening the nut all the way, after which the presence of play on the steering wheel is checked. If you need to exert a lot of force when turning the steering wheel, you need to loosen the nut a few degrees.
- After the nut is adjusted, it must be fixed to avoid spontaneous unscrewing.
After the play has been selected, it is necessary to make a test drive and make sure that the steering mechanism is working properly. If the steering wheel rotates freely and there is no play, the adjustment can be considered complete. If turning the steering wheel is uncomfortable, you need to loosen the nut a few degrees counterclockwise.
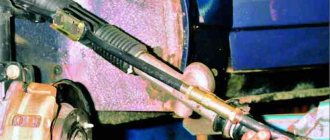
Steering ends: signs of malfunction
New set of tips for VAZ racks
Steering ends are replaced when the following symptoms are observed: when driving over uneven surfaces, when accelerating or braking, a knock is felt, the steering wheel begins to vibrate and shake, play is noticed in the steering rod, and kickback is observed in the gas pedal. You can fully check the serviceability of the tips by checking the integrity of the anthers, etc.
Since these parts affect wheel alignment, they must be replaced on time so that the rubber does not start to wear unevenly.
The steering tips are changed on both sides at once (if one breaks, then after a while the other will break too).
When performing repair work to replace VAZ 2114 tips, the following tools are used:
- The key is “19”, the key is “24”, the key is “27”.
- Calipers.
- Press-out puller or mounting tool.
- Hammer.
- Brake fluid or chemical WD-40.
All work related to replacing tips on a VAZ 2114 can be performed either on a lift, or, as in this case, using a jack.
How to replace the steering rack of a VAZ 2115 yourself
Self-replacement of the VAZ 2115 steering rack - step-by-step instructions
The performance of a car, like any other mechanism, depends on the good functioning of its components and parts. Malfunctions in the steering rack are especially dangerous, as they can lead to fatal situations. The steering rack needs to be replaced if you hear a crunching or knocking sound when turning the steering wheel. Sometimes the situation can be corrected by tightening the bolts, nuts and installing new seals. If the problem persists after this, the steering rack needs to be replaced. Sometimes after the nuts are tightened, the rotation of the steering wheel is difficult or even jams.
Steering rack repair
Do-it-yourself repair of the VAZ 2114 steering rack involves installing new parts into the mechanism body. But it is worth paying attention to the lubrication of parts. The manufacturer recommends using FIOL-1.
- First, lubricate the rack and the internal cavity of the housing.
- Then apply a generous amount of plastic bushing and place the needle bearing in place.
- The rail can be installed in the housing.
- Lubricate the steering gear shaft.
- Next, we hammer the material into the bearing.
- Afterwards the stop is lubricated, screws and stoppers are installed, as well as the casing and anthers.
The detailed process is described in the previous paragraph.
Typical breakdowns
Torn steering rack boot
There are several most common reasons why the unit may need to be replaced:
- The rail has exhausted its service life;
- The vehicle is regularly driven on uneven roads;
- Having turned the steering wheel to its extreme position, sharp accelerations are often made;
- The presence of mechanical damage due to collisions with potholes, accidents, etc.
Drivers should pay attention to the behavior of their car, which itself may indicate that the steering is out of order. This may manifest itself as follows:
- The rack knocks when turning the steering wheel;
- The steering wheel jams and turns to the sides with some difficulty;
- There is knocking and vibration during travel;
- The play at the steering wheel has increased;
- The wheel alignment is disrupted. This can be determined by uneven wear of the rubber.
https://youtube.com/watch?v=vOAgjW9-EX4
Adjusting the steering wheel position
If you don’t like the height and position of the steering wheel, then you will need to grind the edges of the shaft to the size you need or install gaskets between the plate and the body. It is worth remembering that the electric power steering is automatically switched off at speeds above 50 km/h, unlike the same power steering.
Installing electric power steering on your own is quite possible. You just have to remember that even for an experienced driver it will take a lot of time and effort. But for a lover of comfortable driving, the result will justify all costs and hopes.