The clutch is an important element in the design of a car, allowing you to “connect” the engine and gearbox, as well as realize the possibility of comfortable changing gears, eliminating shock loads, etc.
The clutch design on different cars may differ, while modern vehicles often use a hydraulic clutch. Among the main components of the hydraulic clutch system, the main cylinder (clutch master cylinder) should be highlighted.
The purpose of such a cylinder (sometimes called the clutch release cylinder) is to effectively transfer force from the clutch pedal to the clutch release fork. This fork presses the release bearing, which allows this mechanism to operate due to interaction with the clutch basket petals.
VAZ 2107 clutch: device
The “Seven” has a dry single-disc clutch. The clutch hydraulic master cylinder is located directly under the pedal, when pressed, the pusher moves, acting on the master cylinder piston, creating pressure. The brake fluid that fills the hydraulic drive is squeezed out and flows into the working cylinder.
The piston of the working cylinder is connected to the clutch fork by a pusher. When you press the pedal, the latter moves the fork, it displaces the release bearing and separates the support and pressure discs. As a result, the torque from the crankshaft flywheel is no longer transmitted to the gearbox and it becomes possible to change gear.
If the clutch unit malfunctions, when you press the pedal, the gearbox shaft continues to rotate and changing gears becomes difficult or even impossible. If the clutch is adjusted incorrectly, the discs may slip, which is accompanied by accelerated wear.
You cannot continue to drive a car with a faulty clutch - both the clutch discs and the gearbox may be damaged. Therefore, at the first sign of a malfunction, you should start repairing and adjusting it.
The design and principle of operation of the VAZ 2107 clutch
The VAZ 2107 is equipped with a single-plate dry clutch with a hydraulic drive. The drive design includes:
- tank with a stopper and built-in liquid stabilizer;
- suspended pedal with pusher;
- master and slave cylinders;
- metal pipeline;
- hose connecting the pipeline and the working cylinder.
When the pedal is pressed, the force is transmitted through the pusher to the piston of the clutch master cylinder (MCC). The main fluid circulation pump is filled with brake fluid coming from the hydraulic drive reservoir. The piston pushes out the working fluid, and it flows under pressure through a pipeline and a rubber hose into the clutch slave cylinder (CSC). In the RCS, the pressure increases and the fluid pushes the rod out of the device, which, in turn, actuates the clutch fork. The fork, in turn, moves the release bearing, disengaging the pressure and driven discs.
The VAZ 2107 clutch has a single-plate dry design with a hydraulic drive
Replacing the clutch master cylinder VAZ 2107
The simplest way to repair a VAZ 2107 clutch is to change the worn cylinders (main and slave). Their price is low, and the labor intensity of the operation is much lower than when carrying out repairs. Therefore, car owners often prefer to replace rather than repair clutches.
Let's start by replacing the master cylinder. The order of operations is as follows:
- Drain the brake fluid from the clutch reservoir into another container. This can be conveniently done using a syringe.
- Loosen the clamp and remove the hose from the master cylinder fitting.
- Unscrew the fitting of the metal tube going from the master cylinder to the slave cylinder and disconnect the tube.
- Using a 13mm wrench or a socket with an extension, unscrew the two nuts securing the master cylinder to the body bulkhead and remove the master cylinder.
The new clutch master cylinder can now be installed. Before doing this, you should check the condition of the flexible hose of the clutch reservoir. If it cracks at the end, it needs to be trimmed slightly or replaced with a new one.
When installing a new cylinder, it is necessary to ensure that the clutch pedal drive rod fits inside the cylinder. For convenience, you can ask your partner to slightly press the clutch pedal and hold it. Then follows:
- Install the master cylinder onto the studs and tighten the nuts.
- Attach and tighten the metal tube fitting.
- Place the pipe from the clutch reservoir and tighten the clamp.
- Fill the reservoir with brake fluid, following the level marks.
The clutch master cylinder has been replaced.
Replacing the disk and basket
Replacing the clutch disc is done as follows. Unscrew the basket mounting bolts, then remove all parts from the flywheel. There should be no traces of oil on the flywheel or driven disk surface. If there are marks, it is necessary to check the condition of the gearbox oil seal, otherwise the oil leak will continue, which will reduce the service life of the disc. Droplets of oil falling on the surface of the lining or driven disc damage them. If the condition of the oil seal is unsatisfactory, replace it. If the surface of the driven disk is covered with deep scratches or cracks, change the basket.
Wipe with a rag, then degrease the surface of the flywheel and the basket driven disk with gasoline. Insert the disc into the basket, then slide both parts onto the manual transmission input shaft or mandrel, and then insert into the hole in the flywheel. When the mandrel reaches the stop, guide the parts along it to the flywheel and screw the basket with standard bolts. Pull out and then reinsert the mandrel a few times to make sure the disc is seated straight. If everything is normal, insert the mandrel and tighten the bolts with a force of 2.5–3.5 kgf-m. More precisely, the force is indicated in the repair instructions for your machine. This completes the replacement of the clutch disc. Replacing the clutch basket is done in the same way. The maximum mileage of the basket is 150–250 thousand kilometers and depends on many factors.
Remember, replacing a clutch disc is a responsible operation, so do not perform it in a hurry or while intoxicated.
Vibration after replacing the clutch appears due to improper alignment of the disc or weak tension of the basket. If this happens, you will need to remove and reinstall the drive and cage.
Replacing the clutch slave cylinder VAZ 2107
Removal of the working cylinder should be done from the inspection hole or using a lift. The order of operations is as follows:
- Remove the return spring from the slave cylinder bracket.
- Unscrew the fitting of the tube coming from the master cylinder. To prevent brake fluid from leaking from it, you can put a cap on it, removed from the cylinder bleeder fitting, or direct it into a container prepared in advance.
- Unscrew the two bolts connecting the slave cylinder to the gearbox and remove them together with the plate.
- Remove the clutch slave cylinder.
The new working cylinder is installed in the reverse order of removing the old one.
After replacing any of the cylinders, the hydraulic drive system must be pumped. The work must be carried out together with a partner. This is done like this:
- Place a hose on the fitting of the working cylinder and immerse its end in a prepared container for brake fluid.
- Depress the clutch.
- Unscrew the fitting on the working cylinder 1 turn.
- Wait until air bubbles stop coming out and tighten the fitting.
- Repeat the operation until air stops coming out of the fitting. At the same time, monitor the fluid level in the clutch reservoir.
- Tighten the fitting and put on the cap.
There are several ways to bleed the clutch on a VAZ 2107, here is a video about the most popular ones
Clutch slave cylinder repair
To repair the control center, it must be removed from the vehicle. For this you will need:
- round nose pliers or pliers;
- wrenches 13 and 17;
- container for draining liquid;
- clean dry rag.
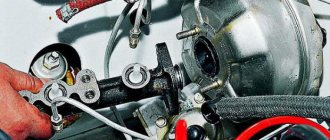
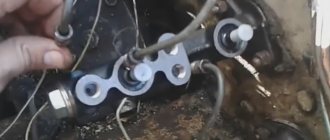
Dismantling of the RCS
Dismantling of the RCS is carried out in the following order:
- We install the car on an inspection hole or overpass.
- From the inspection hole, using a 17mm wrench, unscrew the tip of the connection between the hydraulic drive hose and the working cylinder.
The tip of the hydraulic drive hose is unscrewed with a 17 wrench - We place a container at the end of the hose and collect the liquid flowing from it.
- Using pliers, disconnect the tension spring from the clutch fork and remove it.
The tension spring is removed using pliers - Using pliers, pull out the cotter pin from the cylinder rod.
The cotter pin is pulled out from the cylinder rod using pliers - Using a 13mm wrench, unscrew the two bolts securing the control center to the crankcase.
The clutch slave cylinder is bolted to the crankcase with two bolts - Disconnect the spring bracket and remove it.
The tension spring bracket is mounted on the same bolts as the cylinder - We remove the working cylinder rod from engagement with the fork.
The working cylinder rod is connected to the fork - We remove the cylinder and use a rag to remove traces of working fluid and dirt from it.
VAZ 2107 clutch repair
Repairing clutch cylinders is somewhat more difficult than replacing them, but much cheaper.
Once the cylinders are removed, disassembly can begin. Let's start with the master cylinder:
- Use a thin screwdriver to remove the retaining ring.
- Remove the fitting and gasket.
- Remove the boot by prying it off with a screwdriver.
- Unscrew the cylinder plug using a 22mm wrench.
- Pull out the retaining ring and use a screwdriver to remove the inside of the cylinder.
To restore the master cylinder, the rubber seals must be replaced. It is also necessary to check the condition of the spring, the inner surface of the cylinder and the piston. If there are burrs or damage, parts must be replaced.
Before assembly, parts should be thoroughly cleaned and dried. It is unacceptable for gasoline or oil to get inside the cylinder - they destroy the rubber seals.
Assembly is carried out in the reverse order of disassembling the cylinder.
The clutch slave cylinder, despite some design features, is repaired in the same way as the main one.
After repairing the cylinders and installing them in place, it is necessary to bleed the hydraulic clutch drive.
Assembly
I won’t rant too much on the topic of assembly since assembly is done in the reverse order of disassembly. I will dwell only on the most important points.
We put the sprocket on the crankshaft journal and tighten the nut; we put adjusting washers on the gearbox shaft and then put the basket there along with the spacer sleeve; position the engine relative to yourself so that you can clearly see how aligned the teeth of the motor chain sprockets are relative to each other
In my case, the misalignment of the teeth was about 7 mm. The norm is within a millimeter. For clarity, I attached a ruler to the star. If you have the same situation with the alignment of the teeth, place adjusting washers under the spacer sleeve until the teeth are exactly opposite each other. If this point is neglected, the chain will work skewed, and this will lead to rapid wear of both the chain itself and the teeth of the basket and sprocket.
After installing two additional shims, the tooth misalignment situation was completely resolved.
We install the clutch parts in their places, tighten the nuts and secure them with washers.
We look for the thickest one among the metal disks and install it on the inner drum - with the chamfer facing the engine.
Next, we put the plastic disk behind it with the metal one, and so alternating the disks with each other, we assemble the basket.
We put the clutch rod in place.
We install the pressure plate, tension the springs, adjust the clutch and screw on the cover
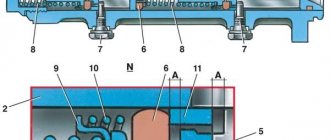
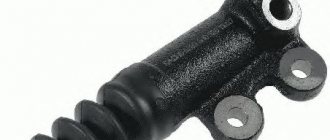
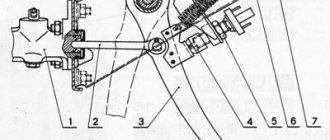
The device of the clutch slave cylinder VAZ 2107-2101
This part in the clutch system plays a fairly important role as the final link in the distribution of hydraulic load. In the classic VAZ clutch system, the master cylinder is located, respectively, in the engine compartment near the gearbox and has a fairly convenient outlet for repairing the VAZ 2106 clutch slave cylinder. The part consists of several main parts, which together form a single small but important unit:
- The piston directly serves to squeeze out the fluid located in the main tank (as usual, special brake fluid is poured there). When the clutch pedal is pressed, it is the piston that activates the hydraulic pressure mechanism and applies forceful pressure to the fork in the clutch.
- The case is the fundamental part in which the entire mechanism is enclosed. The outer part in modern versions is made of durable plastic. In early models on old Soviet designs, a metal body is sometimes found, but this design is less reliable not only due to age, but also due to the likelihood of corrosion.
- The rod is driven by a piston and acts as a pusher both when the pedal is pressed and after it is released. When pressed, this part pushes liquid into the system, and then closes the housing for liquid.
- The protective cap serves to maintain integrity inside the system when liquid enters. Otherwise, it is simply called a cover that covers the housing parts from excessive contact of substances with the mechanical parts of the unit.
- The spring acts as a single unit together with the piston when the gas pedal is pressed and actually “serves” the unit during the return action. One of the main reasons for system failure is often the wear of the spring, which causes the cylinder to not close properly and the fluid to escape beyond the closed circuit.
- A valve for bleeding air, which is also a common cause of failure of the entire part due to its inoperability. This part is designed to remove excess air during piston operation. Excess air, if present in the system and liquid penetrating inside, leads to the disappearance of the clutch, which can lead to an emergency. It is the valve that serves to remove the formed air, but for some reasons this unit can wear out and fail. Moreover, despite its simple design, such a part can rarely be repaired and most often must be completely replaced, not only because of the impossibility of the repair itself, but mostly because of the low cost of both the complete assembly and its individual parts.
Malfunctions and repairs of the clutch master cylinder
If we talk about the GCS, like any other device, this element can also fail. Although the clutch master cylinder is simple in design and reliable, over time individual elements wear out due to constant loads, especially if the car is operated in the city.
As a rule, seals and rubber parts are the first to fail. To put it simply, such sealing elements should be understood as boots that are put on the rod to protect the cylinder from dirt and small abrasives, as well as sealing collars that do not allow the working fluid to leak out.
Another element that can cause problems with the cylinder head is the spring in the cylinder. The spring of the clutch master cylinder constantly experiences loads during vehicle operation, and it is also affected by the brake fluid, which in this case performs the working function. When the metal becomes more brittle, the spring may simply burst.
One way or another, if there is a problem, the cylinder needs to be replaced. At the same time, in a number of cases it is also possible to get by with repairing the main central heating system rather than replacing it. Taking into account the relatively high cost of the part for many cars, this method is optimal. For these purposes, you need to purchase a clutch cylinder repair kit, which includes the necessary spare parts.
This approach usually allows you to sort out the device and completely restore its functionality. The main thing is that the repair kit is of high quality, and that the repair of the clutch master cylinder itself is carried out by experienced specialists.
The principle of operation of the clutch slave cylinder VAZ 2107-2101
The operating principle of this part is quite simple, however, despite its small dimensions, the function of pushing fluid into the system is very important in the operation of the entire clutch. The principle of operation of this unit is to briefly disconnect the gearbox and the motor itself during gear shifting. When you press the clutch pedal, fluid enters the master cylinder under the influence of a piston, which also presses on the clutch fork. This, in turn, acts on the gear selection clutch through a bearing, which also presses on the driven disk, disengaging the clutch.
Subsequently, when the pedal is released, the cylinder is returned to its original position by means of a spring, and the liquid flows back into the tank. The clutch also returns to its original position regardless of whether a particular gear is engaged or the vehicle is in neutral. Thus, this part is an important link during switching and acts as the main part of the hydraulic drive system. The advantage of this system is the simplicity of the design with the presence of a small number of mechanical parts, thereby limiting the friction process and increasing the overall resource. It is also worth noting the ease of repair and low cost of spare parts.
Purpose and operation of the VAZ 2106 clutch slave cylinder
In short, the working cylinder in the VAZ 2106 clutch system performs the function of an ordinary converter. It translates the driver's foot force into high brake fluid pressure in the vehicle's hydraulics.
The clutch slave cylinder for the “six” can be purchased at any spare parts store
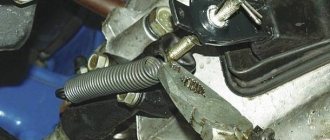
However, the clutch slave cylinder should not be confused with the main one, because these devices are located in different places on the machine. The main cylinder is located in the passenger compartment, and the working cylinder is attached to the clutch housing with two bolts. Getting to the working cylinder is easy: just open the car hood.
The clutch slave cylinder is located on the crankcase cover
Working cylinder device
The clutch slave cylinder consists of the following elements:
- cast body;
- hydraulic piston;
- pusher rod;
- working spring;
- a pair of ring-shaped sealing cuffs;
- washer and retaining ring;
- air valves;
- protective cap.
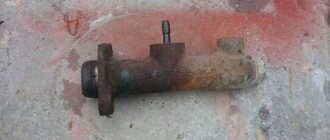
The clutch slave cylinder has a simple design
Operating principle
The operation of the cylinder begins the moment the car owner presses the clutch pedal connected to the push rod:
- The rod moves and presses on the piston located in the main clutch cylinder. This cylinder constantly contains brake fluid.
- Under the influence of the piston, the fluid pressure increases; it rushes sharply through the hose system to the clutch working cylinder and begins to put pressure on its rod.
- The rod quickly extends from the cast cylinder body and presses on a special fork, which moves sharply and puts pressure on the release bearing.
- After this, the clutch discs disengage, resulting in a complete disconnection of the transmission from the engine. At this moment the driver has the opportunity to engage the required gear.
- When the driver takes his foot off the pedal, everything happens in reverse. The pressure in all cylinders drops sharply, and the return spring pulls the working cylinder rod back into the cast housing.
- The fork is released and goes down.
- With nothing else in the way of the clutch discs, they engage again, connecting the transmission to the engine. The car then moves further in the new gear.
The slave cylinder presses on the fork and disengages the clutch
Signs of breakdown
Every owner of a VAZ 2106 should know several important signs that indicate that something is wrong with the clutch cylinder:
- the clutch pedal began to be pressed unusually easily;
- the pedal began to fail (this can occur either from time to time or constantly);
- the brake fluid level in the reservoir has dropped significantly;
- noticeable leaks of brake fluid appeared on the bottom of the car in the area where the gearbox was located;
If fluid leaks appear on the clutch slave cylinder, it means it’s time to repair the cylinder. - It has become more difficult to change gears, and moving the gear lever is accompanied by a strong grinding noise in the box.
Fortunately, the clutch cylinder is easy to repair. It is quite rare to change the working cylinder on sixes, and repair kits for them can be found in almost any auto parts store.
Selecting a clutch slave cylinder for a VAZ 2107-2101
On the domestic market of automobile parts there is a huge number of parts and spare parts for classic cars of the VAZ family. In addition, there are a large number of repair kits for the VAZ 2101 2107 clutch slave cylinder. Over the decades of production of these models, the design has not undergone significant changes, accordingly, the parts must be sharpened and completely match in all respects. Moreover, on all rear-wheel drive models, virtually the same unit is installed, which has similar characteristics and dimensions. The main criterion when choosing a part to replace the VAZ 2101 clutch slave cylinder is the factor of quality and reliability of this unit. Taking into account the large supply from various enterprises, sometimes not in any way connected with the manufacturer, and the varying costs, the quality remains very unstable.
The optimal solution when choosing this system is to purchase an original repair kit or the entire assembly from the automaker. Although the cost of such a unit is often higher than its third-party competitors, the likelihood of receiving a counterfeit product is still disproportionately lower, and, given the importance of the unit in the process of driving a car, it is not possible to rely on chance.
Malfunctions of the clutch slave cylinder VAZ 2107-2101
The most common system malfunctions, which can lead to complete failure of the entire unit, include:
- Presence of excess air in the system. This situation can arise if there are cracks in the rubber pipes or sealing joints, as well as as a result of fatigue of the plastic housing and the presence of microcracks. In this case, a complete replacement of the failed part is carried out, since excess air does not allow creating the necessary pressure to open the bearing and clutch, thereby the owner simply will not be able to engage the gear correctly.
- Wear due to various reasons of the components of the assembly themselves. Thus, as a result of the breakdown of any part of the assembly, the general principle of operation is violated, since, despite the simplicity of the design, each element, performing a specific function, directly affects the performance of the system as a whole. In this case, in addition to simply replacing the entire system, the option of disassembling and eliminating a specific malfunction may be considered by replacing a certain component in the form of a part using a repair kit.
Do-it-yourself replacement of the VAZ 2107-2101 clutch slave cylinder
Carrying out independent repairs of this drive will require the owner not only to have a certain set of tools in the form of various keys with different head sizes and repair kits, but also certain repair skills. Self-repair is quite within the capabilities of an experienced owner of a VAZ classic. Also, the owner will definitely need a lift or MA in the garage, since the part is located in the lower part of the engine compartment, in close proximity to the gearbox.
For beginners, in most cases you will need an assistant. In total, there are two main types of work with this part - removing and installing a new device into the system, which will not require additional time, and repairing the original part with complete or partial disassembly, which will require a sufficient amount of time, this directly depends on the experience of the owner.
How to remove the clutch slave cylinder VAZ 2107-2101
The procedure for removing the unit as a whole takes place in several main stages:
- All fluid must be removed from the clutch reservoir. To do this, you will need a regular small volume syringe. This tank is located in the upper part of the engine compartment. This is necessary to prevent the substance from spilling onto the owner or outside the system.
- After this, it is necessary to loosen the fastenings of the tank itself and, if necessary, dismantle it. At the same time, use a 13-mm wrench to loosen the rubber pipe leading from the tank to the master cylinder, thereby freeing up free access to the system.
- After this, also use a 13 key to disconnect the part from the other clamps of the clutch system and unscrew the 2 mounting fasteners using a regular screwdriver, which hold the body in the seat. After this, the part can be completely removed.
Repair of clutch slave cylinder VAZ 2107-2101
Repair work also takes place in several stages and is carried out immediately after dismantling the device itself:
- Using a 22mm socket wrench, unscrew the plug and remove the boot along with the locking ring.
- Then move the VAZ 2106 clutch slave cylinder rod all the way and then remove the fitting from the seat. This opens access to all internal parts of the device.
- These parts are located inside the housing and are arranged in a certain sequence.
Installation of the clutch slave cylinder VAZ 2107-2101
Reinstallation of a repaired part or installation of a new device occurs in the reverse order:
- The tank and cylinder linkage assembly must be secured in the standard mounting points in the engine compartment using keys.
- After this, it is necessary to connect the main part with the branch pipes of the vehicle systems, while choosing the correct tightening torque for the clamps.
- After this, connect the tank to the general hydraulic drive system and fill the liquid in accordance with the level.
Disassembly
To disassemble the clutch, it is not at all necessary to drain the oil, much less remove the engine from the frame. It will be enough to turn the motorcycle on its side, unscrew the parts that interfere with removing the clutch cover and then remove the cover itself and that’s it. In my case, it just so happened that the engine was one way or another, but it was necessary to remove it from the frame in any case.
This is what the clutch parts look like under the cover. As you can see: there is nothing complicated, much less fundamentally new, here.
First of all, we check the motor chain: press it with a screwdriver or finger and see how much it sags. If the sag is more than 20mm, then we change the chain; if the sag is less, then it can be safely used.
Using a homemade hook from an old bicycle spoke, remove the spring tendrils from the clutch pressure plate.
Remove and set aside the pressure plate and remove the clutch rod from the gearbox input shaft.
We take the discs out of the basket and carefully inspect them. We inspect plastic discs first of all for wear, cracks and the integrity of the protrusions with which they enter the basket.
We check metal disks, including the pressure and support disks, for warping of the working surfaces. To do this, place them one by one on a mirror or piece of glass and look. If the disk does not lie on the glass with its entire surface and when pressing on it it wobbles, then such a disk must be replaced with another one.
If this moment is neglected, the clutch will lead and slip, and no amount of adjustment will correct the situation.
Use an old, unnecessary screwdriver to unbend the lock washer under the inner drum nut. We put a puller on the inner clutch drum, which is an unnecessary clutch disc to which the tires are welded. And with a 17mm head we unscrew the nut on the drum and remove it from the shaft (left-hand thread).
There was some kind of “left” washer under the inner clutch drum...
When inspecting the inner drum, pay special attention to the condition of its internal splines. Often and densely, the nut securing the drum becomes loose, the drum begins to dangle on the shaft during engine operation and, as a result, breaks the splines of the secondary shaft of the gearbox and the drum itself. And then, no matter how well you tighten the nut, it will still unscrew and eventually there will come a moment when the splines simply cut off.
To ensure the continued suitability of the splines, place the drum on the secondary shaft and shake it. If the drum has a slight play, then this is quite normal, but if it wobbles very much, then it is better to replace such a drum with a new one.
In my case, the drum has already been changed and most likely it was changed due to wear on the splines, and there is nothing else to change it for. There is nothing to break in it other than the splines.
Just as in the case of the inner drum nut, we unbend the lock washer, place a tin rod or piece of wood under the motor chain and unscrew the nut securing the sprocket (right-hand thread).
Using a conventional two-legged puller, we pull the sprocket off the axle and remove it along with the basket and chain. The sprocket sits on a key - do not lose it when removing it.
There should be adjusting washers under the basket on the secondary shaft; if they are not there, it means someone has already dug in there before you...
There is essentially nothing to break in the basket itself, as well as in the drive sprocket. The only thing you should pay attention to is the condition of the teeth of the kickstarter ratchet mechanism. By the way, the kickstarter ratchet mechanism here is very reliable and rarely fails, but it won’t hurt to disassemble it once again.
In my case, the ratchet mechanism was in quite satisfactory condition. Even in such a worn-out state, it fulfilled its function. The rivets have not loosened, the teeth are all in place and without signs of excessive wear, so we will leave everything as is and will not touch anything.
Tips and tricks
As the main advice when choosing this unit, you should mention the quality of materials when purchasing. The purchased parts must have the manufacturer's markings and series and batch numbers. Many enterprises have their own information resources where you can check the originality of a part by simply checking the batch numbers and the specific part.
Also, in the process of replacing the VAZ 2104 clutch slave cylinder, it is necessary to strictly follow the sequence of actions and accurately calculate the tightening torque of the hoses and pipes from the fluid tank to the main part in order to avoid cracking of the rubber and plastic parts of the body.
Also, once every few thousand kilometers, it is necessary to carry out an inspection of the entire assembly, since the vast majority of cars of these models have significant mileage, the likelihood of unexpected breakdowns is quite high.
What is a hydraulic drive
The clutch in a car is controlled using a pedal. The force from it to the disk can be transmitted in two ways:
- Using a cable.
- Hydraulic drive.
The simplest and most common is the first method, while the “seven” uses the second. Its essence, without going into details, is as follows.
The hydraulic drive consists of two cylinders connected by tubes and hoses. It is designed so that pressing the clutch pedal leads to a significant increase in pressure in the system. It is mechanically transmitted to the driven disk and disconnects the transmission from the engine. The key elements of the system are two VAZ-2107 clutch cylinders: the main and the slave. One of them transforms the force acting on the pedal into excess pressure in the system tubes, the other does the opposite work, acting on the driven disk.
Clutch design VAZ-2107
The main components of the “seven” hydraulic drive are:
- Main cylinder.
- Metal tube system.
- Clutch slave cylinder VAZ-2107.
- Pedal equipped with a pusher.
- Clutch fork.
The master cylinder is combined with a reservoir into which brake fluid is poured. It is located under the hood of the car, on the wall of the engine compartment. This location allows for a mechanical connection between the cylinder and the clutch pedal. For this, a steel rod, the so-called pusher, is used.
The working cylinder is attached with two bolts to the gearbox housing and is connected to the fork by a rod. The entire length of the metal rod is threaded, which allows you to adjust the clutch. Both cylinders are connected to each other by a copper tube and hoses.
The principle of operation of the VAZ-2107 clutch
The force of pressing the pedal is transmitted via a rod to the master cylinder of the VAZ-2107 clutch. The liquid contained in it is squeezed out into the pipeline. Due to the tightness of the system and the absence of air in it, the force is transmitted to the working cylinder. The rod, extending, acts on the fork, which presses the driven disk. Releasing the pedal causes the rods and brake fluid to move back. As a result, the system returns to its original position.
It is obvious that the basis of the hydraulic clutch drive of the “seven” is the cylinders. They bear most of the load in the form of repeated movement of the rod, during which hydraulic pressure also acts on the internal elements. Therefore, the cylinders are the first to fail. Since they are dismountable, and corresponding repair kits are available for sale, some faults can be repaired yourself. True, more often car enthusiasts prefer to change the entire cylinder.
The fact is that in this case, labor costs for repairs are often inadequate to the cost of the assembled unit. For example, the price of a VAZ-2107 clutch master cylinder is about 1,500 rubles, and you will have to spend a decent amount of time restoring it, especially if you have no experience. However, whether to repair or buy a new one is up to the owner of the “Seven”.
When and how to replace the clutch fork?
First of all, if the clutch fork fails, you will not be able to drive the car normally, since the clutch simply will not work. Of course, you can get to the repair site if you know how to drive without a clutch. However, we are not talking about normal operation of a vehicle with such a breakdown.
The clutch actually connects the engine and the gearbox, and this connection can be interrupted by pressing the clutch pedal in the passenger compartment. It is necessary to interrupt the transmission of torque from the engine to the gearbox to change gears. The clutch also reduces shock, vibration and other loads, protecting the engine and gearbox.
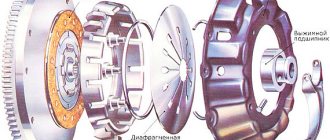
Although there are several types of clutch, the most common is the friction clutch, where the torque from the engine is transmitted through friction. This type of clutch can be single-disc, double-disc or multi-disc friction clutch. At the same time, the single-disc version remains the simplest and most widespread.
A single-disc clutch consists of the following main elements:
- pressure and driven disk;
- release bearing and its coupling;
- diaphragm spring;
- clutch forks;
Simply put, one side of the clutch assembly is attached to the engine flywheel, and on the other side the gearbox shaft is connected through a splined connection. This clutch is always closed (the discs are pressed against each other). In this case, to open the clutch (in fact, to distribute the pressure and driven disks), the clutch release drive is used.
So, after pressing the clutch pedal in the cabin, the force is transferred to the clutch drive, resulting in the movement of the clutch fork. This fork, in turn, transmits force to the release bearing, which moves, influencing the petals of the diaphragm spring of the pressure plate (clutch basket).
The petals of the spring are pressed, the outer edge of the basket moves away from the pressure plate, and tangential springs also help it press out. As a result, the disks open, and torque from the motor is not transmitted to the box. After the driver releases the clutch pedal, the diaphragm spring exerts force, the pressure and driven disks close, the torque is again transmitted from the flywheel and the transmission of torque to the box resumes.
As you can see, the fork is responsible for turning the clutch on and off, that is, the ability to separate the internal combustion engine and gearbox depends on its serviceability. Also, with a manual transmission, provided that the fork and the clutch itself are in good working order, you can smoothly dose the traction without fully releasing the clutch pedal, allow the engine to idle without engaging neutral gear, etc.
If the car's clutch does not respond well to pedal pressure, problems with the fork should not be ruled out. At the initial stage, you can adjust the free play of the clutch fork, but you must remember that this is a temporary measure. After a short period of time, malfunctions in the clutch on/off mechanism will appear again.
If the clutch is not worn out, and there is no noise or vibration during its operation, and the clutch drive does not cause any other complaints, then the fork is often the source of problems. As a rule, a crack appears on the plug, after which the element is actively damaged.
The main symptoms are an increase in free play of the clutch pedal, difficulties when shifting gears when the clutch pedal is depressed, as well as a clear failure of the clutch pedal, and the clutch does not disengage.
- To verify that the fork is causing the problem, it is recommended to inspect the mechanism. To do this, the car is driven into a pit or raised on a lift, then the dirt boot is moved, which covers the clutch fork. Having adjusted the lighting (control lamp, flashlight, etc.), it is possible to inspect the plug.
- If cracks and obvious defects are visible, then they will be noticeable. Often the fork cracks in the part where the part transitions into a smooth flat surface of the part where it transitions into a flat plane. However, even if there are no cracks, the fork may still be severely worn in other places.
- Also, the clutch fork breaks in some cases (when driving, the clutch pedal drops sharply). The fork also bends from mechanical stress, that is, physical deformation of the clutch fork occurs. This occurs as a result of breakdowns of the clutch itself, since in order to bend the part, the force required is quite large.
- The clutch fork legs themselves often wear out. This often happens on cars with high mileage, where the clutch fork has not been changed for a long time. The fork legs directly affect other clutch elements, and defects at the point of their contact with the clutch inevitably lead to malfunctions.
- We also note that even a new fork may have defects, that is, when purchasing spare parts (especially non-original ones), you need to immediately inspect the product for possible defects.
Replacing the clutch fork yourself
As a rule, many car service centers may separately indicate that to replace the clutch fork you need to remove the gearbox. In fact, this is often not the case, and the service simply intends to receive additional income, taking into account the complexity and labor-intensive work of dismantling the checkpoint.
Moreover, if you know how to replace the clutch fork without dismantling the gearbox, you can do all the work yourself in a regular garage. Naturally, the guide below is general, that is, the possibility of such a plug replacement needs to be clarified depending on the specific car model.
So, having made sure that the fork needs to be replaced, you will need to prepare a working or new part. If you have purchased a new fork, experts recommend that you first sharpen its ends (legs) on a grindstone, holding the fork at an angle (an angle of about 45 degrees).
Turning will allow you to install a new fork under the pressure spring located on the release bearing hub. Also, for ease of installation, you need to place a special hook under the spring, which you can use to lift the spring and insert a new fork.
To remove the old plug you will need:
- dismantle the clutch slave cylinder. The cylinder is removed along with the rod. After removal, the cylinder is moved to the side along with the hose to which it is attached;
- remove the protective cover from the old fork, remove the fork from the clutch housing. Then you need to inspect the casing and clean it of dirt;
- prepare for installing a new plug.
Replacing the clutch fork without removing the box with your own hands does not seem difficult. To do this, you need to find a spherical pin in the clutch housing, under which the fork retainer petals are inserted; We also recommend reading the article on how to adjust the clutch pedal. From this article you will learn how to adjust the clutch pedal, as well as what nuances you should pay attention to during this procedure. - Next you need to locate the release bearing hub and wire spring. You need to insert the turned fork legs under the spring, and the hook mentioned above is used to tighten the spring.
- after installation, the fork should stand between the spring and the release bearing hub;
- the final stage is the reassembly and installation of all parts that were previously removed to replace the clutch fork;
- After assembly has been completed, you need to check the quality of the clutch by test driving the car. If necessary, you may also need to adjust/bleed the clutch to get the best results.
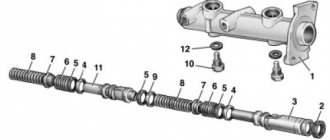
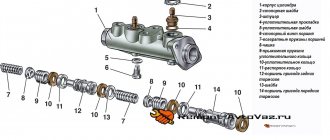
Design and operation of the VAZ-2107 GCS
The clutch master cylinder is a rather complex assembly consisting of a large number of parts. However, in order to understand the principle of operation, it is enough to name the main ones. These include:
- main body with brake fluid reservoir;
- cylinder piston;
- union;
- return spring.
The principle of operation of the cylinder resembles the operation of a conventional piston pump and is as follows: pressing the clutch pedal causes the movement of its pusher, which acts on the piston. Moving forward, it creates pressure in front of itself, which is transmitted through tubes and hoses to the working cylinder. Its rod extends and displaces the clutch fork, the driven disk disengages the transmission. When the pedal is released, the reverse process occurs.
Design and principle of operation of the GCS
To begin with, a hydraulic clutch consists of a pair of cylinders (clutch master and slave cylinders) that allow the clutch to operate hydraulically. As for the master cylinder, the design of the main cylinder and its operating principle is as follows:
- the force from the clutch pedal is transmitted through the pusher to the rod. Next, the piston extends, as a result the valve closes, as a result of which the liquid from the part of the cylinder where it is compressed is able to flow into a separate tank;
- the liquid compressed in the cylinder is pushed through the fitting, after which it enters the hydraulic line, through which it is supplied to the working cylinder;
- the working cylinder acts on the fork, transmitting force to it. After the driver releases the clutch pedal, the piston of the cylinder returns back using a spring.
As you can see, the clutch hydraulic drive works similarly to other systems (for example, the hydraulic brake system), which are based on a fluid that is almost not compressed under pressure, but there is an effective and quick transfer of force to the actuators.
Please note that when choosing a new part, you must take into account individual technical characteristics, method of fastening, connection, the presence of a tank in the kit, body material, dimensions, rod length, fitting diameter, etc.
In other words, when choosing a master cylinder for a particular car, you need to take into account a number of parameters and features. It is also recommended to pay special attention to the material of manufacture. The fact is that cylinders can be either steel, aluminum or cast iron, or plastic (made from polymers).
Products made of cast iron and aluminum are quite common and are an “average” option in terms of quality; plastic cases are the most affordable, but are not always reliable and have a long service life. As for steel, such cylinders are the most reliable, but have a high cost due to the complexity of manufacturing.
Typical faults
A large number of rubber gaskets and seals are used for various seals in the cylinder. Most often, they are the reason for the unsatisfactory performance of the GVC. The symptoms will be the following:
- the clutch does not disengage;
- the pedal is not pressed;
- brake fluid leaks on the cylinder body;
- The clutch pedal does not return to its original position.
Such signs are characteristic not only of a malfunction of the main circulation system. Only leaks of brake fluid on the body indicate it reliably. You will have to repair or change the clutch master cylinder of the VAZ-2107, the price in the second case will be noticeably higher, but the service life will also be longer.
Causes and symptoms of GCS malfunction
As mentioned above, wear and tear of individual cylinder elements is inevitable over time. Also, premature failure of a part can be caused by untimely replacement of brake fluid, ruptures of seals, errors in assembling/installing individual spare parts from the repair kit, etc.
As a rule, the most serious damage can be considered when the mirror of the cylinder itself is heavily worn, scuffs, abrasions and other defects appear on the metal surface, and pockets of corrosion are visible. In such a situation, a conventional overhaul using a repair kit is often not possible. The only solution is to completely replace the clutch master cylinder.
The fact is that one of the properties of brake fluid is high penetrating ability. This means that fluid seeps through even the smallest scratches on the cylinder bore and/or piston. Replacing only the rubber seals does not help in this case.
We also recommend reading the article about whether there is a clutch in an automatic transmission. From this article you will learn what devices and mechanisms in an automatic transmission perform the clutch function, as well as how the clutch works in an automatic transmission.
Often, a high-quality GCS repair kit usually has both cuffs and a new piston. However, if there are scratches on the cylinder mirror, in this case the entire part needs to be replaced. For this reason, it is important to prevent critical wear and tear by paying attention to the slightest signs of failure of the main circulation system. As soon as a problem occurs in the cylinder, fluid can leak out of the system and its level decreases.
Also, the clutch pedal may work worse; while driving, the driver notices that the gear shifting process is disrupted as a result of clutch malfunctions. If there are problems with the cylinder, the clutch pedal may fall to the lower position (fall, stick), the pedal travel becomes tight, etc.
In this case, a visual inspection must be carried out immediately. First of all, you should check the level and condition of the brake fluid. You also need to inspect the cylinder itself. If there are obvious stains on the cylinder or the seals (cuffs) are wet, then a leak is obvious.
We also note that a common problem with the clutch master cylinder is active clogging of the holes in the reservoir cap. In order for the device to work properly, it is assumed that the fluid level in the cylinder reservoir constantly rises and then decreases.
In order for the level to rise and fall normally, there are special ventilation holes in the tank lid. In cases where the holes are clogged with dirt, the entire hydraulic drive malfunctions, the clutch pedal moves hard, the clutch pedal slowly returns to its original position, etc.
Removal and repair
Regardless of whether the owner decided to restore the GVC or preferred to buy a new one, the first step is to dismantle the old one. To work you will need:
- set of spanners;
- medium sized screwdriver;
- pliers;
- brake fluid for topping up;
- repair kit for clutch cylinder VAZ-2107 (in case of repair);
- small container for draining brake fluid.
The sequence for removing the clutch master cylinder is as follows:
- It is necessary to drain the brake fluid from the reservoir. This can be done using a syringe. However, it will be more professional and faster to loosen the clamp, remove the hose from the fitting and quickly place a suitable container under it.
- Using a 10mm open-end wrench, unscrew the metal tube from the main center and move it to the side.
- Using a 13mm socket, unscrew the two nuts securing the cylinder to the engine compartment bulkhead.
- The GCS can be removed.
First of all, the cylinder must be inspected. This will help you decide on repair or replacement. It makes sense to restore the cylinder only if the rubber seals are worn out. The work is carried out in the following sequence:
- Unscrew the plug at the end of the GCS; if necessary, it will have to be clamped in a vice.
- Pull out the return spring.
- Using a screwdriver, remove the rubber cap.
- Now you need to remove the retaining ring.
- Using a screwdriver from the side of the unscrewed plug, push out the cylinder piston.
- Replace all rubber gaskets, rings and seals. To make installation easier, they must be pre-lubricated with brake fluid.
Assembly and installation of the VAZ-2107 clutch cylinder is carried out in the reverse order. After installing the reservoir, it must be filled with brake fluid. True, the clutch will not work yet. Air must be removed from the system.
How to bleed the clutch
Removing air from the system is necessary after any repair of the central circulation system. It is better to carry out work with an assistant. Bleeding the VAZ-2107 clutch cylinder is carried out in the following sequence:
- prepare a small diameter hose and a container with brake fluid;
- fill the tank without adding 1.5 - 2 cm to the top;
- “release” the working cylinder fitting a little and put the hose on it;
- lower its second end into a container with brake fluid;
- press and release the clutch pedal until all the air is released from the system, this can be determined by the absence of bubbles;
- as soon as this happens, you need to fix the pedal pressed and tighten the fitting;
- check clutch operation.
If necessary, the process should be repeated.
Source
Bleeding the clutch of a VAZ 2106 with the help of a partner
Replacing the cylinder or any other manipulations with the clutch inevitably leads to depressurization of the hydraulic drive and air getting into the clutch hoses. To normalize clutch operation, this air will have to be removed by bleeding . Here's what's required:
- 0.5 liters of new brake fluid;
- a piece of rubber hose 30 cm long;
- open-end wrench 8 mm;
- empty brake fluid container.
Sequence of work
For normal pumping you will have to use the help of a partner. It is simply impossible to do everything alone.
- When the clutch slave cylinder is repaired and installed in its original place, brake fluid is added to the reservoir. Its level should reach the upper mark located near the neck of the tank.
The fluid in the clutch reservoir must be added to the mark next to the neck - The clutch cylinder has an air valve with a fitting. One end of the hose is put on the fitting. The second one is lowered into an empty container (a regular plastic bottle is best suited for these purposes).
The second end of the hose attached to the fitting is lowered into a plastic bottle - After this, your partner must press the clutch pedal six times. After the sixth press, he should keep the pedal completely recessed into the floor.
- Unscrew the air valve fitting two or three turns using an 8 mm open-end wrench. After unscrewing, a characteristic hiss will be heard and bubbling brake fluid will begin to flow into the container. You need to wait until the bubbles stop appearing and tighten the fitting.
- Now again we ask the partner to press the clutch pedal six times, unscrew the fitting again and bleed the air again. The procedure is repeated until the liquid flowing from the fitting stops bubbling. If this happens, the pumping can be considered completed. All that remains is to add fresh brake fluid to the reservoir.