There are two types of fog lights on a car: front PTF and rear PTF. As for the PTF located at the rear, according to the law they must be present in all cars, so we will not touch on them in this article. Almost all modern cars have front PTFs or places for their installation. With the development of the automobile market, at first glance, such a “penny” option should be in the basic configuration of the car, but it is this element that often indicates a higher level of equipment of the car, which automobile marketers make excellent use of by adding additional options to the standard fog lights that increase the cost of the car and make it higher class. As for cars that are not equipped with PTF from the factory, in this case you can install them yourself. This article will tell you how to install front PTFs with minimal skills of a car mechanic and electrician, as well as installation rules and what lamps to use.
There is a choice, a comparison is necessary
There is a choice, but it is better to take a proven kit.
Yes, there really is a choice. The market offers fairly high-quality equipment from various manufacturers, ranging from the Bosch branded line to analog kits made in China.
You can conduct a whole analytical analysis of all products with comparison:
- supply kits;
- price corridor;
- the presence of certain advantages of choice (some manufacturers allow you to buy not a set, but one headlight at a time), but let’s leave this for marketers
As they say, heaven is for the birds, and we have headlights, and a complete set. Take it as you will, but there is no better equipment on the market than Bosch yet (author's opinion).
Purchasing equipment from other manufacturers is fraught with pitfalls that will certainly reveal themselves during installation. Either the valve is missing, or the wire is insufficiently long and needs to be extended, or the button for the panel is non-standard and requires additional effort to install.
Purchase and preparation for work
Photo of the kit before installation.
All contacts must be insulated.
We select directly for work:
- All purchased kits;
- 15A fuse and holder for it;
- Screwdrivers, shaped and flat:
- Rigid wire, preferably steel, 20-25 cm for pulling wires;
- A wrench for 8 and 10 and a hexagon for adjusting the light (we also include a tape measure here);
- Wire cutters and electrical tape, as well as plastic clamps for fixing the wiring into a single bundle.
Bumper work
It's better to remove the bumper.
Moving somewhat away from the specific and coming to the general, I would like to say that all work takes place in three stages:
- Installing headlights directly on the bumper;
- Wiring and assembly of the entire system;
- Checking correct installation and adjusting the light.
That's all the instructions.
And we start with the bumper, where the following actions are carried out:
- To begin with, the black bumper grilles are removed, taking into account the fact that they are fixed with both screw fasteners and latches;
- We remove the bumper directly, unscrewing the mounting bolts, as well as the screws fastening to the fender liners;
- After unscrewing the fasteners, the bumper moves forward and moves out with light movements with slight vibrations;
- Next, remove the plugs for the sockets for the fog lamps; this can be done easily with a flat screwdriver, bending the latches;
- The headlight is inserted together with a ready-made purchased plug, which must be painted or sealed before installation, and is fixed with three self-tapping screws in special sockets.
Working with the kit
It is no coincidence that the wires are multi-colored.
Now let's move on to wires, buttons, fuses.
We produce the following:
- First of all, we remove the rubber seal that secures the wiring harness into the interior (it is located behind the clutch pedal);
- We install the button on the panel, and remove the wires from the passenger compartment using rigid steel wire for pulling (we fix the new wires along the length of the harness with plastic clamps so that there is no sagging of the wires);
- The wiring is carried out directly to the fog lights. In this case, the right wire will be longer; it is better to run it under the radiator grille. At the same stage, the negative terminals are installed to the body bolts (except for the crankcase protection bolts); (see also the article Kalina wiring diagram: new elements of electrical equipment)
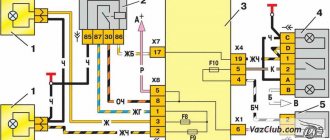
- Next, we find the fuse box, where we will be interested in the pink wire that supplies power to the high beams. All connections are made through a 15 amp fuse;
- Then we need 87 and 30 relays and their power contacts, which, after passing through the fuse, go to the fog lights;
- Contacts 85 and 86 provide the negative component of the network, with output to the negative terminal of the battery and the car body, but with a mandatory “mark” in the fuse;
- Next, the installation is checked and reassembled.
And we put everything in place.
Light adjustment
How to install fog lights on Kalina is already clear, all that remains is to adjust the light. To do this, we find the hole under the headlight where the adjustment screw is located, and use it to adjust the light level.
Adjustment is the final touch.
https://youtube.com/watch?v=THTdZcFdVzU
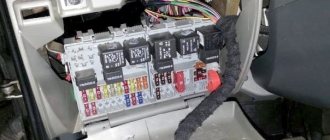
Additional relay and fuse box
It is located behind the glove compartment at the feet of the front passenger. To access, unfortunately, you will have to remove the glove box. The fuses for the electric fans of the cooling system and the engine control relay (injection system) are located here.
p, blockquote 42,0,0,0,0 —>
Scheme
p, blockquote 43,0,0,0,0 —>
p, blockquote 44,0,0,0,0 —>
Purpose
p, blockquote 45,0,0,0,0 —>
- Additional relay (turns on the right electric fan through an additional resistor at low rotation speed);
- Fuse (50A) protecting the power circuits of the additional relay and the right electric fan relay;
- Fuse for the fuel pump (fuel pump) (15A), protecting the power circuits of the electric fuel pump relay;
- Fuse (15A) protecting the constant power supply circuit of the controller;
- Right electric fan relay;
- Left electric fan relay;
- Electric fuel pump relay;
- Main relay;
- Fuse (50A) protecting the left electric fan circuits;
- Fuse (15A) protecting power circuits switched on by the main relay;
- Controller
Why should you install fog lights?
Installing fog lights on a Priora
Unfortunately, not the entire range of vehicles that modern automakers so generously offer us have properly selected fog lights.
Attention! The fact is that in some cars, manufacturers save quite a lot on electrics, which means that the light, which should be bright enough, cannot fully manifest itself simply because it does not receive enough energy for this.
As for bad weather, very often the headlights that were installed by the manufacturer are simply not able to cope with the weather conditions that the car encounters. The number of diodes in them is simply not enough.
Those who doubt the advisability of such a purchase and its adjustment should realize that fog lights help not only in bad weather. Very often, experienced drivers note that the use of such light protects against accidents in places with a large number of turns, since the light does not hit the eyes, but spreads along the asphalt.
If you are choosing fog lights for the first time, pay attention to their characteristics:
- glass thickness and body strength;
- possibility of repair, for example, changing a lighting element or glass;
- quality of fastening and regulation;
- aerodynamic.
Connecting LED lamps
Currently, the efficiency of diode light has been tested in practice by many car enthusiasts and is becoming increasingly widespread compared to factory lamps. Although, many car manufacturers have also started using LED bulbs in headlights along with LED fog lights. This light is more uniform and clear, and these lamps also have lower energy consumption and it is possible to choose a different color palette of lamps. They are installed in standard places in the fog lamp housing.
Preparing for work
YouTube pranks and fuses for Lada Largus
Before going to an auto parts store and choosing fog lights (FFL), car owners should know that the procedure for installing them is regulated by the Road Traffic Rules.
In particular, the installation of PTF on a car must be carried out in places specified by the car manufacturer.
In relation to AvtoVAZ wiring products, the connection diagram for fog lights on Kalina implies their installation in the front bumper:
- For this purpose, it has special places covered with plastic plugs;
- The package of purchased headlights must have all the necessary elements for proper connection (wiring, terminal blocks, power button, fuse and relay).
Seat for PTF in the front bumper of Lada Kalina
What can you buy for Kalina?
A wide variety of foglights for cars amazes the imagination with their appearance and shapes:
- Round;
- Oval;
- Square;
- Twin;
- Recessed;
- For outdoor installation, etc.
Not all PTFs are suitable for Lada Kalina, which forces owners to redo the mount themselves
However, only a few PTFs produced by different manufacturers are suitable for Lada Kalina.
In particular, these are:
- Bosch products, characterized by flat glass headlights and sold only in pairs;
- Fog lamps “Kirzhach” with lens-shaped (convex) glass;
- Fog lights “Luch” are an analogue of German products. The price is lower, but so is the quality;
- Products of Chinese companies under the ProSport brand.
PTF ProSport in chrome configuration
How can I install
There are 2 ways to install fog lights on a Lada Kalina car:
- Without removing the front bumper;
- With bumper removed.
The factory instructions provide detailed information on all mounting points for the front bumper
Connection diagram
For installation, two connection schemes for fog lights are possible:
When connected in parallel, the positive wire goes to each headlight from the relay contact. Power to the relay is supplied through a fuse link with a rating of 15 A, which is enough for most models of fog lights. It is advisable to place the fuse as close to the battery terminal as possible.
The +12V signal voltage should appear only when the ignition is active. This measure prevents the headlights from working when the engine is off. If desired, you can automatically ignite the headlights after turning on the ignition. To do this, the signal wire is connected to the battery charging indicator lamp installed in the instrument cluster. The button must be on.
Parallel connection
Serial connection reduces current consumption and lamp brightness. A similar scheme is used to use fog lights instead of standard headlights.
Serial connection
Connecting additional headlights via a relay is demonstrated in the video tutorial from the “AUTO ELECTRICAL — Steel Horse” channel.
Methods for installing PTF on VAZ 2113, 2114, 2115
Lada 2110 Relyushka Logbook Installing an alternative sound signal 2013
Installation of fog lights can be done in several ways. Which one to choose, each car owner decides for himself, based on his capabilities and preferences. Let's look at the most common installation options:
- Buying a front bumper with PTF. In this case, the headlights are sold already mounted in the front bumper. As a rule, a part can be purchased without any problems at a car tuning studio and immediately installed and connected. The disadvantages of this option include high financial costs.
- Buying a bumper with holes for PTF. With this installation method, you should purchase a bumper with holes for the lights and the headlights themselves with all the necessary elements (wires, relays, power button, etc.).
- Self-installation of PTF is the most common installation method, since it requires minimal financial investment. The car owner only needs to purchase headlights with the necessary installation kit and facing elements.
PTF location diagram on a car
Before connecting the fog lights, it is important to install the devices correctly on the front of the car. This is done in accordance with certain rules, which clearly stipulate the location of the light source.
On modern cars, the installation locations for fog lights are marked from the factory. Basically, such lighting elements are installed on more expensive car configurations. If the headlights were not installed from the factory, then the places for their installation are closed with plugs.
Fog lights on the front of the vehicle must be installed in accordance with established regulations
Is it possible to install xenon in PTF
Many car owners seek to install xenon in fog lights, arguing their actions by increasing lighting efficiency. Is this really true? Let's figure it out. First of all, when installing xenon in standard PTF housings, focusing is disrupted, which is due to a different operating principle in contrast to conventional lamps. Since standard fog lights are designed to operate with certain lamps, they simply cannot cope with xenon. The result of such changes will be too much reflection in the reflector, the rays are refracted, the light becomes blurred. A well-known situation arises - the blinding of drivers of oncoming vehicles, which increases the risk of an accident. Installing xenon in PTF is far from the most successful solution and the effectiveness of such light is questionable, so it should be abandoned.
When installing xenon light in standard fog lights, focusing is disrupted, which leads to dazzling oncoming drivers
Is it possible to install additional high beams?
The rules do not prohibit such “remodeling” of a car. But remember that additional headlights can only be used off-road. While the car is driving along the highway, they must be turned off or covered with light-proof covers.
The T-1 standard does not indicate how to connect additional high-beam headlights on a car. The answer to this question will be given by the instructions for the products. It is also important to comply with the requirements of the relevant GOSTs.
Many car owners are interested in additional high beam headlights – which ones are better and which ones to choose for an SUV. There are no strict requirements here. The main thing is that they are powerful, bright and cope with their tasks. Therefore, give preference to products from reliable manufacturers.
How to supply the PTF with the necessary materials and tools
Installation of fog lights, regardless of the chosen installation method, requires the presence of certain parts and tools, without which it is impossible.
What are the button and relay for?
In order to install fog lights on a VAZ, you need to assemble certain parts in advance or purchase a ready-made kit. The cost of such a set rarely exceeds one thousand rubles.
The PTF kit includes:
- wires with blocks and terminals for a specific VAZ model. There are three of them as standard: one connects the headlights, the second goes to the relay from the switch, and the third goes from the relay to the fuse box;
- fog lamp relay;
- power button;
- clips and ties that secure the wires;
- fog lights.
Which PTFs should you prefer? The headlights themselves are chosen by the driver to his taste, but the main thing when choosing is not to make a mistake with the power, so as not to overload the generator and the car’s electrical wiring. It is better not to purchase headlights with xenon: the generator has a certain power reserve, but is not designed for too high loads. Regular light bulbs will be sufficient.
How to connect fog lights with your own hands
Before directly installing the headlights, their location is determined. In the case of the VAZ 2115 car, the bumper already has standard holes for installing additional lighting fixtures. Similar ones can be cut in the bumpers of VAZ 2113 and VAZ 2114.
There is no need to spoil the appearance of the bumper - fog lights are easily installed on special brackets. Many PTF kits contain special decorative plugs that add attractiveness and neatness to the installed headlights and facilitate the installation process.
Installation and connection algorithm
- Installation of a power button in the car interior. In the case of the VAZ-2114, the place for the button is on the left side of the driver on the front panel. However, its placement can be arbitrary - the main thing is that it is convenient for the driver to drive the car. Often, PTF power buttons are installed instead of plugs on the control panel.
- The grille with the speaker is removed from the standard front panel. Behind it there are two connectors - one is for turning on the headlights, the second is for indicating the operation of lighting fixtures and illuminating the key itself.
- The button is placed in a convenient place, and chips are connected to it. The speaker grill can be returned to its place.
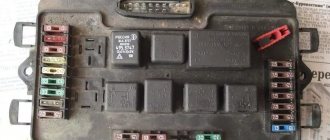
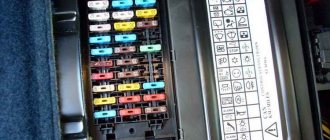
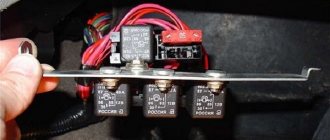
- Under the hood there should be a mounting block that combines fuses and relays. The PTF relay will be mounted in the same place, so the block must be removed: to do this, unscrew the nuts that secure it and lift it.
- On the bottom panel of the mounting block there are two blocks - 7 and 8. Each of the blocks is signed during production at the factory, so it is impossible to make mistakes at this stage.
- The PTF set contains a wiring harness with four contacts. The mentioned wires are pulled to the fuse block from the fog light relay.
- The relay is mounted in the engine compartment of the car.
- The wires coming from the PTF relay are connected to connectors 7 and 8 of the mounting block: in connector 7, terminal 8 is connected to terminal 30 from the relay, terminal 87 is connected to connector 1, terminal 85 is connected to connector 17 on terminal 7, terminal 86 is connected to ground . From block 8, terminals 2 and 3 are directed to the left and right fog lights, respectively.
- The ground wires are connected to the fog lights: they are usually attached to the nuts of the headlights.
Wiring diagram for connectors and terminals of fog lights
The functionality of the entire connection can be checked by turning on the side lights - only then will the fog lights work.
Fog lights only function when the side lights are on
After completing the installation of the PTFs on the car, they only need to be adjusted correctly. The flow of light should not blind drivers in the oncoming lane.
Video: instructions for installing and connecting fog lights
Fog lights are essential lighting equipment on any car, making it easier to travel in conditions of minimal visibility. If there is no PTF on a certain car model, you can install them yourself. The installation procedure does not require special knowledge and can be carried out by the driver without the involvement of third parties.
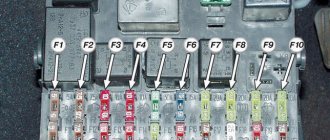
Decoding fuses and relays of block 2114-3722010-18
VAZ-2114, 2115, 2113 cars of the first models with a carburetor have certain differences in the fuse module.
Old style block fuse and relay diagram
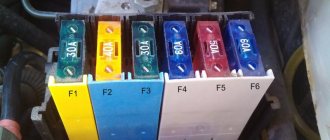
Table 2. Decoding of fuses and relays of block 2114-3722010-18
| № | Current, A | Explanation of fuses |
| F9 | 7,5 | Right rear fog lamp |
| F8 | 7,5 | Left rear fog lamp |
| F1 | 10 | Front headlight cleaners at the moment of switching on, wiper contacts, headlight washer switch valve, headlight wiper switch relay contacts |
| F7 | 30 | Front headlight wipers during operation, winding of the relay for turning on the wipers, fuse for the interior heater, windshield washer, gearbox and timing controller for the rear window wiper, valves for turning on the front and rear washer, relay (winding) for turning on the engine cooling system, relay for turning on the rear window heating, glove box lighting, rear window heating control lamp |
| F16 | 15 | Turn signal indicators and activation of hazard warning lights in turn mode, indicator control lamp, reversing lights, gearbox and relay for activation of windshield washers, generator winding (at startup), control lamps for brake fluid, oil pressure, carburetor flap, hand brake. "STOP" display lamp, voltmeter and coolant temperature indicator |
| F3 | 10 | Interior lighting and rear brake light |
| F6 | 30 | Power windows, power windows on/off relay |
| F10 | 7,5 | License plate lights, engine compartment lamp, warning light on the dashboard (exterior lighting), instrument panel lights, cigarette lighter light, heating lever lights |
| F5 | 20 | Relay for turning on the cooling system fan (electric motor), sound signal. |
| F10 | 7,5 | Left front marker light Left rear marker light |
| F11 | 7,5 | Right front headlight, right rear |
| F2 | 10 | Hazard warning lamp, turn signals and hazard warning relay. |
| F4 | 20 | Rear heated glass, heating on, portable socket, cigarette lighter in the cabin |
| F15 | 7,5 | Front right high beam |
| F14 | 7,5 | Front left high beam Light switch |
| F13 | 7,5 | Left low beam |
| F12 | 7,5 | Right low beam |
| № | Relay circuit | |
| K1 | Headlight washers | |
| K2 | Hazard and turn signals | |
| K3 | Windshield wipers | |
| K4 | Monitoring the health of lamps | |
| K5 | Windows | |
| K6 | Sound signal | |
| K7 | Heated rear window | |
| K8 | High beam headlights | |
| K9 | Low beam headlights | |
How to install fog lights in a car
Many car enthusiasts are interested in whether it is possible to install headlights themselves. Of course, it’s possible, it’s not that difficult, it doesn’t require any special skills. It is quite clear that there is no single instruction for installing fog lights, and there cannot be: installing headlights in cars of different brands and different models has its own characteristics, but, nevertheless, general rules for attaching and connecting headlights still exist - we will talk about them We'll tell you now.
First, purchase your own fog lights. Which headlights to buy - xenon or halogen - decide for yourself.
However, when purchasing headlights, be sure to take into account the fact that they are also divided into types according to the principle of their fastening. Depending on it, headlights can be mounted or mortise
If you can install mounted headlights mounted on brackets on almost any car, then you will not be able to install mortise headlights, for example, on the sixth model of the Zhiguli, since such headlights can only be embedded in a plastic bumper.
In addition to the headlights themselves, you will also need:
- wires;
- insulating tape;
- headlight relay and socket for it;
- wire connectors;
- headlight switch button. There is often an available button or toggle switch on your car's dashboard, in which case you can use it. If there is no free button, you will have to embed it yourself.
General operating procedure
- According to traffic regulations, it is allowed to install no more than one pair of fog lights. They should be secured at a level no lower than 25 cm from the road surface. In addition, it is prohibited to move the headlights forward more than forty centimeters from the side dimensions. Select a location for the headlights according to these rules and secure them there. To install mortise headlights (if there are no ready-made holes for them in the bumper), remove the bumper and carefully cut holes in it of the required size and shape
- Read the instructions that came with your headlight kit. It should clearly and in detail describe in what order, where and how the wires from the headlights should be routed and to which contact which wire should be connected. In addition to the verbal description, the instructions contain an electrical diagram for connecting the headlights, which you will also need to refer to during operation.
- Before starting work on connecting the headlights, be sure to remove the negative terminal from the battery!
Next, for clarity, we will describe the process of connecting headlights using the example of their connection in a VAZ 2109 car
Install a power button.
- To the right of the speaker grille, there is already a regular place for the headlight switch button, which is currently covered with a plastic plug. Remove the grille, unscrew the speaker, and you will see two connectors for connecting the button.
- Remove the plug from the panel, put the button in its place, and connect the button to the connectors. Return the speaker to its place and replace the grille.
Connect the relay and headlight power wires.
- Open the hood and find the black box underneath - this is the mounting block. Unscrew it and lift it up and you will have access to the connectors.
- Route the wires from the fog lights under the hood to the mounting block.
- Stretch three wires from the relay to the black box (pre-select a place where it will be convenient to screw it to the car body). The fourth wire coming from the relay is the ground wire; it does not need to be connected to the mounting block.
- Next, use the electrical diagram included with your vehicle's operating instructions. In accordance with it, disconnect the connectors marked in the diagram as Ш 8 and Ш 7 from the black box, and insert into them the terminals of the wires coming from the headlights and the relay (again, follow the electrical diagram).
- Return connectors Ш 7 and Ш 8 to their places.
- Reinstall the black box.
- Screw the relay to the machine body with a bolt, and secure the ground wire coming from the relay under the same bolt.
- Securely secure the ground wires coming from each headlight near the headlights themselves on the car body.
- Connect the terminal to the battery and check how bright your new fog lights are.
You may also find the article Which headlights are better useful.
Video
The wiring diagram for installing fog lights is shown in a video filmed for the “Car Lover” channel.
and so you are about to install fog lights! but you don’t really understand how, there seems to be a lot of information about this on the net, and there are also a lot of diagrams, but we imagine that PPC you don’t understand the diagrams,
I will try to write a very detailed report that after that Any person was able to connect them right next to the house, and does not pay anyone any money! The most important thing is to remove the battery terminals!
I will describe it according to my Matiz! but this BZ can be connected to anyone! so, let's begin! first what we need!
1) the FOGS themselves!
I didn’t take any photos, so I’ll explain it using other people’s photos and on a piece of paper! I’m not a walker, but it doesn’t matter, the main thing is to make it clear!
and so let's go! According to GOST, it is necessary for the fog lights to be turned on with the current dimensions (but this does not mean that we cannot drive with the dimensions but without the fog lights), that is, if the dimensions are turned off, then the fog light button will click to nothing! but when you turn on the headlights, you can use the foglight button to turn these same foglights on or off!
Let's start with the location of the RELAY! you can put it anywhere, even in a common block, I didn’t bother and put it behind the instrument panel above the radio, so I’m writing as I did) we remove the black (who didn’t paint) central panel, and we see this, that’s where I threw the relay
that is, after these actions we already have a 12 volt circuit from the dimensions, then a button that breaks the circuit and then a relay 85 contact)
Then we pull pin 87 through the plug under the pedals and pull it to the AKUM! don’t forget to put a fuse, it is placed between the positive of the Akum and relay 87 contact (put the fuse closer to the Akum) we’ve passed half the way, let’s go further, we throw the 86 contact of the relay on the body, or the minus (most often the black wire) it would be nice to extend it to the Akum too, but this not necessary!
all that's left is the fog lights themselves,
let's start with the front end, the fog lights are installed in their normal place, and there are 2 wires, plus and minus, coming from each headlight! with a minus, as always, throw it on the body, or connect 2 minuses from two headlights and connect them to the minus Akuma (it doesn’t matter! It’s just that if you throw it on the body, you need to pull fewer wires! But connect the pluses from 2 headlights and pull them into the interior through the same plug as the plus on the Akum, ...pulled it out? Now lift it up to our relay so that the wires are not visible (it’s also more beautiful) and connect it to connector 30, well, don’t assemble everything yet, you never know so! so as not to take it apart again! go put the terminals on the battery... I’ll wait here for now) now turn on the dimensions and check if they work! (of course they work) well, try the fog lights, if everything works then you can hide everything and put it back together, check that there is no short circuit anywhere! and insulate all bare wires)
Installation of fog lights on Lada Priora
1). Disconnect the ground from the battery.
2). We unscrew the bumper fastenings (several screws on the side, bottom and top), and remove it.
3). Using a screwdriver, unscrew the screws holding the plugs.
4). We insert the headlights into the places where the plugs were. We fasten with the same self-tapping screws.
5). We take a long wire from the kit, insert it into the right headlight, then into the left one and pull it into the engine compartment from the battery side.
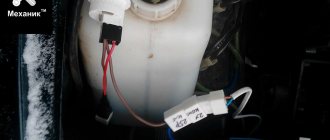
6). We remove the washer tank, and then the expansion tank.
7). Using the “13” key we eliminate the wipers.
8). We unscrew the protective plastic to gain access to the left edge of the upholstery.
9). Loosen the clamp and remove the hose.
10). We remove the upholstery.
eleven). We stretch the wires along the standard wiring through the plug into the car interior and fasten them with the clamps included in the kit.
12). We assemble all the parts in reverse order. Don't forget to connect the two black wires to the outermost bolts of the crankcase guard.
13). Let's go to the car interior. Remove the protective cover under the steering column. To do this, turn 3 locks 90 degrees.
14). Using a screwdriver, unscrew the self-tapping screw, which is located under the fuse block. We take out the block.
15). From the center console, remove the rear window heating button and the plug. They are located to the left of the clock.
16). From the set we take out the button with wires. We stretch the long blue wire to the fuse block, and connect the remaining three to the heated rear window button using the clips included in the kit. We connect everything according to the color scheme.
17). We insert the relay for the fog lights included in the kit into the fuse box. We connect the wires according to the diagram:
- long blue to A85;
- red and black to 30 and 86;
- yellow wire from 87 with two outputs to F17, F18;
- we take the previously passed wires from under the engine compartment and connect them to F17, F18;
- We insert two fuses from the kit into sockets F17, F18.
18). Collecting elements. We connect the ground to the battery, turn on the ignition and check the serviceability of the fog lights (the fog lamps will only work when the ignition is on).
Installation of fog lights on Lada Vesta
This process includes the following steps:
- removing the bumper;
- preparation of the seat;
- installation of headlights;
- PTF connection.
1). Disconnect and remove the battery.
2). Remove the front bumper. The lower part is secured to the body with 4 bolts to the body and 4 screws to the fender liners. We turn it all out. On each side we unscrew 2 screws securing it to the lockers. Under the hood, unscrew the 6 bolts of the upper fastening to the body.
3). It remains to remove two bolts under the license plates. Here you already need to hold the bumper by the beam. Gently pull it towards you to disengage it from the side brackets.
4). Now you have access to the right place, and it's time to move on to the next step.
Preparing seats and attaching headlights
1). In place of the fog lights there are factory plugs. Using a 76 mm bit, we cut holes in them.
2). You should also take care of the hole for the PTF button in the dashboard of the car. To do this, select a place on the center console or next to the trunk opening button.
Connecting fog lights
1). From the right PTF we lay the wiring inside a metal box. We let the wiring into the cabin from the engine compartment in the area of the pedal assembly through a special hole.
2). We connect according to a universal scheme, as in cases of connecting equipment on previous versions of the Lada car line. Load power is taken from the battery (M6 bolt) and supplied to the contact relay through a fuse.
3). Plus comes from the mounting block from the size fuse. Alternatively, you can use the plus of the cigarette lighter.
4). The relay itself is installed under the hood or directly in the cabin.
5). This method of connecting fog lights can be called the most optimal in terms of savings and minimal interference with the electronic part of the car.
Installation and adjustment
Before adjusting the fog lights, make sure the following requirements are met. Firstly, there must be two devices. Secondly, their location is determined as follows:
- the distance to the side surface of the machine should not exceed 40 cm;
- distance from the road surface - at least 25 cm;
- the openings for the light of these devices must be located in the area of the opening that transmits the light of the low-beam headlights;
- viewing angles are + 15-100 vertically, and +45-100 horizontally.
Required condition! You can turn on the fog lights if there are side lights.
For those who are convinced of the presence of fog lights, their correct installation and full compliance with the owner’s requirements, we offer detailed instructions on how to set up fog lights with your own hands.
Video on how to make the adjustment yourself:
The car must be parked on a level area and at a distance of at least 5 meters from it there must be a flat and preferably a single-color wall. The ideal distance would be 10 meters, but if the road does not allow this, then this condition is not mandatory. Of course, those who decide to adjust the fog lights themselves should wait until it gets dark and carry out the procedure in a part of the city where there is no additional evening lighting.
Also check the condition of the wheels, because if one of them is even slightly flat, it will not be possible to carry out the adjustment properly.
Our most important participant is the wall. It is on this that we will create a diagram according to which we will configure the fog lights.
The following parameters must be marked on the wall:
- center of the machine;
- the center of each headlight;
- height from the ground surface to the center of the headlight.
The first straight line will connect the points indicating the height at which the headlights are located. Pay special attention to the coincidence in height of the central points. If the machine is on a level surface, they should be located at the same level
Adjusting the fog lights is to create a light that will sufficiently illuminate the driver’s path and not disturb other road users. To do this, it is necessary that the light and its angle of refraction correspond to certain parameters.
Setting the light level
The level at which the illumination must pass determines the angle of incidence of the headlights. You can calculate its normal position as follows.
If the angle of incidence of the low beam is 1%, that is, at a distance of five meters from the wall it will be 5 cm lower than the marked points on the wall. Data on the angle of incidence provided by the headlights can be seen directly on their surface. We measure down from our straight line as many centimeters as m calculated taking into account the angle of incidence indicated on the headlights and the distance from the wall of the car, and see how our foglights shine. Normally, light should pass absolutely smoothly along this line, refracting only at the central points.