Adjusting the headlight beam
Correctly adjusting headlights can only be done in a service station. However, let's look at how this operation is performed by experienced craftsmen.
Kalina-2 block headlight, correct adjustment of the beam direction
There are two adjustment screws on the back wall of the unit called the headlight unit. The first of them, located closer to the radiator, allows you to deflect the light beam “up and down”, and the “horizontal” direction is adjusted with the second screw. Ideally, this should happen: when the car is 5 meters from the screen, the border of the light spot touches line “2” (see figure). Line “1” is spaced from the ground at a distance equal to the height of the centers of the headlights. The second line is drawn 65 mm lower.
Here are a couple more tips that will be useful:
- The centers of the beams should be on lines AE, BE;
- Line “0” has the following meaning: it intersects with line “1” at one point, so the border of the spot should pass exactly through this point;
- The caps of the plastic adjustment screws are compatible with a hex screwdriver. However, a Phillips screwdriver will also work.
Granta, Priora
In modern domestic cars VAZ Granta and VAZ Priora, the procedure for adjusting headlights is no different. One of the nuances to note is the distance between the horizontal lines; for these cars it is 75 mm.
Also, the adjusting screws of the Grant can be reached through special holes, and the screws themselves are located at an angle.
Adjustment is carried out using a 6mm hex key.
In Priora, the screws are located at the top of the headlight.
In general, headlight adjustment for all cars is done in the same way; only certain dimensional characteristics of the model itself and the location of the adjustment screws should be taken into account.
Design of VAZ 2101 headlights
Design of VAZ 2101 headlights
1 – facing rim; 2 – screw for fastening the facing rim; 3 – screw for adjusting the light beam in the horizontal direction; 4 – screw for adjusting the light beam in the vertical direction; 5 – optical fastening screws; 6 – bracket for fastening the rim; 7 – oblong hole for bracket 6.
Procedure for replacing VAZ headlight bulbs
1. Unscrew the rim screw and remove it, moving towards you and downwards;
2. unscrew the three screws No. 5 securing the optics and turn it counterclockwise, otherwise you won’t be able to see it, then remove it;
3. Pull out the VAZ headlight , remove the connection terminals and replace the light bulb;
4. After replacing the lamp, install the headlight in the reverse order, making sure that the brackets fit into the guide sockets of the headlight rim.
Advice on installing halogen lamps in the headlights of a VAZ car
Halogen bulbs must be installed in headlights specifically designed for them.
The second rule, this also applies to “halogens” in lighting lamps (220 V), they cannot be handled with bare hands, use gloves for this, then the light bulb will last longer, well, if you left your fingerprints, then rub the light bulb with alcohol.
Adjusting the headlights of a VAZ 2101 (21011) car
Below is a diagram for adjusting the headlights of a VAZ car. Why do you need to adjust the headlights? Firstly, so that the road is well lit, and secondly, so as not to blind the driver who is moving towards you. Highly raised headlights really irritate oncoming drivers, if you knew how many good words flow from their lips when they see this.
To adjust the headlights, you need to rotate screws No. 3 and 4; they rotate the headlight optics horizontally and vertically.
Headlight adjustment diagram
Adjusting car headlights
How to remove a headlight on a Lada Kalina in the traditional way
The traditional method is to remove the headlight along with the bumper. If you remove this part of the body, you will have access to all the screws, lower and upper. The dismantling instructions are as follows:
Work begins with removing the bumper. Using a Phillips screwdriver, unscrew the screws securing the fender liners. There are 4 of them in total. Remove one more screw on the left and right. Remove the screws securing the bumper. They are located below. Remove the radiator grille. A few more screws will open in front of you, securing the bumper. Remove the license plate and dismantle the plastic grille to which it was attached. To do this, you will have to unscrew two bolts and pull it out with force. This sheathing is secured with clamps. In the area under the license plate, remove two more screws. Grasp the edges of the bumper and rip it off the latches using a sharp and strong movement.
The weight of the bumper is small, so there is no need to involve an assistant - you can handle it yourself, it is only important to pull it smoothly, without distortions. Once the bumper is removed, you will be able to access the screws that secure the headlights. To do this, remove the lower bumper beam. Remove the screws from the bottom securing the light block
If you do not find them right away, you need to bend the beam. To remove the feints, you will need a ratchet with a No. 8 head. The headlight unit is also attached to the top with two bolts. One is removed with a screwdriver, and the second is unscrewed with a ratchet. Now you need to disconnect the power plugs by first bending the latch. You can remove the headlight without damaging it with only two hands.
How to replace the taillight, also known as the rear light, on a VAZ 2106?
Note! Before you move on to replacement, let’s remember what the headlight consists of, because knowing the composition of the headlight, it will be easier to remove it than without knowing anything!
The rear headlight consists of: Turn signals which are located in the extreme part of the headlight, and they are indicated in the photo by number 1. The headlight also consists of marker-colored lights (Number 2), a bright white reversing light (Number 3), and a brake light (Number 3). 4) and from the side lights that serve to illuminate the rear license plate of the car! (By the way, the taillight can only be removed from the car, provided that the rear license plate lights are also removed and therefore the lights must be removed first, and only then the headlight itself)
Now a few words about what the license plate light itself and the taillight are mounted on! The license plate light is attached to the car using two nuts (Number 1) by unscrewing which it can be easily removed, but in order to completely remove it you will also need to remove the socket with the lamp, which is indicated by the red arrow.
But the headlight itself is attached to the car using four nuts (Number 2), but by unscrewing these nuts, the headlight itself cannot be easily removed because wires are also connected to it, which before disconnecting them must be remembered, and the wires must be reconnected in that the same sequences as they were established earlier.
Removal: 1) At the beginning of the operation, remove the entire rear trim from the luggage compartment. (How to remove the trim, see the article entitled: “Replacing the gas tank”, points 2-5)
2) After the rear trim is removed, remove the side trim from the side where you will be replacing the headlight. Let's say you are going to replace the right headlight, then remove the right gas tank trim, and if you are going to replace the left headlight, then remove the left wheel trim and, moreover, so that the wheel does not interfere, remove it from the car.
3) Now remove the socket that comes with the light bulb by hand and then remove this socket together with the lamp from the license plate light housing.
4) Next, unscrew the two nuts that secure the license plate light to the car body.
5) After this, get out of the luggage compartment and remove the light from the car from the outside.
6) Then, using a marker, or using a camera, photograph or mark the position of all the wires that are connected to the taillight and then disconnect these wires.
7) Next, take a screwdriver in your hands and unscrew the four nuts that secure the light to the car body, and after unscrewing the nuts, remove the light from the car.
When the lantern is removed and if you want to reinstall it again, then be sure to check the condition of the seal that fits the lantern body; in this case, replace the cracked, heavily worn seal with a new one.
Installation: The new lamp is installed on the car in the reverse order of removal.
Note! When installing a license plate light, be sure to check the gasket that is installed on the light; if it is damaged or if signs of rubber aging are visually visible, then replace this gasket with a new one!
And also when installing the rear light, pay attention to the wire that goes to ground and is thereby secured to the lower stud of the rear light housing; be sure to install it in the same way as it was before! (By the way, we were talking about the rear left light, and two wires going to ground are connected to the rear right light, one of which is placed on the lower stud, and the other on the upper)
How to install a new wing on a VAZ
To install the wing, you need to know how to work with a welding machine. Gas or semi-automatic welding is suitable. It is better, of course, to use the second option. This will prevent the use of explosive gas containers.
Before installing the new wing, replace all other previously removed body elements: bumper, headlight, door and hood. This is done temporarily to fit the new wing and set the gaps.
Now you can get started:
- align the part, observing the gaps with other body parts;
- secure it with clamps;
- dismantle the previously installed body elements again;
- temporarily weld the wing in several places so that it does not move with the clamps removed;
- make sure that the part is installed correctly;
- finally secure it in place using spot welding.
After the work has been completed, finally install the removed body elements, clean the welded areas, prime them and paint them.
What generators can be installed on the VAZ 2104
The driver is not always satisfied with the performance of the standard VAZ generator. The thing is that the device is designed for strictly defined loads, and when additional electrical devices are connected, it no longer copes with its work.
Therefore, the owners of the “four” often think about installing a new, more powerful generator, and it could be used without problems:
- additional lighting devices;
- new sound system;
- navigator.
The presence of extraneous instruments and electronic devices primarily affects the operation of the generator
Generators G-222 and G-221 are in principle identical to each other, with the only difference being that G-221 produces 5 amperes less. Therefore, such a replacement will not make sense.
The most popular are Western generators - Bosch, Delphi. However, it is worth considering that the VAZ mechanisms are not designed for the installation of European equipment, so you will have to redo the device mounts.
The owners of the VAZ 2104 themselves are of the opinion that they need not only a more powerful generator, but a device with higher efficiency:
Thus, the owner of a VAZ 2104 needs to clearly understand what specific goals he wants to install a new generator to achieve.
Standard device for equipping the VAZ 2104
Repair of hydraulic corrector VAZ 2114
The manufacturer does not provide for repair of the device, therefore, if it breaks down, the complete device along with the cylinders and pipelines is replaced.
If the angle of the headlights cannot be adjusted when the load level of the car changes, and even with the help of adjusting screws on the headlight unit you cannot obtain the optimal luminous flux, check the functionality in this way:
- First of all, inspect the device for the integrity of the pipelines, as well as for the absence of liquid leaks.
- If after the measures you do not find a malfunction, proceed to checking the performance of the working cylinders. To do this, you need to remove them from the headlight unit and measure the stroke of the rods. Normal functioning of the cylinders is determined by a rod stroke of 6.5-7.5 millimeters.
- Due to the fact that repair of the VAZ headlight range control is not provided, it is better to replace the broken device with a new assembled one.
Which PTF should I put on the Grant?
Today you can find foglights for Lada Granta on sale in two variations - with flat glass or spherical. In this case, the choice of devices depends entirely on the preferences of the car owner. As our compatriots write in their reviews, spherical glass by its design is more durable and strong. Car enthusiasts make such conclusions because it has better resistance to vibrations and impacts from stones. You can find special PTFs for Granta Liftback on sale; they can be installed on this car model, but usually car owners use foglights from Kalina (the author of the video is Vladimir Gennadievich).
Important
Be sure to wash the glass thoroughly and wait until it is completely dry. After this, place it in the oven for 5-10 minutes at a temperature of 60°C. If desired, you can make a film of a different color, but in this case you will need to use a different chloride. By adjusting the concentration of rosin and salt, you can change the color saturation yourself.
The main thing in this process is not to get carried away with tinting, because everything needs to be done in accordance with the current GOST. Acceptable window tinting stipulates that the windshield must transmit at least 75% of the light, while the remaining windows must transmit at least 70%.
Instructions
Initially, you will need to remove the seals before tinting. All car windows to which tinting will be applied must be thoroughly washed with a specialized detergent. You should also rinse all corners very thoroughly. Next, tinting car windows with your own hands (VAZ 2109, 2110, 2107, etc.) is carried out as follows:
- A soap solution is prepared, which is a standard detergent or shampoo mixed with warm water, after which it is poured into the prepared spray bottle.
- The outer side of the glass that has been washed is thoroughly sprayed with a soap solution, after which a tint film is immediately applied, which is cut according to the required dimensions. It is worth noting the fact that the dark layer should be directed inward, while the transparent layer should be directed outward. Here you should be extremely careful, because the parties must never be confused. If you cannot decide which side is dark, then you should split your film very slightly from one corner. After the film is applied to the glass, careful alignment and cutting is carried out. It is best to leave a margin of one centimeter on each edge.
- Now the inner surface of the glass is covered with soap solution. After this, you should act extremely quickly, because the glass should not have time to dry. Carefully separate the dark layer of the film, and at the same time moisten it with the solution with which the spray bottle is filled. In this case, the work of an assistant is very important, because you will be able to perform all procedures much more carefully. In this case, one person will have to hold the clear layer of film, while the other will pull it and spray the dark layer.
- A dark layer is applied to the inside of the car glass. As mentioned above, while tinting car windows with your own hands (VAZ 2106, 2107, 2110 and all others), the glass must remain wet. It is also mandatory to carry out treatment with a spray gun, after which a transparent layer is applied, since the film must have effective protection from any damage. After carrying out all these procedures, you should immediately smooth the film using a rubber spatula, moving from the center to the edges. In this case, you should be especially careful, because any sudden movements are extremely undesirable. You should also completely get rid of any air bubbles.
The film should be smoothed until the transparent part falls off on its own, after which the dried transparent film can be completely removed
Now you can trim the protruding edges by running a knife along the edge of the car glass, but in this case it is extremely important to act without any haste
If you have a hair dryer, then you can thoroughly dry the car glass along its perimeter, but if you don’t have a hair dryer, then just close the door and start working on the next glass. It is advisable that over the next two days you do not insert any seals into the doors or open tinted windows.
Replacing and gluing glass on a VAZ-2107, 2105 and 2104 headlight
Hi all! Today we will tell you how to change the glass on a VAZ-2107, VAZ-2105 or VAZ-2104 headlight yourself. This may be needed if the glass on your headlight is cracked, you break it, or the headlight starts to sweat. Yes, it’s sweating - headlights sweat when they are not sealed. And depressurization of the headlight is possible only if there is a crack in the housing (worst option), you forgot or did not close the back cover on the headlight tightly when replacing the lamps (best option), or you have problems with the glass (poorly glued, broken, cracked). So we will tell you how to independently glue glass into the headlight of a VAZ and similar “square” VAZs.
We remove the headlight from the car, to do this we remove two pads from the back (turning and light):
. and unscrew the headlight, three screws in front, one on top in the middle and two on the bottom on the sides, unscrew them and the headlight unit falls right into our hands. We take her and take her home. We unscrew the two headlight wiper stops, they will interfere:
Now, in any case, we will first need to get rid of the remnants of the old glass, or, if we are simply re-gluing the glass, then carefully remove it without breaking it. To do this we will need a sharp knife, something like this:
Carefully use it along the contour to cut the factory sealant (if the headlight has never been repaired) or silicone or other sealant, depending on the imagination of the person who glued the glass there before you. I have seen headlights with glass that was firmly glued in, that is, essentially unrepairable. And after that we carefully squeeze it out by prying the glass towards ourselves with something. If you cut it well it will come out quickly. Don't overdo it so it doesn't burst. Then we thoroughly clean everything from the old sealant so that only plastic remains:
We prepare the glass for the headlight and try it on. The glass must be “native” to your headlight; Kirzhach and OSVAR are different from each other.
You can buy a special sealant for headlights on the market, but we used regular silicone:
It’s just that black sealant will look a little prettier, but we neglected this. We carefully apply it around the perimeter of the body of our headlight, something like this:
We insert the glass and apply sealant or silicone around the perimeter; if there is not enough and there are gaps left, do not overdo it. We remove the excess and wrap the headlight with masking tape so that the sealant hardens properly and the glass does not move. Let it dry, ideally overnight:
After the sealant has hardened, remove the masking tape (painting tape simply does not leave marks like regular tape) and install the headlight back on the car, plug it in and enjoy. Do not touch the reflector while working, it is very easily damaged and try not to stain it with anything. That's all, you have learned how to independently replace and glue glass into the headlights of VAZ-2107, 2105 and 2104, but if you still have questions, we will be glad to see you in our club of VAZ-2107 lovers.
Self-adjustment
Adjustment diagram Before you start adjusting, you will have to remember your geometry lessons, and also use your draftsman skills. After all, to adjust the glow of the optics, you will need to draw something on the wall.
- Find a wall that has a flat area adjacent to it. Surfaces must be absolutely flat. Without this condition, adjusting the headlights makes no sense.
- The light should be directed towards the wall without any obstructions. That is, there should be no foreign objects in the path of the light.
- Move 5 meters away from the wall.
- Put a friend behind the wheel who will help you. It is advisable that his weight matches yours. If it weighs less, add some weight to the interior.
- Now we proceed to drawing the drawing according to the image we offer.
- The E marks are the middle of your car's headlights. Three vertical lines are drawn through them - A, O and B. They must be symmetrical to the axis.
- Measure the distance from the base of the platform to the middle of the front optics. According to the standards, it is 600 millimeters.
- On the wall, draw a horizontal line 1, which is located 600 millimeters from the base of the floor.
- Draw line 2 parallel to line 1. It should be 75 millimeters below line 1. This line will be the middle of the light spots.
- If you have a hydraulic corrector, an assistant will need to turn the corrector handle to the position without a passenger load.
- Now turn the optics to low beam mode.
- Take turns blocking the light with cardboard or cloth that blocks it out.
- Turn the adjustment screws to achieve the desired result.
- The right headlight is adjusted first, and then the left.
- According to the instructions, the upper edges of the light spots should run along the second line, and the inclined and horizontal sections should coincide at points E.
The procedure looks quite complicated, but in reality you just have to draw a few lines and take precise measurements in millimeters.
It is more than possible to correctly adjust the optics with your own hands. But in practice, it is better to entrust this task to specialized service stations. They have the necessary equipment and, most interestingly, a flat floor and a perfectly flat wall.
Hydrocorrector of headlights: how it works and how to use it
The headlight leveler is an inconspicuous and rarely used device.
But sometimes without its work it is impossible to move at night on busy roads. A typical situation that requires the use of this device: a combination of a heavily loaded trunk and a trip in the dark.
When the trunk is overloaded, the rear part of the car lowers, and the front part “lifts up”. In this case, the “low beam” from a certain distance from the car automatically becomes “high beam”.
At first, the driver is perplexed why all oncoming drivers begin to “blink” and demand to switch the lights. If the driver guesses what happened, then he has to reload bags of potatoes into the cabin and onto the front seat in the dark. If the seats are occupied by passengers, then you have to either turn off the low beams and drive on the lights, or create an emergency situation on the road.
But there is a third way out: use a corrector and adjust the tilt of the light beam, lowering it down.
The opposite situation may also occur: if the hydraulic corrector is adjusted to the maximum load, and the machine is empty, then, on the contrary, it is necessary to raise the beam of light upward. In this case, the driver no longer blinds others, but illuminates the road “in front of his nose,” which is also fraught. Figure 1 illustrates these situations. The normal position of the light beam is shown in yellow.
- How to use the corrector?
- How does the headlight hydrocorrector work?
- How does headlight range control work?
Headlight hydraulic corrector device
It is easy to guess that the operating principle of this device is based on the use of partial pressure of a liquid. Modern cars use several hydraulic mechanisms, the operating principles of which are approximately the same. An example is the braking system. And yet, each of these mechanisms has certain design features. The classic headlight hydrocorrector consists of the following components:
- main cylinder mounted in the dashboard area;
- piping systems;
- actuators installed directly on the headlights.
A special frost-resistant liquid is used as a working agent. Unlike electric ones, hydraulic correctors are made non-separable - this makes it easier to ensure their perfect tightness. Therefore, at the official level (that is, at service stations, car services, dealerships) it is stated that these devices are not repairable, and if they fail, they must be completely replaced. Considering that the cost of hydrocorrectors is relatively low, in most cases buying a new device really seems worthwhile. But this is how a person is designed, that if there is an opportunity to carry out repairs on his own, he will most likely take this step. In the case of a hydraulic headlight leveler, such a possibility really exists, despite assurances to the contrary.
True, it is really unrealistic to perform many operations with your own hands - for example, blowing out the system if air gets in or changing the working fluid. By the way, many drivers, when asked what is poured into the headlight hydraulic corrector, answer that it is brake fluid. This, of course, is not true - antifreeze or a composition similar to it is used here. In operating condition, the device line is always under sufficiently high pressure. If you twist the lever down, the pressure decreases and the rod forces the headlight bulb to turn down. Constant high pressure does not have a very favorable effect on the service life of the corrector, especially if low-quality materials and components were used during its assembly.
In particular, this applies to rubber seals - in winter, when the temperature drops well below zero, they can begin to collapse, which leads to depressurization of the system and leakage of fluid. As a result, the pistons jam, and this may not happen simultaneously on the left or right headlights. As a result, it becomes impossible to change the angle, and the head optics can shine in different directions, one headlight is higher, the other is lower. On all VAZ cars equipped with hydraulic correctors, these devices are assembled according to an almost identical scheme, although, of course, there are minor design differences related to the geometry of the car itself, its layout - the dimensions of the hydraulic corrector depend on this, as well as the features of the layout of the pipelines and the cylinders themselves. We present to your attention the compatibility table of the Civil Code for specific AvtoVAZ models/families:
| Hydrocorrector article number | What models is it compatible with? |
| 2105-3718010 | 2105–2107 (“classic”) |
| 2108-3718010 | 2108—21099 (Samara family) |
| 2110-3718010 | 2110—2112 (family 110) |
| 2114-3718010 | 2113—2115 (Samara 2) |
| 21213-3718010 | 21213 "Niva" |
Improved technical characteristics
Motor
On a VAZ 2106 car, improving engine performance is not difficult and not very expensive. You just need to buy some spare parts and install them instead of standard elements. Such tuning of the VAZ 2106 will not only increase the engine power, but also extend its service life. What can you supply?
- Lighter valves, which increases speed.
- Together with the valves, their bronze guides are installed.
- Crankcase gas filter. It is not included in the standard version, but plays an important role. Thanks to its operation, much less oil gets into the carburetor and does not clog it.
- Turbine. It allows you to increase the speed limit of the six. Along with it, you will need to install special pistons marked “Turbo”.
- Collectors. They not only help to increase the efficiency of the engine, but also create a special engine sound, similar to the roar of a supercar.
- A crankcase that further protects the engine.
Carburetor tuning
The design of this element is quite simple, so it can easily be used to improve the technical characteristics of Zhiguli. There are three classic methods for tuning a carburetor:
- The spring on the throttle valve is removed. This allows you to significantly increase engine power. However, this slightly increases fuel consumption.
- The standard diffuser is designated 3.5. It needs to be replaced with the one marked 4.5. And instead of a sprayer on 30, a similar part on 40 is installed.
- Controversial option: increasing the jets. Although this gives a good increase in power, it greatly increases consumption.
Suspension
If you have modified the engine and carburetor, you must carry out the corresponding work on the suspension. Otherwise, it will not withstand the increased load.
- Shock absorbers are being changed. Instead of standard ones, more rigid ones with two sections or sports ones are installed. You can also install shortened modifications. Many people like to “lower” the VAZ 2106 in this way.
- The diameters change. This makes it possible to improve maneuverability at high speed.
- Factory hinges are replaced with tuned steel spherical ones. This not only makes the design more reliable, but also improves comfort while driving.
- Sports brake discs are installed. The rear brakes are being replaced with modern modifications. As for the brake system, it wouldn't hurt to install a large cylinder as well.
- To give the car improved cross-country ability, a differential lock is installed.
All this work with the six is easily carried out in a garage with a pit or on a lift on your own.
Clutch
After tuning the technical part, it is very important to check the operation of the clutch. Pedal travel should not exceed 130 millimeters
It would be best to install a new driven disk.
Transmission
If you have the finances, you can install a sports gearbox, which differs from the standard one in gear ratios. These numbers are selected depending on the driver’s driving style. Gears will change much faster if you install a short-throw shifter.
Installation of plastic wings on a VAZ 2107
Plastic fenders with bolts on the VAZ 2107 are an alternative to a metal element, which has its own advantages and disadvantages. The advantages of the plastic element are obvious: the wing is not subject to corrosion, the aerodynamic performance of the car is improved, and the total weight on the body is reduced. In addition, plastic elements are simply removed and installed; the price of spare parts starts from 300 rubles.
Among the shortcomings, the minimum resistance of the part to impacts is noted. At the slightest collision, the plastic breaks or bends. The part can no longer be repaired; a full replacement and complete painting of the car is necessary; it is almost impossible to choose the color of the spare part to match the paintwork. The process of installing plastic elements instead of the standard metal one:
- Using a chisel, the old element is disconnected along the weld seams and pulled out.
- The deformed edges are cleaned, the remains of the old element are cut off.
- A layer of auto putty or auto glue is applied to the joints between the body and the plastic fender.
- The part is applied to the seat using glue and secured with bolts.
- 36 hours after the glue has hardened, the bolts are removed and the excess putty that has come out over the edge at the places where the glue is glued is removed.
- A layer of graviton and laminate is applied to the gluing areas.
- The structure is puttied and painted at the final stage.
The cost of replacing the original element with a plastic analogue at a service station starts from 7,000 rubles. Replacing the wing on a VAZ 2107 in 70% of cases is carried out independently. Repairs only require some skill when working with welding.
Clutch adjustment in an injection VAZ 2107
The clutch adjustment carried out on the VAZ 2107 injector is somewhat different from the similar operation on the “Seven” with a carburetor engine. The fact is that on vehicles with an injection power plant, an additional shield is installed to protect against mud deposits formed from road dirt. In the frontal projection, the protective casing is secured with bolted connections, and in the rear projection - with 2 self-tapping screws.
To dismantle this protective casing, use an 8-type socket wrench to unscrew the 4 fastening bolts. We also dismantle 2 self-tapping stern fastening screws. To carry out such a technological operation as adjusting the clutch pedal of a VAZ 2107, the following work cycle is required:
- Using a scale ruler, measure the distance from the pedal to the surface of the driver's mat. Using the force of your palm, press the pedal until the resistance force of the reverse action of the pedal begins to act and measure the length of free movement of the pedal. It should be 1-3 mm.
- If the measured value does not fall within the required dimensions, then: loosen the lock nut, give the bolt a rotational movement, carry out an adjustment followed by tightening the lock nut.
After carrying out the adjustment work, tighten the fasteners, after which you need to tighten the locking nut. We turn the pusher until the desired stroke value is determined, and finally tighten the locking nut. Care must be taken to maintain the position of the pusher in relation to the main center coupling.
Upon completion of the adjustment of the VAZ 2107 clutch pedal, it is necessary to clarify that the desired length of free movement is normal. Data for control: the stroke of free movement of the pedal is 1-3 mm. The length from the driver's floor to the pedal is 90 mm.
In this material we will talk about adjusting the clutch on a VAZ 2110 car, define the main situations for carrying out such work, and also tell you about the sequence of performing the work.
Accessories for car tuning
The production of spare parts and accessories for the VAZ 2107 has long ceased to be the exclusive domain of a limited number of supplier enterprises. On store shelves there is a large selection of additional equipment for car tuning. Rear headlights for the specified car model are present in the most extensive range.
Component manufacturers offer the following types of flashlights:
- Sports version with four separate round and two rectangular signals. They are arranged in the form of separate modules, and the plastic body can be painted to match the color of the car body.
- Skylain lights have an unusual appearance with three round indicators, and in the upper part there are rectangular turn and reverse signals. The visible part of the body is made of high quality transparent plastic and has a chrome finish.
- Rear headlights of the Ciliac type for the VAZ 2107 differ from other designs by the presence of LED direction indicators, which prevent the signals from being illuminated even in bright sunlight. The device is very popular among car owners due to its unusual shape.
- Tinted lamps are designed specifically for lovers of unusual color schemes. They feature round signals with powerful lamps that are clearly visible in any lighting conditions.
- LED rear lights of a classic design, made in carbon color. The indicators in the device are located closest to the color scheme of the original device. The diodes have high brightness and short response time.
The rear lights of a VAZ 2107 car must first of all inform traffic participants about the driver’s intentions and actions. High information content of signals will help to avoid misunderstandings on the roads, and in some cases, emergency situations.
The device of lanterns
The rear headlights are an original unit containing the following elements:
- sockets for installing incandescent lamps;
- built-in reinforcing deflectors,
- printed circuit boards for connecting lights to the power and control system.
All modern lighting equipment necessary for tuning a VAZ 2107 car has standard connectors. The taillights easily connect to the on-board network without any modifications. This simplifies the task of car owners in installing this type of product with minimal time. Flashlights produced for this model fully comply with the requirements of the state standard.
The design of the vehicle provides the following signals on the rear lights:
- side lights – red;
- direction indicator – orange;
- brake light - red;
- The reverse indicator is white.
The light panels are quite large in size, which ensures they are highly informative for traffic participants. They are clearly visible at a considerable distance, and the meaning of the signals in the perception of drivers has an unambiguous interpretation.
We repair the light fixture without disassembling it
You can snap the ball into place without removing the glass, through the holes of the light bulbs on the back side of the illuminator:
- We drill a hole exactly opposite the latch at the top of the headlight;
- Insert a screwdriver into the hole;
- Attach the collet to the corrector ball;
- We seal the hole we drilled;
- We attach a hinged loop from a furniture cabinet (hinges 5-6 centimeters long, with mounting holes and a cutout on top on which it is attached) to each broken corrector unit;
- We insert the canopy into the slot of the adjustment screw;
- We move the screw so that the slot is in a narrow place of the canopy;
- Holding the canopy, unscrew the screw until it stops with force. This is how the canopy is fixed, which needs to be placed in a horizontal position;
- Using an electric drill, using a 3 mm drill, we make a hole in the base of the light where there is a hole on the canopy;
- We screw a shortened screw into the hole so that it does not reach the high beam reflector. This slot secures the adjustment screw securely; it can be broken again.
Types of lighting devices
Depending on the year of manufacture, the VAZ 2110 can be equipped with either Kirzhach or Bosch headlights. Both of them are a block that includes high and low beam headlights, side lights, and direction indicators.
No matter how much difference there is, there are some nuances:
- In Kirzhach, the glass is sealed, so both removing it and replacing it with a new one is more difficult. In addition, the low beam glass has a lens that makes the light output more focused, although limited;
- Bosch glass is secured with latches. They are sealed with rubber gaskets. Their low beam boundary is more blurred, since there is no lens in the glass.
It’s difficult to say unequivocally which headlight unit is better. But disassembling Boshevskys is definitely easier. In any case, it doesn't hurt to know how to do it in both cases.
Engine and chassis tuning
Internal tuning of the VAZ-2104 is aimed at increasing dynamics. To do this, it is necessary to modify the carburetor by installing carburetor diffusers to 4.5 mm, increasing the diameter of the accelerator pump, and replacing it with jets with higher throughput. To create a uniform flow of fuel, you can install two carburetors.
Changes should also affect the ignition system, in which the factory high-voltage wires must be replaced with high-quality equipment. All this will create conditions for stable operation of the engine.
To improve dynamic properties, modern tuners install a sports camshaft. An increase in the power of the power unit can be achieved by boring the engine block. Depending on the engine available on the “four”, the block can be bored for pistons up to 82 mm.
You can increase the compression of a factory-installed engine by installing elongated connecting rods and shortened pistons. To reduce inertia, you need to lighten the crankshaft and replace it (in some situations, the flywheel is replaced with a lightweight one). If you have the financial opportunity, you can install a turbine, but this can cost approximately 70,000-80,000 rubles. When tuning the exhaust system, the exhaust manifold is replaced with a “Spider” one.
The approximate price of almost all the tuning elements indicated above can be found in the table.
| Tuning element | Cost, in rubles |
| Tint film | 370 per 10 cm. |
| Xenon installation | From 1000 to 4500 |
| Eyelashes for headlights | 350 |
| Arc-shaped trunk | From 1190 |
| Alloy wheels | From 1725 rub. per piece |
| Wide profile tires | From 5279 |
| Sports shock absorbers | From 3200 |
| Dashboard lighting | 430 |
| Sports camshaft | From 6820 |
| Exhaust system "Spider" | 3600 |
| Bumpers | 2100 |
Thus, tuning a VAZ-2104 can completely change the appearance and internal structure of the car, but this will require significant financial investments. But you should never forget about your own safety. In this regard, all work aimed at modernizing the car should not violate traffic regulations and reduce the safety indicator when moving in it.
Dashboard
The dashboard of the VAZ Five, as in any other car, is an integral part, since it contains devices for monitoring the technical condition of the car while driving. The device is installed on the left side of the dashboard opposite the steering wheel, which makes it easy to read information. The device is equipped with the following elements:
- 4 pointers;
- 6 indicator lights;
- 1 digital indicator (odometer).
The instrument panel uses the following devices:
- speedometer;
- signal light block;
- car odometer;
- voltmeter;
- coolant temperature sensor;
- fuel level sensor in the tank.
What kind of dashboard can be installed
The “five” dashboard can be improved in several ways:
- perform tuning using new lighting elements, scales and instrument needles;
- introduce an instrument cluster from another car;
- do the tidy yourself by installing the necessary indicators.
It is possible to modify the shield by replacement, but only with careful selection and adjustment of the device to the standard torpedo, as well as after preliminary development of the connection diagram.
From another VAZ model
Some owners install a panel from Kalina on the fifth model of Zhiguli. The product looks modern, and the information from the instruments is much better readable. The essence of the modification comes down to installing a new shield into the standard case, for which it needs to be filed, trimmed, and assembled with the new mechanism. After completing the mechanical work, it is necessary to connect the new instrument panel with the wiring, checking the functionality of all gauges and indicators.
On the VAZ 2105 you can install an instrument cluster from Kalina
From "Gazelle"
If you like the instrument cluster from the Gazelle, then you can install it. At the same time, you need to understand that you will have to redo the wiring by making adapters due to mismatched connectors, and then install the product in a standard case with the accompanying stages of adjustment and modification.
To implement the instrument cluster from the Gazelle, you need to redo the wiring, connectors, and fit the shield to the standard housing
From a foreign car
Many owners of classic Zhiguli cars, in the process of tuning their car, install a dashboard from foreign cars. Basically, products from cars manufactured in the late 1980s - early 1990s are suitable for these purposes. One of these is the BMW E30, Audi 80.
For a VAZ 2105 you need to select a dashboard that will fit in size and will not require major changes in the wiring
External tuning
It is necessary to start tuning the VAZ-2104 from the body, since its changes will be immediately noticeable. Changes can range from something as simple as painting and tinting to something as extensive as making a significant difference in the appearance of the car.
The changes can bring significant benefits to the movement of the vehicle. For example, high-quality tinting will prevent glass shards secured with film from flying around. The car is protected from heating up during hot weather, and the protective film will prevent the driver from getting too tired and even at night will prevent glare from the headlights of oncoming cars. It is also worth noting that if there is a tint film on the windows of the VAZ 2104, the interior practically does not fade under the sun.
The tinting process does not present any particular difficulties and can even be done with your own hands. To apply the film, the material is moistened with a foam solution, part of the protective base is removed, and the film is pressed against the glass. If small bubbles have formed between the glass and the film, they can be removed using a special spatula.
Changes in appearance also include replacement of optics. The easiest way is to install xenon, which will improve headlight illumination. You won’t be able to install xenon yourself, since installing such equipment yourself is prohibited. This should be done by specialists at the service station. To give your car a personal touch, you can decorate the headlights with eyelashes.
Tuning also involves changes to the rear lights. They are darkened with special paint or film. Recently, LED optics have become popular. The photo shows an example of a modernized trunk.
With your own hands you can make a low box where the necessary things and this or that equipment will be stored. The rack can be placed on the roof, and to give it a unique look it should be secured with an arc.
Tuning an outdated VAZ-2104 model is difficult to imagine without replacing rims and tires. The “four” is most often equipped with light-alloy wheels of larger diameter and wide-profile tires. Before installing the disk, you need to check the dimensions so that when turning the wheels do not touch the fenders. Installing new wheels and tires will not only change the appearance of the car, but also:
- Will reduce the load on the suspension when driving over uneven surfaces.
- Improves handling.
- Will increase speed.
- Improves braking.
Tuning the VAZ-2104 must necessarily affect the suspension. A simple option is to install sports shock absorbers and lower the ground clearance. All this will give the car a modern look and make it more collected.
To strengthen the suspension, you need to install a second stabilizer on the VAZ-2104. To install the equipment, special fasteners are welded and all factory elements are replaced with higher quality ones. It is best if the second stabilizer has lateral stability, which will increase the level of safety.
Generators that replace G - 221
What models of generators are suitable for replacement in a VAZ 2101 - 2106 car?
- The first option is a generator from a VAZ 2105; it produces a maximum current of 55A. Not much, but if you don’t use a lot of additional equipment, then this is an ideal option. This generator replaces the G-221 generator without any modifications to the mounting. There are only minor changes in the connection to the electrical wiring; they are due to the fact that in the connection diagram of the G-221 generator the relay-regulator is placed separately, while in the five-wheel generator the relay regulator is combined with the design of the brushes.
- The next option for installing a chisel generator on a VAZ 2101 is 2106. It produces 55A, which is quite acceptable for a small amount of additional equipment.
- The third option for replacing a standard VAZ generator is a generator from a VAZ 21074, its marking is 372.3701-03. It is capable of delivering about 73A of current, which will be sufficient for the average motorist. The installation is practically no different from the previous one.
- The fourth option is to install a generator from an injection Niva. It produces about 80A, which will satisfy the requirements even if a large number of additional light bulbs and amplifiers are installed. It will not let the light go out at idle. But the installation does not require very big changes.
- The fifth and final option is to replace the standard G - 221 with a generator from a VAZ 2110, which produces 105 - 110A (depending on the specific model).
- There are other options (foreign cars, Chinese, our semi-underground companies), but you can consider them here endlessly.
We have listed the most realistic and easiest ways to replace a generator in a VAZ 2106 car. Next we will look at how to practically implement the installation of a generator from a VAZ 21074.
Interior tuning
Tuning any car involves at least minimal changes in the interior. Upgrading the interior may involve simply installing new equipment or completely replacing the interior.
You can change the instrument panel using backlighting or installing any additional elements. There are a small number of devices in the VAZ-2104. They can be supplemented:
- Sensors that report temperature and light.
- TV.
- A device indicating fuel consumption.
- Electronic control unit.
For new devices, holes are cut and wiring is installed. Changes in the interior concern not only the transformation of the instrument panel. You can cover the seats with new material, replace the door locks installed at the factory, and reupholster the ceiling.
The appearance of a modern car is unthinkable without a reinforced bumper that protects the vehicle from impacts. Factory bumpers on the VAZ-2104 were made of aluminum and had an impractical shape.
How does a hydraulic corrector work?
From the name of the device you can understand that its action is based on hydraulic principles. That is, the changing pressure of the working fluid in the system leads to mechanical movements of the desired part. This is true in reality. The entire system for adjusting the direction of light flow consists of the following main components:
- master cylinder;
- connecting tubes;
- working cylinders (on each headlight);
- force transmitting levers.
When the hydraulic corrector is working normally, the reflectors should respond to turns of the handle. This can be easily checked in the dark by pointing the headlights at a vertical plane (some wall, for example). If the reflectors remain motionless, this indicates a possible breakdown of the adjustment system.
Common headlight problems
Not only on the 7, but also on other car models, various malfunctions related to optics occur. If breakdowns occur, you should try to fix them as quickly as possible. One of the simplest breakdowns is the burnout of lamps, as a result of which visibility of the road decreases or disappears altogether. Continuing to drive with faulty headlights is strictly contraindicated, so let’s look at what other types of faults occur with headlights:
- Glass damage is most often caused by a pebble that flies out from under the wheels of oncoming or overtaking vehicles. The glass must be replaced, as water can get inside through the crack, which will cause the light bulb to burn out.
- Failure of the lamp, or rather the burnout of the filament on it. If a light bulb burns out, it should be replaced. The seven is equipped with lamps with two filaments, which are responsible for the operation of high and low beam. As a rule, lamps burn out one at a time, so it is always possible to get home with one working headlight.
- Malfunction of windshield wipers - on some sevens, a mechanism for cleaning the headlight glasses (wipers) may be installed. These cleaners allow you to always keep your windows clear, which has a positive effect on the light of your headlights.
If both headlights on a VAZ 2107 do not light up, then you should not rush to disassemble them. First you need to check the serviceability of the fuses, as well as relays and wiring.
Features of the optics unit
The front optics on the VAZ 2107 are presented in the form of a plastic case, inside which there is a reflector and glass. Glass not only serves as a protective option, but also ensures proper light reflection on the road surface. The front side has a rectangular shape, and on top of the glass, some owners of sevens install plastic covers.
The difference between plastic and glass is significant, but both have their advantages and disadvantages. For example, there are no scratches on glass like plastic, which affects the quality of light reflection. Plastic, in turn, is more resistant to mechanical stress, so if a stone hits, it does not collapse and protects the glass from impact. The headlight units contain low and high beam lamps of type AKG 12-60+55 with H4 socket. In addition to the main light, the headlight unit also contains lamps for side lights and turn signals.
The illustrations show the following elements:
- Adjustment screw for horizontal luminous flux.
- Headlight cover.
- Block for connecting power wires.
- Set screw.
- Vertical direction adjustment screw.
The headlight units on the sevens have a mechanism for adjusting the direction of the light beam. The mechanism is activated by a special hydraulic corrector regulator, which is located inside the car. This regulator has 4 positions, which allows you to control the direction of the light flux depending on the vehicle load. There is a cover on the inside of the headlight unit, which is designed to quickly replace burnt out lamps.
Adjusting headlights on a VAZ 2107
In addition to adjusting the headlights using a regulator in the cabin, VAZ 2107 owners must adjust them depending on the types of lamps used for lighting. To correctly adjust the headlights on a VAZ 2107 with your own hands, you will need to adhere to the following algorithm of actions:
- First you need to place the car on a flat horizontal surface. Moreover, the car must be installed strictly at a distance of 5 meters from the vertical plane. Before carrying out adjustment work, you need to make sure that the pressure in all tires is correct.
- Load the car. To do this, you need to fill the tank full, and also seat 2-3 people in the cabin, so that the load is at least 120-150 kg. Instead of passengers, you can use heavy objects.
- A special marking must be applied to the surface of the vertical plane, according to which the regulation procedure is carried out. A diagram of such markup is shown below.
- First you need to draw vertical lines - the centerline and lines A and B. These lines must be symmetrical with the centerline. Next, you need to find the height h, which corresponds to the distance from the ground to the center of the headlight. A horizontal line is drawn, and then parallel to it, located 75 mm lower.
When performing adjustment work, it is necessary to take into account an important nuance - the adjustment of each headlight should be carried out separately. To implement this, you will need to cover one headlight with material. In addition, the adjustment should be performed mainly in the dark, when the light beam is clearly visible.
In conclusion, it should be noted that this type of setup is performed exclusively for yourself, and if you are going for a technical inspection, it is better to contact a specialized service station.
Description of the torpedo on the VAZ 2105
The front panel is a metal frame covered with polyurethane foam and a special film, mounted in the front part of the cabin. The product contains an instrument cluster, radio panel, glove box and shelf, air ducts, levers and switches.
What kind of front panel can be installed instead of the standard one?
The torpedo of the VAZ “five” today does not look very beautiful: angular shapes, minimal instrumentation, black and not very high-quality finishing material, which cracks and warps over time. For this reason, many owners seek to improve the interior and functionality of their car by installing panels from other cars. On the VAZ 2105, with some modifications, you can install a torpedo from the following cars:
- VAZ 2105–07;
- VAZ 2108–09;
- VAZ 2110;
- BMW 325;
- Ford Sierra;
- Opel Kadett E;
- Opel Vectra A.
Installing a panel from a foreign car onto a “classic” makes the car’s interior more representative
How to remove a torpedo
The need to dismantle the panel may be due to various reasons:
- repair;
- replacement;
- tuning
The tools you will need are a Phillips and slotted screwdriver, as well as a 10mm wrench or socket. The dismantling process is performed as follows:
- We de-energize the on-board network.
- Unscrew the screws securing the plastic steering shaft linings and remove them.
- We dismantle the instrument panel.
- Unscrew the fasteners and remove the shelf.
- We unscrew the screws and take out the glove compartment.
- We pull the handles off the heating system control levers.
- Remove the lever trim element.
- We unscrew the fastening and dismantle the radio panel.
- Unscrew the lower fastening of the torpedo.
- In the places where the glove compartment and tidy are installed, unscrew the fastening nuts.
- We remove the panel from the interior.
- After the work is completed, we assemble everything in the reverse order.
Car modifications
VAZ-2104 . The basic version of the station wagon, with a carburetor engine from the VAZ-2105, 1.3 liters and 64 horsepower. Equipped with a 4-speed gearbox.
VAZ-21041 . A prototype of a station wagon, it was equipped with a carburetor engine from a VAZ-2101, with a volume of 1.2 liters and a power of 62 hp. Just like the base model, it was equipped with a 4-speed manual transmission.
VAZ-21042 . Export version, the steering wheel was located on the right. The car also received a carburetor engine from the VAZ-2103, with a volume of 1.5 liters and a power of 72 hp.
VAZ-21043 . The car was equipped with electrics and interior from a VAZ-2107, some copies had a VAZ-2106 interior. The carburetor engine was borrowed from the VAZ-2103. The gearbox was either 4 or 5 speed.
VAZ-21044 . An export model, equipped with a 1.7-liter VAZ-2107 engine with mono-injection, as well as a 5-speed gearbox.
VAZ-21045 . The export version with a 1.8-liter engine did not enter mass production.
VAZ-21045D . It was produced in small series since 1999, equipped with a VAZ-341 diesel engine with a volume of 1.52 liters and a power of 50 horsepower. The gearbox is 5-speed.
VAZ-21047 . A prototype with an engine starting from a penny. An improved version of the Four, it was equipped with a VAZ-2107 interior and a VAZ-2103 carburetor engine with a volume of 1.5 liters and a power of 72 hp. The gearbox was 5-speed. On export versions, the radiator grille was installed from the VAZ-2107.
VAZ-21048 . Diesel station wagon, with a 1.77-liter VAZ-343 engine. The gearbox is 5-speed.
VAZ-21041i . A car equipped with a VAZ-21067 injection engine. volume 1.6 liters. The gearbox is 5-speed. The electrical equipment and interior are from a VAZ-2107 car, and the front seats are from the Izhevsk hatchback IZH-2126.
VAZ-21041 VF . The interior, electrics and front seats are the same as the previous modification; the radiator grille is also borrowed from the VAZ-2107. It was equipped with a 1.5 liter injection engine from the VAZ-2103 and a 5-speed manual transmission.
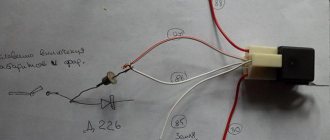
I'm sure I'm not the only one, and like many people I constantly have problems with the contacts on the rear light board. Before the trip I check, all the lights are on, after the trip the lights don’t light up, if you hit the light, it lights up. As soon as you climb in to check the contacts, one of the three mounting legs of the cartridge will inevitably break, that’s not a problem. And it's really annoying. The same goes for replacing a light bulb. It takes a couple a lot of time to replace the light bulb and subsequently repair the contacts and replace the socket. I'm tired of all this. I decided to take this problem seriously. Without hesitation, I decided to go to the store and look for new light bulb sockets. I was advised to take Kalina/Priors/Oki cartridges. And I came across a set of sockets with wires and bulbs for viburnum, exactly what I wanted. So, I bought 2 sets costing 300 rubles, and 2 sets of 6-pin connectors, because... I couldn’t find the “mother” for the contacts that came with the viburnum cartridges.
So let’s look at the essence of the problem - here is the root of all evil, the cartridge is standard, for 07 and 05 flashlights, and if earlier the contacts were made of a normal spring alloy, now they are made of who knows what