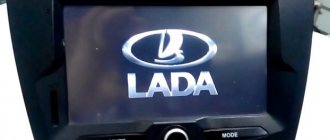
The standard radio for the Lada Granta model is an improved device, the design basis of which is the “Sirf Atlas” processor, supplied by the well-known. In addition to the presence of a radio receiver, the device is equipped with a large touch screen and has the ability to connect an external source via a video input by replacing the software and performing firmware. However, in the basic configuration of a domestic car there is only a push-button radio. Many owners are not happy with this fact and want to connect a more modern radio. This article will tell you how to install a radio.
What to do if the length of the wires and antenna is not enough
To get by without extending the wires, you will have to suffer:
- We put our hand under the panel in the glove compartment area;
- We put the radio in the slide and connect it to the plugs;
- We blindly connect the power, the connector for the speakers, the wires for the amplifier, and the antenna.
Disadvantages of the method: we spend a lot of time, the process is dreary and inconvenient. We'll probably rip off your wrist.
Plus: there is no need to build up wires, which will then interfere with the installation of the PG, resting against the back wall.
As you can see, immediately behind the GU in Grant there is a vertical partition, which greatly interferes with blind installation.
Removing the standard radio in the Grant Luxury
The difference between grants of the luxury configuration: the MMS (multimedia system) installed from the factory. This is a 2 din device.
To remove standard acoustic grants:
- take a knife or plastic spatula to dismantle the acoustics and disconnect the decorative trims to the right and left of the radio. It is not necessary to take pictures;
- in the gap between the cover and the panel we find the head unit lock. There are two of them on both sides. Press it out with a screwdriver;
- we take out the GU on ourselves.
If the radio tape recorder dangles in the slide and rattles
It happens that the acoustics hold weakly in the sled, although they sit firmly. Solving the problem:
- Using the keys for dismantling (included with the control unit), remove the radio;
- We take a small piece of vibroplast (resin-based foil) and glue it onto the slide from the inside, top or bottom - this way we will ensure that the tape recorder is completely pressed against the slide without unnecessary vibrations;
- Once again, use a screwdriver to press down all the fastenings of the slide: some might have been under-tightened;
- We put the acoustics back and check - all unnecessary vibrations during shaking should disappear.
Vibroplast helps not only with soundproofing a car.
How to flash the firmware
- Buy an SD card, format it in FAT, exFAT format;
- We download the firmware for free on the manufacturer’s official website;
- We save the data in the root directory of the SD card;
- We insert the SD card into the slot on the radio, start it, wait for the update to finish;
- Turn on and off the module;
- We customize the new interface for ourselves.
If the firmware is installed incorrectly, additional screen calibration using the CAN bus will be required. It is impossible to do this yourself, only in a service station. After successful flashing, the following is available:
- graphic equalizer;
- viewing photos, pictures, videos;
- improved sound quality;
- possibility of installing a navigation system.
Disadvantages of a standard radio
- Outdated firmware from the “box”;
- Not all options are initially available;
- The need for periodic software updates;
- Push-button interface.
What extensions can there be?
If you plan to connect a professional device via the ignition switch or directly to the network, then in order to do everything correctly, you need to take into account the extensions specific to the 220 radio. Thanks to this functionality, the device is equipped with additional functionality that makes using the radio more comfortable.
For example, these could be extensions:
- ANT. This extension will be useful if the car has a retractable antenna. That is, if you need to activate it, you can simply give a command to the device and the antenna will turn on automatically.
- REMOTE. Thanks to this function, you can connect an amplifier to the system and, accordingly, achieve better sound. If your car is basically small, then this function will not be particularly useful, since in any case you will not be able to achieve the desired sound background.
- ILLUMINATION. Using this extension, you can make sure that the brightness of the device is reduced while driving and does not distract the motorist. When the car stops, the system will automatically increase the brightness of the display.
- MUTE. This extension is enabled only when the car owner needs to talk on a mobile phone. When the phone rings, the system automatically turns on this extension and the speakers are turned off.
How to connect a Lada Granta standard radio with a 1-din connector
- We carry out the work inside the car, having previously disconnected the terminals from the battery in order to prevent a short circuit in the circuit;
- We remove the plastic partition - pocket. It covers the hole, preventing objects from falling inside the torpedo. We use a flat-head screwdriver to unscrew the bolts;
- Two ISO plugs are visible behind the partition body. These types of wire terminals are manufactured in accordance with international automotive standards. More than 98% of all automakers use the standard when equipping technical equipment;
- We remove the metal frame - the block - from the body of the audio unit and place it in the cavity of the torpedo.
- We first connect the blocks with wires. Fitting into the connectors is accompanied by a characteristic click;
- We insert the module into the metal frame.
Note to the driver!!! Incorrect terminal connections result in a short circuit. To ensure the safety of the connection process, the connectors have guides that allow you to install the block in only one position.
New Lada: Installing a protective mesh on the radiator grill of Lada Vesta » Lada.Online - all the most interesting and useful about LADA cars
How to connect a car radio in a car with your own hands
How to connect a car radio in a car - when installing the head unit in a car, always remember that the positive voltage power wire must be laid directly to the battery terminal with the obligatory inclusion of a special fuse block in its circuit, be characterized by high quality insulation and have a large cross-sectional area. It is most advantageous to install this fuse block in close proximity to the battery.
There are cases when inexperienced car owners make a serious mistake in the process of connecting the device, namely: - they take the positive power supply voltage of the radio from the cigarette lighter, this installation option is completely unacceptable. Consequently, due to such incorrect connection, the output power of the device is reduced, this is especially noticeable at maximum volume, when the backlight begins to blink. In addition, with a clear drop in power, distortion begins to occur at an earlier stage of melody playback.
The circuitry of the radio provides a pair of positive voltage wires, one of which is red and is the power wire, and the other yellow is the function of transmitting the control signal. The negative voltage wire is black. It is connected according to the standard scheme - to the car body or directly to the battery terminal with the “-” sign. It is considered preferable to use the second connection option, since it minimizes the likelihood of electrical interference.
The built-in audio power amplifier or active antenna is turned on via a blue “REM” wire.
Dynamic emitters are connected using separate pairs of wires, which have their own colors for each spatially located speaker.
For clarity, the connection diagram is shown below:
This diagram shows that one wire has a clearly defined color, and the other has a duplicate dark stripe; this wire is the conductor of negative voltage, that is, “minus”.
One of the important points during installation is the correct connection of speaker wires. Indeed, if the assembly is incorrect in relation to the color scheme, problems in establishing balance may arise in the future. If the speakers were connected without observing polarity, then the speakers installed at the rear will be out of phase, which will ultimately lead to a lack of low frequencies.
In addition to the usual schemes for connecting a radio to a car, there are several other possible options. For example, they connect directly to the ignition switch terminals. But this method is ineffective, to say the least, the fact is that such a scheme will not work if there is no key in the ignition. There is another option - connect to the alarm connector, but this solution also did not find wide support among car enthusiasts.
Sometimes during the operation of the device there is a need for preventive maintenance, repair or replacement of equipment, so to make this convenient, when installing the car radio, you do not need to shorten the wires, but it will be more effective to use ISO connectors and special adapters.
Here is another solution for connecting the device. The yellow wire goes to the 12v power terminal, and the red wire goes to the parking light connector. The contact point of 12v dimensions is located at some distance from the radio, for this reason it would be advisable to use an electromagnetic relay. Power for the relay can be obtained from the contacts of the ashtray light bulb.
Positive nuances of this scheme:
- The head unit itself starts working the moment the lights are turned on and at the same time retains memory.
- When the side lights are turned off, the head unit stops working. This is a significantly positive moment for those who, out of forgetfulness, do not turn off the light.
- The head unit can work even if the ignition is not turned on.
- If the side light circuit is implemented using LEDs, the electricity consumption is quite insignificant.
The video below shows the process of connecting a car radio in a production VAZ car:
Video:
Music in a car is considered one of the main indicators of driving comfort. Therefore, many car enthusiasts today are interested in the question - how to connect a radio in a car on their own and what is needed for this? In this article we will talk about all the connectors and their markings, as well as the procedure for installing a car radio with your own hands.
How to install 2 din in grant norm or standard
Everything is more complicated here. Need to:
- dismantle the center console trim - unclip the fastenings, move it forward and disconnect the buttons and heater handles;
- cut out a vertical plastic partition that will not allow you to install a 2 din device;
- file the plastic casing of the central air duct;
- try on a new acoustic unit, adjust the fastenings if necessary;
- install adapters from the delivery kit on the wiring (if required);
- install the device;
- if we leave the old center console trim: we cut out the partition, try it on, put it in place with the buttons and handles connected, adjust the decorative frame of the control unit, install it;
- if we install a new trim on the console under a 2 din device: we transfer the heater control unit and buttons from the old trim, install them in place, and put a decorative frame on the control unit.
How to properly connect a car radio
Connecting the car radio is done in several ways:
- Using an ISO connector.
- Without using chips by splicing wires.
- By directly connecting the power wires to the battery terminals.
- Via the ignition switch or a separate switch.
- Through a security alarm.
Car radio diagrams, which help with the correct connection, are printed on a label on the top cover of the device. They indicate the color marking of the wires established by the generally accepted standard:
- red - power management;
- yellow - power supply to memory and amplifier;
- black - mass;
- blue with a white stripe - power supply to the antenna with amplifier.
For reliable fixation, the wiring can be secured using cable ties.
Connection with and without chip
The first option for connecting the radio to the car is suitable if you have an ISO connector, which is built into recently released devices. If the tape recorder is equipped with a proprietary connector, then you need to purchase an adapter suitable for it, which may or may not be equipped with an additional feature. In the first case, if there is a mating part in the car wiring, the connectors are inserted into each other.
How to remove the standard radio or mms on a Lada Granta
May 18, 2022 Lada.Online 48,588
It's no secret that the standard MMS (multimedia system 2190) or a simpler radio for Lada cars can be modified in various ways. In some cases, this requires dismantling it. Let's look at a simple instruction that allows you to remove a Granta radio in 1 minute.
Procedure:
- Unclip the upper part of the center console trim by prying it up with a screwdriver or plastic spatula;
- Press the radio latches on both sides with a screwdriver, moving the upper part of the plastic cover to the side;
- Pull the radio out of its seat.
If you cannot remove the Granta audio system due to tension in the wires, then:
- lower the glove compartment lid down, releasing the upper latches from engagement with the panel;
- and disconnect the USB and antenna wires from the back of the radio by reaching through the right side of the panel.
Installation is done in reverse order, everything just clicks into place. The process of withdrawing MMC Grants is also shown in the video:
Now you can familiarize yourself with the sticker on which the radio model is indicated, and based on this, select the appropriate firmware. You can also disassemble the MMC to replace the standard amplifier chip with a more powerful analogue. Don't forget that you can connect a rear view camera or amplifier to the standard radio.
Keywords: cassette player Lada Granta | Lada Granta torpedo
Share on social networks:
Found an error? Select it and press Ctrl Enter..
Guests cannot leave comments in the news, please log in.
Connecting Pioneer to the multifunction steering wheel
If you need to install a non-standard radio in a car with a multifunction steering wheel and not lose control from its buttons, use an adapter. They are universal and specialized for specific brands. Look in stores for an adapter for a multifunction steering wheel. Its connection is carried out as follows:
- disconnect the battery from the car’s on-board network;
- remove the standard radio and pockets, if any;
- find the ISO connector for connecting the car radio - the adapter will be installed in it;
- connect the adapter cable (supplied with it) to the radio, and the adapter itself to the ISO connector of the car;
- configure the steering wheel buttons;
- reconnect the battery to the network.
Step-by-step instructions for installing the head unit
Required:
- a narrow flat screwdriver or plastic spatula for installing acoustics;
- 1-din radio with frame.
The seat in Grant is designed for 1 din.
To work with large 2-din sizes, you will need to cut out the partition and install a decorative frame. Step 1. Using a flat-head screwdriver, remove the plastic plug for the radio. To do this, carefully pry it around the edges and pull it towards you.
The placeholder for the radio is installed from the factory.
Step 2. On the back of the plug there is a mount for ISO connectors. There are two connectors: music power and wires for the speakers.
When connecting the pads, you can’t confuse them - they have fastenings of different shapes. 8 wires at the speaker terminal. The second power connector.
Step 3. If necessary, connect an adapter for your radio to the ISO. Usually it comes included.
If an adapter is not needed, proceed to step 4.
If an adapter is needed for acoustics, it is included in the kit. Example in the picture.
Step 4. Remove the glove compartment. Holding the glove compartment clamps in the upper position, forcefully lower the glove compartment down.
Overcoming resistance, we pull the lid towards ourselves - the glove compartment is removed.
Removing the glove box on a Grant is easy when you know where its latches are located.
Step 5. Using a flashlight, we climb under the panel in the area of the front right passenger's feet. Behind the felt on top we find a thick black wire - at its end there is a plug for the factory antenna.
New Lada: Error P0036 - Oxygen sensor heater 2, bank 1
We extend the plug to the installation location of the radio.
Here we are looking for the antenna wire.
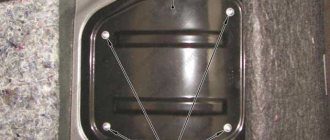
Step 6. Install the metal slides for the radio. Use a screwdriver to bend the fastenings of the slide at the top and bottom to ensure secure fastening.
These fasteners secure the slide into the panel opening.
Step 7. Connect the power connectors, speakers, antennas to the radio. We insert it into the slide all the way. We attach a decorative plastic frame.
If you plan to install an amplifier, you must first stretch the wires under the panel and bring them to the installation site of the power unit.
Preliminary work
What should you consider during installation? It is necessary to ensure that when parked for a long time, the head unit does not discharge the battery. It is important for many drivers to be able to use their equipment even with the ignition off.
- If there is an old radio in the car, it must be removed. For this you will need a screwdriver. To ensure safety, disconnect the battery.
- Remove the decorative trim (in most cases it is more convenient to do this from right to left, opening the glove box).
- Remove the screws that secure the head unit and the air duct cover. The cover can be removed (not necessary, but this will increase ease of use). But the “Emergency Stop” button does not have to be disconnected from the power supply.
- Remove the radio and turn off the on-board computer screen. Remove it from the bracket. Done, you got rid of the old device - you can install a new one.
Video: dismantling an old radio in a car without special tools
Dimensions and connectors
Radio tape recorders are available in single-block and double-block (1 and 2 din). European manufacturers, as a rule, produce 1 din equipment. Japanese, Korean and American usually work with 2 din - such models have 2 times the height, so the car must have a niche of the appropriate size.
Different radios and cars have different connectors. Most often, the head unit is connected via ISO 10487. Before purchasing, check whether the car has it. Yes, no, it’s okay, the problem can be dealt with in two ways:
- use adapters that allow you to switch from conventional pads to ISO;
- connect directly (the method requires at least a little experience in working with wires).
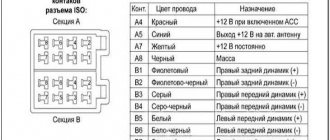
ISO connector pin assignments
Marking of tape recorder wires
Before starting installation, examine the wires on the new radio. Typically, two ISO connectors are supplied with head units for easy connection. They consist of a group of contacts (each with 8 pieces). One connector connects to the power supply, the second to the sound reproduction system. If your car does not have a corresponding port, disconnect the connector from the wires and connect the equipment using the twisting method.
The wire insulation is colored differently for easy identification. Each of them has its own functions.
- The wide yellow wire is designed to connect to the battery. It must be connected to power only through a fuse.
- The wide red wire is connected to the battery through the ignition switch. In this case, the radio will only work when the ignition is on. Attention! Some car enthusiasts connect the yellow and red wires, but this is not recommended - the battery may quickly discharge.
- The wide black wire is negative. It is attached to the car body.
- The white wire with a blue stripe allows you to use a subwoofer, amplifier and antenna.
- The gray one is for connecting to the “+” terminal, which is located on the front right speaker.
- Gray with a black stripe is connected to the same speaker (terminal “-”).
- White is the “+” terminal of the front left sound element.
- White with black - the same speaker, “negative” terminal.
- The green one must be connected to the “+” terminal of the rear speaker.
- Green and black are the same, but at a minus level.
- Purple - to the one located behind, on the right side, on the “+”; its “brother” with a black stripe - also with dynamics at “-”.
Choosing the right radio size
We carry out installation either independently or by contacting specialists at the service center. In the second case, the service is paid.
By default, all VAZ and Lada models are equipped with a 1-DIN radio. The opening dimensions correspond to: 180 x 50 mm. This is an old standardization that has been in force since the times of the USSR. Modern audio modules can be purchased complete with a pre-installed LCD display.
To install the radio in the Granta liftback, cut out the top pocket, remove the plastic, and install the assembled module. For a beginner, the process will seem somewhat complicated, so strictly follow the instructions.
Let's start connecting
You should know that all ISO connectors, as well as wire color pinouts, are standard, so it is extremely difficult to make a mistake. It is clear that it will not be difficult to take the connector and connect it to the mating part. But, as we have already said, quite often they resort to a more labor-intensive procedure, such as manually connecting the wiring. For these purposes, we disconnect the wires from the connector plug and connect them according to the functionality of the wires.
Having connected the wires, they will need to be insulated carefully to avoid possible damage due to a short circuit. To prevent the wires from becoming disconnected over time, it is recommended to secure them with a plastic clamp.
In all vehicles on the center console
or the dashboard provides mounting positions for a car radio. Often this place is covered with a decorative panel. Before installing the radio, it will need to be removed using a screwdriver.
In the resulting compartment you can easily find the mating part of the wires necessary to connect the Pioneer radio. Then the wires or connectors are connected according to the connection diagram. Now the radio can be installed in the slot in its seat.
The radio comes with an instruction manual with a detailed diagram for connecting the device, as well as a pair of steel plates with eyes. They are necessary so that the car radio, if necessary, can be easily removed from the slot. These plates are installed on the sides of the radio, and the eyes can be bent with a screwdriver and covered with a panel.
Installing two speakers in the front doors
- dismantle the door card, handle, control unit;
- We compare the standard cutouts for the speakers with the actual dimensions. If necessary, expand with a file or fine sandpaper. It is strictly forbidden to use cutting objects, as there is a high risk of damage to the plastic of the door card;
- we check for the absence of roughness in the hole, install the speaker, fix it, connect the standard terminals with wiring;
- we check the operation of the speaker, install the door card, and fix the metal grille to protect the speaker from mechanical damage.
Installing a sound amplifier
By liftback radio amplifier we mean:
- crossover installation;
- subwoofer installation.
The choice is up to the owner of the Lada Grant, as different goals are pursued: cleanliness, sound quality. Obviously, the cost of the equipment will also vary upward. Crossovers are installed in the cavity of the glove box, since their dimensions do not exceed 100 x 150 mm and are rectangular in shape. Subwoofers are fixed in the luggage compartment. Equipment requires more space.
Connection of an external device is carried out strictly in accordance with the operating instructions:
- brown wire color: responsible for the operation of the system;
- black: power supply to equipment;
- yellow: audio module activation;
- red: settings and programming.
At the very end, do not forget to connect a red wire with a pre-installed fuse to the positive terminal of the battery. It directly connects the amplifier (subwoofer) to the current source.
How to connect an amplifier and subwoofer?
In addition to the need to connect a radio, many people want to connect a subwoofer and amplifier. Not every Lada Granta owner will be able to enjoy the sound generated by the standard radio. This fact forces car audiophiles to lean toward the additional installation of high-quality audio amplifiers and subwoofers. The goal is known - great sound.
To install the indicated devices yourself, we resort to the following simple manipulations.
- First, we dismantle the lower part of the center console.
- We remove the panel and find mini ISO connectors.
- We insert the plug of the previously purchased adapter into one of these sockets (indicated in yellow). We do not touch the blue and green cables. Owners who have already performed this procedure note the following - we can no longer use standard wires, so we resort to the “mini iso” connector.
- Next, we connect a special fuse to the battery, having previously connected the cable from the amplifier (marked in red) to it.
- The subwoofer in combination with the loudspeakers is connected to the amplifier. We connect the battery ground wire (black) to the LADA Granta body and the corresponding terminal on the amplifier.
- After the measures have been taken, we return the panel and radio to their place.
- Enjoy the updated and high-quality sound.
Characteristics of the standard radio "Frets Grants Liftback"
The radio for the Lada Granta liftback is supplied as standard equipment. Product in 2-DIM format (100 x 180 mm).
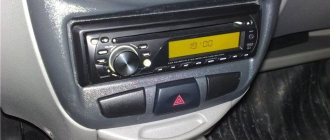
In addition to the classic radio, there is a built-in card reader, Bluetooth, and a USB output for connecting flash drives. The only disadvantage of the audio module is that it is a push-button type. Which is not to the liking of many car enthusiasts, which is why they install more modern modifications.
New Lada: Technical characteristics of the new Lada X-RAY
During the startup of the audio module, a greeting from Lada Kalina 2 is displayed. This is not an error, as many owners think. This type of audio was originally developed for the Lada Kalina 2. Obviously, the manufacturer did not change anything and started production for the Granta. Installation/disassembly of the module is somewhat complicated due to the tight fit, so be prepared for this.
It is based on the Windows operating system, which allows you to connect to the World Wide Web via a 3G modem. There is no such option out of the box; you first need to reflash the device, but more on that later.
Via Bluetooth, it is possible to connect to a phone, and the “hands-free” option is activated. Which is very convenient and practical when driving a car. The owners were also pleased with the stock radio. At first glance it looks simple, but it turns out not to be so.
For example, as soon as a news broadcast is broadcast, the radio automatically switches to the programmed channel. The audio module reads the following formats: MP3, WMA, WAV, WMV. Control of the Lada Granta Liftback head unit is accessible and intuitive, even for an inexperienced owner.
Instead of a total
- If we install a simple radio, the size should be no more than 178 * 50 mm. Installation requires plastic spatulas or a screwdriver. Adapters and slides are included.
- To install 2 din, you need a new overlay on the console, a decorative frame on the GU itself, wire cutters and a metal blade to adjust the installation location.
- Are we replacing the standard speakers with another of the same size? Still need a new decorative frame. Otherwise, gaps in the panel will be visible.
More articles about Granta here.
Installation of Lada Granta car radio
Tools:
- Open-end wrench 10 mm
- Small flat screwdriver
- Knife (if necessary)
- Soldering iron (if necessary)
Parts and consumables:
- Car radio
- Solder (if necessary)
Notes:
Initially, in this car model, the calculation is made for a 1-DIN radio. If the owner wants to install another type, a newer one, for example 2-DIN, he will need to start sawing the partitions in the console itself. And if the size is not suitable, then a suitable cantilever frame will have to be cut into the panel. This is much more complex than the first type of installation listed. In the second option, it is better to entrust the installation to a specialist, because there is a high risk of damaging the interior trim.
Here is a description of how to install a 1-DIN radio.
Installing a car radio on a Lada Granta
1. Remove the negative terminal from the battery.
2. Remove the plastic pocket installed in place of the future radio using a flat-head screwdriver.
3. Having taken out the pocket, on the reverse side you will find slots where ISO connectors will be inserted to connect the radio. Disconnect the connectors to completely remove the pocket.
4. Now remove the metal frame from the radio and install it in the place where the plastic pocket was. Unbend the frame's tendrils to lock it securely in place.
Note:
There should be a click to confirm that the frame installation was successful.
5. Connect the connectors to the radio.
Note:
If you connect the radio to the connectors incorrectly, all car systems may fail, including, of course, the sound system.
Some radio manufacturers make custom connectors. Most of them come with an ISO plug. But there are times when none of the types are suitable, then the last option remains - cutting the wires. You remove the original plugs of the radio and the plugs of the car wiring and solder them together, but be sure to match the color.
A mistake many car enthusiasts make is twisting the wires and wrapping them with adhesive-backed insulating tape. In winter, the same electrical tape cracks due to frost. As a result, a short circuit may occur in the wiring, which will lead to the failure of all electrical systems of the car.
6. Insert the car radio into the previously installed frame.
7. How to install speakers, see here.
The article is missing:
- Photo of the instrument
Source: carpedia.club
Reviews
| № | Positive |
| 1. | Victor, 39 years old: after buying the car, he did not change the radio, despite the push-button control option. The sound quality is good, the radio reception is excellent, that's enough for me. |
| 2. | Konstantin, 41 years old: bought the car second-hand, second owner. I didn’t change anything, I left the original radio. The functionality is good, the build quality is also good, it reads from a flash drive. |
| 3. | Vasily, 44 years old: I listen to the radio more, the reception in the city is good. True, it causes interference near metal structures, but this is natural. |
| 4. | Kirill, 36 years old: I work as a taxi driver, on wheels all day. The standard tape recorder saves the day, it works properly. My friends recommended replacing it with a touchscreen model from the new Granta, but so far the old one hasn’t failed. |
| Negative | |
| 1. | Victor, 38 years old: the standard audio module, although not bad, seemed to me not enough, so I replaced it with a foreign one and supplemented it with an amplifier. Now the volume is good, the quality is high. |
| 2. | Mikhail, 42 years old: I work as a courier, I drive for the entire shift. I expected more from the standard radio, so I had to replace it with a new one. The volume suits me, I plan to connect an amplifier - a crossover. |
| 3. | Ivan, 33 years old: I bought the car second-hand, immediately replaced the audio module, the reviews are not good. New and high-quality equipment from Trinity, no problems. |
| 4. | Vladlen, 40 years old: friends gave me a gift in the form of a radio with touch control for our anniversary. Before this there was a push-button one. Can't compare, quality, sound, control, functionality at a high level. |
ConclusionThe opinions of motorists on the functionality and sound quality of the standard radio are divided, which is obvious. Everyone evaluates according to their own criteria. Some people care about sound, others about functionality, and others about control. Regardless of the type of radio: push-button or touch-sensitive, the workmanship is good.
No massive breakdowns or defects were recorded. Maintenance is not expensive, parts and components are available both at official representative offices and on the Internet. Now it will not be difficult for the owner to remove the radio on the Granta liftback with his own hands without contacting a service station.