How to choose good lamps
It is not enough to replace a faulty element in a car; you also need to select the right spare part. Light bulbs are no exception. The auto parts market offers a large selection of lighting devices from a variety of manufacturers with appropriate quality.
Conventionally, lamps can be divided into three categories:
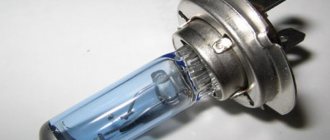
- Good lamps should last a long time, but don't have to be expensive. Quite good manufacturers, such as Philips, Osram, etc., sell affordable lighting devices with standard characteristics. The price of one lamp, for example, with an H1 base is, on average, 102 rubles. In this case, the characteristics will be averaged, as on standard lamps with, “Dialuch” and other lamps, on the packaging of which you can find Chinese characters, are cheap low-quality light sources. The illumination is worse, and the service life can sometimes exceed the operating time of even the most expensive lamps.
- A separate category of light sources are expensive light bulbs or, as they are commonly called, high-brightness lamps. Trivial examples are: Osram Nigth Breaker +110 or Philips Racing Vision +150. In fact, the brightness of such lamps is actually higher, since they operate in overheating mode. But durability is less. You can also include LED lamps and xenon, as this is a kind of optics tuning.
When it comes to choosing a lamp, we always think of light sources for low beam headlights or PTF. For other luminaires, lamps are selected with much lesser requirements.
Selecting an original light bulb based on the article number is expensive. It’s much easier to go into a store and tell the salesperson about the type of base so that he can give you the right light source.
How to change the running light bulb on a Lada Granta
The running light lamp appeared in the arsenal of modern cars relatively recently.
The technical manual of the domestic Lada Granta model clearly states that the role of daytime running lights (DRL) is assigned to side optics, the design of which is double-filament.
When the ignition is turned on, the thread responsible for the operation of the DRL lights up first, and with the activation of the headlights, the side lighting is simultaneously turned on. The power of the first of the designated threads is 21 W, and the second is 5 W.
For running lighting, the manufacturer uses ordinary DRL lamps. The most undeniable advantage of such devices is their low cost, but there are more than enough “cons”.
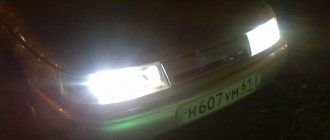
This is evidenced by customer complaints, which reflect dissatisfaction with the dim light beam of a yellowish tint and the low service life of the lighting device.
Many car owners are interested in the question: how to change the running light bulb.
This arrangement of facts forces Lada Grant owners to “rush” in search of analogues of DRLs and replace them at the first opportunity.
LED DRL lamps without sockets or conventional devices, but with increased light output and a more pleasant color spectrum of radiation, are suitable as such devices. There are plenty of such lamps in the assortment of any specialized store.
If the owner likes LED technology, then experts advise taking into account their brightness parameter. What to do when you need to replace the running light bulb.
Types of lamps used in the Lada Kalina 1 car
Lada Kalina cars use a huge number of light sources. To make it easier to navigate, they are divided into categories: external and internal.
External lighting devices:
| Low beam | H7 |
| High beam | H1 |
| Front turn signal | PY21W |
| Rear turn signal | PY21W |
| Side turn signal | W5W |
| Side light | W5W |
| Rear marker lamp and PTF | P21/4W |
| Stop signal | P21W |
| Reverse | P21W |
| License plate light | W5W |
| Fog lights | H11 |
Internal lighting devices:
| Trunk lighting | C5W |
| Interior lamp | C10W |
| Instrument lighting | W1/2W |
| LCD indicator | W1/2W |
| Cigarette lighter | W1/2W |
| Glove compartment lighting | C5W |
| Individual lighting | T4W |
We connect the LEDs. How and which ones are best to install on Kalina 2
Many motorists love to spend their free time alone with their iron friend. And, if there are no problems with the car itself, then they are engaged in tuning it. In such cases, almost everything can be replaced, from the appearance of the car to the parts of its engine.
It is quite common to replace manufacturer-installed side lights with LEDs. However, this decision is quite wise, since LEDs are much more durable and consume less energy. But, on the other hand, they do not glow like lamps do.
In addition, they are safer than standard lamps, since the power supply of the LED lamp is instantaneous, which allows the driver behind to react to the light faster.
However, replacing an LED is a little more difficult in reality than in the text, since you can simply buy an LED cluster and replace standard lamps with it. Replacement will require some effort. Now we’ll figure out step by step how to replace LEDs and which ones are best to choose for installation on Kalina 2.
Among the many LED options, the best ones for Kalina 2 are those marked W21/5W, P27/7W (3157, 7443) and the abbreviation SRCK. You shouldn't have any problems installing these LEDs.
What causes lamps to burn out in Lada Kalina
There are three reasons why lamps in a car can burn out. And here is each of them:
- Life time. It is worth noting that any lamp is designed for certain operating hours. Once the operating time exceeds its limits, the light source begins to dim, and then the filament melts and the light source stops working. The operating time of the lamp may be affected by the voltage of the on-board network.
- All automotive light sources are designed for a voltage of 12 Volts, but not more than 14.7V. If this parameter is exceeded, the incandescent device begins to operate in overheating mode, which leads to its failure ahead of schedule. Overvoltage can occur due to a breakdown of the voltage regulator relay.
- Quality. A lot depends on the quality of the light source - from illumination to service life. To prevent the lamp from burning out prematurely, try to choose light sources recommended by the manufacturer.
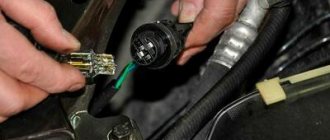
Switching on through dimensions or low beam
The second version of the DRL connection diagram involves using the power circuit of the side light bulb. To do this, the positive wire from the running lights is directly connected to the “+” from the battery. In turn, the negative wire is connected to the “+” of the side light, which is currently electrically neutral. As a result, the following current flow path is formed: from the “+” of the battery through the LEDs to the size, and then through the light bulb to the body, which serves as the minus of the entire circuit. Due to the low current consumption (tens of mA), the LEDs begin to glow, and the lamp spiral remains extinguished. If the driver turns on the side lights, then +12 V appears on the positive side of the side lights, the potentials on the DRL wires are equalized and the LEDs go out. The circuit goes into normal mode, that is, current flows through the side light bulbs.
This circuit solution has several disadvantages:
- running lights remain on when the engine is turned off, which is contrary to current regulations;
- the circuit will not work if LEDs are also installed in the dimensions;
- the circuit will not work correctly if the DRLs contain powerful SMD LEDs, the rated current of which is comparable to the current of a light bulb;
- For safety reasons, an additional fuse must be installed.
This connection method can be improved by connecting the positive wire of the LED module not to the “+” of the battery, but to the “+” of the ignition switch, thereby eliminating the first drawback. Some motorists use schemes for turning on running lights through a low beam lamp. That is, when the low beam is turned on, the DRLs automatically go out, but in other cases they work. In addition to the above disadvantages, this method does not comply with GOST R 41.48-2004 and traffic rules.
When parking a car at night, side lights are used to indicate it; the use of DRLs is prohibited.
Relay location
The relays are in the same block as the fuses.
K1 - headlight washer . If the washers stop working and this relay is working properly, check their nozzles. Sometimes they become clogged or damaged.
K2 - electric windows . Check this relay together with fuse F2. See F2 for troubleshooting.
Short circuit - starter relay . If you turn the ignition key and the starter does not turn, it may be the relay. Check its contacts and clean them if necessary. Next, you need to check the battery terminals so that there is reliable contact between them, and if necessary, clean them. Also check the contact group of the ignition switch, there may be no contact there.
K4 - additional relay, rear window defroster, heater switch, wiper and washer switch .
K5 - relay-breaker for turn signals and hazard warning lights . If the direction indicators or hazard lights do not work, check this relay together with fuses F1 and F3.
K6 - windshield wiper relay . Check together with fuse F4.
K7 - high beam relay . Check together with fuses F14 and F15.
K8 - sound signal . Check together with fuse F6.
K9 - fog lights . Check together with fuses F16 and F17.
K10 - heated rear window . Also check relay K4 and fuses F4 and F8.
K11 - heated seats . Also check fuse F18.
K12 - reserve.
Before you start repairs
Before changing the low beam lamp on Kalina, you need to check the integrity of the on-board network:
- When understanding the causes of failure of any component of electrical equipment, you should first make sure:
- the fuse is in good working order;
- look at the circuit connectors, which should be well secured;
- Often the causes of electrical equipment malfunctions are the oxidized ends of the pads; their terminals should be cleaned.
- Take a good look at the places where the car is connected to ground. Often, due to the lack of reliable fastening, disturbances in the functioning of electrical equipment occur, so replacing low beam lamps on Kalina may not always help with the problem.
- the equipment will help to find faulty places in the electrical circuit;
- is a combined electrical measuring device.
There are several types of such devices:
- digital, equipped with a liquid crystal display;
- analog;
- universal models, characterized by the presence of a liquid crystal screen and a dial indicator.
Multimeter
During repairs, we recommend using a digital device (in other words, a multimeter), which is small in size.
To check de-energized circuits, the device should be switched to ohmmeter mode:
- if you need to measure very low resistance (for example, within a few Ohms), you should enter a clarification - from the obtained indicator we subtract the internal resistance, the electrical resistance of the probes and multimeter wires (within 0.07 Ohms);
- to determine a more accurate value, the device is switched to the mode for measuring low resistance values (up to two hundred Ohms), then the ends of the probes should be short-circuited.
To check live circuits, the multimeter should be switched to voltmeter mode (the limits of permissible measurements are up to twenty volts). The device is capable of measuring the current consumed by electrical equipment of vehicles (up to ten amperes).
In cases where the task is to find out whether or not there is voltage in a certain section of the circuit, without resorting to measuring the value, you can use a special indicator light designed for twelve volts. You can also use a test lamp.
You can make it yourself:
- you will need a car lamp with a power of up to 4 W;
- take 2 two wires, the length of which is from 500 mm;
- solder them to the lamp.
The car is equipped with 2 headlights, in which halogen lamps are mounted. There are two screws on each to adjust the light beam. They make it possible to change its direction in the vertical and horizontal planes.
Connection to Kalina's on-board network
There are no restrictions or rules regarding the connection diagram in GOST. But turning on and off daytime running lights must obey certain rules. The running lights should turn on automatically when the engine starts and turn off when the engine stops. When you turn on the high or low beams, the DRLs should turn off. Sometimes Kalina car owners want to additionally turn off the daytime lights when the engine warms up.
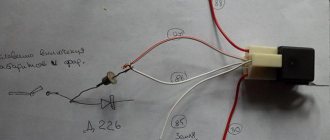
This option is possible with certain knowledge and skills in working with automotive wiring. When installing daytime running lights on Kalina in the factory version with a diagram and instructions for connecting to the control device, usually no problems arise. The mentioned device is a relay with five terminals numbered 85-87, 87a and 30. To connect it to Kalina, you need to find any power wire from the low beam headlights and the positive wire from the ignition switch.
All these wires need to be installed with a female terminal with a small piece of wire, carefully insulating the connection points. Wires of the required length are also connected to the relay terminals, but with male terminals. Next, the wire from terminal 86 of the relay must be connected to the car body under any mounting bolt. It is advisable to immediately connect the wire marked “minus” from the DRL here.
After installation is completed, you can check the operation of the lamps on the Lada Kalina car. To do this, you need to turn on the ignition. When the engine is running, the daytime running lights should light up. Next, you should turn on the low-beam headlights, the DRLs should go out, and the low-beam headlights should light up.
Read also: Expiration date of car tires
When switching to high beam, the situation should remain the same. Next, you need to turn off the high and low beams, and the running lights will light up. Then turn off the engine and the daytime running lights should go out.
I’ve long wanted to install daytime running gear on my Viburnum, but the ones I found on sale were either long, bulging, or completely out of place... and after much agony of waiting and choosing, I took it for myself:
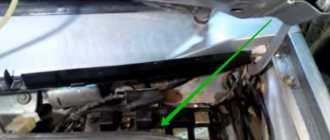
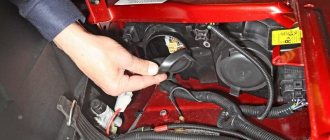
Begin. I decided to run the power wire into the cabin through the hole under the wiper drive. To do this, first remove the battery, the levers along with the brushes from the shaft, then the plastic lining, and lastly the gear motor:
At the same time I cleaned the hole for draining the water, everything was clogged with earth for some reason...:
Remove the rubber plug:
We pass the DRL power wire through it:
We bring the wire into the interior, fasten it:
We prepare the necessary tools for fastening the DRLs themselves:
We unscrew the two screws that hold the lower plastic grille and take it out:
We outline and drill small holes for further screwing of self-tapping screws into them:
We put the lower plastic grille and two “lamps” in their places:
As a result, everything was installed according to GOST standards :) (I hope):
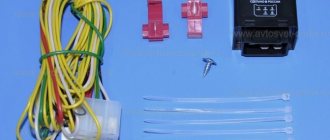
The first stage is now complete. Let's move on to the second one. These DRLs have a third wire (yellow), which is thrown to the dimensions, and in theory, when the dimensions are turned on, the daytime lights should work in the floor of the channel. But I need it so that when I turn on the headlights/low beams, they are completely turned off, and in the end I cut off this yellow wire at the root so that it doesn’t get in the way. In order for the DRLs to turn off the way I want, I need to use a 5-pin relay (avtogsm.ru/rele-5-kontakt-p211.html), I didn’t look for long, but took the whole set with wires and a fuse (I remember the rules DRLs should be able to be manually switched off without problems) from an unused PTF connection kit for the VAZ 2108... altered the pinout to suit your needs (30 - power supply for running lights, 85 - ground, 86 - dimensions, 88 - wiring, where 12V appears after switching on ignition), cut off the excess:
Pinout of the standard MUS, this is where we will hang the relay:
We pull out the larger wires needed from the bundle with the wire under the panel, and install a relay on them:
We tighten and paste over everything that can make a sound with a model:
continued in the next post, my limit of uploaded photos to the page is over))
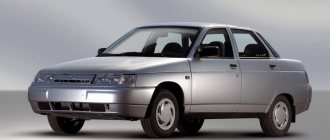
Daytime running lights on Kalina do not lose popularity due to the requirements for cars, which stipulate that even during the day, cars on Russian roads must be driven with fog lights, daylight running lights or DRLs on. The manufacturers of this optics did not miss this innovation. Today, a wide variety of lighting devices have appeared on the market, which comply with state standards and at the same time give the vehicle a presentable appearance.
Read also: VAZ 2106 generator anchor
running lights for Lada Kalina