Car window tinting is, without a doubt, an important element of external tuning. To tint your car or not is a matter of choice for every car enthusiast. In this article we will talk in detail about how to properly tint car windows with film yourself. And at the end you can watch a training video.
Tinting is a process that requires care and preliminary preparation. But with some skill, you can do car window tinting yourself.
You may also be interested in the following materials on our website:
- Athermal glass tinting film;
- An alternative to tinting is frame curtains;
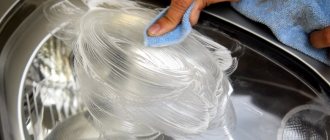
- Instructions for tinting headlights with your own hands;
- How to remove tinting from glass yourself.
Below we have prepared for you step-by-step instructions for tinting car windows: from choosing a tinting film to gluing a reflective strip on the windshield.
Choosing a film for car window tinting
The tinting film market is so large that to review it, we wrote a separate article about films for tinting car windows.
We do not recommend buying cheap Chinese DIY kits; instead, we recommend purchasing only high-quality roll film for window tinting.
Also listen to the recommendations of sellers who sell tint films. From them you can purchase all the tools necessary for tinting windows.
Still, it is better to see once than to hear a hundred times. Therefore, we suggest watching a video tutorial on tinting car windows with your own hands, which is located at the bottom of this article.
And for better assimilation of the material, all stages of self-tinting windows are described below and can be used as a cheat sheet.
Should I do it myself?
The easiest way is to take the iron horse to a car repair shop, where they will quickly and efficiently cover the windows with a protective film. But you have to pay for pleasure, which no one wants to do. An attractive option is to make it yourself at home, especially since at first glance there is nothing complicated about it. There is no need to crawl under the hood or understand the components, everything is on the surface. What could be easier than sticking a film?
You can actually do the tint yourself. There are many videos on the Internet with detailed instructions on how to make it yourself. However, you need to remember some nuances. This way there will be no problems with the law, and the aesthetic appearance of the car will be combined with a comfortable stay inside.
Materials and tools for tinting car windows
In the process of tinting your car windows yourself, you will need the following tools:
- Spray,
- Soft and hard forcing,
- Paper napkins,
- Sponge,
- Scraper,
- Ruler,
- Knife,
- Hair dryer.
To work with the tint film, use a water-soap solution prepared in the following proportion: 5 drops of washing shampoo per 1.5 liters of water. Mix the solution thoroughly (you can use the container of your spray bottle for this).
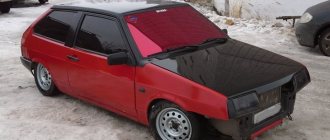
Before you start tinting, you should thoroughly clean the exterior of the glass using a prepared water-soap solution.
Pattern of film for tinting car side windows
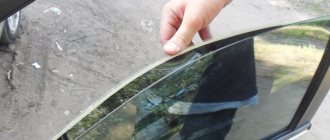
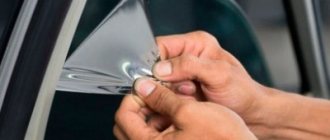
Before you start tinting your car windows, you need to cut out the tint film.
To do this, you need to determine where the adhesive layer is located - it is protected by a transparent liner. Always cut the film along the roll and make sure that the cut piece is a few centimeters larger than the glass.
- Moisten the outside of the glass and place a pre-cut piece of tint material on it with the liner facing toward you. The bottom of the film should be parallel to the outer horizontal window seal and overlap it by approximately one centimeter.
- Using a punch and a knife, make side vertical slits in the film so that you can then place the pattern over the vertical seal by about one centimeter.
- Next, having folded the bottom part of the pattern, lower the glass a little and, having secured the film along the upper edge of the glass, make a horizontal cut in it, and then give it its final shape.
The blank for tinting fixed glass is cut out so that it is several millimeters larger than the transparent area of the glass.
- Pre-fix the film on the outside of the wet glass surface.
- Cut out the workpiece carefully and slowly.
- If the transparent area is limited by the seal, then cut along the seal using a forcing.
Be careful not to damage the car's exterior parts with a knife!
- For ease of work, try to remove excess pieces of the pattern immediately after the cut.
- If the transparent area is limited by an opaque strip of paint, then the cut should be made so that it extends a few millimeters into the opaque part.
Be sure to ensure that the knife blade is always sharp (break off dull parts of the blade in a timely manner).
Principles of protecting windows from the sun
To reduce the impact of the sun, both light and heating, they decide to tint the windows. But there are several options for obtaining this effect:
- Using mirror protection – a reflective effect is obtained, the degree of reflection can be different;
- Infrared protection, in this case an athermal film coating is used, which only removes the heating effect without reducing the light illumination in the room;
- Ultraviolet protection, here the opposite effect with the previous option, objects can heat up and the light level decreases, the degree of light reduction can also be selected based on the preferences of the owners.
Thus, the last two types are selected based on climatic conditions. If the region is often hot, then it is better to use the second type, if the third is cold. The first type is selected if you want to reduce both light and heating.
To reduce the impact of the sun, both light and heating, they decide to tint the windows.
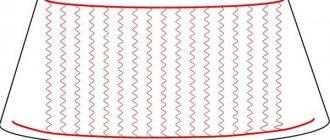
Pattern of film for tinting the rear window
The pattern of the tint film for the rear window of a car has some features due to its spherical surface.
- Before cutting, the outer surface of the glass and the film for tinting must be completely dry.
- The letter “H” is drawn on the surface of the glass with a wet sponge, and the tint film is rolled out along the roll with the adhesive layer facing out. Our blank must be larger than the transparent area of the glass.
- The remaining tint material along with the roll must be carefully removed. To do this, it is better to resort to the services of an assistant.
- After this, place the workpiece on the outside of the rear window so that there are no horizontal folds, but only vertical ones.
- Smooth out the film in an “H” pattern, since glass has a spherical surface.
Wrinkles on the tint film must be smoothed out using a hair dryer. Be careful - do not overheat it; only the vertical folds can be heated!
- After removing all the folds, moisten the surface of the glass and film, and carefully smooth the pattern. As a result, it should take the shape of glass without wrinkles.
- Smooth the workpiece from the center of the glass to its edges, both vertically and horizontally.
Carry out this operation carefully using forcing. Make sure that the film does not break during the tinting process, but is evenly smoothed over the surface of the glass.
The next stage of tinting is precise cutting of the film. In this case, it is recommended to use a spotlight to illuminate the car interior, and the cutting line should extend several millimeters onto the opaque area of the glass (see the video below).
How to choose a film?
The choice of darkening agents must be approached as responsibly as possible. A good film is durable and corresponds to the stated ability to transmit light, but it is not cheap. So there is no need to save money here. Moreover, the car owner has already saved on installation by doing all the work with his own hands. Again, you need to remember that tinting is done individually for each glass, which means that at least three sets of films will be required.
In addition to the throughput written on the packaging, you need to look at the color of the canvas. A film of a dark gray shade will be optimal for rear row windows. It will protect passengers well from ultraviolet radiation and prying eyes. At the same time, it must be matte and not reflect the appearance of an interested buyer in the canvas. A regular film will suit a black car, but there are other variations. For example, there are tints with a “transition” on sale. In such films, the colored edges smoothly blend into the classic black fabric. This film will harmoniously combine with yellow, red, blue and bodywork.
You also need to navigate the types of films. They are:
- Painted. Cheap and easy option. Paint is added to the canvas, thereby creating darkness. Does not create a mirror effect, but is not durable. Burns out quickly. Suitable for drivers who want to try car tinting for the first time.
- Metallized. They contain a suspension of some metal, usually aluminum. The layer is placed between the shielding layer and the painted layer. This trick allows you to significantly extend the life of the tint; the film does not fade under ultraviolet light for a long time.
- Spatter. The technology for producing metallized films has been improved; now tints are created through ion exchange. In addition, with spatter films, various impurities are applied to the canvas. This product has a very aesthetic appearance and justifies the high price with its durability.
- Products from Infiniti. The Japanese manufacturer applies metal spraying to the outer layer. This trick improves the reflectivity of the film (transmits no more than 30% of the light flux). In addition, it has a mirror effect. Therefore, it is better not to drive in Russia with such tinting unless the car enthusiast wants to run into a fine.
- With the transition. The tint layer will be applied unevenly over the entire canvas. As a rule, the film in the upper part has the greatest reflectivity. At noon, when the sun shines most strongly, the driver and passengers will not worry about a celestial body shining in their eyes. At the same time, visibility is reduced much less than with traditional films. It can be considered to some extent a compromise.
- Energy saving. Innovative technology removes glare, that is, reduces strain on the driver's eyes, and prevents ultraviolet rays from entering the car. Interestingly, the glass appears transparent.
- Carbon type. Expensive and rare. The canvas is placed in a vacuum and the surface is sprayed with graphite. This improves the film's performance. Does not glare, does not reflect, does not transmit light, durable. The only downside is the price.
Based on functionality, films are divided into:
- Shockproof. Protects people from splinters if the glass breaks.
- Sun protection. Everything is simpler here - preventing ultraviolet rays from entering the interior of the car.
- Decorative. Typical for owners of premium car brands. Emphasize the style and individuality of the car.
By capacity:
- 5% - full tinting. It is impossible to see anything from the outside, even if you look closely. The best option for rear windows.
- 10% - individual outlines are visible in the car’s interior, but nothing more.
- 15% - silhouettes with little detail are visible. Not much different from the previous version.
- 20% - passengers' faces are visible.
- 35% - small objects and people are visible quite clearly.
- 50% and above - good visibility from outside the car. Nothing can be hidden from prying eyes.
By manufacturer. The leaders on the market are films from American manufacturers. They are of good quality and high price. Of course, the Russian market is not limited to American goods only. Recently, stores have been flooded with products from China, Israel, India, and South Korea. The most popular brands among buyers are:
- Johnson;
- Infinity;
- SunTek;
- SunGuard;
- SunControl;
- LLumar;
By price.
The cost of materials is a key factor when purchasing them, and tint film is no exception. The assortment in stores is large, but the rule “a good product cannot be cheap” applies here too. High-quality tinting is made from expensive raw materials using modern equipment. Cunning auto repairmen like to offer customers cheaper tinting, but you shouldn’t believe them. Such a film will most likely last a year or two, after which the car owner will again worry about the problem of bright sun. If you plan to have tinting for as long as possible, then there is no point in saving, only unnecessary expenses.
The cost of film is determined per roll or per linear meter. A good painted option costs from $10 per meter. A priori, metallized film will cost one and a half to two times more. High-tech products (energy-saving, carbon and others) cost from fifty dollars per meter. You also need to consider the cost of the car. There is no point in buying expensive protection for a budget brand car, since the owner will sell it before the film wears out its life. And on the contrary, it’s a pity to put a cheap painted analogue on a car that costs several million rubles.
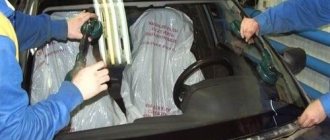
Applying film for tinting on car side windows
Wet the surface of the side glass and use a scraper to clean its lower part. Then lower the glass a few centimeters, wet it and also clean the rest of the surface using a scraper.
Clean the surface with the blade consistently and make sure that there are no uncleaned areas.
Next, wash the glass with a hard sponge and wipe dry using a rubber pad. Wipe the edges of the glass with a napkin. Moisten and wipe the glass again with a rubber pad.
- Before applying the tinting film, wet the glass generously.
- Then it is necessary to remove two-thirds of the liner protecting the adhesive layer from the workpiece and moisten the adhesive surface. It is convenient to carry out this operation on the rear window of the car by placing the pattern with the adhesive layer facing outwards.
- It is better to cut off the excess liner removed from the workpiece before applying the tint film.
Wet your fingers. Your fingertips must be clean, since in the process of tinting the glass you will need to touch the adhesive layer of the film.
Carefully take the workpiece and place it on the prepared glass surface.
Try to ensure that the adhesive layer only touches the surface of the glass and does not touch the seals or other surfaces.
Align the tint film along the top edge. Make sure that there are no gaps or gaps anywhere, and begin to carefully squeeze the solution out from under it.
Follow a few simple rules:
- Hold the pattern with your hand, since when you initially squeeze out the liquid, the workpiece will slide along the glass.
- Squeeze water from the center to the edges.
- Use rubber and then hard forcing. Using hard distillation, expel the liquid in the same directions - from the middle to the edges.
- Then, using a forcing tool and a hair dryer, fix the film at the top edge of the glass.
- After this, use a knife to remove the excess tinting film protruding onto the upper edge of the glass - this technology allows you to avoid leaving gaps along the upper edge.
Raise the glass. Bend down the bottom part of the pattern protected by the liner and generously moisten the glass with the solution. Remove the liner completely.
Do this extremely carefully and make sure that the film without a liner does not touch anything other than the glass with its adhesive layer!
Carefully tuck the tint film under the glass seal. Squeeze out the horizontal inner seal using a force and, when inserting the film for tinting, make sure that it does not break - this operation also requires certain skills, so be especially careful (pay attention to how the master will carry out this operation in the video tutorial below) .
- Squeeze the solution out from under the film using hard forcing: squeeze out the water in successive movements from top to bottom and from the middle to the edges.
- Finally remove any remaining moisture using a distiller wrapped in a napkin and a hairdryer.
- Make sure that no water bubbles remain under the film during the tinting process.
The technology for cleaning and sticking small fixed glasses will be identical.
Varieties
Film designed to protect the loggia and windows in the apartment comes in several types. Each category has certain properties:
- Sun protection. This film can absorb up to 80% of ultraviolet rays. This is the optimal solution for residents of the southern regions who are forced to live in the summer with the air conditioner constantly on.
- Mirror. In addition to the main function, it obstructs the view from the street, although in the dark the mirror effect begins to work in the opposite direction. Looks good on glazed balconies and loggias.
- Protective. This film not only absorbs sunlight, but also makes the glass more durable. Recommended for installation on the first floors of apartment buildings and in the private sector.
- Matte. Let us immediately note that matte film is not the best option for tinting a loggia or windows in an apartment. Frosted films are intended for decorating glass partitions, mainly in office buildings or hospitals. However, the matte film will make it difficult to see from the street, and absorbs some of the sun's rays. Therefore, if desired, it can also be used in residential premises.
Applying film for tinting on the rear window of a car
The process of cleaning the rear window of a car is slightly different as it has heating filaments and extreme care must be taken not to damage them. It is also recommended to use a plastic spatula instead of a scraper.
- After cleaning, the glass should be washed with a hard sponge, wiped dry using a hard scrub and wiped with a napkin around the perimeter.
- Before applying the film for tinting, moisten the glass generously with the solution, while covering the rear shelf with a rag or some other available material so as not to flood the car’s electrical equipment with water.
To apply the tint film to the rear window, it is better to use an assistant.
- When removing the liner, immediately wet the exposed adhesive layer with a soap and water solution.
- Carefully, without touching the adhesive layer to foreign objects, place the workpiece on the glass - this is a very important operation and requires a certain skill.
- Make sure that the film does not curl, wrinkle or bend.
The adhesive layer of the pattern should only touch the treated surface of the glass and, in no case, any parts of the car’s interior or the installer’s clothing.
Align the pattern with the glass so that there are no gaps, and begin to smooth it using a rubber pressing tool.
When tinting the rear window, smooth the film from the center to the edges so that no air or water bubbles remain under it. Use a plastic spatula in hard-to-reach places.
- Next, moisten the tint film and squeeze out the remaining solution from under it using hard forcing.
- Squeeze along the heating threads - from the center to the edges.
- Then perform this operation by hard forcing, but already wrapped in a napkin.
The final stage is pressing the tint film around the perimeter by forcing, while simultaneously heating the glass from the outside using a hairdryer.
Be careful not to overheat the glass with a hairdryer - it may burst!
Preparing everything you need
Before applying the tint, you need to prepare a clean and dry place to work, as well as a standard set of tools:
- Tinting film that meets the requirements of GOST 5727-88. Light transmittance for the windshield should be at least 75%, for the front side windows - 70%, for the rear side and rear - any. Typically, 4 side windows require 1 roll of film filter.
- Liquid soap (without dyes) to fix the film. It is better to use special installation compounds that do not leave streaks, or a 10-20 percent solution of any transparent shampoo.
- Plastic sticker for smoothing tint. Usually it comes complete with a film filter, but if you don’t have one, you can use any elastic plastic, rubber spatula or construction rubber eraser. Also in the store you can find special distillers for removing bubbles (chisler - for hard-to-reach places, slammer - for squeezing the edges, bloomax - for forcing out liquid).
- Scrapers for cleaning glass surfaces. 12 cm products of various shapes are best suited.
- Spray bottle (manual) for applying soap solution.
- Blade or utility knife. The latter is made of mild steel, so it is convenient to cut the film without fear of the glass being scratched.
- Soft rags, clean rags or napkins made of lint-free material.
- Industrial dryer.
If you are tinting your car yourself for the first time, it would be a good idea to purchase special camouflage markers and tapes. With their help you can correct minor errors.
You should also ensure that you have easy access to clean, cold tap water. The room should be free of insects and dust.
If everything is prepared, you can start cutting the film filter.
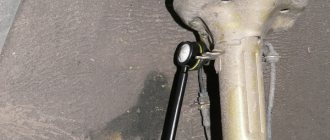
Pasting a reflective strip on the windshield
The tint strip must be cut along the roll with a small margin. Then wet the surface of the glass and place your workpiece on it with the adhesive layer facing out.
Make slits along the seals and remove excess tinting film.
Do not forget that you must use only special blades that do not leave scratches on the glass!
- Smooth out the pattern so that there are no horizontal folds - only vertical ones.
- Then, using a hairdryer and forcing, heat and smooth out the vertical folds.
The windshield is sensitive to temperature changes, so do not heat it up or cool it down suddenly!
- Moisten the workpiece, fold it in half and smooth it carefully so that there are no folds or wrinkles.
- Then, using a ruler and a knife, make notches at a distance of 10-12 centimeters from the top edge of the pattern.
Make notches as often as possible. Using this method you can make a reflective strip of any width. The width will depend on how far from the edge you make the notches.
- After this, remove the excess tint film.
- Then lay out the pattern along its entire length and use a ruler to cut the notches between each other (this process is clearly shown in the training video below).
When working with film when tinting windows, always place the adhesive layer and liner on yourself.
- After this, place the resulting workpiece again on the damp windshield from the outside.
- Wet and smooth the pattern and use the light from inside to make precise cuts.
To avoid gaps after applying the tint film, make a cut so that the film extends a few millimeters onto the opaque area of the glass.
Clean the glass and apply the film for tinting from the inside in the same way as in previous cases.
In conclusion, I would like to note that tinting car windows is not the easiest job if you lack the proper experience. If you still want to make your car stand out from the gray mass of “steel horses” like it, we advise you to also pay attention to other types of car tuning.
What is it for?
Many drivers, especially beginners, want to get their car tinted.
Black windows give even a budget car a more attractive look. To be tinted “to zero” is the pinnacle of the dreams of some categories of motorists who are not afraid of problems with the Road Patrol Service. In addition to the aesthetic component, tinting solves a number of practical problems. For example, the film does not allow sunlight to pass through, which is especially important in summer. This way the interior heats up less and interior elements do not fade. The next reason is impenetrability to prying eyes. Every driver perceives a car as a personal space and does not want passers-by and other motorists to examine the interior and himself.