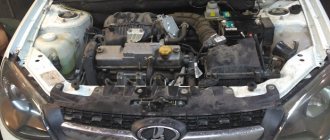
Today an old friend arrived in his Grant to replace the timing belt, rollers and pump. Since the replacement period is not specified in the technical regulations, we focus only on mileage. The regulations say to check the condition of the belt every 15,000, replace it if defects are detected.
In practice, it turns out that the optimal mileage for replacing a timing belt is 60,000 or 4 years of operation.
It is not by chance that we take the time interval, since the belt ages over time and, as a result, loses its mechanical properties.
Important! When the timing belt breaks on a 1.6 engine, all valves bend.
Characteristics of Lada Granta timing belt
The Lada Granta gas distribution mechanism is driven by a belt.
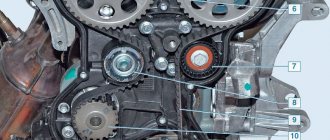
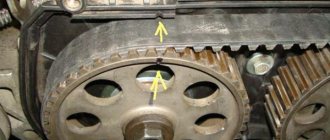
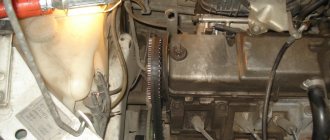
This type of device has been familiar to car enthusiasts for a long time. After all, the timing belt design migrated from the VAZ 2108 engine, which became the basis for all subsequent modifications of VAZ power plants. The Grant is equipped with two types of engines: an 8-valve engine and a 16-valve engine. The gas distribution system of the 16-valve power unit has a complex structure and increased dimensions compared to the 8-valve one. Accordingly, replacing the Granta timing belt becomes more complicated. The main feature of the 16-valve device is the presence of two camshafts operating synchronously, in parallel with the crankshaft. The structure is located in the cylinder head. All three shafts are synchronized via a toothed belt. The main disadvantage of a timing belt drive is the unreliability of the belt itself. When it breaks or jumps, the valves meet the pistons and bend. The structure of the 16-valve timing belt is clearly shown in the photo.
16 valve unit
- Installation mark on the drive cover.
- Lid.
- Intake camshaft pulley.
- Phase disk (sensor).
- TDC mark on the camshaft.
- Exhaust camshaft pulley.
- Support roller.
- Tensioner roller.
- Drive belt.
- Pump pulley (coolant pump).
- Installation mark on the oil pump.
- Crankshaft alignment mark.
- Crankshaft pulley.
You can change the timing belt kit yourself. The main thing is to know about the presence and correct placement of installation marks. By the way, most foreign cars do not have such marks, so in this case VAZ cars have the advantage.
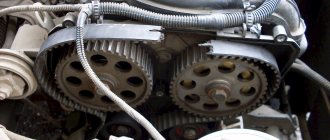
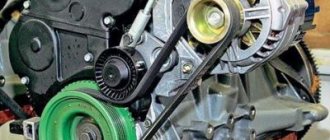
The eight-valve timing drive of the Lada Granta, compared to previous modifications of the car, looks simpler. The scheme is simple, because there is no idler roller and there is only one camshaft. The 8-valve timing device can be seen clearly in the photo.
8 valve system
What happens if you set the tags incorrectly?
The consequences of a job done incorrectly can range from minor to significant. It is for this reason that it is important to approach all work responsibly. If you don’t have the proper attitude or self-confidence, entrust the work to a professional auto mechanic. Depending on the brand of the car, the following troubles may arise during the operation of the car:
- Misaligned phases often cause valve burnout
- Valve bends on some VAZ family cars
- Possible deformation of the cylinder head, failure of the guide bushings, and the formation of cracks inside the elements
- Remaining oil on spark plugs
The above consequences of incorrect label installation are observed in most cases. But, for example, on an 8-valve VAZ-2114 engine, the valves do not bend or bend even in the most severe cases. But the 16-valve power unit of the “fourteenth” does not have such advantages, so a major overhaul of the engine may be required.
Replacing the timing belt of a Lada Granta with a 1.6 8-valve engine with your own hands on video
Replacing the Ford Fusion timing belt
The timing belt on the eight-valve Lada Grande is the link that connects the camshaft to the crankshaft. It works with virtually no noise. Some engines use metal chains. They certainly have their advantages, but they still make a fair amount of noise.
The timing belt on a Grande cannot break suddenly. The break is preceded by a fairly long destructive process. If a break occurs while driving, this will certainly cause a collision between the valves and the piston system. Because of this, the valves will definitely bend, and this is an expensive repair. In order to prevent such damage, it is necessary to change the belts on time, and in order for the replacement to be timely, it is necessary to diagnose their condition from time to time during operation. Experts say that timing belts on the Lada Grante need to be replaced after 60,000 km. Of course, this is only a recommendation, and you should never forget about diagnostics.
Other experts say that belts begin to break down after 40,000 km, and that is when they need to be changed. And yet, quite often belts break not because they are completely worn out, but because the rollers or pump break. If the belt is severely worn or broken, it must be replaced. To do this, you can contact a car service, or you can do it yourself. Although this operation is quite complicated, it can still be carried out by a non-professional. For this we will need a mounting tool, a large screwdriver and keys for 10 and 17. Replacing a belt on an 8-valve Lada is almost identical to replacing this unit on a 16-valve one.
Of course, the reasons for the breakage can be very different; among other things, this can also happen due to the low level of assembly quality of the unit at the factory. Poor quality material may also occur. One of the main causes of wear and tear is improper operation of the machine. Manufacturers of the Lada Grand claim that the timing belt assembly should be seriously examined only after 200,000 kilometers, but this, to put it mildly, is not entirely true. And if you remember about Russian roads, it becomes completely clear that this is definitely not the case.
Replacement process
First of all, you will have to remove the battery terminals. Then the generator drive belt is dismantled. To dismantle the node we are interested in, we need to provide the most complete access to it. Because of this, you will have to remove the front wheel on the right. At this point, preparation for the replacement can be considered complete, and the replacement itself begins.
Before direct replacement, it is necessary to dismantle the timing mechanism. This must be done so that the first piston can be installed in the upper position. To do this, loosen the tensioning mechanism nut. After this, the belt will definitely weaken and sag.
Now we need to unscrew the main bolt securing the generator pulley.
This can be done using the most ordinary key. It may well happen that the bolt will not come out of the pulley. If this happens, don’t be upset, just do the following: remove the plug in the clutch housing. At the same time, do not forget to fix the flywheel teeth. To do this, you can use conventional installation. Now the pulley bolt will no longer turn because the crankshaft is in a locked state. And after that we easily remove the generator pulley.
Remember that the pulley should only be removed after the mounting has been removed.
Attention! After removal, the pulley is placed on something clean, for example, a rag. Remember that if debris gets into the assembly unit, this may well cause jamming
Now it's time to remove the upper timing case cover. To remove the lower part of the cover, you will have to unscrew 3 mounting bolts. Then you can directly remove the timing belt. If it does not give in, pry it off with a pry bar. After dismantling the belt, be sure to check the condition of the tension roller. Particular attention should be paid to the level of play. Appearance can also say a lot about the condition of a given node. To make removing the belt more convenient, you first need to remove it from the timing pulley, and then from the crankshaft.
Assembling the unit is done in the reverse order, making sure to correctly adjust the belt tension.
Replacement tips, video
Lada Granta, which received the numerical index 2190, is a popular car of the VAZ concern. Russian drivers immediately liked it, since at a very reasonable price it was characterized by a European appearance, decent electronic equipment, interior comfort and reliability.
Many buyers are now looking for Grants on the secondary market, intending to save money. Indeed, the reliability of the car is such that this approach is quite acceptable without compromising quality.
The main point is a careful approach to selection, studying all the parts that are most susceptible to wear and tear and the effects of time. One of these parts is the timing belt, the replacement of which we will talk about in this article.
Replacing the timing belt on an 8 valve engine
The need to replace the timing belt
Generator pulley
According to the maintenance regulations, the timing belt must be changed no later than 75 thousand kilometers. In fact, if we take into account the quality of consumables for domestic cars, it is recommended to replace them at least every 45–55 thousand kilometers. Failure to comply with the regulations leads to the need for serious engine repairs. A belt break (cutting of teeth, jumping) will inevitably result in the valves being damaged as a result of a strong impact on the pistons. Moreover, it may be necessary to replace not only the valves, but also the entire piston group
Therefore, it is important to inspect the belt at least once every 15 thousand km for cracks, traces of oil, etc.
To better understand the importance of replacing the timing belt, you need to know how it functions. Due to the belt, the engine torque is transmitted through the crankshaft to the camshaft (to several camshafts - in the case of a 16-valve engine)
In turn, the camshafts are responsible for the synchronization of the valve timing. If the belt breaks, the correct operation of not only the timing belt, but also the entire mechanism is disrupted. Even with a slight slip of the belt, a phase shift will be observed, and accordingly, engine operation will be disrupted.
The situation is as follows: power is significantly reduced, the engine overheats, fuel and oil consumption increases sharply. If the belt simply breaks, this will cause the exhaust and intake valves to open in front of the piston. As a result, they will be damaged. This development of events leads to a major overhaul of the engine. If this happens on the road, the driver needs to call a tow truck, and this is an additional expense. In order not to take unnecessary risks, it is necessary to promptly replace all faulty parts and consumables of the timing mechanism.
Necessary tool
It is most convenient to work in a garage or on a flat concrete surface. You will need a jack, boots to prevent the vehicle from rolling away, wrenches and sockets, including Torx wrenches.
You immediately need to mentally prepare for the fact that you will have to work in very cramped conditions, and it is better to wear protective gloves on your hands.
If we talk about the new set, the originals are produced by the rubber products plant in the city of Balakovo. You can also find good reviews about analogues produced by European partners.
It’s not worth buying Chinese belts, their service life is much inferior to the original, and their strength can fail at the most inopportune moment.
Preparatory stage
Replacing the timing belt VAZ 2110 8 valves
The Lada Granta car can be equipped with 2 types of power units: 8 valves and 16. The difference in the timing devices of these engines is that the 16-valve version has 2 camshafts, respectively, 2 gears instead of one in the 8-valve version. In addition, in addition to the tensioner, the mechanism contains an additional deflection roller.
They should also be changed together with the timing belt, since worn rollers can cause the belt to break or skip on the gears. Then the valve timing is disrupted, the engine begins to “shake,” and the power noticeably drops. The replacement operation is completely accessible to any car owner who has the desire and certain tools:
- a set of the most popular open-end wrenches and sockets;
- mounting blade (mount);
- flat screwdriver;
- jack;
- round nose pliers with curved pointed ends or a special fork for the tension roller;
- cloth gloves.
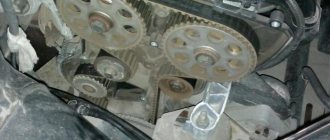
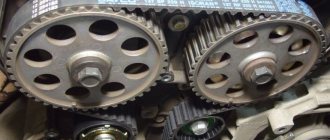
1 - toothed pulley of the engine crankshaft; 2 — tide on the oil pump cover; 3 — toothed pulley of the cooling water pump; 4 - tension roller; 5 — toothed pulley of the exhaust camshaft; 6 — rear timing belt cover; 7 — toothed pulley of the intake camshaft; 8 — guide roller; 9 — toothed belt; A - TDC mark on the crankshaft toothed pulley; B mark on the oil pump cover; C, F - mark on the rear timing belt cover; D — mark on the gear pulley of the exhaust camshaft; E - mark on the intake camshaft toothed pulley
Grant's car
is one of the popular models produced by the Volga Automobile Plant today at ours.
The latter will be far from superfluous, since you will have to loosen bolts and nuts in a limited space, and there is a danger of injuring your hands. Work can be done on any level area or in a garage. The presence of an inspection hole is not necessary, but it is much more convenient if there is one.
Selection of components
The VAZ catalog contains the elements:
- 21126-1006040 – timing belt (137 teeth);
- 21126-1006238-00 – automatic tension roller;
- 21126-1006135-00 – guide roller.
Gates produces analogues:
- 5631XS – drive belt;
- T43147 – roller with automatic tension;
- KO15631XS – repair kit: belt + roller T43147 + guide roller.
For those who have lost the fastening elements of the covers, we provide the catalog numbers:
- 21110-1144026-10 – T30 key screw;
- 00001-0011977-73 – spring washer.
Happy replacement!
Generator drive pulley Unscrew the main bolt of the generator pulley
You can unscrew the bolt of the generator pulley using ordinary keys, which were mentioned above in the list of necessary tools. If the bolt does not come out of the generator pulley, then you must perform the following steps:
dismantling the plug in the clutch housing
The flywheel teeth are fixed with a mounting blade, the presence of which was justified by the list of necessary tools.
After performing these steps, the generator pulley bolt will stop turning, since the crankshaft will be fixed with a mounting blade.
Removing the generator pulley
The generator pulley must be dismantled immediately after removing the mounting blade. After dismantling is completed, the pulley must be placed on a clean surface. The presence of debris in the unit assembly can cause it to jam.
dismantling the lower timing cover
The process of dismantling the lower timing cover is carried out by removing three mounting bolts. Put the belt on the pulley. I bought a belt on Grant 825, which could be a Lada Granta. This design occurs in Grants 21116 and 11186 engine models.
timing belt removal
The last stage is dismantling the timing belt and then determining the condition of the tension roller. The belt removal process occurs in the following order:
Removing the timing belt from the timing pulley
removing the belt from the crankshaft.
It is at the second stage that the Grant timing belt is dismantled along with the tension roller. We carry out a visual inspection of the roller, in particular, we determine the external condition and the level of play of the mechanism.
At the time of reinstalling the lower timing cover, it is necessary to adjust the tension of the belt itself.
The reasons for premature belt breakage on the Lada Grant remain a mystery, which is based not only on the poor quality of the material used in the belt, but also on the low quality of assembly of the aggregate units through which the timing belt passes.
Among other reasons for premature timing belt breakage, one can note the desire of the car manufacturer to keep up with Euro 3/4. It was the desire to adjust the car to these standards that led to the above-mentioned negative aspects in the daily operation of the car.
Despite the manufacturer’s claims about the quality of Grant’s timing belt and the threshold of his personal mileage of 200,000 thousand km, it breaks already at 70–80 thousand km. Priora/Kalina timing belt, which is better? A Gates roller belt can be a good and worthy replacement solution.
It is the Lada Granta from Priora that the timing belt will fit the Lada Granta and will not cause premature failure. The price of a timing belt for a Grant allows it to be changed every 50,000 thousand km, which, in turn, will reduce the likelihood of other cost items arising regarding the repair of engine valves.
Inspection and signs of wear
The manufacturer recommends carrying out a visual inspection of the belt every 20 thousand kilometers, despite the fact that the declared service life of the original part is 75 thousand kilometers.
The belt is inspected on a cold engine, for which the cover of the gas distribution mechanism is first dismantled. If the glass washer fluid reservoir gets in the way during inspection, it is also better to remove it.
Both the tank and the lid are secured with simple bolts, so there will be no problems with dismantling.
To accurately determine the condition of the belt, you must also remove the right front wheel and the splash guard.
Using the 17 head, the crankshaft rotates to the right; you need to hold on to the powerful bolt that secures the drive pulley of the auxiliary elements.
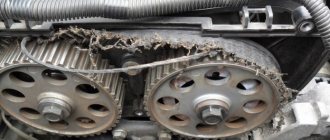
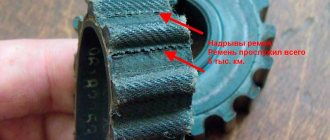
Signs indicating the need for urgent replacement are as follows:
- material delamination;
- formation of longitudinal and transverse ruptures, cracks, convex areas;
- fractures in the area of the teeth;
- traces of soot and melting of the material on the back side of the belt;
- tousled material in the end area.
Please note that the reason for replacement is the presence of even one sign.
We would like to separately mention the presence of oil stains on the part. Even if it looks normal, it is better to change it, since oil destroys the material.
Lada Granta checking and replacing the timing belt of an 8-valve engine
Timing drive diagram: 1 – crankshaft toothed pulley; 2 – toothed pulley of the coolant pump; 3 – tension roller; 4 – rear protective cover; 5 – camshaft toothed pulley; 6 – toothed belt; A – boss on the rear protective cover; B – mark on the camshaft pulley; C – mark on the oil pump cover; D – mark on the crankshaft pulley.
Use a 5mm hex to unscrew the four screws securing the front upper timing cover.
Remove the cover.
We hang the right front wheel and engage fifth gear in the gearbox. By rotating the wheel clockwise, we turn the engine crankshaft and inspect the timing belt. With normal belt tension...
...cutout 1 of the outer disk of the tension roller must coincide with the rectangular protrusion 2 of its inner sleeve.
The surface of the toothed part of the belt should not have folds, cracks, undercuts of teeth and separation of fabric from rubber. The reverse side of the belt should not have wear, exposing the cord threads, or signs of burning. There should be no delamination or fraying on the end surfaces of the belt. If defects are found on the belt or there is a significant discrepancy between the belt tension control elements (see photo above), the belt must be replaced. You should also replace the belt with a new one if traces of engine oil are found on it (before installing a new belt, the cause of oil getting on the belt must be eliminated) or when replacing the coolant pump.
Attention! Failure of the timing belt (breakage and cutting of teeth) can lead to valves sticking into the pistons due to mismatch of the rotation angles of the crankshaft and camshaft and, as a result, to expensive engine repairs. We replace the timing belt in accordance with the maintenance regulations every 75 thousand
km or if defects are found on the belt
We replace the timing belt in accordance with the maintenance regulations every 75 thousand km or if defects are detected on the belt.
Next, we need to remove the generator drive belt or accessory drive belt.
To avoid damaging the crankshaft position sensor, it must be removed.
With the ignition off, release the clamp of the wiring harness block and disconnect the block from the sensor connector.
Use a 10mm socket to unscrew the sensor mounting bolt.
We remove the sensor from the oil pump cover boss hole and put it in a place where there are no steel filings that could subsequently disrupt the operation of the sensor.
Before dismantling the belt, it is necessary to check the engine valve timing - set the piston of the 1st cylinder to the TDC (top dead center) position of the compression stroke.
Using the “17” head, turn the crankshaft clockwise by the bolt securing the generator drive pulley...
...until mark 1 on the camshaft sprocket aligns with boss 2 on the rear timing cover.
To ensure that the crankshaft is in the correct position, remove the rubber plug for the inspection window at the top of the clutch housing.
Mark 2 on the flywheel should be located opposite the slot 1 of the scale on the upper cover of the clutch housing.
Before removing the generator drive pulley bolt...
...we ask an assistant to secure the crankshaft from turning by inserting a screwdriver through the window in the clutch housing between the flywheel teeth.
Using a 17mm socket, unscrew the bolt securing the generator drive pulley...
...remove the pulley...
...and the puck.
Use a 5mm hex to unscrew the three screws securing the front lower timing cover
Remove the cover.
Using a 15mm spanner, loosen the tension roller mounting bolt.
At the same time, the tension roller will rotate and the belt tension will weaken. Remove the timing belt from the crankshaft and camshaft pulleys.
Remove the belt from the engine compartment.
Attention! After removing the timing belt, do not rotate the crankshaft and camshaft to avoid the pistons sticking into the valves. Marking of the timing belt (width 17 mm, number of teeth 113)
Marking of the timing belt (width 17 mm, number of teeth 113).
12Read more »
Preparatory steps, exactly 3 steps
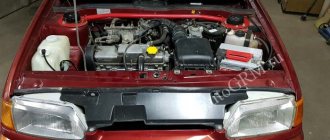
The engine in Grant Lux looks as shown in the picture.
Engine "Grants" with 16 valves
Part "2" is a tension roller that can be loosened to remove belt "6". Then unscrew the fastening of the covers protecting the timing drive, and you can begin replacement.
In details:
- Holding the lead screw with an 8 wrench, loosen the lock nut using a 19 wrench (Fig. 1). The screw in the photo is marked with an arrow;
- To loosen the tension, rotate the screw clockwise. The belt can be removed from the pulleys;
- Using a Torx T-30 wrench, unscrew the seven screws holding the protective covers in place (Fig. 2). The covers themselves are easily removed.
The engine shield attached to the top can also be removed: unscrew the filler plug and pull the shield up. By the way, this advice is not relevant for motors 21127.
Loosen the nut, then turn this screw. Fastening the covers, Torx screws. Difference between internal combustion engines 21126 and 21127
But it is always recommended to remove the washer reservoir: use a “10” wrench to unscrew the nut on the stud, disconnect the terminals, and remove the reservoir. It can be thrown to the side, but the hose is not disconnected.
Protective measures: always disconnect the negative terminal of the battery (key 10). Let the car itself be on the “handbrake”.
People often encounter the problem that the tension roller prevents removing the bottom cover (see figure). The problem can be solved simply: loosen one of the fixing screws (key “19”), and the roller can be moved away.
The fixing screw is located on the side. Final operation.
Removing the starter
To fix the engine flywheel, you need to gain access to it, and to do this you need to remove the starter. In cars with a manual transmission, everything is left as it is: the crankshaft is fixed if you engage 5th gear and press the brake. But owners of cars with automatic transmission will have to work hard:
- The plastic connector is disconnected from the starter;
- Using a 13mm wrench, unscrew the nut holding the power terminal (Fig. 1);
- Using the same “13” key, you can unscrew the three mounting screws (Fig. 2).
At the last step, the starter housing must be held.
First, disconnect all terminals. The number of fixing screws is three.
We wish you success.
Timing belt malfunctions on Grant and methods of elimination
Failures of the distribution device in advanced cases can lead to failure of the power plant. This can be avoided if you inspect all gas distribution elements in a timely manner and correct defects and breakdowns in a timely manner.
Main symptoms of malfunctions and procedures
| Cause | Remedy option |
| The engine does not develop maximum power, insufficient dynamics. | |
| Violation of the gaps between the pusher and the camshaft cams. | Adjusting the gaps. |
| Gap between seat and valves. | Grinding seats, replacing valves. |
| Engine operation is unstable and often stalls. | |
| Violation of the clearances of pushers and cams. | Adjusting the gaps. |
| Valves burnt out or deformed. | Replacement of worn elements. |
| Oil consumption has increased. | |
| Worn or deformed valve gaskets. | Replacing gaskets. |
| Worn valves or guide bushings. | Replacing valves or guides. |
| Valves are knocking. | |
| Large gap between the camshaft cams and the drive levers. | Set the correct gap. |
| The spring has failed. | Change the spring. |
| Large gap between rod and guide. | Replacement of worn elements, repair and grinding of cylinder head. |
| Camshaft cam wear. | Replacing the camshaft. |
| The drive belt is noisy. | |
| The belt tension has weakened. | Pull the belt. |
| Worn tensioner roller. | Part replacement. |
| The tensioner rod is jammed. | Remove the jam. |
| The camshaft is noisy. | |
| Camshaft cams and levers are worn. | Replacement. |
| Bearings are worn out. | Replacing bearings. |
| The compression in the cylinders is reduced. | |
| Valves burned out. | Install.new.valves. |
| Loose fit of valves to seats. | Grinding of seats and valves. |
Diagnosing timing belt faults is a complex procedure. Signs may also indicate other components and assemblies. To accurately determine the cause of the failure, it is necessary to dismantle the cylinder head. In a private garage, this procedure is quite labor-intensive, and you also need to have special skills and equipment.
What is the replacement plan?
Cars of the Lada Granta model line are equipped with different versions of the power unit. Some of them are not without problems in the event of an unpleasant break in the belt drive. This is caused by a collision of pistons with valves, as a result of which the latter are bent and the engine requires repair.
The possibility of bending (if a break occurs) is not available on the “11183-50” version of the motor, which is equipped with the standard equipment.
Further in this material we will look at versions of motors that have such a feature as bending of valves when the belt drive breaks. And let's try to understand which timing belt is better.
Another important question: when to change the timing belt? To eliminate this unpleasant situation, the manufacturer deliberately regulates the periodic period of mandatory replacement of the specified “consumables”. The answer to the question of how long it takes to change the timing belt from the manufacturer is after 15 thousand kilometers. This requirement applies to both 8-valve engines and their 16-valve modifications.
Even despite the fact that the “21116” modification is equipped with a motor with an imported head, if the belt breaks, a similar sad fate awaits it.
The manufacturer does not recommend independently carrying out the procedure for either checking the condition of the belt or replacing it. And therefore, when the time has come to change the timing belt, you should contact a service center. If it is revealed that the indicated operation was performed manually, there is a high probability that the owner will be deprived of the possibility of warranty service. For self-replacement, the manufacturer provides permission regarding:
- cabin filter;
- a similar element for the intake system.
However, many car owners still carry out the replacement on their own, but not all new drivers know how long it takes to change the timing belt, and also which timing belt is better than the rest.
Checking the timing belt
According to the documents that come with the car, the belt synchronizing the movement of the shafts has a service life of 45 thousand kilometers. However, it may fail earlier due to increased loads or insufficient attention to the car engine.
A performance check must be carried out every 15 thousand kilometers. To do this, you will need to remove the cover from the timing belt drive.
- First of all, check the belt tension control tab: the cutout of the inner roller disk should coincide with the tab located on its rectangular bushing. Even with minor discrepancies, it is necessary to replace this consumable.
- Next, inspect the outside of this Lada Granta component. Make sure there are no signs of wear, oil, carbon deposits, or threads.
- At the end, the belt must be integral, without separation into layers and fibers.
The Lada Granta in the liftback body has an eight-valve engine with a power of 87 horsepower. If the timing belt breaks on such an engine, the valves bend on the pistons, which threatens you with difficult engine repairs.
When purchasing a component, please note that the Grant uses a belt with 113 teeth, the width of which is 17 millimeters. If you choose the right one, you will not need to replace a failed component soon, so carefully study the new part before purchasing
Car enthusiasts recommend purchasing Gates brand components from the USA. The good thing about this is that official support can tell you the address of the nearest store that sells quality spare parts. The price of a repair kit (belt and roller) is about 3,000 rubles. At the same time, you will receive a high-quality product, the service life of which is approximately twice that of stock (about 80 thousand kilometers).
On the question of motors
Grants are equipped with five power plants. Two of them are equipped with 8 valves, 3 - 16. We will consider 16-valve engines as the most technologically advanced, powerful and in demand.
The leader in popularity is the VAZ 21126 modification, which is a redesigned and improved version of the unit under the symbol 21124.
Other 16-valve engines have indexes 21127 and 21126-77 (sports version). All of them deserve a lot of flattering reviews in terms of reliability and power, but a common disadvantage is the inevitable deformation of the valves when the timing belt breaks, which is fraught with a major restoration that requires huge expenses.
That is why it is extremely important for the owner to detect signs of imminent belt breakage in time and replace it with a new part.
Instructions for carrying out work
Replacement
How does the belt on 2190 differ from replacing it on a 16-valve unit? Below are instructions for the first type of motor; for our client, the differences from the second will be considered separately. First, you need to remove the positive cable from the battery and disconnect the connector from the crankshaft position sensor.
KEY-DOP
Then remove the timing belt guard and set it aside. In order to avoid mistakes when installing a new belt, you need to align the marks on the engine housing with the mark on the camshaft gear
. This can be done by turning the bolt holding the pulley on the engine crankshaft with an open-end or socket wrench, and do not forget to turn the gearbox into neutral.
The second method, using a suspended wheel, was described above. When the marks coincide, you need to remove the rubber plug located on the gearbox and open the inspection window. The flywheel is visible in it; the mark on it should also coincide with the slot on the body. The next step is to remove the belt from the generator drive pulley. To do this, you need to loosen the lower mounting bolt of this unit, and unscrew and pull out the upper one.
Then the generator housing can be moved forward and the belt can be removed from the pulleys. Immediately, using this moment, you can inspect the removed belt for defects and damage, and, if necessary, replace it. Next comes the operation to loosen the bolt holding the crankshaft pulley
. It often happens that you can’t just do this with a spanner wrench, especially after factory tightening. There are several ways.
- Insert a flat, powerful screwdriver or pry bar into the flywheel inspection window, blocking it. Hold the screwdriver with your right hand and loosen the pulley bolt with your left hand using a 17 mm wrench.
- If you have an assistant, the procedure is greatly simplified. One will engage 4th gear, press and hold the brake pedal, while the second one will unscrew the pulley. It’s much more convenient to do this, both hands are free to work.
- Some car enthusiasts put a spanner on the pulley bolt and rest it against some element of the body or suspension, after which they turn the crankshaft with the starter in neutral gear. The method is quite dangerous, it is permissible to use it in the most extreme case, when it is not possible to loosen the bolt by other methods.
Replacing the timing belt for Lada Largus 8 valves.
After the bolt is unscrewed, the pulley is removed and the working part is wiped with a rag. Then you need to loosen the tension roller bolt, the belt tension will weaken and you can remove it. Since the roller also needs to be changed, it needs to be unscrewed. The last element that will need to be removed is the bottom cover of the mechanism; it is attached to the engine with three bolts.
This completes the disassembly of the unit. Before installing a new roller and timing belt, you need to make sure that the pump drive shaft rotates freely and does not jam. Otherwise, you will have to make a decision to replace the coolant pump.
We change the belt ourselves
Replacing the timing belt after the specified period on Lada Granta engines of 16 and 8 cl is a simple process, and even a novice motorist can do it with his own hands. The main thing is to carefully follow all the instructions and not miss anything.
Required Tools
- keys for 10 and 17;
- mounting spatula;
- roller tension key;
- Jack;
- sets (gears) and TORX heads;
- pliers.
Stages of work
- First, remove the negative terminal of the battery.
- Remove the generator belt drive.
- We fix the car using stops; we determine for ourselves what is best for this.
- When we jack up the car, remove the right front wheel.
- Remove the cover of the gas transport mechanism.
- The piston of the 1st cylinder should be located at the highest point.
- We loosen the belt tension using a tension roller or bolt.
- Loosen the tensioner pulley nut.
The next important step is the correct tension of the Lada Granta toothed belt drive with 16-cell and 8-cell units.
- First of all, you need to warm up the engine, the coolant temperature should be 20-25 ° - this is a certain norm. In particular, this temperature must be such that the roller tracks coincide. If you warm up more to 80-90 °, the mark will shift by 5-6 millimeters. Important! Use rollers that are recommended for Lada Granta 8 or 16 cl, otherwise the results may be different, even the belt may break.
- Next, you need to align the marks on the camshaft pulley and the marks on the rear cover.
- We repair pulleys using the device described above.
Attention! The tensioner pulley should not move or deviate much in one direction or another, this will be evidence that it is in good condition and functioning properly. This means that its rupture is excluded.
What's the result?
As you can see, the timing belt is an important element and needs constant monitoring
Taking into account the fact that inspecting the condition of the timing belt is difficult (partial disassembly of the car is required), it is recommended to pay attention to the operation of the internal combustion engine, identify extraneous noise, and also pay attention to the timing of the scheduled replacement of the timing belt
Finally, we note that timely replacement of the timing belt will help to avoid unexpected troubles associated with its breakage (if the valve does not bend) or labor-intensive and expensive repair of the internal combustion engine (in the case when the valve bends on the engine).
We also add that replacing the Grant timing belt involves not only replacing the belt, but also replacing the pump and tension pulley according to the regulations. All this is included in the list of work performed as part of scheduled vehicle maintenance. At the same time, replacing the belt yourself can be done with your own hands and allows you to save money.
Signs of a Worn Belt
You can avoid expensive repairs by monitoring the condition of the parts in the timing mechanism drive. This will make it possible to timely detect the beginning of the process of destruction of parts in the drive and prevent the creation of a situation where motor repair is required. First of all, pay attention to the condition of the product and its wear. If wear is high, heavy loads or high ambient humidity can cause the belt to slip.
Increased wear can cause deviation towards the tension roller and strong heating due to a failed bearing. Protruding shreds of drive material indicate that wear has begun. The owner should be alarmed by the appearance of cracks; the greater the number of such damages, the shorter the remaining service life of the product. If the outer side of the belt appears shiny, it indicates a loss of elasticity and must be replaced. If the drive has lengthened to such an extent that its tension cannot be adjusted, the belt must be replaced.
Source
Engine tuning
Initially, engine 21127 had already received factory tuning, but there were still opportunities to further increase power:
- In addition to the standard receiver, a damper with a diameter of 54 mm is mounted to achieve a performance of about 110 liters. With.;
- another 10 l. With. will be added by replacing the exhaust catifold with a “spider”;
- The Stolnikov camshaft modification 8.9 will provide power in the upper speed range.
Tuning 21127
Complex tuning is possible by installing a Stolnikov 9.15 camshaft with a phase shift of 316 degrees, replacing injectors with Bosch 431 360 (more efficient compared to standard ones) and milling the valve seat stages. In this case, the internal combustion engine will receive about 150 hp. With.
Thus, motor 21127 is an industrially tuned version of the previous internal combustion engine 21126. The characteristics are improved only by modifying the intake air system (damper inside the receiver plus DBP, DTV).
Conclusion
Despite the simplicity of the algorithm for replacing the timing mechanism on an eight-valve engine, it is still better to contact a service station for professional installation. The timing belt is not a mechanism that you can skimp on the quality of tuning.
Subject to the manufacturer's recommendations and moderate driving style, the timing service life is more than 80,000 km.
Frequent breakdowns that occur are due to the fault of the owners of the technical equipment, as a result of violation of the rules for using the machine.
Which cars are equipped with ICE 21127?
Immediately after development, engine 21127 is recommended to be installed on cars manufactured by AvtoVAZ:
- Lada Granta - since 2013, Lux and Norma configurations;
- Lada Kalina-2 - since 2013, only with a manual transmission, mainly on sedans and hatchbacks;
- Lada Priora - since 2013, Luxury equipment.
Lada Priora Luxe configuration
In principle, the engine’s sufficiently high performance characteristics made it possible to install it on the Lada Largus, Vesta and X-Ray. However, by the time of their serial production, the ICE 21127 had been upgraded to the next version 21129 with a control unit that complies with Euro-5 standards, so the plant management limited itself to the indicated modifications, leaving the volumes the same.
Motor 21129