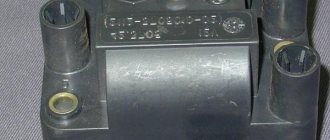
The headlight hydraulic corrector is used to change the angle of the headlight beam. The fact is that depending on the load of the car, the direction of the headlights changes and it may happen that it is not directed at the road surface, but directly into the eyes of the driver of oncoming traffic, which creates a dangerous situation when driving. The headlight hydraulic corrector for the VAZ 2114 consists of a main cylinder, which is located on a panel board, and working cylinders, they are located directly on the headlight housing and are connected to the main cylinder by connecting tubes. Inside the cylinders and tubes there is a special composition that is resistant to low temperatures. This liquid does not come into contact with air at all. It is worth noting that the hydraulic corrector is an integral mechanism; it cannot be disassembled and, in the event of a breakdown, cannot be repaired. During operation of the VAZ 2114, jamming of the pistons in the cylinders or leakage of fluid from the tubes or cylinders may occur. So when a car’s hydraulic leveler fails, it makes sense to replace it with a more modern electromechanical headlight leveler.
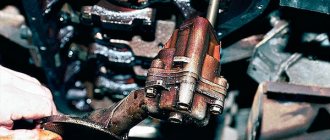
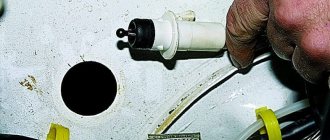
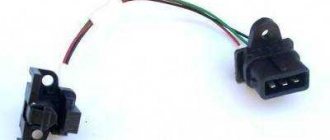
The electrical manifold kit includes the headlight leveler, several O-ring actuators, and a wiring harness. Let's begin installing the equipment in the interior of the VAZ 2114. First, you need to dismantle the dashboard light switch handle and the hydraulic corrector handle, if available. We take a thin flat screwdriver and pry up the lining with the corrector scale, thereby removing it. Then, using a Phillips screwdriver, unscrew the self-tapping screw securing the light guide for the corrector scale backlight and remove this light guide. We take the 21 socket and unscrew the nut securing the main cylinder of the corrector, to do this we press on its rod and press it into the hole that is on the instrument panel of the VAZ 2114. Open the hood of the car and disconnect the working cylinders of the corrector from the headlight housing, press on the latch and turn the working cylinder the cylinder counterclockwise, thereby freeing it from the fastening, now it can be pulled out from the body. Using side cutters, we cut through the tubes and remove the right cylinder. Using the same actions, we release the left cylinder from its mounting.
To make it more convenient to work, it is recommended to disconnect the battery terminals. We lay the wiring harness blocks of the electric headlight range control of the VAZ 2114 through the seal. We lay the wiring of the corrector along the standard wires of the car. We install the electric corrector into the hole in the headlight housing and connect it to the right and left headlights. Now we go into the car interior and connect the negative wire of the electrical corrector to ground, and connect the supply wire to the wire that supplies voltage to the low beam filament. We connect the electrical corrector wiring harness block to the regulator, and assemble the regulator itself in the reverse order of removal. So, we installed an electric headlight range control on a VAZ 2114 car with our own hands.
- Causes and troubleshooting of headlight hydrocorrector on Lada Samara
- How does the VAZ 2114 headlight range control work?
- When a part needs to be replaced or repaired
- Causes of corrector breakdowns and ways to eliminate them on the VAZ 2114
- Replacing the headlight hydraulic corrector on a VAZ 2114
- How to choose a hydraulic corrector
- Removing the hydraulic corrector
- Installing a new part
Maintenance and operation of the product
The design of the headlight hydraulic corrector is non-separable; in the event of a malfunction, it can be replaced entirely. The main thing is to remove it completely, and not cut it off, to make it easier to install a new device.
If the angle of the headlights increases, you can try to adjust the mechanism. What should be done?
- When the car is loaded, the headlights need to be turned down so that the light beam is directed at the roadway.
- If the vehicle load is minimal and the rear part of the frame is in a raised state, the headlights should be projected upward.
If the unit does not resume proper operation, then you need to check the presence of liquid in the cylinders and tubes. To do this, the products are removed and the working stroke of the rods is measured; it should be about 7 mm.
This is how the manufacturers intended that most of the time the hydraulic corrector is under pressure, as a result of which the working cylinder rod is retracted and the optics rotate downward.
The importance of proper headlight installation
Proper installation and adjustment of lighting devices is no less important. For example, it is better to lower the headlights of a loaded car slightly lower than usual. In a similar way, you can direct the light flux not to the sky, but to the road. This method will avoid dazzling oncoming vehicles and ensure proper illumination of the road.
If the car is not loaded with anything, then the headlights should be raised slightly. Lighting equipment is quite sensitive and difficult to adjust, so this work is best entrusted to qualified specialists who have extensive experience in adjusting headlights.
Correct headlight settings
And so, first of all, I checked for operability, then I removed the folding on the control unit using a 6-size drill. I removed the cap with the regulator, and got to the board with the resistors.
Replaceable resistors in the divider.
This is a voltage divider. It can be called a variable resistor, but with fixed positions. Initially, I was upset by the number of positions, there are only 12 of them. But when I opened the case, I discovered a restrictive ring; this ring can be twisted as much as you want. Using the selection method, I replaced the outermost resistors with resistors of the required value, I adjusted the maximum rod overhang to 38 mm (I left 2 mm in reserve, so the gears of the gearbox should not be affected), as well as the rod stroke within 10 mm.
But no matter what, the characteristics of the electric corrector fully correspond to the characteristics of the hydro one.
Max stem extension is about 38 mm.
Min rod overhang approx. 28 mm
After putting the regulator in place, I selected the desired position of the limiter ring in such a way that the number of positions increased to 15. Using a drill bit of 2, I drilled holes in the control unit housing and clamped the cover with screws.
The corrector was installed like it was originally, the only thing was that I had to twist it with the connector to the driver's door, I did this so that the dashboard would fit. I ran the cables through a rubber plug that previously contained the hydraulic corrector hoses. There were quite enough cables, there was even a little extra left. I installed the handle from my original hydraulic one, since the one that came with the kit protruded above the body, which spoiled the look a little.
Everything works, the only negative is the speed at which the motors move the reflectors, it is too low and this is unusual after hydro. I hope that this instruction will be useful and useful to someone. I’ll add that I had the idea in my head to use Hella electric correctors, which are similar to the Lanosov ones.
But I didn’t find accurate information, so I didn’t take any risks. These correctors are good because, like Lanos, the control circuit is located in the corrector itself. You'll only have to spend money on wire and resistors. If the corrector fails, it is quite simple to replace it. Well, if you have correctors from a VAZ 2110, you will have to look for a used motor or replace it with Volgov ones; when replacing, you will have to re-solder the control unit.
Causes of mechanism malfunction
The cause of product failure may be liquid leakage from the cylinder or tubes, which causes disturbances in the structure of the seals. Poor quality rubber causes loss of working fluid, which leads to jamming of the unit pistons in one position. Accordingly, the angle of illumination of the headlights changes, which is simply impossible to eliminate without replacing the entire mechanism.
If an electronic corrector is installed on the machine, then very often the system sensor begins to act up due to the destruction of the mounting bracket of the unit. Sometimes there may be a problem with the contact connection.
The correct operation of the headlight range control directly depends on the safety of motorists and pedestrians. That's why you need a headlight hydrocorrector, serviceable and fully functional!
Operating principle
When the driver decides that the headlights need to be adjusted, he turns a special knob inside the car to do this. It controls the pressure in the corrector piping system. Accordingly, when it is necessary for the headlights to go down, everything happens as follows:
- The handle turns down;
The switch in the cabin looks like this
- The pressure in the system drops;
- The operating rod enters the housing;
- The headlight goes down.
Based on this, we can say that most of the time high pressure is maintained in the working mechanisms; this is necessary to maintain the horizontal position of the headlight.
In winter, or during the transition period, when the temperatures outside and in the engine compartment are very different from each other, pipelines and rubber seals can delaminate, and working fluid can leak out. In this case, the headlight range control will most likely fail, and the working cylinders will jam and require complete replacement.
In terms of calibrating the device, the instructions from any domestic hydrocorrector will do. This is due to the fact that structurally they are all made very similar and you can figure out any of them yourself.
In order to adjust the position of the headlights, the driver should turn a special handle located in the cabin. It is this that allows you to control the pressure in the pipelines of the corrector. To lower the headlights, turn the handle down. It's a simple control system, but even that can break. What to do if the corrector turns out to be faulty?
Control knob for hydraulic headlight adjustment
Debugg
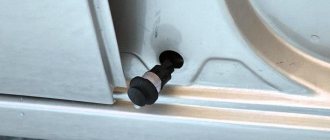
How to change range control on a VAZ 2114? To remove it, you need to disconnect the clamps from the wire fastening clamps; before doing this, it is recommended to remove the terminals from the battery. Further:
- Remove the cylinder (regulator) handle by pulling it slightly towards you.
- Unscrew the cylinder nut on the panel.
- Remove the lever trim.
- Remove the mechanism from under the panel.
- Remove the corrector cylinders from the housings by pressing their latches.
- Next, you need to remove the mounting hoses with clamps on the car body.
- Push the rubber seal into the middle of the cabin and place two more cylinders with tubes there.
How to find a breakdown
Repair of the VAZ 2110 headlight hydrocorrector Many people, when headlight adjustment fails, immediately blame the hydraulic corrector for everything and rush to replace it as quickly as possible. But don't rush to conclusions. There may be other causes of the malfunction.
- Pay attention to any leaks of working fluid. If they are not there, check the stroke of the rod.
- To check the stroke of the rod, the actuator cylinders are dismantled. The normal value is between 6.5 and 7.5 millimeters.
- It is impossible to repair the hydraulic type corrector provided by the factory for the VAZ 2110, since the design of the device is not dismountable.
- If malfunctions occur, the entire assembly must be replaced, including cylinders and pipes.
Which hydraulic corrector should you choose?
Often, instead of a standard unit, car enthusiasts prefer a more practical and efficient electric corrector, which is not provided by the manufacturer, but easily fits into the socket of the old mechanism. Its difference lies in the electric motors that ensure the functioning of the product drive. This corrector is mounted in the same way as a regular one.
The electrical device for the VAZ 2114 headlight hydraulic corrector is installed as follows:
- the negative terminal is removed from the battery;
- the main cylinder is turned counterclockwise and dismantled;
- the sealing retainer and ring are changed;
- installs the corrector in place of the master cylinder;
- the lever of the device is removed in the car interior;
- the positive terminal of the electrical corrector is connected to the socket of block No. 20 and fixed under the instrument panel on one of the body studs;
- instead of pipelines, wiring is laid;
- the device is connected to the actuator;
- the terminal is connected to the battery;
- The functionality of the unit is checked.
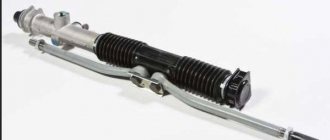
Hydrocorrector of headlights for VAZ 2114 with electric drive
This is how to replace the headlight hydraulic corrector on a VAZ 2114 with an electric drive !
Stem adjustment
Stem adjustment
In some cases, the headlight adjuster fails due to a misalignment of the adjustment lever. Thus, if the VAZ 2114 headlight hydraulic corrector does not work, do not rush to change it. First, make sure that the connection between the rod and the lever corresponds to the working position.
The rod of the main cylinder of the corrector rests against a lever that acts on the same rod, which is rigidly fixed to the headlight shade. A lever passes through the adjusting bolt and acts as a fulcrum. The adjustment mechanism functions like a swing. The corrector swings the lampshade, and the adjusting bolt makes it possible to raise/lower the support point of the swing. If the bolt is unscrewed to its extreme position, the opposite end of the lever in the form of a ball may slip out of its attachment point with the lampshade rod.
What else can be done to more effectively illuminate the road when a car is moving?
In other words, how to improve the headlights on a VAZ 2114? What should be done?
- Replace existing lamps with improved ones that have a larger light output angle. You can install xenon.
- If the car's reflective surface peels off from the metal body, then it would be correct to install a new headlight instead of the old, non-functional one.
- Regular cleaning of headlight covers from dirt; protective film can be used as a preventative measure.
- If black deposits appear on the headlight bulb, the quality of lighting decreases. Therefore, you need to replace the lamp in time.
- If condensation gets inside the lamp, the level of efficiency of road lighting decreases. To avoid an accident, the correct solution would be to replace the defective headlight.
Dear motorists, check the quality of functioning of car headlights in a timely manner and place increased demands on the operation of these units. Eliminate all possible causes and remember that traffic safety guarantees peace and order to all road users.
Connecting the electrical corrector BUK02-01 to a VAZ-2110
Installation of the BUK02-01 autocorrector on a VAZ-2110 (2111) car is carried out without modifications to standard places. In this case, you must first change the length and adjust the stroke of the rod depending on the specific model:
- VAZ-2110: stroke 2.0 with length 34.0.
- VAZ-2111: stroke 3.63 with length 34.0.
The stroke of the BUK02-01 rod is 7.0 with an offset of 38.8. Therefore, you will have to cut off the rod and reduce its stroke.
To cut the length of the rod, connect power to the drive so that the rod extends to its maximum stroke. First, we cut off part of the rod, then grind it off with a 9 mm file. After this, we glue the sawn-off part back with superglue.
The headlight electric corrector is adjusted in the “0” position, which meets the technical inspection requirements. Each division of the switch allows you to shift the axis of the light flux by 0.06 m, provided that the adjustment stand is installed at a distance of 1.2 m from the car headlights.
Repair of old
Yes, we don’t care about the assurances of auto parts manufacturers, we will repair it. We stock up on free time, and you can spend the whole day on this procedure, be patient and let’s get started.
Here is a detailed video on repairing a VAZ hydraulic corrector:
Pros:
- Savings on buying a new one
- Self-esteem that you did it yourself
- Efficient headlight range control
Minuses:
- A sea of wasted time and nerves
- There is no guarantee that it will work for a long time. There were cases that after repair the lifespan was a day, but there were cases - a year, a year and a half, depending on your luck and where your hands grow from
A brief overview of the design of automotive optics
The design of a regular headlight is not complicated. Most often, the headlight combines the following elements:
- light source (LED, metal halide, xenon and other lamps);
- reflector (reflective element);
- light-scattering element (corrugated glass);
- housing with fastening.
Headlights with super-bright diode lamps are very popular among car owners. Such headlights require a record low amount of energy and can work for a long time without interruption.
The operating hours of such headlights range from 30 thousand to 100 thousand hours, while a conventional halogen lamp has a service life of only about 2000 hours.
Most often, headlights are considered in terms of their functionality, i.e. how well they perform their assigned functions - road lighting. However, headlights can highlight the appearance of a car and add personality to even the most ordinary design.
In this article we will try to figure out which headlights are optimal for the VAZ-2109 car, methods for upgrading and tuning headlights, as well as common models of headlights and rear lights.
Replacement with a new one
Manufacturers of auto parts assure us that the hydraulic corrector cannot be repaired. Let's believe them for a moment and decide to replace him. The price of a new part starts from 400 rubles.
Minuses:
- Service life from 1 to 3 years. Even if you don’t use it, it will find ways to fail and bring you a lot of “hemorrhoids”
- Replacing the old one is another quest. It is installed differently on different VAZ models, but you will have to lie upside down in the cabin
Now think for yourself, if it will serve you faithfully when new, and you will use it once a month, at best, and it will break in a year, then why would you again pay 400 rubles and stand on your own to replace it? How feasible is this procedure? Based on my experience working at a service station, not many people come to us to replace it. Why? - because after one or two cases of replacement, everyone “forgets” about it and drives as is.
If you still decide to change the VAZ hydraulic corrector, then watch the video:
Selection of electrical correctors
I had to rummage around on the Internet for quite some time, then I paid attention to the electric correctors from the VAZ 2109 and 2110, but the first has a rod stroke of 6 mm, and the second has 3.6 mm. I didn’t like it, although I read on the Internet that it is possible to select resistors in the control unit divider, and thus, it is possible to adjust the extreme positions of the rod to the required range.
Later I found information about installing electric correctors from GAZelle and Volga. The reach and stroke of the rod they have is what you need, but you can’t buy it as a kit anywhere. Motors are sold separately, catalog number - EPK02, price - 825 rubles, control units are also sold separately - BUK02-01, price - 950 rubles. You won’t be able to find the cables separately, since in the Volga they are included in the standard wiring. I also searched and found a ready-made installation kit with cables, but it is only suitable for VAZ 2109 and 2110 - 110308141101031, price - 10,000 rubles.
Now let’s do the math: the motors and block from the Volga totaled approximately 1,775 rubles. You won’t have to redo anything there, but you will need to buy additional pads and wire, and these are additional costs. A ready-made kit for 2109-2110 costs 2000 rubles, but there is a risk that it will not be possible to configure. I thought about it and ordered a kit for 2109, I ordered it only because of the rod travel (6 mm), although the offset is 4 mm less than what we need. When I received the parcel, I was disappointed, but because they sent me a kit for 2110. I was upset, of course, but I didn’t give up.
The specifications indicate the reach and stroke of the rod.
Main components of an automatic corrector
Normal operation of the system is ensured by:
- Car body position sensors - usually there are 2 or 3 of them (rear and front).
- A control unit on a microcontroller with a simple operating algorithm.
- Actuators are stepper motors in the headlights.
- Wiring.
Using sensors, the distance to the road surface in front and behind the car is monitored. Using the electronic control unit, the tilt angle of the machine is calculated. And, depending on the speed of the car, the light beam is adjusted. Almost all automatic systems provide for manual adjustment - a switch is installed for this purpose.
Automatic corrector operation
This is a more advanced solution, since during operation the possibility of interfering with the operation of the system is completely excluded. They are widely used in the optics of new cars and in xenon headlights. In the latter, the beam of light has a high intensity, so it is imperative to set a correction so that drivers moving in the oncoming direction will not be blinded.
The use of automatic corrector is very wide; the distance from the car body to the cut-off line is the same, regardless of:
- Uneven road surface.
- Vehicle speed.
- Acceleration.
- Loads.