The crankshaft position sensor on Renault Logan is also called a synchronization sensor. This device is designed to determine the position of the crankshaft, as well as its speed and direction of rotation.
He is responsible for the coordinated operation of the crankshaft with the spark supply process and fuel supply. The computer receives impulses from the Logan DPKV, and it, in turn, synchronizes the following processes.
- Timely supply of the required amount of fuel.
- Timely ignition.
- Characteristics of crankshaft rotation.
- Tachometer readings about engine speed.
- Valve opening processes.
Every approximately 70 thousand kilometers of Renault Logan, the crankshaft sensor must be diagnosed or replaced. However, this depends on the nature of the vehicle's operation.
Device
The modern automotive industry is gradually moving away from carburetor-type engines, increasingly giving preference to injectors. To operate such engines, an electronic unit is used that receives signals from all sensors. Next, the ECU is connected to send impulses to their destination in a timely manner.
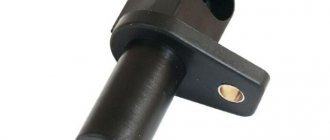
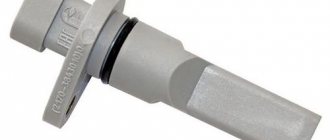
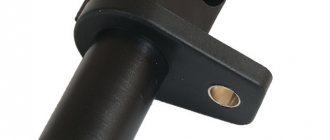
Visually, the crankshaft sensor is a core with a wound wire. On top of it is a plastic case or adhesive filling. This element rarely fails, but situations occur that require its replacement.
How does the sensor work?
To learn how to troubleshoot the specified device, you need to understand its design and understand the principle of operation. The sensor design is simple and includes the following elements:
- multi-turn coil;
- magnetic core;
- the coil leads are soldered to the connector contacts;
- non-separable plastic case with a hole for fastening.
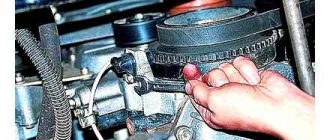
The meter is installed in close proximity to the toothed pulley attached to the crankshaft on the timing gear side. Through conductors, the sensor is connected to the main electronic unit that controls the operation of the motor.
The magnetic core is brought out through the end part of the plastic case and is as close as possible to the teeth of the rotating pulley. The gap between the parts does not exceed 1 mm.
The operating principle of the device is based on the phenomenon of electromagnetic induction . When a significant mass of metal passes in close proximity to the core, the coil generates a short-term electrical impulse. The teeth of the rotating pulley cause a series of such impulses, transmitted through the wires to the controller. Thanks to this, the electronic unit always “knows” the position of the crankshaft, determines the top dead centers of all pistons and promptly sends a command to the injectors to inject fuel.
This is where the second name of the device came from – crankshaft speed sensor. It must be understood that impulses are generated only under the dynamic influence of the metal mass, that is, when the pulley rotates. If the crankshaft has stopped, no current occurs in the element circuit.
Note. Based on sensor signals, the controller not only promptly directs the fuel mixture to the cylinders, but also commands the ignition system to produce a spark when one of the pistons performs the compression stroke and approaches its top point.
Operating principle
The crankshaft sensor became necessary when there was a complete transition from carburetor to injection engines. Together with injectors, on-board computers began to appear in car interiors.
- The crankshaft sensor systematizes data on its operation and determines the position of the cylinders at dead centers.
- This data is then transmitted to the electronic control unit.
- And the electronic unit, in turn, sends a signal about the adjustment.
- The sensor makes changes according to the requirements of the unit.
- For this purpose, a gear is located on the crankshaft. But there are no two teeth here. They are called zero and starting.
- The magnetic field drives this wheel. At those moments when the wheel moves by the zero or starting element past the sensor, the electronic control unit records the initial position of the crankshaft. As a result, an adjustment occurs.
The main feature of the crankshaft sensor is that it cannot work poorly: either it is fully functional or it fails.
Replacing the crankshaft sensor Renault Logan Sandero: step-by-step instructions
138.Feb.2020
Since we remove the terminal from the battery for a long time, the ECU resets the calibration values of the XX regulator.
You can calibrate the sensor in 2 ways: using dealer equipment at a service station or manually. Let's take a closer look at the second option.
The vehicle's engine ECU updates the calibration positions of the XX sensor locking elements each time the power unit is started and when the vehicle reaches a speed of 50 km/h with uniform acceleration.
The calibration process consists of fully retracting the locking element and then releasing it until the valve is completely closed. Simply put, to calibrate the Renault Logan XX valve, it is enough to slowly accelerate to a speed of just over 50 km/h.
There is an alternative method in which you do not need to accelerate the car:
- Connect the negative terminal back to the battery.
- Turn on the ignition, wait 10-15 seconds without starting the engine. The regulator rod moves to its extreme position.
- We start the car. At this moment, the engine operates at high speed.
- We wait 1-1.5 minutes and turn off the engine. The XX regulator rod moves to its extreme position.
- Repeat steps 3 and 4 five times.
- We start the car again and let it idle for about 5 minutes. The XX speed will automatically reach the desired value.
Detonation
The detonation controller on Logan is installed on the cylinder block, in particular, between the second and third. It is best to change the knock sensor after the car is driven onto an overpass or into a garage with a pit.
This is necessary because the knock sensor is located in an inconvenient location and can be difficult to access:
- First of all, you need to squeeze the latch and move the block with the wire to the side.
- Using a 24mm wrench, unscrew the element and remove it.
- Install the element in reverse order.
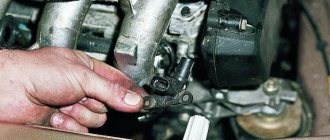
Location
To find the crankshaft sensor under the hood, just look at the space between the transmission and the engine.
This device is usually located in the upper part of the flywheel housing. It must have a plastic or adhesive body, which is attached to the generator pulley using a bracket.
Therefore, we can say that the main location of the DPKV is the bracket of the central part of the generator pulley.
Articles
Below are common Renault Logan crankshaft sensors, indicating manufacturers, part numbers and market prices.
Article - VDO, S119915001Z
- Maxgear, 24-0043: 600–650 rub.
- StartVOLT, VS-CS 0901: 600–650 rub.
- Autolog, AS4124: 600–650 rub.
- Lucas, SEB1780: 600–650 rub.
- Autolog, AS4260: 600–650 rub.
- Meat & Doria, 871751: 600–650 rub.
- Kamoka, 109007: 800-1000 rub.
- Maxgear, 24-0071: 800–1000 rub.
- Autolog, AS4850: 800–1000 rub.
- Stellox, 0600003SX: 800–1000 rub.
- Hoffer, 75174841: 800–1000 rub.
- Meat & Doria, 874841: 800–1000 rub.
- VDO, A2C59513358Z: 800–1000 rub.
- VDO, S119915001Z: 800–1000 rub.
- ERA, 550467: 800-1000 rub.
Review of Renault Logan engines
Symptoms of a problem
The driver needs to know the reasons for failure of the crankshaft sensor.
- Intermittent engine idling.
- The engine speed changes spontaneously.
- With increased engine load, engine detonation is noticed.
- The car is difficult to start, and engine power is significantly reduced.
The reasons for the incorrect operation of the DPKV may be contamination of the non-magnetized rod. In this case, it is enough to clean it.
Also, during operation, a wire break may occur, which will lead to the same symptoms.
It is very rare for a coil to break. To find out this fact, just call her. If there is a break, the device will not show anything.
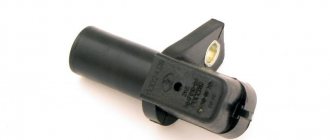
Signs of a broken crankshaft position sensor
Renault Logan crankshaft position sensor
There are several symptoms that can easily be used to diagnose a faulty sensor.
- Unstable speed, engine tripping at idle
- An involuntary increase in speed is followed by a drop, and after the fall in speed there is an increase
- Difficulty starting the engine
- Noticeable drop in Logan engine power
- The appearance of detonating ringing under load
Breakdown factors:
- Reading surface is dirty. In case of such a malfunction, you can simply clean the contact surfaces
- Broken wiring
- Coil break. At the time of ringing, the device does not provide any readings
- If the meter is faulty, the spark formation process occurs untimely, leading to incorrect operation of the Logan engine, “under-combustion”, therefore, excessive fuel consumption, decreased dynamics, or the inability of the engine to start.
In the event of a breakdown, the Renault Logan crankshaft sensor should be replaced.
Renault Logan power steering sensor: to jam or not to jam
Examination
It is worth understanding that reliable diagnostics can only be performed by service center specialists using special equipment. But you can draw a preliminary conclusion yourself.
To check the serviceability of the sensor, it must be dismantled. Next, the tester is connected to the contacts. If you bring any metal object to the sensor, it should give off a pulse. When this does not happen, the DPCV is faulty.
The crankshaft sensor rarely fails. Replacing it is not difficult and is done in the reverse order.
Methods of checking in garage conditions
The simplest and least labor-intensive way to check for a unit malfunction is diagnostics using diagnostic equipment. Diagnostic time takes no more than 5 minutes, and there is no need to go into the engine compartment. The range of diagnostic devices on the market is huge, both in functionality and pricing. Among budget devices, we can recommend a car diagnostic scanner, made in Korea – Scan Tool Pro Black Edition.
According to our personal experience, this device, despite its low price in the region of 1950 - 2500 rubles. is able to diagnose the general condition of the car by displaying error codes with their descriptions, as well as the operation of various sensors in real time. The auto scanner has a compact size and is connected via the OBD-2 diagnostic connector. Data transfer is carried out to any modern device - smartphones, tablets, PCs running Android, iOS and Windows OS.
If you do not have such adapters, then you need to remove the sensor and perform the diagnostics described below:
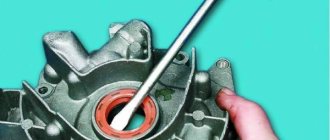
- Thoroughly clean the device body with a rag moistened with an organic solvent - white spirit, turpentine or other degreaser. Pay special attention to the end facing the toothed pulley.
- Make sure the fastening is secure. Due to a loose screw, the sensor may move away from the metal teeth, as a result, the gap will increase and the generated pulse will weaken.
- Clean the connector contacts from oxidation.
- Inspect the wiring for melting or breakage.
If the above actions do not produce results, the crankshaft sensor is dismantled and checked with a multimeter in 2 stages. At the first, the resistance between the terminals of the device is measured, which makes it possible to verify the integrity of the induction winding. Clean the contacts, turn on the ohmmeter and check the resistance between them. Normal readings are in the range of 500–700 Ohms; if the turns are shorted, you will get a zero or reduced value; if there is a break, you will get infinity.
Replacement
To do this you will need a new sensor, a 10mm wrench, a socket, a wrench and a screwdriver.
- To replace the top, you will have to disconnect the air pipe to gain access.
- On the right, you need to disconnect the chip from the sensor using the tab.
- Unscrew the fixing bolts.
- The old device is replaced with a new one and screwed on.
Finally, it is important to check the distance between the end of the DPKV and the teeth of the crankshaft pulley. It should be 1mm. If it is less, then the housing risks rubbing against the teeth; if it is more, then interruptions in engine operation may occur.
How to check DPKV yourself - 3 different ways
Before you start checking the synchronization sensor with instruments, you must mark its initial position on the engine. After removing the electronic device, inspect it for external damage. If the sensor is dirty, it is necessary to clean it, including removing corrosion from the contacts, if any, using gasoline or alcohol. If there is no external damage to the sensor, you can begin to diagnose it using instruments.
How to check the crankshaft position sensor with an ohmmeter
In order to check the crankshaft sensor with an Ohmmeter, you must perform the following procedure:
- The first thing to do is to inspect the device while it is installed on the car, or rather, check for a gap between it and the synchronization disk. It is quite possible that there is no gap there due to the fact that dirt has adhered to the sensor or disk, which led to the violation.
- If everything is in order with the gap, we will remove the device from the car.
- The next stage is assessing the external state. The sensor body must be intact, without signs of damage, the core must be clean, the contact terminals must be free of traces of oxidation, and the wires must not be damaged.
- If external contamination is visible on the DPKV, you can wash it before checking (to do this, use only pure gasoline or alcohol), and also clean the contacts with a file.
- After cleaning, rinsing and drying, you can start taking measurements. To do this, switch the multimeter to ohmmeter mode and connect the probes to the sensor contacts.
- When measuring, a working DPKV should show a resistance in the range of 550-570 Ohms.
Checking the inductance of the crankshaft sensor
Checking the inductance of the crankshaft position sensor is a more complex method. To do this you will need:
- voltmeter, preferably digital;
- megohmmeter;
- inductance meter;
- network transformer.
For correct indicators when measuring the sensor, the recommended air temperature is 20-22 0 C. We measure the winding resistance with an ohmmeter and the method indicated above.
To measure the inductance of the crankshaft speed sensor winding, an inductance meter (inductive coil, capacitance and resistance) is used. The inductance should be in the range of 200-400 MHz.
Using a megohmmeter, the insulation resistance is checked. This parameter at a voltage of 500V should not be higher than 20 MOhm.
If during the repair of the sensor the synchronization disk is inadvertently magnetized, then demagnetization is carried out using a network transformer. Based on the results obtained during test measurements, you receive data about the sensor’s malfunction, or, conversely, its serviceability
When installing an old or new sensor, carefully install it in the seat according to the marks. Do not forget about the distance that should be between the synchronization disk and the core (0.5-1.5 mm)
Based on the results obtained during test measurements, you receive data about the malfunction of the sensor, or, conversely, its serviceability. When installing an old or new sensor, carefully install it in the seat according to the marks. Do not forget about the distance that should be between the synchronization disk and the core (0.5-1.5 mm).
How to Test a Crankshaft Position Sensor Using an Oscilloscope
A digital oscilloscope allows you to effectively monitor and find faults in injection system sensors. Now we will talk in detail about checking the crankshaft sensor using an oscillogram:
The crankshaft position sensor (CPS) is the most important in the injection system; it synchronizes the operation of the electronic engine control unit. The VAZ DPKV signal is a series of repeating electrical voltage pulses generated by the sensor when the crankshaft rotates.
The drive disk is a 60-2 gear, i.e. 58 equidistant teeth and two missing teeth for synchronization. When the drive disk rotates together with the crankshaft, the depressions change the magnetic flux in the sensor's magnetic circuit, inducing alternating current voltage pulses in its winding. The oscillogram of the inductive DPKV has the following form:
Here it is worth paying attention to the signal amplitude and pulse shape. If the turns in the sensor winding are short-circuited, the signal amplitude will be reduced
Also, from the oscillogram it is easy to calculate the runout of the drive disk and damage to the teeth. On some foreign cars, a Hall sensor is used as a DPKV, producing rectangular pulses.
And this is how the crankshaft and camshaft position sensors of Nissan engines work synchronously. Based on the rising edges of the signals, the displacement of the shafts relative to each other can be determined.
Spark plugs for Duster 1.6 and 2.0 l
Engine crankshaft sensor 405, 406, 409, 4213, 4216 - dpkv (synchronization sensor)
Renault 7700500155
The original spark plugs 7700500155, which are used for all Renault Dusters, are manufactured by Champion. The manufacturer has the same spare part number RC87YCL, the price is 200 rubles. Also, these spark plugs can be found on sale under the number OE033/T10 (replacement number by the manufacturer).
Has one side electrode. Resistance – from 3 to 7.5 kOhm. Also very common is the model of the original spark plug with two side electrodes Renault 7700500168, price - 170 rubles. This model, according to the official catalog, is installed from the factory on 8-valve Renault Megane and Logan engines.
It is sometimes installed by official dealers during maintenance on Dusters. As the experience of some Duster car owners shows, when installing spark plugs with 2 side electrodes, a slight decrease in engine vibration during idle operation can be observed. In general, there is no significant difference between the two models of original candles.
In dealerships, when carrying out maintenance, they also often install original spark plugs under article number 224018651R, price - 130 rubles. This spare part is manufactured in Russia, Enels. The box with the original contains spark plugs from Bosch (Champion is not produced at the Russian plant)
Dimensions of the original spark plug for Renault Duster 7700500155
| Thread length | Thread diameter | Key size | Gap | Heat number (according to Champion nomenclature) | Center electrode material |
| 19 mm | M14x1.25 | 16 | 0.9 mm | 8.7 | Nickel |
The heat rating in the Champion nomenclature differs in meaning from other well-known manufacturers. The heat rating of 8.7 on Champion spark plugs is equal to 7 on NGK spark plugs, 22 on Denso and 5 on Bosch.
When replacing spark plugs on a Duster, you should pay attention to the most popular analogues among drivers:
- K20PR-U, Denso (Japan). Price - 90 rub. The model has a U-shaped groove in the side electrode, which makes the spark more powerful and ensures better combustion of the mixture. This candle model also has a lot of positive reviews;
- Z 193, BERU (Germany). Price - 130 rub. Most reviews are positive. This model maintains its service life very well, and even when replaced, most drivers still look functional;
- RFN 58LZ, EYQUEM (France). Price – 180 rub. A high-quality spare part with many positive reviews. On the plus side, when installed, there is a decrease in engine noise at idle.
Denso K20PR-U
BERU Z 193
EYQUEM RFN 58LZ
Also, you can install iridium spark plugs on Renault Duster. The most popular model is Denso IK20, price - 460 rubles. They have many positive reviews. According to the observations of drivers, when installing these spark plugs, there is a real increase in the dynamic performance of the engine.
Find out more about the new Logan
- Replacement of engine power unit mounts 1.4-1.6(8V) | Renault | Renault management
- Modified Renault Logan and Nissan Almera photo gallery
- Muffler for Renault Logan: how to remove and change
- Car disassembly Renault Logan I restyling in Bryansk | Spare parts for Renault Logan 1 restyling at the Bryansk showroom
- Renault Logan in Orenburg - prices, photos, specifications and configurations -
- Power steering pump pulley bore diameter 18.7 mm '8200246248 Renault. Wholesale and retail.
- Renault Logan does not idle on a cold engine
- ELECTRICAL DIAGRAM RENAULT LOGAN - ELECTRICAL DIAGRAM
Diagnostics
A 12V light bulb integrated into a socket with two outgoing wires, a large cross-section wire with two crocodiles at the ends, will help you verify that the DPKV circuit or the sensor itself is broken. First we check the spark:
- Remove the spark plug wire (8 valve engines K7J, K7M) or individual ignition coil (16 valve engines K7M, H4M) from the spark plug.
- Insert a spark plug into the wire or coil.
- Place the spark plug thread securely against the engine ground using a wire with two alligator clips.
- Turn the starter and observe.
Lack of spark is one of the signs of a faulty Renault Logan DPKV. Let's check the second sign - the fuel pump does not pump while the starter is running. To do this, connect a 12V test lamp to the contact pair of the fuel pump plug shown in the figure.
There is no need to rush to dispose of the sensor. In 90% of cases, the cause is a loose contact or an oxidized contact pair. In any case, it is necessary to disconnect the plug, clean the contacts and move them slightly apart.
In order to check the serviceability of the crankshaft sensor, check for the presence of a spark. To do this, remove a high-voltage wire with a tip from any cylinder and attach it to a known-good spark plug. Its body is connected to the “ground” of the car, after which the crankshaft is cranked with a starter.
To access the fuel pump, move back the rear seat of the Renault Logan and lift the gas tank flap - it is held in place by plastic latches that can be easily pressed out with a screwdriver or other flat object. Next, you should remove the block from the fuel pump connector and connect a 12-volt test light bulb to its black and brown wires (the other two are responsible for the readings of the fuel level sensor).
Currently reading: Do-it-yourself installation of a towbar on a Renault Logan – Taxi Bolt
If, after turning on the starter, the light does not light up (no further fuel is supplied), then, combined with the lack of a spark, this fact is direct evidence of a breakdown of the DPKV, which is the reason why the 8-valve Renault Logan, Sandero, Largus engine does not start.