Cost of the kit and work with it in the service
The service station carries out the full range of work to restore the body. You can weld the bottom of a VAZ 2115, the price of work without the cost of dismantling, materials and components starts from 15,000 rubles. It is also permissible to change rotten jacks, sills and replace part of the bottom, the cost of work is up to 10,000 rubles.
Repairing the underbody, like any other part of the body, is classified as labor-intensive and complex. The cost of the repair kit must be added to the cost of the work.
- original floor from AvtoVAZ - from 3,000 rubles;
- bottom with thresholds ─ from 5,000 rubles;
- sound insulation ─ from 500 rubles per 1 sq. meter;
- anticorrosive ─ from 600 rubles per 1 kg.
Simple calculations show that self-repair will cost three to four times less, but only if the driver understands the complexity of the work and has minimal skills in using electric welding and working with metal.
Product delivery options
Note! Below are the shipping methods available specifically for this product. Payment options may vary depending on the shipping method. Detailed information can be found on the “Delivery and Payment” page.
Parcel by Russian Post
Available payment methods:
- Cash on delivery (payment upon receipt)
- Using cards Sberbank, VTB, Post Bank, Tinkoff
- Yandex money
- QIWI
- ROBOKASSA
Shipping throughout Russia. Delivery time is from 5 to 12 days.
Parcel by Russian Post 1st class
Available payment methods:
- Cash on delivery (payment upon receipt)
- Using cards Sberbank, VTB, Post Bank, Tinkoff
- Yandex money
- QIWI
- ROBOKASSA
Shipping throughout Russia. Delivery time – from 2 to 5 days. More expensive than regular delivery by Russian Post, approximately 50%. Parcel weight up to 2.5 kg
Express Parcel EMS
Available payment methods:
- Cash on delivery (payment upon receipt)
- Using cards Sberbank, VTB, Post Bank, Tinkoff
- Yandex money
- QIWI
- ROBOKASSA
Article on the topic: How much does a 32-inch LG TV cost
? Shipping throughout Russia. Delivery time – from 3 to 7 days. More expensive than regular delivery by Russian Post, approximately 100%.
Transport companies
Available payment methods:
- Using cards Sberbank, VTB, Post Bank, Tinkoff
- Yandex money
- QIWI
- ROBOKASSA
Delivery is possible to any locality where there is a representative office of the transport company. Delivery time – from 2 to 10 days. Sending large parcels is approximately 50% more profitable than by Russian Post.
Courier delivery in Togliatti
Available payment methods:
- Cash upon receipt
- Using cards Sberbank, VTB, Post Bank, Tinkoff
- Yandex money
- QIWI
- ROBOKASSA
Delivery time from 1 to 12 hours.
Pickup from our warehouse
Available payment methods:
- Cash upon receipt
- Credit, installments
- Using cards Sberbank, VTB, Post Bank, Tinkoff
- Yandex money
- QIWI
- ROBOKASSA
Pickup times must coincide with store opening hours.
The VAZ-2109 was produced quite a long time ago. Over the years of service, its radiator grille was exposed to an aggressive environment in the form of salts and moisture. It is for this reason that more and more often motorists have to change it. Replacing a VAZ-2109 TV yourself can only be done if you have a welding machine.
Replacing parts or the entire bottom
Repairs begin with inspection and repair of thresholds. Rotting of the central part of the body begins with corrosion of the sills and wheel arches, so if rust has destroyed parts of the bottom by 30%, then we can confidently say that the sill is rotten by 60% and requires complete replacement. The bottom of the VAZ 2114 consists of the following elements:
- underbody panels under the seats;
- threshold extension;
- crossbars;
- side member amplifier;
- space for a jack or jacks;
- central support platform;
After cleaning the underbody from anticorrosion, the jacks, side members and panels under the feet of the driver and passenger are inspected. These are the most vulnerable parts. If the general condition is satisfactory, then it is recommended to cut out the problem areas and install the original floor parts from the repair kit. The process of partial overcooking of the bottom in steps:
- Drill out the spot welding points and cut out the rusted metal with a chisel.
- Clean the edge of the future weld with a grinder and treat with a degreaser.
- Attach the original part or the cut out patch. The metal patch should protrude 1 cm beyond the edges of the trim; welding will be carried out overlapping.
- Spot weld the edge of the metal. Weld the patch in increments of 2 cm welding, 4 cm skip.
- Clean the weld seam.
- Treat with primer, apply a layer of oil anticorrosive or bitumen mastic under the sound insulation layer.
- After complete cleaning, treat the outer part of the bottom with bitumen mastic.
A complete replacement of the bottom of the VAZ 2114 is required in 50% of cases of body repair. However, experienced drivers warn about the danger of independently repairing the entire bottom, which remains the main part of the supporting body. If you don’t have experience, you can disrupt the geometry of the car, and even the slightest misalignment threatens that it will be impossible to set the wheel alignment and the car will start to drive sideways, the tires will quickly begin to wear out, the engine mount may come off, fuel and oil consumption will increase, etc. Beginners are advised to cut out the bottom in parts and replace only the part that is rotten.
Before the bottom is completely re-welded, all pipes of the fuel, brake and exhaust systems are dismantled. On VAZ 2114 cars, after three to four years, all pipes and fittings of the fuel and brake systems are corroded and acidified. It is almost impossible to remove the element; service technicians recommend cutting out the metal hoses and, after working on the bottom, installing new pipes made of brass or copper. The advantages of such hoses over metal ones are obvious.
- The softness of the metal will allow the hoses to be bent and installed exactly in the bottom pockets.
- If the bottom is changed in parts and the master has to tap out the place for the pipe himself, the brass tube can be installed at any angle and secured to a special coupling.
Algorithm for replacing the entire bottom:
- Drill out spot welding areas.
- Use a chisel to cut out the bottom. You can use a grinder, but it is recommended to tap the metal with a chisel or hacksaw blade.
- Leave 1 cm of the old bottom to allow for overlapping welding of the new element.
- Reinforce the side members with additional metal panels.
- Place the bottom from below and grab the points.
- Cook in 3-4 cm increments.
- Clean the weld seam with a grinder or metal disc.
Carrying out repair and welding work
Repairing the underbody of a VAZ 2115 is quite difficult. Under the bottom of the car there is a fuel system, brake system and muffler pipes. When replacing an entire part, these systems must be completely removed and reinstalled after welding. Experienced tinsmiths recommend not dismantling the muffler elements, but cutting them out, after repairing the bottom, boiling the part and installing it in place.
If the underbody is partially repaired, there will be no need to remove the fuel and brake system pipes. When cutting out entirely, it is recommended to cut out the bottom not along the factory welding line, but leaving an allowance of 1-2 cm. The new element is welded with an overlapping seam, which increases the rigidity of the body and the durability of the weld seam.
Malfunctions
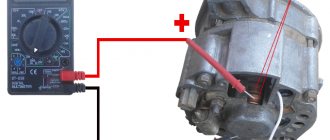
Diagnosing the problem will not be a problem for you if you understand a little electrical engineering and know how to work with a device such as a multimeter. If not, we recommend that you contact a specialist. A professional check of the ignition module of a VAZ 2110 using a multimeter will give you the result you need and will allow you to answer important questions.
Do not rush into repairs, since the problem may not lie in this element at all. Before checking the ignition module on a VAZ 2110, consult with professionals and arrange a check of your car. You will have to spend time and money on this, but it is better to be prepared for troubles.
Before checking the VAZ 2110 ignition unit, make sure that all other engine systems are working properly.
Quite often, short-term breakdowns occur in the system, which soon disappear. The check engine light does not detect them, but they remain in the controller and are entered into its memory. If you try to read errors on the controller with a tester, it will not show anything, since there were problems, but now they are gone.
Article on the topic: Do-it-yourself replacement of the VAZ 2110 oil filter
We have already become familiar with the signs of a malfunction in the VAZ 2110 ignition module, and the reasons for such situations may be dirty contacts, poor ground connection, electrical interference, and so on.
Possible problems
When installing music devices, vehicle owners face various problems. Because of them, the radio for the VAZ-2114 does not turn on or any of the functions do not work.
Most common problems:
- Burnt fuse. This situation occurs due to connecting additional amplifiers or any other equipment to the radio, as well as listening to music at high volume.
- Network short circuit. It appears due to errors made during wiring.
- Oxidized contacts. During operation of the device, moisture may enter its housing. It will damage the contacts and prevent you from using the radio.
A radio is a useful device that should be in every car. Even a novice car owner can connect it on his own. To do this, he will need patience, the correct implementation of all the provided actions and several hours of free time.
Replacing the bottom of a VAZ 2114
Today we will talk about replacing the bottom of the Samara and Samara-2. Here's everything that will change in the near future:
Packed for 16 pieces
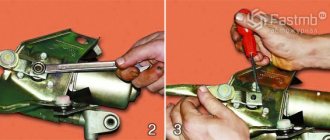
So, let's get straight to the topic. Before starting car repair work, I would like to remind you about safety precautions, because I think everyone will agree that you want to see the finished result with two eyes, and not one... Part 1: Drilling and cutting out the bottom
. To cut out the bottom, we need to disassemble the interior. We completely disassemble the interior, remove everything, including the steering wheel and pedals. We take the Bulgarian wife (Bulgarian) in our hands and CAREFULLY cut off parts of the bottom along the lines (indicated in the photo in blue), so as not to touch the elements that will be useful to us in the near future.
After that, take a drill and put an attachment on it to remove rust from the metal.
We begin to process with a drill the places where we will drill out the points (indicated in the photo in red). Then we take a “7” drill, sharpened for drilling out points, and drill it out. For those who don’t know what it is, look here When all the work is completed, we dismantle the remains of the bottom using a hammer and chisel. Final result.
Part 2. Preparing the new bottom for installation.1.
We take a new bottom trough and begin to clean the transport soil with a brush using a drill.
(Sometimes you don’t need to remove the shipping primer. It’s easy to check. We take a rag, wet it with 646 solvent and throw it on the area of the shipping primer. After 10 minutes, we carry out a test with another rag (clean): take it and lightly rub the shipping primer. If the primer is cleaned off or the rag turns dark , then we remove such primer. If the rag remains clean and the primer does not come off, then we leave it, having previously filled it with sandpaper R120, so that the anticorrosive will adhere better)
in the process
The process is quite hectic, but I managed it in 3.5 hours of continuous work.
Afterwards, we take sandpaper with a p80 mark and matte the metal so that the soil lays down normally and does not fly off in the future.
When the metal is matted, we dilute primers (acid and epoxy) and prime the bottom. First, prime with acid primer in one layer. Leave it for an hour to dry (you don’t have to do this step)
The best friend will not leave you in trouble)))
Then we prime with epoxy primer (I used novol protect 360 primer) in 2 layers. interlayer drying 15 minutes
The bottom is reliably protected
2.
When the bottom is primed, we leave it in the garage overnight and come back only the next day.
Why did I recommend not touching the lower elements of the bottom (all sorts of hooks, brackets) when trimming? Because we will weld them immediately in place, measuring all the dimensions as they were. I strongly recommend not to repeat my mistake, but to first weld the trough into the car and only then weld everything else to it.
, although if you have a flat floor, you can do it like I did. Only if the bottom moves a little with the propeller, it’s not my fault))) We weld all the studs, brackets, hooks and other elements, measuring everything from the old bottom.
We weld all the upper elements of the bottom, measuring all the old dimensions and marking everything with a marker.
All we need: a middle floor reinforcement, seat reinforcements, seat brackets, and those two little crap on which the outer slides are placed (the rightmost ones in the photo).
tried it on and circled it with a marker.
cleaned with R80 sandpaper
Covered with epoxy primer.
3.
We clean the side members from rust.
Bringing the radiator to life
As a rule, it is not the entire system that becomes unusable, but only some part of it. The first signs that it is necessary to intervene are a specific smell in the cabin, the appearance of steam from the exhaust vents, and very rapid evaporation of coolant. First of all, you need to check the radiator. You should not bother with checks when the engine is running or has not yet cooled down. The problem most often lies in the radiator, in the area of the heater tap or in the electrical circuit. Let's look at these weak points in more detail.
Replacing a faucet or electric motor is not the first step; first you need to carefully inspect the radiator for leaks. Then you will have to remove it and check the tightness. The radiator is removed in the following order. First you need to disconnect and (preferably) remove the car battery, completely drain the antifreeze from the cooling system and disconnect the wires from the sensor that turns on the fan motor. Then you will have to remove the fan casing fasteners, disconnect its bracket and wires, and tilt it to the side. This will allow you to remove the protective cover. All that remains is to disconnect all the hoses, slightly tilt the radiator to the side and remove it out.
Replacing the electric radiator motor
It should be noted that it would not be superfluous to replace the rubber shock absorbers located on the radiator holders.
After the unit is removed, it is necessary to put tight plugs on the pipes or holes (except one) to which they are connected. Through the remaining inlet it is necessary to pump air into the radiator. Just be careful: do not allow air pressure to exceed 0.2 MPa. After this, lower the radiator into a bath of water, preferably so that it completely covers it. If air bubbles appear, the seal is broken and replacement is necessary. If there are no bubbles, there is a chance that it is simply clogged. In this case, it is necessary to flush the device.
Replacement
To carry out repair work, you need to prepare tools, materials, power tools:
- complete set of keys;
- locksmith - chisel, hammer;
- electric welding machine;
- electrodes dia. 2 mm;
- drill;
- drill dia. 5-6 mm;
- a grinder with a grinding wheel, have a metal disc in stock;
- primer;
- paint;
- solvent;
- aerosol can with anti-gravel composition in black Body 950;
- cotton gloves;
- canvas mittens;
- rags;
- fire extinguisher – you need to check the expiration date;
- plastic containers for 6-7 liters, they can be made from 10 liter canisters;
- safety glasses;
- tassels;
- moisture-resistant sandpaper.
Preparing the machine
Replacing the lower cross member of the VAZ 2109 radiator frame
Place the vehicle on a level surface:
- Open the hood.
- Open the expansion tank cap.
- Place a container under the cooling radiator and open the drain plug.
- Drain the antifreeze.
- Place the second prepared container under the engine and drain the antifreeze from it.
- After this, install and tighten the plugs.
- Disconnect both terminals from the battery.
- Remove the battery.
- Place wheel chocks under the rear wheels.
- Raise the front of the car with a jack.
- Install standard supports.
- Align the front part of the body level. You can apply a level.
- Remove the front decorative grille.
- Unscrew the headlight mounts from the engine compartment and disconnect the terminals.
- Take them out and put them on a rack in the garage.
- Unscrew the upper radiator mounting. First remove the electrical wiring terminals from the fan and remove the wires as far as possible from the intended work area. If possible, wrap the wires with tarpaulin.
- Tilt the radiator towards the engine and unscrew the clamps securing the pipes.
- Remove the pipes. Move them away from the front end.
- Remove the radiator and fan assembly.
- Remove the radiator inserts from the lower channel.
Preparing the frame
VAZ 2109 radiator frame panel
When carrying out work by one car enthusiast, it is necessary to prepare the purchased parts:
Clean frame parts from transport primer
Pay special attention to welding points and bends. Use welding to weld the joints. Clean with a grinder. If necessary, straighten. Apply a solvent with a brush to degrease the metal. It is necessary to prime the internal parts first, since after they are installed from the engine they become inaccessible. After checking these parts on site, mark them. Connect them together with clamps. Carry out welding work to connect them
Start welding parts from the top and gradually move to the bottom. Clean welded joints. Strip the front of the frame down to metal. Cover with primer, then paint with one coat of paint. The sealant is applied.
While the parts are drying, you need to cut off the old frame.
Removing the old frame
- Using an electric drill, drill out the spot welds at the fastening points. The outer part of the frame is welded to the side members (see Replacing the front side member on a VAZ on your own).
- Now use a chisel to cut off the remaining weld seams.
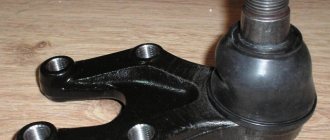
The practical part is removing the generator, disassembling it, repairing it and reinstalling it.
Due to the fact that the generator is located under the hood of the car, it is necessary to turn off the engine, turn the steering wheel to the right all the way and open the hood. The electric generator on VAZ 2108 - 15 cars is installed in front of the engine, in the lower left corner of the engine compartment, between the engine and the cooling radiator.
Before dismantling the generator, it is necessary to disconnect the ground from the battery, i.e. negative contact.
Replacing VAZ generator brushes
Before removing the generator itself, in order not to do unnecessary work, we remove the charging relay from the generator housing and check the production of the generator brushes.
The charging relay is installed in the rear of the generator housing, and is attached to it with two bolts. To unscrew them you will need a Phillips screwdriver. When unscrewing the bolts, be careful not to drop them on the crankcase guard, otherwise getting them out of there will be one big problem. To remove the relay, you need to disconnect the wire, the “female” contact. After removing the charging relay and visually inspecting the brushes, we decide to purchase a new generator voltage regulator relay or reinstall the dismantled one, depending on the wear of the brushes. For their normal operation, a brush length of at least 4 cm is required. Now we proceed directly to removing the electric generator from the engine.
- We disconnect the wires from the generator - as a rule, they are red and consist of two groups of wires, red. One group consists of two wires and is attached with a nut to a bolt on the rear wall of the generator. The other group consists of one wire and is connected to the generator terminal via a male-female contact, also on the rear wall of the generator.
- To remove the generator from the engine, you need to unscrew two nuts and one bolt in the following sequence: unscrew the nut attached to the generator belt tensioner bar (at the top of the generator), unscrew the bolt securing the tensioner bar to the engine block and remove it. The last step is to unscrew the nut from the bolt securing the generator bracket to the engine block.
- The generator mounting bracket is located at the bottom of the engine block, directly below the generator. After unscrewing this nut, you need to remove the generator belt from the generator pulley itself.
- The generator mounting bolt should be pushed to the left, out of the bracket, until it stops against the body shell or the generator’s mud protection.
- On the right wheel side, you need to unscrew the two screws that secure the dust protection of the generator to the car body.
- If the generator mounting bolt still rests against any body parts, you should press on the engine with one hand, and at the same time pull out the bolt with the other hand.
The cost of replacing the front side member of a VAZ-2108-09 in a car service center
Since replacing a submarine is not an easy job even for an average car service center, not all craftsmen undertake it, especially since not everyone is eager to begin restoring the body of a used Nine. Mostly, small auto repair shops carry out minor and medium body repairs, while large auto repair centers do not want to deal with domestic cars at all. Prices for body work from auto repair companies and private owners are most often approximate; often the final cost of the repairman is announced closer to the end of the repair. The fact is that “pitfalls” may unexpectedly appear, and as a result of their identification, the work is delayed and becomes more complex.
Some car service centers indicate two values in the price list at once - the upper and lower limits; in large cities or the capital, they charge from 3,500 to 9,000 rubles for replacing the front side member; usually, work from private repairmen in garages costs less. Often, along with the submarine, it is necessary to change the wing splash guard, sills, and repair the bottom; some auto repair shops note in their prices that the cost of repairs in the price list is indicated without painting.
How to pull out body parts of a “nine” with your own hands
In conclusion of the article I would like to dwell on such a point as body deformation. If the “nine” has any deformed part of the body, then there can be no talk of any tuning until restoration is carried out.
As a rule, complete restoration of the body and elimination of deformations is carried out on a special machine. It's called a slipway. This is professional equipment on which only an experienced and knowledgeable specialist can carry out procedures.
As for restoring the body at home, it must be borne in mind that such an operation is possible only for minor components. Thus, massive body elements, such as a spar or a beam, cannot be pulled out without a slipway. But you can successfully deal with a dented threshold or fender on your own in your garage.
The algorithm for carrying out the work is not very complicated:
- The car is placed on the handbrake, stops are placed under the wheels;
- One of the ends of the cable is tied to a monolithic support, for example, to a large and strong tree;
- The other end is tied to the body part;
- By winding a metal rod around the cable, it becomes possible to gradually tighten the cable.
Replacing parts or the entire bottom
Repairs begin with inspection and repair of thresholds. Rotting of the central part of the body begins with corrosion of the sills and wheel arches, so if rust has destroyed parts of the bottom by 30%, then we can confidently say that the sill is rotten by 60% and requires complete replacement. The bottom of the VAZ 2114 consists of the following elements:
- underbody panels under the seats;
- threshold extension;
- crossbars;
- side member amplifier;
- space for a jack or jacks;
- central support platform;
After cleaning the underbody from anticorrosion, the jacks, side members and panels under the feet of the driver and passenger are inspected. These are the most vulnerable parts. If the general condition is satisfactory, then it is recommended to cut out the problem areas and install the original floor parts from the repair kit. The process of partial overcooking of the bottom in steps:
- Drill out the spot welding points and cut out the rusted metal with a chisel.
- Clean the edge of the future weld with a grinder and treat with a degreaser.
- Attach the original part or the cut out patch. The metal patch should protrude 1 cm beyond the edges of the trim; welding will be carried out overlapping.
- Spot weld the edge of the metal. Weld the patch in increments of 2 cm welding, 4 cm skip.
- Clean the weld seam.
- Treat with primer, apply a layer of oil anticorrosive or bitumen mastic under the sound insulation layer.
- After complete cleaning, treat the outer part of the bottom with bitumen mastic.
All the features of do-it-yourself headlight restoration and repair
A complete replacement of the bottom of the VAZ 2114 is required in 50% of cases of body repair. However, experienced drivers warn about the danger of independently repairing the entire bottom, which remains the main part of the supporting body. If you don’t have experience, you can disrupt the geometry of the car, and even the slightest misalignment threatens that it will be impossible to set the wheel alignment and the car will start to drive sideways, the tires will quickly begin to wear out, the engine mount may come off, fuel and oil consumption will increase, etc. Beginners are advised to cut out the bottom in parts and replace only the part that is rotten.
Before the bottom is completely re-welded, all pipes of the fuel, brake and exhaust systems are dismantled. On VAZ 2114 cars, after three to four years, all pipes and fittings of the fuel and brake systems are corroded and acidified. It is almost impossible to remove the element; service technicians recommend cutting out the metal hoses and, after working on the bottom, installing new pipes made of brass or copper. The advantages of such hoses over metal ones are obvious.
- The softness of the metal will allow the hoses to be bent and installed exactly in the bottom pockets.
- If the bottom is changed in parts and the master has to tap out the place for the pipe himself, the brass tube can be installed at any angle and secured to a special coupling.
Algorithm for replacing the entire bottom:
- Drill out spot welding areas.
- Use a chisel to cut out the bottom. You can use a grinder, but it is recommended to tap the metal with a chisel or hacksaw blade.
- Leave 1 cm of the old bottom to allow for overlapping welding of the new element.
- Reinforce the side members with additional metal panels.
- Place the bottom from below and grab the points.
- Cook in 3-4 cm increments.
- Clean the weld seam with a grinder or metal disc.
CO elements
The cooling system used on the VAZ 2109 operates at low pressure. After studying the components, you will learn about their functions and features.
Element
Peculiarities
It ensures efficient, stable operation of the system. The pump is used to pump cooling liquid, which facilitates its movement along a small or large circuit. The pump consists of a housing, an axle with a pulley located on it connecting to the timing belt, and a plastic impeller. The latter allows the coolant to move. A bearing lubricated with antifreeze is installed between the axle and the housing. Because of this, the presence of water in the system is unacceptable. Otherwise the bearing will collapse
Plays an important role, although in practice the CO can do without it. The system works in such a way that the engine first warms up to operating temperature (about 90 degrees Celsius), after which it is necessary to further cool the liquid. First, the coolant moves along a small circuit - through the jacket into the stove radiator, and then the excess is returned to the expansion tank. But when the operating temperature is reached, the thermostat begins to move the coolant flow into the radiator. A thermostat can be called a mechanical valve that automates the operation of the CO. Hot liquid acting on the bimetallic plate of the thermostat deforms it, which is why the coolant supply valve to the radiator can open or close
The SO VAZ 2109 has a pair of radiators - a stove and a main one. Their design is the same regardless of whether you have a carburetor or an injector. At the same time, there is a noticeable difference between the main and stove radiators. The main one is larger in size, they perform different functions, plus the main one has holes for a sensor that turns off the fan. If the stove radiator can be connected to operation at any time by pressing a button, then the main radiator operates in automatic mode when certain operating parameters of the CO are achieved
Expansion tank with plug
A constant pressure is maintained inside the CO, which ensures efficient coolant circulation. On the VAZ 2109, the system is designed so that at high pressure the liquid does not boil when it reaches 100 degrees, but at higher parameters. This increases engine reliability. Pressure support is provided by an expansion tank with a cap and a pair of mechanical valves - inlet and outlet. The inlet valve is activated if the pressure drops to 0.13 atm. The second one comes into operation at the moment when the pressure is above 1.3 Atm.
Do not underestimate the role of pipes and clamps in the CO, since it is through them that the coolant is supplied to the required points. When replacing, under no circumstances use cuttings from other pipes that do not correspond to the parameters used previously. Plus, if at least one pipe is damaged, everything will have to be replaced as a set, and not separately
How to amplify a new TV on a VAZ-2109
In the process of self-repair, you can strengthen the structure. To automate the process, the old TV is removed using a drill. Therefore, the upper and lower parts are often removed separately. During the process, monitor the condition of the bottom - the place where the part is attached to the body. You will need to join two sheets of metal. To do this, leave the width only 2 millimeters, many masters leave 5, which is wrong. Carefully, slowly, remove the metal to leave the desired sheet width.
It is necessary to drill holes around the perimeter of the new TV to help secure the part more securely. Through them you can fasten the grille with self-tapping screws. Next, install the headlights, look at the gaps and weld the structure. Clean the weld spots.
To strengthen the structure, weld a profile pipe at the bottom. Weld it to the walls, and then install the second part of the TV. The pipe profile should be square 50x50 millimeters. Thanks to this profile, the structural parts will not rotate. On 16-valve engines, it is imperative to use a pipe, since this power unit is heavier in weight. After you have made the first welding points and secured the part, remove the screws and weld the structure again.
Final processing
Primer, anti-corrosion treatment, installation of new sound insulation and installation of the interior with electrical connections are the final stage of work on the bottom. For external treatment, you will need bitumen mastic or anticorrosive Body 930. The product has a budget cost and is highly resistant. The mastic forms a dense but elastic protective layer that does not allow moisture to pass through and protects the iron. Final work step by step:
- Clean weld seams.
- Treat welding areas with a primer containing zinc.
- Cover the inner surface with mastic and install new sound insulation.
Preparation for repair
Repairing the underbody of a VAZ involves a set of measures:
- preparation of the necessary material and tools;
- interior dismantling;
- installing the car on a lift or repair plane;
- cutting out rotten elements of the bottom during partial or complete replacement of a part, if it is necessary to completely digest the body;
- patch welding or bottom welding;
- anti-corrosion treatment;
- installation of interior, replacement of sound insulation, additional work.
To repair the body yourself, you will need to prepare the following materials and tools:
- A new bottom or part of it for a complete replacement, metal patches for a partial repair. It is recommended to take industrial steel with a thickness of up to 1-1.2 mm. The standard metal on the body of the VAZ 2114 has a thickness of 0.9 mm for the bottom, 0.8 for the sills.
- Angle grinder, grinder with a set of replaceable discs from metal, for processing a weld seam, stripping metal from corrosion, to a soft attachment for grinding soil.
- Welding machine. For self-repair, it is recommended to use a semi-automatic machine using wire in a carbon dioxide environment.
- Electric drill, set of drills.
- Sound insulation sheets.
- Metal brushes, coarse and fine sandpaper, chisel, set of screwdrivers.
- Zinc-based primer, putty, set of spatulas, anti-corrosive agent for final processing.
The first stage of work is dismantling the interior and lifting the car onto the overpass.
Dismantling the interior
The bottom 2114 is a stamped part that is welded to the reinforcements of the side members and hinged panels along factory lines. Original replicas require no trimming and are ready for installation. Description of replacement in stages:
- The fuel is drained from the car and the battery is removed.
- The electrics are turned off, the front and rear doors are dismantled.
- The chairs and flooring are pulled out, and the sound insulation is removed.
- All plastic lining of the pillars is dismantled, the dashboard must be covered with a thick piece of rags.
- The glass is sealed on both sides with thick paper.
- An inspection is carried out from the inside, rusty areas are tapped with a hammer, and the scale of work is determined.
The cost of repairs at a service station for a VAZ 2114 starts from 15,000 rubles. When replacing them themselves, owners can save at least 10,000 rubles. Repair kit price for independent work:
- replica – 3500 rub.
- anti-corrosion kit – 1000 RUR:
- rental of electric welding ─ 1000 rubles;
- sound insulation sheet ─ 300 rub.
Metal cutting process step by step:
- Use an angle grinder to clean the bottom from dirt and used anti-corrosion.
- Check the general condition of the metal and jacks.
- In case of partial replacement, cut out the rusty places with a grinder or chisel, and prepare patches.
- Sand the metal until white.
- Drill out spot welding points if the entire part is being replaced.
It is recommended to cut the metal for patches using metal scissors. Welding cutting is used if the driver has experience in welding. Otherwise, you may end up with a patch with convex edges, and the metal will be inconvenient to weld to the body.
Delivery by transport company
Delivery by one of the transport companies with a representative office in your city. Delivery time: 2-10 days depending on the distance of your locality from Togliatti. The most convenient and fastest way to deliver orders of different sizes. Delivery cost from 250 rub. depending on weight and delivery distance.
Orders are sent by transport companies based on 100% payment for the order. Dispatch by transport companies PEK, KIT, Baikal-Service is carried out on Wednesday, Thursday and Friday.
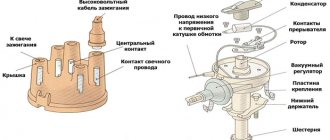
Radiator frame
This body part of the “tens” is called a TV. The element is replaced in the event of a strong front impact, when the “original” part is easier to replace than to repair.
As a rule, in an accident during a frontal impact, the upper frame and the beam, which serves as a reinforcement for the bumper, are most deformed. But the TV is changing completely in any case.
Body parts for VAZ 2110
According to experts, replacing a TV on a “ten” is much easier than on a “nine” or other models released by AvtoVAZ earlier. This is explained by the simplicity of the design of the “Desyatovskaya” radiator frame.
The TV is mounted to the body using welding points. They are located in 4 places - the radiator frame is attached in the places where it connects to the wing reinforcements (“booms”) and to the side members. To dismantle the TV, it will be enough to drill out the points in these places and then cut them off with a sharp chisel.
After the new radiator frame is put in place, the welding areas will need to be thoroughly cleaned with an emery wheel and puttied. In places where the frame touches the body, sealant must be applied.
Sequencing
First, we’ll tell you how to replace this part yourself. You will need to prepare the car - sequentially disassemble it from the engine compartment so that you have access to the radiator. Dismantle it and the old part.
Next you need to do:
- Sand the new part (it is covered with shipping primer) and re-paint it with automotive primer. Do this only in advance, since later it will be impossible to do this work from the engine compartment.
- Use a chisel and hammer to remove the old grate.
- Clean the welding points, putty and coat with primer. Take measurements and weld the new frame. Place the weld points where they were.
- Paint the outside of the structure. It is advisable to additionally cover it with anti-gravel.
- Reassemble the car in reverse order.
Replacing the TV is extremely important, as if it is weak, it may sag and break. The cost of this work at a service station is quite high, so car enthusiasts often try to make the replacement themselves.
When repairs are required
For all VAZ models, the body was made of black or low-carbon steel of class 08Yu, 08KP. The parts were not galvanized, but were coated with a polymer anti-corrosion composition; the film protected the bottom from moisture for up to 6 months, then natural oxidation processes began. After the purchase, drivers had to carry out thorough anti-corrosion treatment of the metal.
Repair or complete over-welding of the bottom of the VAZ 2114 will be required in the following cases:
- It is impossible to jack up the car; the jacks fall through.
- The floor in the car became uneven, the metal sagged from corrosion.
- The driver's seat cannot be adjusted; when the doors are closed, increased gaps appear.
- Noticeable areas of corrosion on the sills and wheel arches. If you lift the car onto an overpass and check it with an awl, the anti-corrosion layer from the bottom will fall off, and traces of rust will be clearly visible.
Design Features
Model 2114 was built on the basis of the VAZ 2109, it is a restyled version. The hatchback received a new steering column, a modernized dashboard, an updated one and a half liter engine, redesigned for Euro 2 protocol. The VAZ 2114 shares the same wheelbase with the Nine, 2460 mm. The configuration of the bottom panel is the same for the models.
Are there any differences between 2114 and 2115
The VAZ 2115 model is considered a related model. The hatchback is built on the basis of the VAZ 21099 with various transport sizes and shares one wheelbase with the entire Lada Samara family. The standard dimensions of the bottom and sills for VAZ 2108, 2109, 21099, 2113, 2114, 2115 models are the same and interchangeable.
The bottom of the VAZ 2114 structurally consists of the following parts:
- central reinforced panel;
- driver's side panel;
- side passenger;
The factory stock bottom is a one-piece stamped part, primed and painted black. The polyethylene coating acts as protection.
Hood
VAZ 2110 body parts
Like other body parts, the hood is dismantled for the purpose of replacement or repair. In this case, work must be performed with the help of an assistant:
- The location of the washers located on the hinges of the body part is marked with some sharp object or chalk. This is done for the convenience of reinstalling the body element;
- The hood is opened, then the safety hook is removed from the element using a 10 key. It is held in place by 2 bolts;
Replacing the hood with a new carbon one
- Rubber plugs are also removed from the hood;
- The caps suffer the same fate (there should be 17 of them);
- The nuts securing the hood on both hinges are unscrewed.
- The hood is removed from the studs;
- The new hood is installed in place of the old one. It is imperative that the fastening nuts are tightened and the hood is adjusted to the correct position.
A new or repaired hood on the “ten” can be soundproofed or upgraded in various ways.
How to check the system
In any case, replacing the VAZ heater radiator becomes possible only after diagnostics have been carried out. It is imperative to make sure that it is the heater radiator that is to blame for the heater malfunction. How to carry out the necessary diagnostics?
- First you need to bend the central instrument console where the computer is installed. In this case, the shield should be disconnected from the delivery note, after which the housing of the heating equipment will be opened.
- Now you should take a flashlight, with which you can find a place where water is still oozing. It is mandatory to check the tap and pipe.
- The next stage is assessing the leaks. If the leak turns out to be small, it cannot always be noticed in the cabin. Only after a thorough examination can you understand what the essence of things is and how to proceed in the future.
If a problem persists with the radiator, it needs to be replaced. Most often, the task can be successfully completed in the shortest possible time.
Final processing
Primer, anti-corrosion treatment, installation of new sound insulation and installation of the interior with electrical connections are the final stage of work on the bottom. For external treatment, you will need bitumen mastic or anticorrosive Body 930. The product has a budget cost and is highly resistant. The mastic forms a dense but elastic protective layer that does not allow moisture to pass through and protects the iron. Final work step by step:
- Clean weld seams.
- Treat welding areas with a primer containing zinc.
- Cover the inner surface with mastic and install new sound insulation.