Rear window replacement
You can replace the rear window of a VAZ 2109, as mentioned above, yourself. Before installing new glass, you must remove the old one.
Removal
To do this, you should:
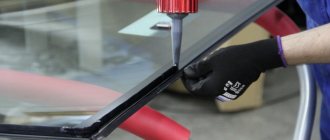
Take a screwdriver and stick it into the seal on which the glass is attached. It should be inserted approximately 5 mm.
Note: it will be possible to insert the screwdriver deeper, but you should not do this, as you may make a hole that is too deep.
- Push the seal out. First you need to pull out a small piece. The downside is that you cannot pull out the entire seal by pulling it. It's just quite fragile, so it breaks quickly.
- Carefully move the screwdriver a few cm. Tear off another piece of the seal.
- Step by step you can get rid of everything.
Note: since the glass is secured with a seal, as soon as it is gone, it will begin to wobble. Therefore, you need to get rid of the seal slowly and carefully so that the glass does not fall out before it is needed.
After the seal has been removed to the upper side corner, you can begin to remove the glass itself.
Don't try too hard when removing the glass. Usually it cannot be kept completely intact.
It certainly cannot be reused. The main thing is not to damage the body of the vases, otherwise additional repairs will be required.
Preparing for installation
Before you begin installing new glass, you must do the following:
Wipe the edges with degreaser to make it easier to install the seal. That is, the cleaner the glass, the better the seal will fit.
Note: If the old seal was removed carefully, it can be reused. However, in order to remove it carefully you will have to suffer. Therefore, it is advisable to use a new seal.
- Put on the seal. First, it is distributed in the corners, and then pressed against the sides of the glass.
- After this, you should install a lock, which is a small wedge that looks like the letter P. It needs to be inserted so that it is in the center of the seal, but runs along the entire perimeter.
Note: The wedge should be stretched slightly before installation. If you don't do this, then there simply won't be enough. Usually you can stretch it up to 20 cm!
The wedge is installed as follows: first you need to insert the long part, then the short one. This needs to be done around the entire perimeter of the glass. If a small part of the lock remains intact (that is, it is redundant), then it must be cut off, otherwise it will interfere with subsequent actions.
Installation
Installing the rear window may be necessary when replacing it, or when tinting it. Although usually, tinted glass is new, since, as stated earlier, it is almost impossible to remove the rear window without damaging it. In order for the installation to be completed successfully, you should find a rope that is long enough to completely surround the sides of the rear window. It should be quite tight, since it cannot be allowed to tear. If part of the rope remains in the seal, it will be very difficult to pull it out. The installation of a new rear window should be done as follows:
- Determine where approximately the middle of the rope is. Insert this part into the upper side of the seal.
- The seal has two grooves. You need to find the one that is closer to the top of the glass.
- Use a screwdriver to insert the rope into the groove until it stops. You need to insert the rope to the middle of the glass area. We need to stop there. One end of the rope should hang freely on one side. In this case, the second one must be stuck into the seal.
- On the opposite side, you should also insert the rope until it intersects with the end of the previous rope.
- When they intersect, the end of one must be placed on the end of the other.
Note: the ropes must overlap each other. The overlap should vary between 5-10 cm.
- The free ends of the rope should be pulled into the cabin.
- Only after this can glass be placed in the opening. It is advisable to have someone help, as it is quite heavy and can be accidentally dropped. The bottom of the opening should fit into the outer groove.
- You need to press lightly on the glass. At the same time, it should press even better into the seal. In addition, this way it will sit in its place much better.
- The rope should be pulled towards you from both sides (as if you need to tie a knot).
- Stretch half the rope to the bottom corners of the glass.
- After this, smoothly seat the glass.
- To make it easier to pass the left corners, you need to “twist” the rope clockwise, and the right corners - vice versa.
Protection from dirt of the interior and body
Replacing the rear side glass in a VAZ 2109
Replacing the rear side glass on a VAZ 2109
Today, many are interested in the process of changing side glass itself, namely detailed operations and step-by-step procedures for its installation. If you follow the instructions and recommendations, you can do the work yourself, but if for some reason this is not possible, it is better to contact an experienced auto mechanic who will carefully remove the damaged glass, preserving the molding.
Note! Installation of new glass is carried out only after removing the damaged product and cleaning the interior from fragments.
Replacing rear side windows in a VAZ 2109
Types of damage
There are 2 main types of damage to car windshields: chips and cracks. Chips are small, most often located at the edges, areas of destruction of one of the triplex glasses (usually the outer one). You can operate a car even if there are a large number of chips without urgently replacing the glass.
In turn, cracks are through-cut damage that has a longitudinal or branched shape. They can appear even from a small pebble, but, regardless of their size, they pose a serious threat. Thus, over time, cracks in the glass can increase, gradually occupying an increasingly larger area, which can ultimately lead to a weakening of the glass surface and its complete loss.
Considering that this can happen even while driving, it is worth understanding that the only solution when cracks appear should be to replace the windshield (and, if necessary, replace the rear window of the VAZ 2114).
Replacing the windshield of a VAZ 2101-2107 (how to install glass on a VAZ classic)
It is worth noting that in some cases (for example, when the crack occupies a small area), temporary measures can be taken to prevent its increase, which will allow you to use the car for some time without replacing the glass.
- drawing 5 mm lines using a glass cutter in front of all ends of the crack;
- drilling small holes in front of each end of the crack using a pobedit or diamond drill;
- contacting a car service to seal (seal) the crack.
What types of glass are there for car windows?
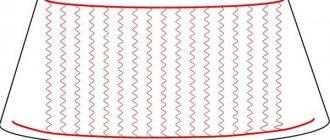
In the latest VAZ 2109 models, car glass is manufactured using high technology. Such products differ from simple glasses in their high strength and design features. They allow all road users to protect themselves in the event of an accident from injury due to broken glass. The production of rear glass is carried out using one of two technologies:
- Triplex. This technology is most often used for the manufacture of rear windows, windshields, side windows, and inserts in hatches. Triplex is translated from Latin as “triple”; the design involves multilayer glass production: two or more layers of organic or silicate glass. During the manufacturing process, they are glued together with a special film, then pressed at a certain temperature. When broken, broken parts of glass remain on the film, which prevents them from breaking into numerous fragments that have very sharp edges.
- Stalinite. In this case, the glass is tempered: at first it is heated to a certain temperature, then it is cooled evenly and gradually in the air flow. During destruction, the glass breaks into a large number of small fragments with blunt edges, which causes the least harm to the driver and passengers in the event of an accident. They are used less often on modern cars, but the lower price is a temptation to install such elements.
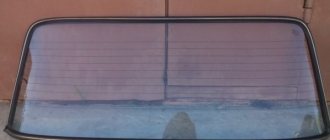
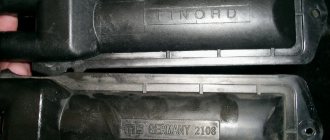
Tip: When purchasing a rear window, you need to carefully consider the markings on it. It is made using the chemical etching method, black in color, the place of application is clearly visible in the photo.
Marking of the rear window of VAZ 2109
Installation and connection diagram for VAZ 2109 window regulators: step-by-step instructions with photos
- Before starting work, you must turn off the power supply to the vehicle's on-board network from the battery. Or we separately turn off the power circuits for the cigarette lighter and the backlight of the instrument panel and buttons, because The power supply wiring for the power windows will be connected to these circuits in the future.
- Remove the door trim. It can be removed quite easily, but it is better to stock up on mounting pins.
- First of all, we dismantle the mechanism of the standard manual window lifter, fixing the glass (for example, using office tape) in a position that provides access to the place where it is attached to the lifting mechanism.
- Unscrew the bolts securing the door glass to the standard window lifter mechanism.
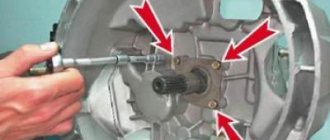
- We dismantle the guide of the standard window lifter mechanism (trapezium). Unscrew the bottom nut:
- Two nuts in the middle:
- Top nut:
- The guide is free, now all that remains is to unscrew the three nuts securing our window lifter in the area of the rotation handle.
- We take out the entire door window lifter mechanism. To do this, we bring the lower pin of the guide into the hole in the door (see photo).
- By pressing with a screwdriver, we remove the upper fastening of the guide.
- Done, the window lift mechanism is disconnected. We take it out of the door cavity.
- That's it, the standard mechanism has been dismantled, let's start installing a new one. The new mechanism is attached using standard fasteners; you don’t have to drill anything new. We place the window lifter mechanism into the inner cavity of the door through the largest technological hole in an “assembled” form (otherwise it won’t fit), as if in the “open” position of the glass.
- We fasten the mechanism inside the door using two studs, which we insert into two holes that previously held the middle part of the guide of the standard VAZ 2109 window lifter. We combine them and screw on the nuts.
- The next task is to combine the mounts on the window lift linkage system with the mount on the glass. This can be done by supplying power to the power window motor contacts from an external power source, for example, any working car battery.
- When the lift mechanism is combined with the strip on the glass, we connect them using the bolts from the kit.
- It is advisable to lubricate the rubbing parts thoroughly.
- The mechanical part is complete, let's move on to the electrical part.
- We estimate the route for wiring from the door from the electric motor of the window lift drive to the installation location of the buttons - activators.
The standard place for buttons in the high panel of the VAZ 2109 is two plugs to the right of the cigarette lighter, and we install them there. The hardest part is running the wiring from the door into the rack and then out of the rack under the dash. For this purpose, there are technological holes in the rack. You may need to use a special probe. The wiring is done with a wire with a cross-section of at least 1 mm. sq. We lay the wires in such a way that they do not touch any moving parts of the door or the ESP mechanism itself. We will take power for the electric windows from the cigarette lighter. We make electrical connections according to the following diagram: When the circuit is assembled, it is necessary to connect the battery power and check the correct operation of our system. We turn on the side lights and check the correct operation of the backlight of the ESP activator keys. If the backlight does not work, swap the sockets on the contacts of the keys, indicated in the diagram as 3 and 6. You can install the window lifters in the standard way, here are two diagrams:
Connection diagram for electric windows on a VAZ 2109 with mounting block 17.3722 (before 1998)
Connection diagram for electric windows on a VAZ 2109 with mounting block 2114-3722010-60, 2114-3722010-10 and 2114-3722010-18 (new model)
You can read more about the types of mounting blocks for front-wheel drive VAZs here.
- We check the functionality of the window regulators. The glass should move smoothly, without jamming or jerking, and should not come out of the guides. To facilitate the movement of glass in the seal, it can be treated with silicone grease.
- All that remains is to reinstall the door trim.
- That's it, the installation of the window lifters is complete, let's enjoy the completed modification!
Complete analysis of the rear light of the VAZ 2114
Completely disassembling the rear light
, for further tuning with LED strip.
The note. If the glass is slightly larger, this gap is necessary for an expansion joint. Just like temperature differences, metal and glass operate in different ranges.
Replacing headlight glass on a vase 2109
To fix the glass with adhesives, you must apply a load. This can be done using the rubber band from the automatic care kit. It's necessary:
- Secure with a hook above the body of the machine.
- With a slight stretch, the second end hooks onto the bottom of the machine frame.
- The rope should be pressed tightly against the glass because you can place a wooden block under the headrest.
- Leave the glued parts for one day.
Side glass replacement process
To change the side glass on a VAZ 2109, you need to prepare a screwdriver, as well as size 8 and 10 keys. The rear left door consists of an armrest, a window sill, side and turning glass, a window lifter handle, and a handle for the internal lock drive. Now let’s turn our attention directly to the list of necessary work, without which it is impossible to replace the glass:
Note! The upholstery is attached to the door using 7 plastic holders.
Replacement of rear side windows of VAZ 2109
Note! The glass is placed on the limiter in the same position.
Side rear window of VAZ 2109
Replacing the side one on a VAZ 2109
Note! The window lifter handle should be placed so that with the glass raised to the limit, it deviates from the vertical to approximately 45 degrees forward.
As you can see, the process of changing the side glass does not involve any particular difficulties, so you should not rush to contact a service station. Today, with the help of videos and photos, you can carry out repair work yourself. Detailed instructions are also provided, allowing you to do everything correctly, taking into account all the subtleties. Since the price of auto repair services is not suitable for everyone, most drivers inevitably become experienced auto mechanics.
Source
Windshield installation
It is better to install the prepared installation kit into the car body together with an assistant and do it in the following order.
Attach the kit with the seal to the outside of the frame. Pass the free ends of the mounting cord into the vehicle interior. Start installation from the middle of the bottom contour of the frame
While your assistant holds the kit pressed against the frame with its bottom edge, you begin to carefully pull the mounting cord into the interior. The cord carries along the inner leg of the letter “H”. Due to deformation, it goes over the side of the frame and, as the cord is pulled out, it takes its normal position on the interior side
In this case, the outer leg remains outside, and the side of the frame, as expected, is placed between them. Carry out the installation symmetrically, with small movements, alternately pulling out one or the other end of the mounting cord. The assistant should constantly push the installed glass into place with light blows of his palm.
Finally remove the last section of the mounting cord from the middle portion of the top edge of the outer seal groove. Upon completion of installation, it is very useful to knock on the glass on both sides, pressing your fingers on the seal from the outside and inside at different points of the contour.
Start the engine, drive with sharp turns on a not very smooth road. Minor deformation and vibration will help the glass shrink properly in the frame. Installation stresses will disappear, the fit will automatically adjust, and the sealant will harden in a few days.
How to reinstall a VAZ element
If we describe the replacement of the rear window on a VAZ 2106, then we must take into account that the “six” does not have window heating. To work here, in addition to an assistant, we need:
- flat screwdriver;
- blanket;
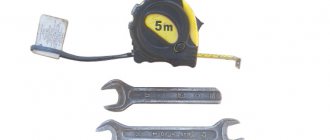
- nylon cord 5 m;
- soap solution, brush.
Also read about repairing a crack in a car windshield and replacing a rear engine mount.
Begin.
- From the trunk side, use a screwdriver to pry up the trim trim in each of the lower corners and remove it.
- We remove from the inside, in the cabin, all decorative trims covering the edges of the window.
- Starting from one of the lower corners, bending the seal with a screwdriver, gradually squeeze the glass out along with the seal. The bottom corner of the window is released first, and then everything else.
- We pull out the glass by the bottom and side parts. Having taken it out completely, remove the seal from the middle to the edges.
- We inspect the seal and also clean its drainage holes with a screwdriver.
- We put the seal on the new part removed from the blanket, first moving along the bottom side, then along the side, then along the top side and again along the side.
- We insert the rope into the groove of the seal intended for the edge of the body along the entire perimeter, and at the end of the process there should be ends of the rope of 20 cm each.
- We coat the upper part of the seal and the edge of the body on which the rubber element will be placed with a soap solution.
- We place the part of the window where the ends of the rope come out onto the edge of the body. The assistant goes into the salon and begins to carefully pull out the ends of the rope. At the same time, we press on the outside and tap on the glass with our hand. As a result, the window should sit in its place along with the seal.
- We put everything that was removed back in place.
Replacement principle
When replacing the windshield on a VAZ 2109 car, it is necessary to take into account its dimensions
When purchasing, it is important to compare the auto glass article number with the data indicated on the factory element. The size of the frontal fragment is standard, as on all VAZ models
Rules and nuances of replacement:
The rubber seal should fit tightly in all corners, and the structure itself should fit into the side, top and bottom sides of the frame. Installation of glass requires the installation of an internal lock. The locking mechanism is an important element during installation; it is shaped like a wedge. It needs to be installed in the center, but the wires should be routed around the entire perimeter. Careful removal of the structure is required first.
It is important not to damage the frame. If the size is slightly off, it can be easily corrected with a rubber mallet. Anti-corrosion treatment of the element and frame is also necessary. It is recommended to use a rust modifier and primer
After drying, sealant is applied to the frame, then sealing material is installed. The external and internal grooves of the frame are lubricated.
The length of the nylon cord is equal to the size of the car glass. It is better to purchase this material with a diameter of at least 4 mm. The quality of the cord is checked by touch; it must have a slippery surface. The nylon fits into the grooves of the seal.
Glass replacement
It is better to buy glass and a glass holder as a set for replacement.
To replace, you need an extension, a wrench, an 8 and 10 mm socket and an assistant.
The side glass is blocked with a screwdriver to prevent it from falling out. The door trim is removed. A felt-tip pen marks the places where the glass frame is attached to the door on the frame and on the door. The bolts securing the glass frame to the window regulator are turned out.
The window regulator bar must be fully raised. The cable on the roller from the bottom of the glass is dismantled. Then the seals (velvet covers) are carefully removed.
Hold the glass during this time so that it does not fall out. After removing the seals, the glass is lowered down about 10 cm, tilted to the side and removed from the groove.
The new glass is installed in the reverse order. Apply WD-40 or a similar lubricant to the glass frame, insert the glass and leave to dry. After the grease has dried, the glass is installed in the door. New glass is installed in the seals.
If the seals have become unusable, new ones are cut out of rubber, while the old ones are used as patterns.
The glass with seals is inserted into the groove, aligned and lowered into the stopper. The window lifter handle is lowered to its lowest position. The glass is fixed with bolts and the cable is installed in its original place.
The operation of the window regulator is checked and, if necessary, the cable tension and the position of the seals are changed.
Secrets of installing side windows 2109-2115
In this post I want to show how and at what angle the side windows are inserted and removed from the doors.
It seems like there is nothing complicated. But those who do this for the first time often encounter such a problem. They twist the glass this way and that, eventually they take it out but scratch everything. I also struggled at first. With the rear ones in general. When I inserted it, I kept turning it this way and that for a long time. I even ran home to watch it on the internet. But I didn't find anything. Then I picked up the angle. And I decided to take a photo and post it. You never know who will find this useful. and will help avoid scratches.
So: Front door glass. They are installed and removed from the outside of the frame. You don't have to take off the velvet covers.
With the front ones it's not so difficult. But with the rear it is more difficult. The shape of the frame gets you confused.
Rear windows are installed and removed from the inside of the door, the velvet covers must be removed. We lower the beveled side down and remove (insert) the glass at an angle of approximately 45 degrees.
Maybe someone will find this information useful. and will help avoid scratches on the glass and save some nerves)
Source
Re-equipment of the "nine"
If you were driving a car that had electric windows installed, and even more so if you spent a long time behind the wheel, then in the future it will be difficult for you to do without electric windows. You get used to good things quickly, and to good and comfortable things even faster. But since the ninth model Lada car does not initially provide for the installation of electric windows, and every self-respecting owner of an always up-to-date “nine” wants to get such control, especially for this case it will be described here how you can independently equip your swallow with electric windows.
Required tools and materials
- Tinting film, for VAZ 2109 - at least 3 m.
- Baby shampoo or any high-quality detergent, at least 100 ml.
- Rubber scraper.
- A sharpened knife or blade.
- Sprayer in the amount of 2 pieces (needed to dilute the shampoo).
- Warm water.
- Dry wipes or lint-free cloth.
- Special hairdryer.
- Metal meter ruler.
- Assistant.
LLumar film
To quickly complete the task, the assistant will provide significant savings in time and resources, and will also significantly increase productivity. Prepare all this before starting work and your successfully tinted car is almost ready.
Replacement
There are two options for replacing the windshield on a VAZ 2114:
Contact a car service. Fast, simple, but expensive. On one's own. If you have experience in repair work of this kind, time, patience, and an assistant, then dismantling is possible in your own garage.
How to remove
The work begins with the fact that we remove all unnecessary things. Side trims, wipers - this interferes with dismantling. Now we remove the old glass: starting from the top corner, squeeze it out along with the rubber. It is advisable to have someone help. If you pry the seal with a flat screwdriver from the inside, it will be easier to remove the headband.
Clean the grooves. The replacement now needs to be replaced with a seal. If the rubber is cracked, it is also advisable to replace it.
How to replace frames and seals
Replacing the windshield frame requires more effort, but this operation can be done at home.
We measure the frame. Its width is 680 mm in the center and 1378 mm diagonally. Further actions:
- We weld the fasteners on the sides.
- We make an amplifier, weld it to the frame from the outside.
- We clean the frame and the cavity for the wipers.
- We prime it twice.
- Apply adhesive sealant.
- We evenly coat the frame and cavity with paint and weld it.
The seal needs to be replaced as it wears out. If it has shrunk in places and lost elasticity, then it is advisable to install a new one in the near future. To replace the front window seal of a VAZ 2114 you will need:
- a set of flat screwdrivers;
- stationery knife;
- putty knife;
- solvent for nitro paint;
- adhesive sealant.
To make installation easier, apply lubricant to the rubber seal and soap solution to the lower groove. You need to put a thin, strong rope inside the seal. Place the new seal on the glass. We pull the ends of the cord in the center of the bottom of the material. It is advisable to soak the cord with detergent.
Search
rear window replacement
on VAZ-2109
Rear window The car is a real assistant for the driver. It is through him that we see what our client can do, what is happening behind us, and correctly assess the situation. However, glass is a very fragile material, and if a stone or other loose object gets caught in it, it can crack or shatter into a large number of small pieces. For a temporary solution, of course, cover the gap with a thick film. But this, of course, is not an option. In the future, the rear window will need to be replaced.
The car owner may have postponed this work until later, fearing serious expenses. In fact, our client is left to do everything possible to find the funds to purchase new glass and glue. The rest of the work is completed independently within 1-2 hours.
Replace the rear window on a VAZ-2109
Before you go to the store differently in the market and get a new rear window for your car. It is important that it fits your model correctly (pay special attention to heating and design features).
Then prepare the necessary tools. To get the job done you need. new glass (this is reasonable), special glue (ideally a two-component composition), new sealing rubber (you will need to throw the old one), a string for cutting glass, special suction cups (necessary for holding and lifting the glass). Additionally, tape, a knife, sandpaper and solvent are useful.
It is best to work in a well-lit area with sufficient maneuverability. If the weather outside is perfect, you can stay right next to the garage. Helping your partner replace the rear window is highly desirable. It is difficult to cope with such work without outside help.
Sources
- https://MasteraVaza.ru/salon/steklo-salon/vaz-2109-zamena-zadnego-stekla-760
- https://avtozam.ru/vaz/zamena-zadnego-stekla-lada-2108-vaz-2108.html
- https://maslo-5w30.ru/avto/zamena-zadnego-stekla-vaz-2109
[collapse]
Replacing the windshield on VAZ 2108, VAZ 2109, VAZ 21099
Welcome! Most people who periodically use their car have their windshield deformed from time to time, most often this happens from a stone hitting it, a bird flying past, or an accident. The windshield of a car plays a very important role; it creates additional rigidity for the car body, which has a very positive effect in the event of a collision.
Note! It is not recommended to leave a car without the glass removed for a very long time, because if the windshield is missing for a long time, the car body may become distorted; of course, you won’t see anything by eye, but this will make itself felt when installing a new glass!
What other glasses can be replaced using these instructions? Using this article, you can replace other fixed windows on a Samara family car in exactly the same way, since their replacement is carried out in the same way; fixed windows include:
- Front windshield.
- Rear trunk window.
- As well as small rear side fixed windows.
Protection from dirt of the interior and body
Replacing the rear side glass in a VAZ 2109
Regardless of how the broken glass is replaced, we must not forget about thoroughly cleaning and removing small fragments from the interior. Otherwise, there will be a risk of injury to both the driver and passengers. As a rule, even a minor crack grows into a large web. This is due to the strong “tension” of the glass. To prevent the crack from expanding, the technician must remove it.
Replacing the rear side glass on a VAZ 2109
Today, many are interested in the process of changing side glass itself, namely detailed operations and step-by-step procedures for its installation. If you follow the instructions and recommendations, you can do the work yourself, but if for some reason this is not possible, it is better to contact an experienced auto mechanic who will carefully remove the damaged glass, preserving the molding.
Note! Installation of new glass is carried out only after removing the damaged product and cleaning the interior from fragments.
Replacing rear side windows in a VAZ 2109
Selection and replacement of glass
When purchasing a windshield for a VAZ 2114 car, you need to take into account several important circumstances that influence the choice of a high-quality and durable product.
There are two ways to directly replace any damaged car part:
- With the help of specialists at the service center;
- Independently, with the help of others.
If you are not confident in your abilities, do not skimp on installing a windshield and trust the professionals.
If you nevertheless decide to use a more complex but budget option, that is, you are going to install the windshield yourself, you should remember that replacing the windshield of a VAZ 2114 is carried out approximately in the following order.
Free the removable windshield from the antenna, mirror, alarm, video recorder and other foreign objects that may be on it or glued to it. Remove the side trims on both sides. Remove the old windshield using gentle pressure from the inside. Start squeezing the “lobovka” outward from any angle convenient for you. Make sure that the seal is also removed from the car along with it. Take a closer look; if the parts are difficult to remove manually, use a flat-head screwdriver made of reliable metal. Pry up the part using the tool as a lever, this will make the glass come out faster. Squeeze the rubber seal over the metal edge of the body. At the same time, it will most likely not be possible to remove the triplex intact, since it is already damaged. There is no particular need for this, since using a windshield with numerous cracks poses a danger to the life and health of people in the car. But for your own safety, when removing old glass, use protective gloves to prevent cuts and be extremely careful. After removing the old windshield from the groove, the opening must be properly cleaned, get rid of the remaining sealant. Even if the old sealant remains intact after dismantling the windshield, it is still recommended to purchase a new seal and use it to install a new spare part. Pay attention to the corners of the seal. At the bend points there must be special holes for water to escape - “drainers” or drainage holes. The drainage holes of the seal and the car body must match, otherwise water, if it gets on the glass, will end up in the car interior. The new seal should be well lubricated, for example with sealant or silicone, which will simplify the installation of the new glass. Some experts believe that the use of sealant or silicone, although it makes the glass fit stronger, nevertheless complicates its removal in case of damage
So in this matter, rely on your own opinion. Place a lubricated seal on the new windshield. On the inside of the seal, place a thin thread of nylon around the entire perimeter so that the edges of the thread are in the middle at the bottom of the glass. Enlist the help of a friend: grab the “lobovuha” from different sides and insert it into the opening of your car, and then carefully press it to the seat. Lead the ends of the nylon cord inside the car, that is, into the interior. Next, one person should press the “lobovka”, while the other should carefully pull out the nylon thread from under the seal
When approaching corners, be especially careful, since it is at the bends that the nylon thread is most difficult to remove.
In car services, the process of replacing a windshield generally takes no more than half an hour, while replacing it yourself will take much more time. To make installation easier, special handles with suction cups are used, with which it can be easily lifted and inserted into the opening.
Only you can decide how to replace your windshield - yourself or with the help of specialists. One way or another, the presence of cracks on the windshield indicates the need to replace it as soon as possible. Don't risk your health and the health of your passengers!
Didn't find the information you are looking for? on our forum.
Side glass replacement process
To change the side glass on a VAZ 2109, you need to prepare a screwdriver, as well as size 8 and 10 keys. The rear left door consists of an armrest, a window sill, side and turning glass, a window lifter handle, and a handle for the internal lock drive. Now let’s turn our attention directly to the list of necessary work, without which it is impossible to replace the glass:
Note! The upholstery is attached to the door using 7 plastic holders.
Replacement of rear side windows of VAZ 2109
Note! The glass is placed on the limiter in the same position.
Side rear window of VAZ 2109
Replacing the side one on a VAZ 2109
Note! The window lifter handle should be placed so that with the glass raised to the limit, it deviates from the vertical to approximately 45 degrees forward.
Add a commentAdd a comment We recommend reading Heating the rear window of a VAZ 2110: design and repair Replacing the rear window of a VAZ 2109: how to do it correctly Removing the windshield of a VAZ 2109: how to do it correctly VAZ 2109: replacing a window lifter on your own
Glass (side, windshield and rear) is an invariable attribute of every car. Their main purpose is to provide the motorist with the necessary visibility and protect them from negative environmental influences (rain, cold, heat, hail, and so on). In fact, it is thanks to the glass that complete comfort in the cabin is ensured.
Cons of glass
But glass (especially side glass) has a big drawback - it is sensitive to mechanical stress. Thus, even a small stone hitting one of the side windows can lead to a crack or complete destruction of the surface. In such a situation, the only way out is replacement. Many car enthusiasts go to a service station and shell out considerable sums for the work of a master. What for? Replacing the front or rear windows on the doors of VAZ-2108-21099 cars is not difficult. The main thing is to strictly follow the instructions and have the necessary tools at hand.
We replace the front windows on a VAZ-2108-21099 along with a window regulator
The first thing to start with is to buy replacement glass. It is advisable to give preference to the product for your car model (this point can be clarified with a consultant in the store). In this case, the damaged glass must be removed as carefully as possible.
Before you start disassembling the glass, be sure to remove the door trim and remove the rear view mirror (it will interfere with operation). Then proceed in the following sequence:
If you are planning to change the window regulator, be sure to look at the markings on the bracket. Usually this place indicates which vehicle the device is intended for. For example, on the window regulator for the “eight” there will be VAZ-2108, and on the “nine” - VAZ-2109 and so on. In addition, after the main inscription there will be two more numbers - they indicate the type of glass (right or left).
We replace the rear windows on a VAZ-2108-21099 along with a window lifter
When replacing rear windows, the sequence should be as follows:
If necessary, treat the window lift cables with a special lubricant (in case of replacing any of the front or rear side windows).
Inspect the quality of the glass rise, the absence of distortion, and the tightness of contact with the frame. If there are no complaints, then you can safely finish the work and be proud of your achievement.
Conclusion
Changing the side windows in the front and rear doors and replacing (if necessary) the window regulator is a matter of a maximum of 30-40 minutes per glass. At a service station they may ask for 1,000-2,000 rubles for such work. Thus, when replacing it yourself, the savings are significant. All that remains is to decide on this step, buy replacement glass, prepare a minimum set of tools and act. Good luck.
Home • VAZ • 2109 • Body
In order to remove the rear door on a VAZ 2109, follow these steps:
Open the door and remove the two bolts securing the limiter bracket to the B-pillar
Unscrew the two bolts securing the upper and lower door hinges to the B-pillar and remove the door. Installation of the VAZ 2109 rear door is performed in the reverse order of removal. Before final tightening the bolts securing the hinges to the B-pillar, close the door and position it so that the gaps in the openings around the entire perimeter are the same. Then carefully open the door and finally tighten the fastening bolts.
Replacing the window regulator and glass on a VAZ 2109
In order to install the rear door glass on a VAZ 2109 or replace the window regulator, follow these steps:
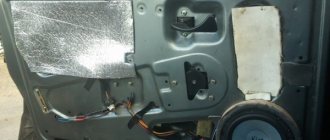
Lower the window all the way down and remove the rear door trim in the same way as removing the front door trim. The photo shows the location of the rear door trim mounting pins
Remove the inner lower glass seal
Remove the three holders, two on top and one on the bottom, using a screwdriver. Remove the rear protective film from the door
Unscrew the two bolts securing the glass frame to the window lifter slide, holding the glass. Carefully lower the glass down
Unscrew the two lower and one upper nuts securing the window lifter guide
Unscrew the three nuts securing the window lift mechanism
Remove the window regulator from the door
Remove the outer lower glass seal
Remove the upper seal of the rear door of the VAZ 2109
Turn the glass back and remove it from the door
Check the tightness of the glass in the frame. If the clip does not fit tightly, replace the glass along with the clip. Installing the rear door glass of a VAZ 2109 with a window lifter is performed in the reverse order of removal.
Installation of electric windows on a VAZ
The procedure is performed in the following sequence:
- temporarily remove the glass seal located on the inside of the door;
- remove the glass, and then dismantle the window regulator fastening mechanism;
- we install devices that will operate from an electric drive;
- connect the negative terminal to the battery and check the operation of the new window regulator;
- We install the glass in place and trim the door.
Unlike conventional mechanical devices, power windows are not equipped with traditional gear reducers, but with a special drum. The shaft of a DC electric motor is inserted into its hole located in the center. In this case, the motor is only a component of the gearmotor, on which, as we found out earlier, the speed and quality of raising and lowering the windows depends.
Installation of the lifting device is quite simple. It starts with disconnecting the battery. After this, use a curved screwdriver to unscrew 3 screws, unfasten the door trim latches and remove the door pocket. Using a thin screwdriver, pry off the handle (latch) of the window lifter - the tip of the tool is inserted into the recess between the latch and the socket.