Step-by-step procedure with photo support for replacing brake pipes on a car.
Leakage of brake fluid and depressurization of the entire brake system can be caused by damaged pipes through which brake fluid moves to each brake mechanism (wheel). If this happens, then the car owner will have to work to replace them, which, as a rule, is carried out with the car raised. The car can be raised with a jack and more bricks or other hard objects can be placed so that you can get to the pipes and change them. But usually the car is taken to a car service center where there is a lift, so it will be easier to work. The procedure itself is not complicated, more fuss will be with pumping the brakes, although this should not cause problems even for a novice car owner. The procedure was carried out on a VAZ 2110 car, but this can be done on any other brand.
Step-by-step procedure for replacing brake pipes:
1. Remove the “–” terminal from the battery.
2. Raise the car on a lift.
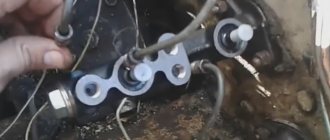
4. To remove the plastic brake pipe protection from the pan, you need to unscrew the three nuts that secure it.
5. Next, remove the metal plates and remove the tubes from the holders. If the holders were subject to deformation or were broken, they must be replaced with new ones.
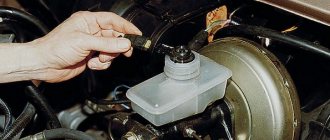
6. Now we install new brake pipes, if necessary, new holders with protection and screw the pipes to the main brake cylinder in the reverse order.
Under the influence of aggressive environmental factors, brake pipes and hoses wear out and therefore periodically need to be replaced. Timely replacement of these elements is a guarantee of trouble-free operation of the machine and your safety. In this article we will answer the following questions:
- How often do brake lines and hoses need to be replaced?
- How to carry out repairs yourself?
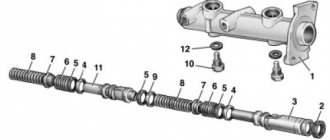
Scheme
The diagram of the VAZ 2109 brake system is quite simple and does not have any complex parts. This simplifies its repair and makes it an ideal car for novice car owners.
Generally speaking, it consists of:
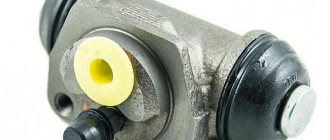
- Main brake cylinder;
- Working mechanism of the brake;
- Brake booster of pneumatic vacuum type;
- Contact pipelines with high pressure;
- Expansion tank into which brake fluid is poured;
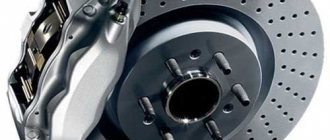
- Wheel brake discs located on the front axle;
- Brake drums for wheels located on the rear axle.
Below is a drawing of the VAZ brake system.
The main stages of replacing brake pipes on a VAZ 2109, 2110
You can replace the pipeline lines in the direction from the main brake cylinder to each wheel according to the following diagram.
- Disconnect the battery terminals.
- Raise the car to the desired height using a jack.
- Remove the car wheels.
- Using a “10” wrench, unscrew the nut securing the tube to the master cylinder and install a plug for dust and dirt in the supply hole.
- Carefully release the pipeline towards the wheels. Remove the protective plastic box and remove the line from the metal and plastic holders. Try to do this carefully so as not to damage the clips.
- Unscrew the brake hose fitting and remove the damaged line.
- Start installing the new tube in the opposite direction: from the wheel to the master cylinder.
- Reinstall all holders, replacing worn or damaged parts as necessary.
- Blow out the pipeline with compressed air, connect it to the system and bleed the brake system according to the instructions, replenishing the missing fluid as necessary.
When to change hoses
The service life of brake rubber pipes is about 3 years if the car is used regularly. A poor-quality hose may leak after six months or 2-3 thousand kilometers, or even earlier.
In order not to lose the brakes while driving and not become the culprit of an accident, the owner of the “seven” must constantly monitor the technical condition of the flexible hoses and immediately change them if the following signs are detected:
- when many small cracks appear, indicating critical wear of the rubber shell;
- in case of detection of wet liquid stains, which most often appear near the very tips;
Most often, the pipe breaks near the tip, and fluid literally floods the steering rod - in case of mechanical damage and rupture of the pipe;
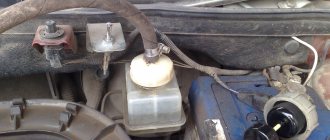
All the liquid can leak out through a through hole in the pipe, which is noticeable by a decrease in the level in the expansion tank - a decrease in the level in the expansion tank is another reason to check the integrity of all connections;
- It is also recommended to replace the hoses after purchasing a used car.
To identify cracks, the pipe must be bent by hand, otherwise defects may go unnoticed. A friend of mine discovered a fistula in the hose in this way, and quite by accident - he was about to change the upper ball joint, while disassembling it, he touched a rubber tube with his hand, and brake fluid flowed from there. Until then, the hose and surrounding undercarriage components remained dry.
To identify cracks in the rubber part, the hose must be bent by hand
If you ignore the above signs and drive further, the flexible line will break completely. Consequences: the fluid will quickly leak out of the circuit, the pressure in the system will drop sharply, and the brake pedal will fall to the floor when pressed. To minimize the risk of a collision in the event of a brake system failure, take the following steps promptly:
- The main thing is don’t get lost and don’t panic. Remember what you were taught in driving school.
- Pull the handbrake lever to the maximum - the cable mechanism operates independently of the main fluid system.
- Stop the engine without pressing the clutch pedal or changing the current gear.
- At the same time, monitor the road situation and use the steering wheel, trying to avoid collisions with other road users or pedestrians.
The advice regarding turning off the engine is only suitable for Zhiguli cars of the VAZ 2101-07 series, which are not equipped with hydraulic or electric power steering. In modern cars, you should not turn off the engine - the steering wheel will instantly become heavy.
Video: diagnostics of flexible brake pipes
Features of replacing brake hoses
When replacing brake pipes on a VAZ 2110, it is a good idea to check the condition of the elastic hoses. If you notice even minor cracks and mechanical damage on them, replace them. Also install new hoses if the service life of the old ones has already exceeded the required limit.
The elastic hose replacement scheme consists of the following steps:
- Clean the cylinder well with a wire brush, treating it with rust remover if necessary;
- Using a “14” wrench, unscrew the wheel caliper fitting;
- Plug the caliper hole to prevent dirt from getting into it;
- Using wrenches “17” and “10”, unscrew the fitting and disconnect the hose from the tube;
- Remove the elastic hose holder;
- Install the new hose in sequence from tube to caliper.
Replacing the brake system elements described above is not a very pleasant matter. However, if you are going to replace the piping and hoses, be glad that you won't have to do it anytime soon.
Brake system
Replacement caliper assembly 1 pc.
Cleaning the front brake caliper 1 pc.
Front brake caliper bulkhead 1 pc.
Replacement front brake disc kit
Purpose of flexible pipes
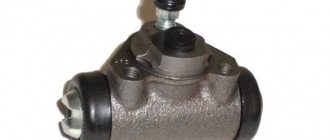
The contours of the VAZ 2107 liquid brakes are made of metal tubes leading from the master cylinder (abbreviated as GTZ) to all wheels. It is impossible to connect these lines directly to the working cylinders, since the wheel brake mechanisms are constantly moving relative to the body - the chassis absorbs unevenness, and the front wheels also turn left and right.
The brake circuits of the "seven" use 3 flexible lines - two on the front wheels, one on the rear axle
To connect rigid tubes to the calipers, flexible connections are used - brake hoses made of moisture-resistant reinforced rubber. The “seven” has 3 pipes - two on the front wheels, the third supplies fluid to the brake pressure regulator of the rear axle. Short thin hoses between the expansion tank and the gas turbine engine do not count - they do not have high pressure, spare parts rarely become unusable.
Flexible eyeliner consists of 3 elements:
- Textile fiber reinforced flexible hose.
- A steel fitting with an internal thread is pressed onto one end of the pipe, into which a mating sleeve of the metal tube is screwed. There is a groove on the outside of the tip for fixing the element to the car body with a special washer.
- The shape of the second fitting depends on the purpose of the hose. To connect to the front mechanisms, an eye with a hole for a bolt (the so-called banjo fitting) is used; on the rear contour there is a conical tip with a thread.
The front brake circuit pipe is equipped with a banjo fitting for an M10 bolt
The first end of the hose, connecting to the circuit tube, is always attached with a fixing bracket to a special bracket on the body. On the rear axle the second tip remains free, on the front wheels it is additionally fixed to the calipers with overhead brackets. To prevent liquid from seeping through the threaded connection, 2 copper sealing washers are put on the bolt.
A cone with an external thread is screwed into the tee, the second end of the rear hose is connected to a metal tube
Please note: the hose eyelet for the front wheels is made at an angle relative to the longitudinal axis of the pipe, as shown in the drawing.
The eye of the outer tip must be adjacent to the plane of the brake caliper at an angle
Work procedure
Rear brake pipes VAZ 2109
Before you take action, you need to prepare first. During the preparatory work, it is necessary to clean the surface of the fitting tubes from contamination. You also need to apply a special compound to all threaded connections, this will make it much easier to unscrew the nuts. In addition, you need to prepare a wrench, spare brake fluid for topping up, a small container to drain the remaining fluid from the system and a suitable vinyl tube. For convenient repairs, it is recommended to install the machine either on an overpass or on a pit for inspection:
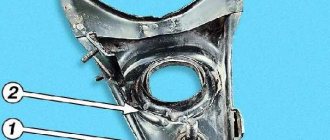
- First, use a Phillips screwdriver to unscrew two self-tapping screws that secure the tube to the body of the vase.
- Using a suitable wrench, unscrew the 2 fittings through which the tubes are attached to the hose with the regulator.
- The tube is removed.
- After all necessary work has been carried out, the tubes are installed in the opposite order to dismantling.
- Add brake fluid.
- The quality of repaired brakes is checked.
On newer VAZ models, the tubes are first unscrewed from the main cylinder and brake hose, only after that the holes are plugged. In this case, you will have to unscrew the 3 fastening nuts and remove the plastic covering. Next, dismantle the metal plates and disconnect the necessary tubes from the clamps; if they are damaged, they will need to be replaced.
Note! New elements must be secured in the opposite order. To check the quality of work, it is necessary to bleed the system. It must be done to eliminate excess air.
Replace the rear brake pipe of a VAZ 2109
Signs of air penetration into the system are considered to be increased travel and softened sagging of the brake pedal when pressed. It is necessary to follow a certain sequence of bleeding the brakes:
- rear right;
- front left;
- rear left;
- front right.
In addition to changing the brake line, the brake hose may also need to be replaced.
When control sensors indicate a breakdown of the brake system
- The “breakdown” symbol appears on the control panel if there is a low level of brake fluid in the reservoir, then you need to plan to bleed the system and decide how to replace the brake hoses on a VAZ 2114 yourself or with the help of a specialist.
- There is also a sign on the panel that the parking brake is engaged. It must be turned off at the moment you start moving, otherwise damage cannot be avoided, and then all the problems will follow each other, and a situation will arise with a solution to the question of how to replace brake hoses on a VAZ 2114.
Thus, vigilance and vigilance again are the main things that the driver must remember when entering the garage and while driving along the route every day and every second. It’s better to sit down and figure out how to replace brake hoses on a VAZ 2114 than to experience stress at speed when the brake pedal simply falls under your foot and the car does not stop on demand.
Required tools and replacement
- Using a jack, lift the front wheel and remove it. Don't forget that the wheel bolts can also become stuck. To make them easily unscrew, spray WD-40 from a can several times and wait about 10 minutes. If the bolts are unscrewed but the wheel cannot be removed, there is also a “folk” method. For these purposes, some drivers carry a piece of board and a small sledgehammer in the trunk. We place the board next to the wheel and hit it with a sledgehammer several times. The wheel should come off;
- Hold the tip on the brake hose with a “15” wrench. At the same time, turn the fitting on the tube with a “ten”;
- To prevent brake fluid from leaking, put on a protective cap. If the nut is stuck, use VD. We wait 10-15 minutes, unscrew;
- Next, you need to remove the sensor wires from the rubber holders based on pad wear;
- The hose coupling must be removed from the shock absorber strut holder;
- Unscrew the “15” hose fitting from the cylinder. The copper seal ring also needs to be replaced. Usually seals are sold as a set;
- Install the new hose, carefully tightening the nuts;
- We repeat the procedure in a similar way on the other front wheel (since, we remind you, it is best to change the hoses at least in pairs);
- After everything, we bleed the brake system, checking the presence of fluid in the reservoir (by level). If necessary, top up!