Suspensions are affected by driving style and the condition of the roads on which the car travels. It is better to skip the story about the state of affairs in the CIS countries. Racks are the most vulnerable elements of the chassis. To find out what condition these parts are in, the car should be taken to a service center. The replacement can be done independently, but the driver must know exactly what to change. There are main signs by which you can determine that the chassis elements have become unusable:
- While driving the VAZ 2114, the driver hears knocking and noise even when driving on a flat road. The shock absorbers are worn out - this diagnosis is usually made by car specialists.
- Difficulty maintaining a smooth driving pattern. In 95% of cases, the cause of such a malfunction is the spring.
- Regular suspension breakdowns. The culprit could be the rear undercarriage components or the entire rack stopping normal operation due to a malfunction.
Elements of the front suspension of the VAZ 2114 are less likely to fail, but the process of replacing springs and shock absorbers is no different from working with the rear suspension. Usually the driver feels where the breakdown has occurred. Repairs should begin only after receiving a “diagnosis” from the workshop.
Replacing springs and struts should be done in pairs on one suspension. When changing only one shock absorber, at first most of the load will fall on the old parts, and this will significantly shorten their life.
VAZ 2114: replacing the front pillar with your own hands
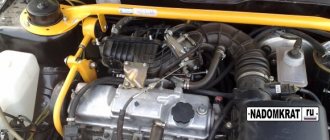
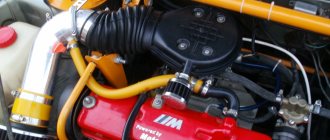
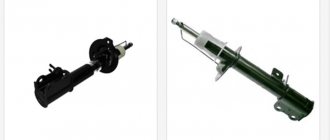
On a VAZ 2114 car, the front strut is replaced if it fails. The resource of the suspension element is quite long, but do not forget that the fourteenth has been produced since 2001, and the youngest car is currently three years old. And the service life of a shock absorber depends on many factors, including the conditions in which the car is operated. And, unfortunately, they are not always ideal - the quality of the roads leaves much to be desired. Let's look at the entire process of replacing the front pillar on a VAZ 2114.
Primary problems with the hood latch
The first malfunctions in the locking mechanism are noticeable immediately
If you pay due attention to them, a simple adjustment will help you repair the lock. The hood lock cylinder on the VAZ 2109, for example, is made of industrial steel and for it to break completely, you need to ignore the first malfunction signals for more than one month
- Each time you close the hood, you need to slam the lid harder and even put pressure on the frame.
- The lid clangs and rattles on rough roads. Moreover, this can be clearly heard in the cabin.
- The lock does not close the first time.
- When the cable is loosened, you need to pull the handle several times for the lock to open.
- After pressing the hood handle in the cabin, the lid does not lift, forming a gap, but remains in place. The gap between the frame and the cover can only be seen if you lift the cover yourself.
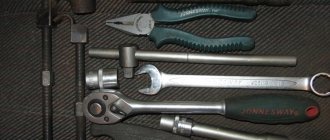
Tools for work and materials
When replacing the front strut on a VAZ 2114, it is necessary to have all the following tools at hand:
- Jack (ideally, of course, a hydraulic or pneumatic one would be suitable, since they are convenient to work with).
- A set of keys.
- Pliers, duckbills, forceps.
- Hammer and chisel (just in case).
- Puller for the ball joint of the steering tip.
- Spring tensioner.
- Steel wire.
- Lubricant like WD-40.
Replacing the front struts of a VAZ 2114 with your own hands is impossible without a new set of spare parts. What is better - to take all the elements separately or together? Depends on how “killed” the shock absorbers installed on the car are. If all the elements of the rack have become unusable, then you can purchase it assembled, then the repair procedure becomes much easier - it will be enough to unscrew a few bolts and install all the suspension components.
But this is true for cases when you purchase branded spare parts, for example, Kayaba (KYB, Kayaba). But if the renovation is “budget”, then you can collect all the elements separately:
- Shock absorber strut VAZ 2114. Standard SS20.10P/L.00.000-01 will cost you about 5,000 rubles, but you can find it cheaper. The price directly depends on the manufacturer. But we must not forget that quality can also be judged by price. On the VAZ 2114, the front strut is not replaced so often, so you need to be responsible when choosing components.
- Support bearing number 348702 (or included 8115). Bearing dimensions 14.5x52x1475x100x19 (according to specification).
- Chipper (silicone is preferable, but rubber is also possible). The ideal copy is number SS74101 - a complete analogue of the stock one.
- Anther. The cheapest option is plastic, with the number 2108-2902814, but it deteriorates quite quickly and is not worth buying. The similar 2110-2905681-R, from the front pillars of a VAZ 2110, performs much better in operation.
- Bolts securing the hub to the shock absorber.
- A spring is needed if the old one has sagged too much.
- “Little things” such as washers and metal spacers for springs can be borrowed from an old rack.
But we must not forget that the replacement must be carried out simultaneously on both sides! Therefore, all of the above spare parts will have to be purchased in double quantities.
Originals
Most often, drivers do not bother with the selection of parts and simply buy ordinary stock spare parts. Overall, this is a good option. They last quite a long time and cost little. But there is one caveat here. The original springs are quite soft, which makes the car not very stable when cornering. This doesn't suit speed lovers too much. Also, original parts don't handle a full vehicle load very well. In this case, they sag. If you often carry large groups or the trunk is constantly loaded, then it is better to choose something more rigid.
VAZ-2111
. The chassis of the “tenth” family is almost identical. Therefore, springs from “11” are perfect for installation on “14” and “15”. The advantage of these parts is the large thickness of the spring coils, which makes it more resistant to various additional loads. This is an ideal option for people who often have to transport various things in their car. The disadvantage of this approach is the increase in suspension stiffness.
Replacing the front struts of a VAZ 2114
And now more about how to replace the front strut supports of a VAZ 2114 with your own hands. First, you should prepare the car for work - disconnect the battery, install stops under the rear wheels so that the car cannot be moved. And we begin:
- Raise the side to be repaired using a jack.
- We remove the wheel. Need I say that you need to loosen the bolts in advance?
- Place the brake pipe to the side so as not to damage it.
- Using keys “17” and “19”, unscrew the bolts securing the strut to the hub. These bolts and nuts can be thrown away immediately - reuse is unacceptable. Firstly, there is a plastic lock on the thread, and it is designed for a small number of tightenings. Secondly, metal fatigue affects and the bolt can become deformed when tightened.
- On a VAZ 2114, the front strut can be replaced without removing the spring. But you still have to unscrew the nut and remove the tie rod end.
- Using a key set to “13” you need to unscrew all three nuts that secure the support bearing housing to the car body.
After this, the entire rack assembly can be removed and a new one installed in its place. As you can see, replacing the front struts of a VAZ 2114 is not that difficult. But if you install an old spring, you will have to tinker with disassembling the old unit - this can be problematic, since long-term use takes its toll on it. Rust appears, the metal “sticks”, sometimes even penetrating lubricant cannot help.
The repair procedure is the same on both sides. Installation of a new rack is carried out in the reverse order. It is important to observe the tightening torque of threaded connections, since your safety depends on it. Use a torque wrench for convenience. At this point, the replacement of the front struts of the VAZ 2114 is completed, you can continue to use the car.
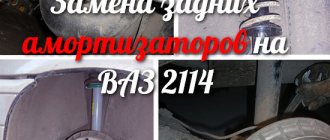
Removing shock absorber struts
Be sure to treat all threaded connections before replacing the rear pillar of the VAZ-2115. The repair instructions are as follows:
- Remove the plugs located in the luggage compartment. These niches contain nuts that secure the shock absorber rod.
- It is advisable to use a special wrench to unscrew the nut on the shock absorber rod. But if there is none, then you can clamp the rod from below using pliers, and unscrew the nut from above with a tubular wrench.
- Then you need to unscrew the bottom bolt, which secures the rear strut to the beam. Be sure to hold it with a second wrench so that the bolt does not turn.
- After this, you can pull out the rack assembly.
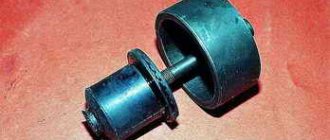
Signs of malfunction of VAZ 2114/2115 racks
The following signs indicate the need to replace the struts on the VAZ 2114/2115:
- When a strut fails, the first thing to start leaking is the shock absorber.
- Steering wheel wobble appears.
- Vehicle vibration increases when driving on poor-quality road surfaces.
- The car begins to drive around.
- The skidding trajectory on a winding road becomes larger.
- The braking distance of a car changes upward.
- The suspension periodically makes extraneous sounds and squeaks.
Why is it necessary to change springs on time?
So, what can happen if a vehicle's spring has reached the end of its life or has broken completely?
There are several negative consequences of this problem:
- The vehicle's ground clearance decreases, which can lead to damage to other vehicle parts due to contact with poor-quality road surfaces (potholes, bumps, and much more).
- The rubber of the wheels in the rear arches of the car begins to feel double friction, which means it wears out more often.
- Transport control deteriorates, as it may begin to tilt to one side and swing during the trip.
- The service life of the depreciation-type system quickly begins to decrease.
Damaged spring
It turns out that a spring that has failed can lead to serious problems in the future. Therefore, the next question is absolutely logical: when should the replacement be carried out?
Most often, manufacturers claim that their product can last for about 10 years. But they mean that vehicles will only move on level roads, without auxiliary loads. This is almost impossible to do on Russian roads, so it is best to replace it three years after the start of use.
How to check the struts of a VAZ 2114, VAZ 2115
Self-diagnosis methods are, to put it mildly, ineffective, so it is recommended to carry out diagnostic work exclusively on specialized equipment. There is one way, but it only works when the rack has already worn out. You will need to stand near the corner of the car (near the right pillar, for example).
Stand near the edge of the right headlight and place your hands on the hood or fender, then rock the car two or three times, and when it is at the bottom, sharply remove your hands. If the car then goes up and a little down and immediately stops without unnecessary vibrations, then the strut is most likely normal. We carry out similar actions on the left wing. Most often, one rack fails, so the difference in its “behavior” is obvious.
Another reason for the malfunction of the front shock absorber strut of the VAZ 2114/2115 is the failure of the upper support. The reason for replacing the upper supports is usually one of two reasons:
- ruptures and cracks in the rubber part of the support. As a rule, this occurs due to aging of the rubber. This is fraught with the fact that a support that is in this state will suppress noise and shocks while the car is moving much worse;
- failure of the upper support bearing. It occurs much more often than the breakage of a rubber element, and more anxiety is added, since the support with a broken bearing knocks loudly, even on small irregularities.
Hood lock functions
The purpose of any locking mechanism, be it the hood lock of a VAZ 2109 or a BMW, is to tightly hold the engine compartment lid, preventing street dirt and water from entering the engine compartment. The engine compartment is provided with optimal ventilation, but air penetration should not occur through the cover.
The “disease” of 90% of VAZ cars is that six months after use, the hood lock begins to deteriorate: the cylinder wears out, the springs lose their rigidity, the cable (traction mechanism) frays, and cracks can form on it. Therefore, the lock should be adjusted twice a year, replacing, if necessary, faulty parts. Otherwise, a sudden opening of the hood on the highway is guaranteed.
How to change the front struts of a VAZ 2114, VAZ 2115
There are two options for dismantling the shock absorber strut: one allows you to avoid subsequent adjustment of the steering wheel alignment angles, the second allows you to quickly complete the work with more compact units, but after that it is necessary to adjust the steering wheel alignment angles. The difference is that in the first version we remove the strut together with the steering knuckle, without loosening the nuts of the lower and upper (adjusting) bolts securing the strut to the steering knuckle. In this case, the amount of work is greater: we additionally disconnect the brake caliper and ball joint.
We proceed according to the first option, disconnect the steering rod, remove the brake pad guide with the caliper and the brake disc, and remove the outer CV joint from the hub.
Let's improve the VAZ 2110
To raise the rear suspension on a VAZ 2110 you need to:
Put the car on the handbrake. Using a jack, raise the rear of the car so that the wheels are in the air and rotate freely. Remove the wheel. Unscrew the shock absorber mounting bolt. To do this you will need a key “19”. Get the bolt. Perform a similar operation with the opposite shock absorber. Take the spacer and determine on which side the distance from the base to the first hole is greater. The side where it is larger should be directed inward. The same spacer can be installed on both the right and left shock absorbers, since these devices are mirror symmetrical. Install the spacer so that a line is drawn from the center of its lower hole to the upper hole, which falls into the vertical of the rack
You can install the spacer so that it is not adjustable in height by screwing the shock absorber into a single hole. By unfolding the spacer, you can adjust the suspension height by screwing the strut into the upper or lower hole, but the device will then need to be placed on the opposite rear shock absorber. When installing a spacer on an eye, it is important to install a bolt spacer so that the mechanism does not break during operation. You don't need to tighten the bolt too much, just make sure it fits snugly and doesn't wobble. Install the strut mounting bolt into the holes in the spacer and shock absorber
The height can be adjusted by selecting the top or bottom holes. Also install a spacer on the opposite shock absorber. Adjust the rear brake pressure regulator by unscrewing its mounting bolt. Next, you need to move the bracket with something until the distance between the lever and the spring becomes 2 millimeters. Check the functionality of the brake system. When braking hard at low speed, the rear axle should lock a little later than the front. If the rear wheels brake much later, then you need to reduce the distance from the lever to the mounting spring, and if it is too early, increase it.
Photo instructions
Unscrew the lower mounting bolt
We take out the bolt
We turn the side with a large distance towards the longitudinal axis of the machine
The installation line must coincide with the longitudinal axis of the shock absorber
Regardless of hole selection
Insert spacer and bolt
Insert the bolt into the holes
How to change rear struts on a VAZ 2114/2115
For the rear wheels, telescopic racks are used, on which there is a rod and a place for a spring behind the bowl. The lower shock absorber eye is bolted to the suspension arm bracket, and its rod is secured to the upper suspension spring support through two rubber pads (one at the bottom of the support, the other at the top) and a support washer (under the nut). The hub has a double-row angular contact ball bearing, similar to the front wheel hub bearing, but smaller.
To replace the rear struts on a VAZ 2114/2115:
- We hang the rear wheels, remove the back of the rear seat and remove the rear wheel arch trim.
- Unscrew the nut with a 17 spanner, holding the shock absorber rod with a 6 spanner.
- Remove the nut, spring and support washers, and the top cushion.
- Using two 19mm wrenches, unscrew the nut of the bolt securing the shock absorber to the beam.
- We take out the bolt and take out the shock absorber along with the spring.
- We remove the spring gasket and check for deformation and damage.
- For ease of assembly, attach the gasket to the spring with wire or electrical tape. This will make it easier to install it in the body.
- We install the shock absorber so that the rising part of the spring cup is directed towards the wheel.
- We secure the lower end of the shock absorber, but do not tighten the nut.
- We insert the end of the shock absorber rod into the hole in the body and smoothly lower the car.
- We fix the rod.
- Then tighten the bolt of the lower shock absorber mounting.
For work we will need:
- spanners sizes 17,19, 22;
- socket head sizes 13, 17, 19;
- open-end wrench 9;
- hammer;
- pliers;
- mount;
- spring tie;
- jack;
- ratchet handles and cranks;
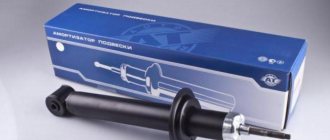
- new oil shock absorber KYB 665059 or its analogues VAZ 21082905002, 21082905003, SACHS 100831.
The price of the shock absorber KYB 665059 was 1200 rubles. Relevance of prices in Moscow and the region for spring 2022.
We remove the rubber plug of the upper support and, using a special key that allows you to hold the rod while unscrewing the nut, loosen the connection.
Repair
To repair the lock and replace parts, you will need the following tools:
- open-end wrench for 17 and 19;
- liquid oil for lubrication;
- Screwdriver Set;
- pliers or pliers.
Repairing a lock yourself requires some skill and slowness, so you need to count on at least 2 hours. First you need to determine which mechanism in the lock has failed; most often it requires repair:
- springs (zam, hook, latch);
- replacement of traction.
Replacing the lock spring
The lock spring is located on the car frame. Wear of the metal part, deformation and cracks cause the hood to not close tightly. Using the VAZ 2114 as an example, you can install the lock spring in several stages:
- Disconnection from the spring of the traction mechanism. A screwdriver is used.
- Removing the spring.
- Installing a new lock spring.
Replacing the latch spring
If you need to change the latch lock spring, for example, on a VAZ 2114, you will need a flat-head screwdriver and a 19mm wrench. You can change the spring in three stages:
- Kickback (loosening) of the locknut.
- Unscrewing the pin.
- When the locking mechanism is removed, the spring is replaced with a new one and a similar assembly is performed in the reverse order.
Replacing the hook spring
Unlike the previous two spring replacements, replacing the lock spring will require either pliers or fine tweezers. Repair is more painstaking and requires a certain skill. The work is carried out according to the following principle:
- Use a screwdriver to pry off the lock washer that holds the hook axis.
- The washer is removed from the grooves with tweezers (or pliers).
- The hook axis is removed.
- The spring is removed.
Replacing traction
It is necessary to change the lock drive when the locks are in working condition, and when the hood is opened using the handle from the passenger compartment, the lid does not open.
Replacement of traction is carried out according to the following principle:
- The cable is released from the hook (the hook itself does not need to be removed).
- A 13 key is used to secure the handle axis.
- The handle is removable.
- Use pliers to straighten the bent part of the cable.
- The locking sleeve extends and the end of the cable is released.
- The loop is removed from the draft lever.
- The rod is pulled out from the motor side.
- The shell is released from the holders and the part is replaced.
We change the rear and front struts, springs and shock absorbers on a VAZ 2114
Suspensions are affected by driving style and the condition of the roads on which the car travels. It is better to skip the story about the state of affairs in the CIS countries. Racks are the most vulnerable elements of the chassis. To find out what condition these parts are in, the car should be taken to a service center. The replacement can be done independently, but the driver must know exactly what to change. There are main signs by which you can determine that the chassis elements have become unusable:
- While driving the VAZ 2114, the driver hears knocking and noise even when driving on a flat road. The shock absorbers are worn out - this diagnosis is usually made by car specialists.
- Difficulty maintaining a smooth driving pattern. In 95% of cases, the cause of such a malfunction is the spring.
- Regular suspension breakdowns. The culprit could be the rear undercarriage components or the entire rack stopping normal operation due to a malfunction.
Elements of the front suspension of the VAZ 2114 are less likely to fail, but the process of replacing springs and shock absorbers is no different from working with the rear suspension. Usually the driver feels where the breakdown has occurred. Repairs should begin only after receiving a “diagnosis” from the workshop.
Replacing springs and struts should be done in pairs on one suspension. When changing only one shock absorber, at first most of the load will fall on the old parts, and this will significantly shorten their life.
Anti-roll bar
While driving, the suspension is subject to different influences. In many cases, the effectiveness of voltage suppression has a direct impact on the vehicle's handling and the comfort of staying in it. One of the important elements of the system is the anti-roll bar. This suspension element is responsible for ensuring that the car does not roll too much when turning at high speed. Modern stabilizer systems are quite complex, as they adjust the position of the body depending on the steering angle and speed.
If the stabilizer malfunctions or is ineffective, the following problems may occur:
1. When turning at high speed, the car may lean heavily to one side. Such a displacement of the body leads to a redistribution of the center of gravity. As a result, the side that is on the inside of the turning radius loses traction. If this suspension element malfunctions and when turning at high speed, there is a possibility of loss of control and vehicle rollover. 2. If the stabilizer does not work correctly, there is a possibility that the tires will touch the arch protection. In such a case, the tires may be damaged, which will also lead to loss of controllability and the inability to continue driving. 3. When turning sharply at low speed, a non-functioning stabilizer will cause the body to sway. If the stabilizer works correctly, the vehicle's stability returns almost instantly.
Installing new springs and shock absorbers
Replacing springs and struts for a VAZ 2114 is carried out according to the same principle, regardless of whether the rear or front suspension is being repaired. For repair you will need:
- Jack;
- Hammer;
- Heads and keys with sizes 13′ and 19′;
- Breakdown;
- Spring ties;
- Puller for ball joints;
- Ratchet handle and knob for it;
- Pliers;
- New details.
Warning: when installing new struts (shock absorbers) or springs, the owner of the VAZ 2114 must raise the rear or front part of the car. To avoid injury, you need to put chocks under the front wheels. During operation, first gear must be engaged. You shouldn’t rely only on a jack; it’s better to play it safe and add strong supports. The chassis must be in an unloaded state, so the supports should not overlap the beam.
- You need to lift the front or rear of the car with a jack, depending on which suspension will be serviced.
- The wheels must be removed.
- To get to the rack, you need to remove the steering tip. It is held in place by a bolt and a cotter pin.
- When the strut is freed from the steering tip, it is necessary to unscrew the nuts securing the strut to the lever. This is done as follows:
You can evaluate the result of shock absorber repair as follows: the car is placed on a flat surface, and the driver pumps it several times. If the car is firmly on its wheels, then the process was completed correctly. After 100-200 km, you will need to re-tighten the nuts. This is done to consolidate the new elements that have already been “adjusted”. Regular inspection and lubrication will help keep your undercarriage in good condition.
Detailed video on replacing rear struts:
- Let's figure out what wheels can be installed on a VAZ 2114
- Spacers VAZ 2114: what are they for and how to install
- Racks for VAZ 2114: selection, breakdowns and replacement
Runout of the steering wheel and gearshift knob VAZ2114
Installation of sports locks
Sports hood locks can be installed instead of standard parts or as additional insurance. It is recommended not to abandon the original locking mechanism; this is an additional guarantee that the hood will not be opened by intruders; the latches on VAZ cars are quite strong and can withstand significant mechanical forces if they are opened.
Preparing for installation
Before installing the sports lock, it is necessary to accurately measure the places where the rods are attached on the bar.
- Holes are drilled in the frame above the headlights and rods are installed.
- the tops of the rods are smeared with grease, and the hood lid is covered so that fingerprints remain on the lid.
- On the hood, on the printed marks from the rods, the necessary holes should be drilled.
Hood drilling steps:
- The hood cover is drilled from the inside out.
- Take the smallest drill and drill a hole on a solid wheel.
- The hole is expanded with a large drill.
- Checking holes for additional boring.
- The hole should be 1-2 mm away from the rod.
The preparatory procedure before installing the sports lock is completed.
Lock installation
Installing the lock also requires using a drill to secure it to the hood. Stages of work:
- For example, the protective coating is removed from the plate on the hood lock of a VAZ 2106, the plate is applied to the hood and the four mounting holes for the plate are measured.
- Use a thin drill to drill the cover for the screws.
- The plate is screwed on with self-tapping screws.
- The rods are tightened to the optimal position.
- Studs are inserted into the holes of the rods.
- Installation of safety cables.
- Installation completed.
Of course, repairing and adjusting the lock is not a complicated procedure that you can easily do yourself. A well-reinforced hood means driver safety on the road; it’s hard to imagine what the consequences of a hood suddenly opening on the highway could be.
Didn't find the information you are looking for? on our forum.
We recommend reading:
GTZ VAZ 2110 signs of malfunction, purpose of the device, performance check replacement
How much gasoline remains in the tank when the light on the VAZ 2107 comes on, plus a table of other brands
How to remove a drum on a VAZ 2107
Replacing hydraulic compensators on a VAZ 2112 16 valves
Replacing the hand brake on a VAZ 2107
VAZ 2114 where is the starter on
VAZ 2110 takes a long time to warm up, why does this happen?
The signal on the VAZ 2110 is lost: reasons
Replacing front struts, springs and supports on a VAZ 2114-2115
The front struts on VAZ 2114-2115 cars wear out much faster than the rear ones, and this is due to the fact that the front part of the car bears a large load, since the main units are located there. If the shock absorbers are leaking, or are starting to leak heavily in potholes, then it would be best to completely replace them. Many people are used to dealing with such problems at a service station, although if you try a little, you can do it all on your own. The main thing is to have all the necessary tools and equipment at hand. Below is a detailed list of everything:
- spring ties
- ball joint or steering wheel remover
- pliers
- hammer
- keys for 13 and 19 as well as similar heads
- crank and ratchet handle
- breakdown
I recommend that you first familiarize yourself with the video, which will be presented below, and then read my photo report on the work done.
How to adjust the hood latch
The first faults that the driver notices can be eliminated by a simple inspection and tightening or replacing some parts. Adjustment of the hood latch on all VAZ cars is carried out in two main stages: horizontal and vertical.
Vertical adjustment
Vertical adjustment is a check of the optimal length of the lock latch. This must be done if the hood cannot be securely locked in the closed position. When driving, a rattling noise is heard, even with the engine turned on, when the car is standing still, there is a slight bouncing of the cover.
To adjust, use a 19 mm spanner and a flat head screwdriver. Stages of vertical adjustment.
- Loosen the locknut on the latch. To prevent the latch itself from turning, hold it with a screwdriver.
- If the hood lid does not close well or does not close at all, it is necessary to adjust the length of the latch. You just need to unscrew it (enlarge it) with a screwdriver.
- If the cover rattles and vibrates when driving, shorten the length of the latch by screwing the latch several turns.
- Verifying the correct latch length setting can only be done through experimentation.
- There are no dimensions, calculations or measurements with a centimeter tape, even in production.
- After the mechanism is adjusted, the locknut should be tightened with a wrench while holding the lock latch.
Horizontal adjustment
It is necessary to carry out horizontal adjustment on a VAZ 2115 if the lock jams when opening or a metallic grinding noise is heard when driving.
Horizontal adjustment of the latch is carried out in several stages:
- The locknut is loosened.
- The latch lock moves in a horizontal plane so that when closing the cylinder coincides with the standard hole in the frame.
- Checking the fit and tightening the locknut.
- Adjustment helps to get rid of the problem with minor shifts of the working mechanism during constant driving loads.
Guide to self-replacement of front suspension struts on VAZ 2114 - 2115
The first step is to put the car on the handbrake, remove the front wheel bolts and jack up the car. Then finally remove the wheel and you can begin this repair of the chassis on the VAZ 2114-2115.
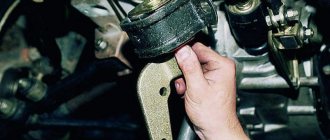
First, you need to release the rack from the mount with the steering tip. Read about this in more detail in the article on Replacing tie rod ends. After we have completed this task, unscrew the two nuts securing the strut to the lever from below, as is clearly shown in the photo below:
And we try to pull out the bolts from the back side with our hands. If this cannot be done due to rusted connections, then you can use a punch or a wooden block to knock out the bolts with a hammer:
When the bolts pop out, the stand can be moved to the side, thereby disconnecting it from the lever:
Now open the hood and unscrew the three nuts securing the front support to the body glass of the VAZ 2114-2115. This is clearly shown in the picture below:
When you unscrew the last nut, hold the stand from below so that it does not fall. Then you can remove it without any problems:
So the entire front suspension module has been removed. To disassemble it, we will need spring ties and a special wrench to unscrew the central nut on top of the support. The first step is to loosen the top nut, holding the rod from turning:
Never let go completely, otherwise you might get a spring on your forehead or something else. Tighten the springs using special tools
And only then unscrew the nut completely and remove the upper support cup:
Then you can start removing the support itself:
And then the springs:
Now all that remains is to remove the rubber boot and compression buffers and you can begin replacing all the necessary parts of the front suspension: support bearings, supports, struts or springs. The entire assembly process is carried out in strictly reverse order and does not take much time. When installing the module on a car, it is possible that you will have to tinker a little so that the holes in the strut body itself and the lever line up at the bottom. But if you have a mount, you can do it yourself!
The prices of components are approximately the following (for example, I will name from the manufacturer SS20):
- The supports are sold at a price of 2,000 rubles per pair
- Front struts can be purchased for around 4500 for two pieces
- Springs can be purchased at a price of 2000 rubles
As for the remaining parts, such as compression buffers and anthers, in total you will spend about 1 thousand more rubles. Of course, the effect after installing a non-factory suspension is simply pleasing. In general, I’ll write about this in future articles.
Which racks to choose?
You shouldn’t delay repairing the breakdown, because... This rear suspension unit of the vehicle ensures body stability. There are many options in spare parts stores from different companies. Leaking liquid means a complete failure of the element, but in some cases it is possible to pump old parts. For better results, you need to install new spare parts.
Useful video:
In addition to the factory version from AvtoVAZ with article number 2108-2915004 , 2114 has long been producing higher quality analogues. The price of modified and higher quality options is much higher. If the cost of an “original” spare part is 1800-2000 rubles, then a proven product is sold at a price of 3000 rubles and more.
For those who like to save on spare parts, there is an option from Patron with article number PSA341824. The price of the stand from Patron is only 1300 rubles. There is no need to talk about the quality of the product. There are a lot of reviews that say that they can withstand no more than 10,000 kilometers.
VAZ 2115: features of replacing springs
Replacement of VAZ 2115 springs, old and new springs
Replacing the springs on the VAZ 2115 is necessary in cases where their integrity is compromised, in the event of mechanical damage or cracks, or in case of significant subsidence. All car owners should know that replacing a spring on a VAZ 2115 requires a pair replacement, that is, the springs of both the front and rear suspensions are replaced as a set (pair), regardless of the condition of the second spring, the same applies to shock absorbers.
Choice depending on manufacturer
Often, when components break down, people try to buy original, factory-made replacement ones, not wanting to try something new. But you can find decent products from other manufacturers; there are springs that are far from worse than the original ones.
List of the most popular manufacturers:
- Sirius. An experienced manufacturer with a huge range of products and the ability to individually order components according to customer drawings.
Having studied all the manufacturers, you can make your own choice and understand which rear springs are best installed on the VAZ 2114.
Replacing the front spring
This work is best done on an overpass or inspection hole, although it can also be done simply on a flat area without a slope:
- First we need to stop the car with the handbrake, then remove the bolts that secure the front wheel, then lift the car with a jack
- Finally removing the wheel
- To replace the spring and shock absorber of the front suspension, you need to remove and disassemble the spring strut
- After removing the wheel, turn the steering wheel in the direction opposite to the removed wheel until it stops
- Now it is convenient to remove the cotter pin
- Then, using the “19” key, unscrew the nut that secures the pin of the tip of our tie rod to the strut arm
- We take a puller and press the finger out of the lever
Use a puller to press the finger out of the lever.
- If suddenly there is no puller, then unscrew the nut not completely, then insert the mounting blade (pry bar) into the spacer between the strut arm and our steering rod, then apply sharp blows to the end of the strut lever with a hammer
- Be sure to remove the brake hose coupling from the strut holder
- To unscrew the shock absorber rod nuts, you need a special wrench that allows you to keep the rod from turning
- We go into the engine compartment and remove the plug from the upper strut support
- Then loosen the clamp on the shock absorber rod nut
- Then, from below, before unscrewing the upper bolt securing the strut to the steering knuckle, paint the installation marks on the bolt and strut bracket
Preparing for replacement
Before you begin repairs, you need to prepare the car. To do this you will need:
- Park the car on an overpass or inspection hole. Only in this case will you get maximum visibility of all suspension elements.
- Wheel chocks must be placed under the front wheels.
- Next, you need to hang the entire rear part of the car; to do this, loosen the wheel bolts.
- Lift the left and right sides alternately and remove the wheels. Install reliable supports on both sides.