The Priora has three brake lights: two in the rear lights and an additional one installed in the spoiler. Their purpose is to warn drivers of cars moving behind about braking. Operating a vehicle with non-functioning brake lights is prohibited. If the lights on the Priora do not light up, you need to contact an auto electrician or fix the problem yourself. In the latter case, the driver needs to have a minimum set of tools to find and eliminate the causes of the malfunction.
Removing and installing the flashlight
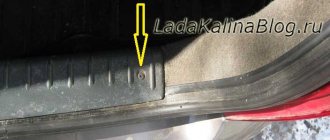
The rear light is accessible from the luggage compartment of the Priora. To directly get to the lamp, you need to pull back the trunk trim.
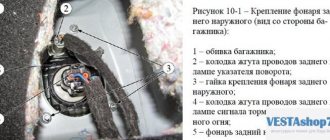
The process of removing the rear light
- We open the trunk and fold back the upholstery in the rear part of the wing.
- Then you can see 3 wing nuts that hold the flashlight on. We unscrew them while holding it on the other side.
- Next, pull the flashlight towards you and remove it from the rear fender.
- Removing the lamp socket is done by turning it counterclockwise and pulling it towards you.
- Installation is carried out in reverse order.
Led lights
Making rear diode headlights on a Priora is becoming an increasingly popular way to decorate the optical elements of a car.
This method will not allow you to change the appearance of the equipment, since standard lighting devices act as the basis, but they are significantly altered.
Despite this, diode taillights on Priora have better luminescence efficiency than standard light elements - incandescent lamps
Another positive quality of replacing rear light bulbs on a Priora (station wagon, sedan, hatchback - no matter what body type) is the ability to create certain patterns from ribbons, for example, you can arrange light elements in turn signals in the form of arrows, in brake lights - in circles and etc.
The essence of creating rear diode lights on a Priora comes down to the fact that the headlight is disassembled, the standard lighting elements are removed from it - light bulbs along with sockets, and everything inside the housing is painted over with black paint (along with the reflector).
Then tapes in the form of the previously selected pattern are glued to the inner surface of the glass. Next they are connected to the on-board network. All that remains is to assemble the lantern, and that’s it – the diode headlights for the Priora are ready.
Read Installing a laser brake light on a car with your own hands
Replacing lamps
After the lamp is removed, you can begin replacing the lamps.
- To do this, unscrew the lamp socket by turning it counterclockwise.
- We take out the cartridge. The lamp should be removed from the socket by slightly pressing it and turning it counterclockwise 90 degrees. After this, the lamp should come out of its seat.
- Install new lamps in reverse order.
Work step by step
Let's get to work. The first step is to wash the headlight. Remove the backing from the film and moisten it generously. We also wet the lanterns. Place the film on the lens. We also wet the top. We take a squeegee and begin to expel the water from under the film from the center to the edges. If the tinting material has anti-gravel protection, you don’t have to be afraid to scratch it with a squeegee
It is very important to ensure a good fit of the material at the edges. The edges can be heated with a hairdryer and additionally smoothed for reliability.
After this, it is necessary to roughly trim the excess film. Sometimes during these manipulations the film needs to be heated and pulled to the side. Heating allows the film to become more elastic.
When we remove the excess trimmed film, it is necessary to glue the edges of the lanterns with an alcohol solution - this will increase the adhesion of the adhesive layer. After a while you will see that the edges are well glued. To be sure, we warm them up again with a hairdryer. We remove the protective layer and make a clean cut along the contour of the headlight.
There can be many colors of tinting, however, if you just want to additionally protect the optics and give them shine, you can use a transparent film to tune Priora headlights with your own hands.
What kind of lamps are installed in the Priora headlamp?
The Priora's rear light has 4 lamps, which are responsible for turning on the turn signal, dimensions, reverse, brake light and PTF. They are almost the same, but have some differences.
- The turn signal lamp is marked PY21W and is orange; when installing a regular white lamp, the turn signal will blink white.
- The size and brake lamp has two spirals, which are responsible separately for braking and illumination.
- The reverse lamps and PTF lamps are the same.
Tail light lamp marking table
| Purpose of lamps | Marking | Peculiarities |
| Reverse | P21W | White |
| Turn signal | PY21W | Orange color |
| Brake light and dimensions | P21/5W | Two spirals for dimensions and a brake signal |
| Rear PTF | P21W | White |
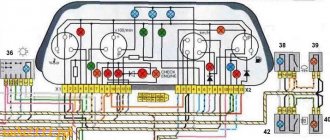
Fuse and relay block on Priora Lux and Lux Plus: designations and assignments
The fuse and relay block on the Priora in the Lux and Lux Plus configurations looks like this, as shown in the photo below.
The photo below shows how to correctly count fuses.
The fuses are indicated above, how to correctly read them on the block. They have the following designations:
- F1 - Reserve socket.
- F2 - 25A - Heated rear window, electrical package module, relay and connector “10” of block XP2 for connecting the rear window heater.
- F3 -10A - Right headlight, high beam lamp, instrument cluster, signal lamp for turning on the high beam headlights.
- F4 - 10A - Left headlight high beam lamp.
- F5 - 10A - Mounting block (protection), horn relay and horn.
- F6 - 7.5A - Left headlight low beam lamp.
- F7 - 7.5A - Low beam lamp of the right headlight.
- F8 - 10A - Mounting block, anti-theft alarm relay and anti-theft alarm sound signal.
- F9 - Reserve socket.
- F10 - 10A - Instrument cluster, contact “20”. STOP signal switch and STOP signal lamp. Interior lighting unit and interior lighting. The door sill light on the right front door. Auxiliary STOP signal.
- F11 - 20A - Mounting block, high-speed windshield wiper relay. Switch for cleaners and washers, contact “53a”. Wiper and washer switch, contact “53ah”. Heated rear window switch. Mounting block, rear window heating relay (winding). Windshield wiper motor. Rear window wiper motor (for 2171, 2172). Windshield washer motor. Rear window washer motor (for 2171, 2172). Airbag control unit, pin "25".
- F12 - 10A - Instrument cluster, contact “21”. Electrical package controller, contact “9” of block X2. EMUR control unit (EUR), contact “1” of block X2. Reversing lamp switch. Parking system control unit, contacts “11” and “14”.
- F13 - 15A - Cigarette lighter.
- F14 - 5A - Dimensions lamps (left side). Instrument cluster, light on indicator. License plate lights and trunk light. Electrical package controller, contact “12” of block X2.
- F15 - 5A - Dimensions lamps (right side). Lamp for lighting the glove compartment.
- F16 - 10A - Hydraulic unit of the ABS system, contact “18”.
- F17 - 10A - Left side fog lamp.
- F18 - 10A - Fog lamp right side.
- F19 - 15A - Seat heating switch, contact "1". Front seat heater.
- F20 - 10A - Recirculation switch (on indicator). Mounting block, relay for low beam headlights and parking lights (automatic lighting control system). Heater electric fan relay. Automatic lighting control switch. Windshield wiper and external lighting control unit, contacts “3” and “11”. Climate system control controller, contact "1". Automatic window cleaning system sensor (rain sensor), contact “1”.
- F21 - 5A - Light signaling switch, contact "30". Diagnostic block, contact “16”. Clock and climate control controller, pin “14”.
- F22 - 20A - Windshield wiper motor (automatic mode). Mounting block, windshield wiper relay and high speed windshield wiper relay.
- F23 - 7.5A - Control unit for windshield wipers and external lighting, contact “20”.
- F24-F30 - Reserve socket.
- F31 - 30A - Electrical package controller, terminal “2” of block X1. Electrical package controller, terminal “3” of block X1. Double-glazed window control module on the driver's door, pin “6”. Lamp light for the threshold of the left front door.
- F32(F28) - 40A - Reserve on Priora without ABS. On a Priora with ABS: ABS system unit.
And a similar table in the form of a photo, which can be printed on a printer if necessary.
Below is a pinout diagram for the central unit of the body electronics.
Now about the actual purpose of the relay on the mounting block. Below is a photo with the relay designation.
All these relays have the following purposes:
Below is a wiring diagram of the mounting block for Priora Lux Plus.
This is interesting! When replacing fuses, buy products not only of the appropriate rating, but also from reliable manufacturers. It is not recommended to buy Chinese-made products that are not tested. For Priora, it is recommended to choose fuses of the LittelFuse brand.
Replacing brake light bulbs and parking lights
With the release of the restyling of Priora 2, a large number of details have changed in it. The rear lights are especially noticeable; they have become LED. Now the dimensions have become lower, which gives the car a wider appearance in the dark. To achieve this effect, it is not at all necessary to buy and install LED lights.
To do this, just swap the backlight from the top position to the bottom. We don’t touch reverse and turns!
After such a replacement, when you press the brake pedal, the brakes will light up where the side lights and fog lights were previously illuminated. And the dimensions and rear PTFs will glow from the bottom of the lamp.
Additional mounting block Priora
- F1 (15 A) – main relay and starter interlock circuit fuse;
- F2 (7.5 A) – fuse for the power supply circuit of the ECU (controller);
- F3 (15 A) – Priora fuel pump fuse;
- K1 – main relay;
- K2 is the place where the Priora fuel pump relay is located.
Attention!
The relay and fuse diagram may differ depending on the configuration and production date of the vehicle. Current diagrams of the mounting block are presented in the operating manual for the date of manufacture of the vehicle (download from the official website).
Let us remind you that on our website you can find detailed instructions for repairing the Lada Priora with your own hands.
Often, car owners have a situation where the rear brake lights do not light up. An experienced motorist can guess what the reason might be. Therefore, it will not be difficult for him to determine the source of the malfunction and eliminate the problem. For beginners and inexperienced owners, it is advisable to contact specialists or study reliable information on car repairs.
This article outlines the main causes of this malfunction and provides recommendations for eliminating it. The owner of the car can make the repairs himself or contact a car service center.
Malfunction of LED brake lights
If, after carrying out the measures described above, it is not possible to determine the reason why the brake lights do not light, you should clarify the type of lamps used. They can be made using LEDs. Their installation has a number of features. Typically, LED lamps have a certain polarity for connecting to the vehicle’s on-board network.
Manufacturers always take this into account when developing. Incorrect connection results in the lamp not lighting up. In some cases, such inclusion may lead to damage. If a connection polarity violation is detected, this indicates that the repair on the vehicle was carried out by an unqualified person.