The service interval is the period of time between vehicle maintenance. That is, between changing oil, fluids (brake, coolant, power steering) and so on. At official service stations, after this work, specialists themselves reset the counter.
In principle, there is nothing wrong with the fact that the “service” light comes on. Essentially, this is a reminder to replace consumables . Often such maintenance is done independently, without involving the services of service centers. But after the maintenance procedure itself is completed, the question remains: how to reset the service interval?
The service interval is reset by manipulating the dashboard, battery terminals and ignition switch. Depending on the make and model of the car, these manipulations may vary. As a rule, the procedure comes down to the following sequence.
Technical data
Selection of oil and fluids
Repair and replacement
On vehicles with flexible service intervals, the display cannot be reset manually. Reset can only be carried out using a suitable diagnostic tool.
When manually reset, the maintenance interval is not set to flexible interval. The service interval can only be reset if the combined instrument panel has already shown a service request message.
Maintenance notification
On Volkswagen Passat cars, a special service key or a notification about the need for maintenance appears as the odometer approaches the desired indicator.
The service interval is standard in most cases, and it is 15 thousand kilometers.
Regardless of the generation of the Volkswagen Passat model, the only correct action when a service notification appears is to perform the procedure for resetting the service interval counter.
The procedure itself is somewhat different for Passat of different generations. Therefore, the instructions applicable to models B5, B6, B7 and B8 will be discussed separately. These are the most current and most widespread generations of Volkswagen Passat, actively used on Russian roads.
Reset on a regular on-board computer
First, let's talk about the nuances of resetting the service interval on a Skoda Rapid equipped with a conventional on-board computer. This is a fairly common configuration, since many Russians prefer the basic and mid-level equipment versions of the Skoda Rapid model.
And the multifunctional display of the on-board computer appears in more expensive trim levels.
To reset the counter informing about the required service and remove the annoying notification on the on-board computer screen, you need to follow this sequence:
- On the dashboard, directly below the on-board computer display and between the speedometer and tachometer wells, there are two physical buttons. Left and right. The driver should be interested in the right one, where the image 0.0 is printed.
- Turn off the ignition on the Skoda Rapid. After this, hold down the reset button.
- Hold the 0.0 button pressed for several seconds.
- After this, the mileage should reset to zero, and then the previous value will appear on the display again.
- Hold down the reset button and turn on the ignition. You just don’t need to start the engine.
- Now a message should appear on the on-board computer screen prompting you to reset the service interval.
- There you are asked to click “Yes” or “Cancel”. To select the desired item, use the switch on the steering column lever, or use the switch buttons directly on the steering wheel. This already depends on the configuration of a particular model.
- After confirming the reset, the counter is reset.
Now a few words about how to remove the inspection service. In fact, the procedure for resetting the inspection service is no different from resetting the service interval on Skoda Rapid cars.
The only difference is that the inspection service is reset with the emergency lights previously turned on. First turn on the hazard warning lights, and then repeat all the procedures described above.
Maintenance period adjustment
If the car is under warranty, the car owner tries not to skip scheduled maintenance procedures. With older vehicles, drivers often skip recommended maintenance intervals. This does not mean that they refuse to carry out maintenance, but such procedures tend to be carried out less frequently than necessary. In this case, the constantly lit wrench will, of course, be annoying.
But there is a way out: reset or reset the Peugeot 308 maintenance interval. Moreover, you can do this yourself, without contacting a service station or “experts” among your friends or acquaintances.
Resetting the service interval on the instrument panel
The procedure algorithm is extremely simple and does not require the use of any tools:
- you must turn off the ignition, if it was on, and press the mileage reset button located at the bottom left of the speedometer scale;
- while pressing the key, insert a contact;
- since the service mode indication is programmed for a certain period of time, you must wait until the mileage value on the display is reset;
- After zero appears on the display, turn off the ignition.
As you can see, the procedure is really simple and takes no more than a minute, and such manipulation will eliminate the annoying reminder of the need for maintenance.
It is important to understand that such a reset of the maintenance interval in Peugeot 308 vehicles must be perceived by the on-board computer. Usually this happens automatically if you have done everything according to the above algorithm. But there may be some nuances, for example, if you are used to disconnecting the battery when leaving the car for a long period of time. In this case, in order for the odometer readings to drop to 0 in order to record the BC in the memory, you must perform the following steps:
- get out of the car, slamming the door loudly;
- lock the car with central locking;
- wait at least 5 minutes (preferably 10) necessary to save the changes made to the on-board computer;
- and only then can you disconnect the battery terminal.
Resetting the service interval on a Skoda car produced 2010 and younger
The process differs depending on the configuration of the machine. Let's consider the options.
Multifunction steering wheel
Press the enter key on the right spoke of the steering wheel.
The “Main Menu” will appear in the MFI window. Scroll the wheel and select “Settings”. Fix it by pressing the wheel.
Select from the proposed list by rotating the “TO” wheel and pressing to confirm the selection.
Rotate the wheel and select “Reset”, press the wheel and confirm the choice.
In this section, select and confirm “YES”. After confirmation, go to the bottom of each list and select “Back”. We return to the usual route section of the display. Turn off the ignition. After a short pause, turn on the ignition and check whether the notification about the need to perform maintenance has disappeared. If there is any left, we will repeat the process more carefully and carefully.
A car with a regular steering wheel
- There is a “trip” button on the instrument panel, it is indicated by a white arrow in the picture, press and hold it with the finger of your left hand and then turn on the ignition with your right hand.
- After pausing for a few seconds, release the button.
- Now carefully turn the button to the right, wait until the numbers 15000 appear on the display.
- Release the button and turn off the ignition. The service interval has been reset.
After a few seconds, turn on the ignition and check whether the indication of the need for maintenance has disappeared. If the reminder does not disappear, try again.
Share in the comments how you reset the message about the end of the service interval. I would be grateful for your comments. tips, additions. Share information with friends.
Maintenance regulations or how is a car serviced?
The routine inspection procedure takes from 6 to 12 hours, depending on the workload of the official dealer’s booth in your region, and proceeds as follows:
- Body inspection: Visual inspection of the integrity of the paintwork and anti-corrosion coating of body elements, as well as the windshield and all glass. Then the hood lock is lubricated and replaced with a new cabin filter, after which the exhaust pipes and fuel system are checked. Finally, clean the drain holes and drain box;
- Diagnostics of the engine and transmission - replacing the oil and air filters and technical oil, then adding fuel additive G Next, replacing the spark plugs and refractor on the engine, after which the engine is checked for deformation and leaks. Also, on models with an automatic transmission, add new ATF fluid;
- Checking the carriage: This is where the ball joints and tie rod ends are checked for distortion, then the bearings are checked for play. Additional diagnostics of the brake system and brake pads for damage and corrosion, after filling the brake fluid to the mark and cleaning the brake drum linings from dirt. Upon completion of the truck diagnostics, the suspension system is checked for leaks and deformation;
- Gait analysis - measuring tire pressure and monitoring tread depth, after which the tire's expiration date is checked;
- Electrical equipment monitoring - monitoring the condition of external lighting devices, diagnostics of batteries and electrical equipment control levers. Subsequently, the light optics and sound signal are checked and calibrated. Finally, the interior lighting is checked and the check count sensor data is reset. The sensor of the Era-Glonass system is also monitored;
- Final work and control inspection: This stage includes a control train in the car, as well as filling out a service book and a technological inspection checklist.
How to reset the service interval
The appearance of a signal about the need for maintenance is a common problem that almost every motorist has encountered. In this case, the display may flash and the device may make annoying beeps. In service centers, when resetting, they make an entry in the service book and stick a sticker indicating the date of the next maintenance. Manufacturers do not recommend resetting the data yourself, as the indicator settings may be lost. But most often, no malfunctions in the operation of the vehicle systems are observed.
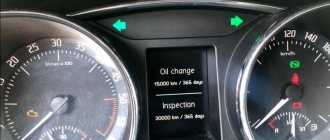
Typically, a service notification appears after approximately 15,000 kilometers or 372 days. But most drivers perform maintenance much more often, approximately every 5-7 thousand kilometers. After changing the oil and filters yourself, the message “Service” appears. After all, the system cannot recognize that the fluid has already been replaced. You can remove this inscription yourself without overpaying at a car service center. It is possible to reset the recorded information if the “Service” indicator lights up on the screen.
Automatic notification
The display of the controls shows the remaining cycle until the next scheduled maintenance. The readings are reset every time you visit the service center. Regular servicing is mandatory for Peugeot 308 vehicles with a valid warranty and a valid service contract.
Maintenance warning
The Peugeot 308 maintenance interval is 20,000 kilometers. It is this value that is fixed in the settings of the on-board computer. As for the warning about the approaching end of the maintenance interval, the corresponding indicator begins to work when there are 3000 kilometers left until the next maintenance.
This is done in the standard way: when you turn on the ignition, the wrench symbol lights up on the dashboard for 5 seconds, and the mileage indicator shows the remaining mileage until a visit to the service center. After this period, the key disappears and the mileage value becomes equal to the number of kilometers traveled since the previous service (that is, since the intercharacter interval was reset).
When less than 1,000 kilometers remain until service, the driver warning algorithm changes: the mileage reading still changes after 5 seconds, but the spanner light does not go off after that.
If you missed the next service of your Peugeot 308, when you turn it on, the wrench starts blinking, and the meter displays the mileage you have driven after the next 20 thousand kilometers (in order not to deceive the driver, this value is indicated with a minus sign). After 5 seconds, the meter reading will return to normal, but the key symbol will remain lit to remind you to perform maintenance.
How to reset the inspection service on a Skoda Rapid
The action algorithm is selected based on which on-board computer is installed. Difficulties may arise if the manufacturer supplied the Maxi Dot system with a built-in VAG scanner. You can quickly reset the readings by following the steps in this order:
- With the ignition off, press the daily mileage switch and do not release.
- Activate the ignition without pressing the button.
- When a message appears on the screen about resetting the maintenance indicator after changing the oil, press the left button located at the bottom of the wiper lever.
- The information should be deleted; you can remove the ignition key.
In Skoda vehicles with a standard on-board computer there are two separate reset buttons. The Rapid model uses a double button with the following symbols: Set – to switch display modes and reset data, 0.0 – reset the TO indicator.
- If the car was manufactured after 2013, you must turn on the
- You need to turn everything off, then hold down the “set” key, it’s on the right.
- After a few seconds, turn on the ignition
- Release the button.
The left side of the key labeled “0.0” does not need to be used. It is clicked when the oil interval is reset. For models equipped with a multifunction display, the procedure is different. You must turn on the ignition and follow the instructions:
- Click on the lower right button and do not release until the menu opens.
- Quickly press the lower left key.
- Press and hold the right button again until the “Setup” message appears.
- Then briefly press the second key.
- Repeat steps from step 3. “Service” should appear on the screen.
- Perform steps 4 and 5 again, wait until the “Reset” line is displayed
- Click on the lower left button.
- Turn off the ignition.
Step by step video:
Service interval
The service guys were right. You can change the maintenance interval for your Volkswagen Polo yourself.
To do this, you need to find two buttons on the panel: “0.0 / SET” and the left button of the distance counter in the form of “two squares”.
Reset algorithm
The sequence of actions is as follows:
- we get into the car, insert the key into the ignition, but do not turn it;
Insert the key into the ignition switch.
Press the right button with the ignition off.
Press the button and turn on the ignition.
Press and hold the left button.
The range will now be reset to 372 days or again 15,000 km. If the operation is requested again, it is performed in the same way.
Service interval reset, Skoda maintenance reminders
Resetting the service interval and maintenance reminders is necessary after changing the oil, filters and other measures provided by the manufacturer.
For different models of manufactured cars, different service intervals are set, a reminder of which the driver sees on the instrument panel.
Skoda has the ability to check how much time is left before service.
Naturally, every owner who cares about his car promptly carries out all the prescribed measures to replace oils, fluids, filters and other elements included in the list of works for a specific mileage or age of the car.
Even if all the required work has been completed, the warning on the dashboard will remain. It needs to be removed. Often, maintenance is performed earlier than the due date and the reminder will not be activated, but after the time or mileage remaining before the due date, it will be displayed and will annoy you, so the interval after maintenance must be reset even if there is no reminder about it. The service interval is set at the manufacturer's factory. Mileage 15,000 km, time 367 days.
Passing Standards
It’s worth saying right away that the more often this procedure is performed, the better.
It definitely won’t get any worse after such a decision. Photo: drive2.ru There are generally accepted standards for completing the service.
- The standard recommendation from European manufacturers is to adhere to the 15 thousandth interval. Or replace it at least once a year. The second option is for the case when the mileage does not reach the specified threshold. This figure cannot be increased, only decreased.
- The interval decreases in the same way, taking into account the climate and conditions prevailing in Russia. Here you enter numbers up to 7-10 thousand kilometers. The main thing is not to try to save money by resolving this issue.
It is recommended to give preference to oils that have been on the market for a long time. Then the quality of the product will raise a minimum of questions.
It is better not to purchase compounds in the markets, otherwise there is a high probability of stumbling upon fakes.
A little about the service interval
The name of the service interval was given to the time between vehicle maintenance procedures. That is, between carrying out work to replace fluids, units, and so on. Resetting counters is the responsibility of specialists when carrying out work at specialized service stations.
Do not worry if the “service” sensor lights up. This is just a reminder that it's time to replace consumables. Maintenance is often carried out by drivers themselves, without the involvement of specialists. But after completing the procedure, the question often remains about resetting the interval.
What is a phase sensor and how does it work - see here.
Reviews from KIA Sportage owners will help you understand whether this car is worth buying or not.
Resetting the service interval
At 44,500 km, a reminder about the next maintenance began to pop up. Since I decided to carry out all subsequent maintenance myself, it became necessary to reset this reminder. The configuration of my machine is without maxidot. After searching the internet, I found this simple instruction:
1. Turn off the ignition. 2. Press reset button 2. 3. While holding down reset button 2, turn on the ignition. 4. Within 20 sec. press button 1. 5. Turn off the ignition.
About the InSP indication
InSP on the Volkswagen Polo display means the following:
- InSP3 - check the voltage in the power supply to the central locking control unit.
- InSP2: all external lamps need to be checked, a fault has been detected.
- If only a combination of letters flashes, without numbers, this is a reminder of a scheduled technical check based on mileage or age.
- InSP4 - presence of water in the diesel filter.
InSP in the dashboard until 2016
It is impossible to ignore this indicator (and indeed not at all). Not a single system is designed specifically to spoil the car owner’s nerves; if he warns about something, it means there’s a problem. Therefore, you need to make sure that the service period has not yet expired, or make an appointment at a service station.
To find out the remaining mileage, you need to:
- turn off the ignition;
- press odometer.
- After the daily mileage is displayed, the button is pressed again and held for a few seconds.
The letter combination InSP and the number of kilometers until the scheduled check will flash. For the Russian Federation, the range is 15 thousand kilometers.
Reset on the multifunction display
On many cars of the Skoda Rapid line of the 2018-2019 model year, as well as on earlier versions, the configuration included a multifunction display instead of the usual on-board computer screen. Here, resetting the service interval has its own characteristics.
In the case of a multifunction display, there may be 2 types of buttons underneath it. The first option is soldered, that is, it is a double button with images 0.0 and Set. There is another option where there are 2 separate buttons. On the left it looks like several rectangles following each other, on the right 0.0.
- if you have soldered buttons, then turn on the emergency lights before performing operations;
- turn off the ignition;
- hold down the right side of the button labeled Set;
- hold for a few seconds;
- Without releasing the key, start the ignition;
- do not start the engine, but only activate all systems;
- release the button now.
That's it, we managed to reset the service interval to zero.
The left side of the key, where 0.0 is shown, is not used during the service interval reset process. But it is necessary to reduce the oil interval.
When using two separate buttons on a Skoda Rapid with a multifunction display, in order to reset the service counter, you must follow the following sequence of operations:
- click on the right button under the on-board computer screen;
- hold down this key and hold until a special menu opens;
- quickly press the left button under the display once;
- press the 0.0 button again;
- hold it until the Setup message appears on the computer screen;
- after releasing, press the same 0.0 key again;
- now wait for the Service notification to appear;
- make one short press on the left button;
- hold down the right key again;
- after this the message Reset should appear;
- confirm the reset action by pressing the left button once;
- turn off the ignition.
After this, start the ignition again and check whether the notification has gone away and whether the service message about the need to undergo a technical inspection has been reset.
Please note that full routine maintenance is carried out first, and only then the counter is reset.
Many Skoda Rapid owners, believing that the car can last longer and there is no need for maintenance yet, deceive the on-board computer, reset the service interval and continue operation. But at the same time, consumables and many components are seriously worn out. They need replacement and diagnostics.
In practice, resetting the service interval counter on Skoda Rapid cars yourself is quite simple. But the main difficulties arise from differences in the configuration and type of on-board computer screen. If you choose the right instructions, you will be able to reset the service without outside help, spending literally a few minutes of your time on this.
How to reset with your own hands
If all the instructions for any car brand could be collected into one, then the necessary actions would have the following description:
- Turn off the ignition.
- Pressing the corresponding button.
- Turn on the ignition.
- Clamping the button, or its normal use.
- All that remains is to wait for the interval to reset.
This is an approximate order. Different machines have their own process characteristics, but there are not that many differences. Photo: best-jogurtnica.ru
How to reset service on Skoda Octavia (A7, A5, A3)
Depending on the configuration, information can be displayed on the display or multifunction screen. To reset on a car with a regular display, for example, Octavia A3, you must perform the following steps:
- Turn on the ignition.
- Press and hold the knob located to the right of the screen for 5 seconds.
- Without releasing the button, turn on the ignition again.
- Now you need to turn the knob to the right or left. The service interval has been reset.
For Octavia A5 models produced before 2015, the instructions presented above will not work. The operation is performed according to the following scheme:
- Press and hold the mileage reset regulator for about 15 seconds. At the same time, activate the ignition.
- Turn the regulator to the right. The display will show the value “15,000 kilometers”.
- You need to wait a few seconds and make sure that the data has been successfully reset.
The next generation of cars from the Czech automaker is the Octavia A7, which began production in 2013. To reset the service interval on this machine, you will need to follow a few simple steps:
- Without turning on the ignition, press the switch on the right. It is intended to reset the counter of the distance traveled per day.
- After 15 seconds, turn the ignition key.
- You can now release the switch. The display will display a menu with several options; here you need to select zeroing the service interval.
- You can then reactivate the ignition.
Video on how to reset the interval on the Octavia A7:
Skoda Rapid Severyanochka › Logbook › Resetting the oil change reminder / then UPDATED
Good afternoon. Last night the car gave a warning and 30 days later I changed the oil. I immediately went online to find a way to reset this reminder. But of all the options, not one helped. It was possible to reset the inspection service, for example it will arrive in 365 days or 15,000 km. But I still haven’t figured out how to get rid of the oil change notification. I spent the entire evening, but the proposed options (with and without an emergency lane) did not work out.
UPDATED Thanks to the post by oleg32-71, I was able to reset the oil change reminder.
INSTRUCTIONS Six months ago I did this on my car, I found a recording on the disk. Procedure: - insert the ignition key, - press the button on the dashboard - without releasing the button, turn the ignition key and release the button - the message “Reset service data” will appear - press the button on the dashboard - the data will be restored. Oil service is restored in the same way. A second after releasing the button with the panel already inserted, the message “Reset oil change” appears, and after another second, “Reset inspection service”. Pressing again resets the selection. The changes will take effect the next time you turn on. It turns out that the messages come one after another, and in a second you need to have time to click the desired message.
Methods for resetting the service interval
Skoda Yeti cars can be equipped with a standard on-board computer or a computer with a multifunction display. In the second case, to reset you will need to use the multifunction steering wheel buttons or the keys on the windshield wiper control lever.
With a standard on-board computer, you can use the Set and 0.0 buttons.
On Skoda Yeti cars that were produced after 2013, there is a clock button on the right side of the dashboard. And on the left there is a reset button.
Instruments of the Skoda Yeti car
To reset the service interval on a Skoda Yeti, you need to perform the following operations:
- turn off the ignition by turning the key to the zero position and pulling it out of the lock;
- hold down the button designed to reset the interval;
- hold down the button for 5 seconds;
- turn the key in the ignition;
- only then release the key;
- if the message does not appear on the on-board computer screen, press the clock setting button;
- the program will ask you whether you need to reset the data and remove the old counter;
- turn the wheel on the steering wheel on the right side until the answer is “Yes”;
- click on the button in the center;
- after this, the service interval should be reset;
- turn off the ignition and immediately turn it back on;
- When the ignition is turned on, the Service Oil message should disappear.
As for the service indicator or inspection interval, resetting it on Skoda Yeti cars is carried out according to a similar scheme. The only difference is that you will need to use the hazard alarm.
The hazard warning light on the machine turns on before all the operations described above are completed. After this, the counter is reset.
Service interval information
There is an alternative option on how to reset the service interval that appears on the screen on the Skoda Yeti.
This option is relevant for those versions where a multifunction display is provided. Interestingly, the same method is used on Skoda Superb and Skoda Rapid cars.
For this method, you should use the buttons located on the steering column switch. This is the right lever responsible for the windshield wipers.
The instructions in this case look like this:
- Turn the key in the ignition until the instrument panel lights come on. But you don't need to start the engine itself.
- Using the button on the steering column switch, enter the Settings menu on the multifunction display of the on-board computer.
- To navigate between different menu items, use the button at the end of the steering column lever. It is conditionally divided into 2 parts. In fact, these are up and down arrows.
- Having selected the “Settings” item, press the lower left key, which will allow you to enter the “Settings” menu.
- A submenu will appear in front of you. In it, find the “Service” section.
- There is another sub-item called “Reset”.
- Click on the bottom switch on the left side (Reset).
- Click reset again to clear the memory.
- Turn off the ignition.
Maintenance indicator reset instructions
Immediately after this, start the ignition again and check whether the service notification from the on-board computer screen has really disappeared.
This method may not work on some versions.
Then use the alternative instructions. To do this you need:
- press and hold the reset button on the right side of the dashboard, near the speedometer well (0.0);
- a menu should open;
- it happens that the menu does not open, and then additionally click on the clock setting key on the left side of the dashboard;
- if the menu appears, press the right button again;
- hold until you see Setup on the multifunction display screen;
- briefly press the clock button once;
- repeat the previous procedure as for calling the Setup message;
- but now the inscription Service should appear;
- Press the right button again until the Reset menu appears;
- click on the left button;
- turn off the ignition.
In the case of Skoda Yeti cars, the situation is really difficult. Different versions, different reset methods.
The most correct solution to reset the current service interval and restart the mileage counter until the next maintenance on the Skoda Yeti crossover is to look at the instruction manual specifically for your modification.
The manufacturer will provide the necessary tips, and you will be able to resolve the issue without involving specialists.
In any case, one of the presented methods for resetting the service interval will definitely suit you. Decide on the version of your crossover, see if you have a multifunction display, how the buttons are presented on the dashboard, and get to work.
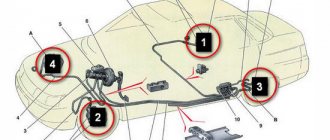
Peugeot 308 (07-14). Synchronization of the anti-theft system remote control
System operation
- Pressing the key lock button [1] once will lock the doors and activate the anti-theft system.
- Pressing the key lock button [1] again within 5 seconds of locking will activate the entire locking system.
- Press and hold the Key Lock button [1] for about 2 seconds to close the windows.
- Pressing the key unlock button [2] disables the anti-theft system, central locking and the entire locking system.
- If programmed:
- Pressing the key unlock button [2] once disables the anti-theft system and only unlocks the driver's door.
- Pressing the key unlock button [2] twice within 5 seconds disables the anti-theft system and unlocks all doors and the trunk/tailgate.
- Pressing the key button [3] only opens the trunk/tailgate.
- If the doors or trunk/tailgate are not opened within 30 seconds of unlocking, the locks are automatically locked and the anti-theft system is activated.
Note. The anti-theft/central locking functions can be changed using on-board diagnostics or diagnostic equipment.
Synchronization
When
- The system failed due to frequent key presses outside the reception area.
- The key batteries are completely discharged.
- Replaced the batteries in the keys.
Like
- Turn off the ignition.
- Turn on the ignition with the synchronized key.
- Press and hold the key lock button [1] for about 3 seconds.
- Turn off the ignition.
- Remove the key from the ignition.
- The synchronization procedure is completed.
- To confirm that the synchronization was successful, the door locks will be locked and unlocked.
Programming
When
- The key has been added or replaced.
- System malfunction.
Like
- Get all the keys.
- Get your personal car safety card.
- Keys can only be programmed using diagnostic equipment.
Immobilizer
System operation
- The system is activated after the ignition is turned off.
Service Warning
This is not to say that resetting the service interval is a mandatory procedure for any car, including the Skoda Yeti crossover. But it is recommended to do this.
By resetting, it is possible to remove the annoying message from the on-board computer screen. Yeti electronics will think that the machine has not passed the scheduled service inspection and is being operated with old consumables and worn-out spare parts.
According to the maintenance rules, the dealer is obliged to reset the service interval upon completion of all procedures as part of scheduled maintenance. It is presented in the form of a Service Oil service message.
In addition to the service interval, there is also an inspection interval. It resets according to a similar scheme, but has one difference. You will learn about it further.
The maintenance interval for Skoda Yeti cars of the 2012 model, as well as older and younger versions, is identical. It is 15 thousand km. The on-board computer, using a special sensor, counts this interval. And as we approach the 15,000 km mark. displays a service message on the on-board computer screen. To remove it, the counter must be reset.
Difficulties with resetting the service interval on Skoda Yeti cars are due to the fact that this crossover was produced in several modifications. And each of them used its own reset scheme.
Is it worth doing it yourself?
Let's consider the question: is it worth resetting the service interval of the Skoda Octavia A7 yourself?
- On the one hand, nothing should irritate the driver while driving. Therefore, these actions are justified, especially since this operation of resetting the oil change on the Skoda Octavia A7 is not particularly difficult. This work will also allow you to save money prepared for visiting a car service center.
- On the other hand, if the car is under warranty, a maintenance reset for the Skoda Octavia A7, carried out not by employees of the official Skoda dealership, may become a reason for refusal of warranty repairs and maintenance. Czech manufacturers also warn motorists that when resetting the service interval of the Skoda Octavia A7, the display settings may be lost.
Therefore, the car enthusiast himself must decide whether to perform a maintenance reset on the Octavia A7 or to do a similar procedure officially, at the dealer. To make a decision, you need to weigh all the pros and cons and take into account the consequences of such a decision.
Service interval indicator for Skoda Octavia A7
How to reset the service interval on Skoda: Octavia, Rapid, Fabia, Superb, Yeti
How to reset the service interval
The appearance of a signal about the need for maintenance is a common problem that almost every motorist has encountered. In this case, the display may flash and the device may make annoying beeps. In service centers, when resetting, they make an entry in the service book and stick a sticker indicating the date of the next maintenance. Manufacturers do not recommend resetting the data yourself, as the indicator settings may be lost. But most often, no malfunctions in the operation of the vehicle systems are observed.
Typically, a service notification appears after approximately 15,000 kilometers or 372 days. But most drivers perform maintenance much more often, approximately every 5-7 thousand kilometers. After changing the oil and filters yourself, the message “Service” appears. After all, the system cannot recognize that the fluid has already been replaced. You can remove this inscription yourself without overpaying at a car service center. It is possible to reset the recorded information if the “Service” indicator lights up on the screen.
How to reset service on Skoda Octavia (A7, A5, A3)
Depending on the configuration, information can be displayed on the display or multifunction screen. To reset on a car with a regular display, for example, Octavia A3, you must perform the following steps:
- Turn on the ignition.
- Press and hold the knob located to the right of the screen for 5 seconds.
- Without releasing the button, turn on the ignition again.
- Now you need to turn the knob to the right or left. The service interval has been reset.
For Octavia A5 models produced before 2015, the instructions presented above will not work. The operation is performed according to the following scheme:
- Press and hold the mileage reset regulator for about 15 seconds. At the same time, activate the ignition.
- Turn the regulator to the right. The display will show the value “15,000 kilometers”.
- You need to wait a few seconds and make sure that the data has been successfully reset.
The next generation of cars from the Czech automaker is the Octavia A7, which began production in 2013. To reset the service interval on this machine, you will need to follow a few simple steps:
- Without turning on the ignition, press the switch on the right. It is intended to reset the counter of the distance traveled per day.
- After 15 seconds, turn the ignition key.
- You can now release the switch. The display will display a menu with several options; here you need to select zeroing the service interval.
- You can then reactivate the ignition.
Video on how to reset the interval on the Octavia A7:
How to reset the inspection service on a Skoda Rapid
The action algorithm is selected based on which on-board computer is installed. Difficulties may arise if the manufacturer supplied the Maxi Dot system with a built-in VAG scanner. You can quickly reset the readings by following the steps in this order:
In Skoda vehicles with a standard on-board computer there are two separate reset buttons. The Rapid model uses a double button with the following symbols: Set – to switch display modes and reset data, 0.0 – reset the TO indicator.
- If the car was manufactured after 2013, you must turn on the
- You need to turn everything off, then hold down the “set” key, it’s on the right.
- After a few seconds, turn on the ignition
- Release the button.
The left side of the key labeled “0.0” does not need to be used. It is clicked when the oil interval is reset. For models equipped with a multifunction display, the procedure is different. You must turn on the ignition and follow the instructions:
- Click on the lower right button and do not release until the menu opens.
- Quickly press the lower left key.
- Press and hold the right button again until the “Setup” message appears.
- Then briefly press the second key.
- Repeat steps from step 3. “Service” should appear on the screen.
- Perform steps 4 and 5 again, wait until the “Reset” line is displayed
- Click on the lower left button.
- Turn off the ignition.
How to reset the service interval on a Skoda Fabia
If the car was produced no later than 2010, it is enough to follow the following scheme:
- With the engine off, press the button near the speedometer.
- While holding the button, turn on the ignition.
- The key must be turned to the right.
- When the data is reset, turn off the ignition.
Video for cars up to 2013:
For Fabia 3 New models starting from 2014, the reset is done in the same way as described above. In Skoda Fabia cars, starting from 2011, when the oil needs to be changed, an icon with a key appears on the display. Performing the operation to reset the service interval is even simpler:
- Press and hold the daily mileage button located on the right.
- Without releasing the key, turn the ignition key.
- Release the daily mileage button.
- Now press the left key, after which the key on the screen should disappear.
- The ignition must be turned off.
To check whether the measures taken helped, you need to wait a few minutes. Then turn the ignition key again and look at the display. If everything works, there will be no icon on the screen.
The second method is for cars with a multifunction display manufactured since 2011:
- With the ignition on, press the button located on the right and do not release it until the main menu opens.
- Press the same key again. When “Setup” is displayed, release the button and press the middle key.
- Now you need to press the first button again for a few seconds. When the “Service Interval” line is highlighted, release.
- Quickly press the second key, then hold down the first.
- You can release the button after “Reset” is highlighted.
- To reset, you need to confirm the action by pressing the left button.
- Turn off the ignition.
In case of resetting reminders on the Skoda Fabia 2, produced from 2007 to 2014, the methods presented above will not work. The procedure is as follows:
- You need to hold down the key used to erase the mileage.
- Without releasing the button, put the key in the ignition.
- Next, you need to release the mileage erase and click on the button with the folder image.
- The key icon should disappear from the screen. Immediately after this, turn off the ignition and wait until the display goes off.
How to reset the service interval on a Skoda Superb
It is easy to reset data on Skoda Superb cars starting from 2008. But first you have to figure out the location of the buttons on the multifunction steering wheel. On the right there is a wheel with which you select items in the menu. You will also need the lower left switch with an arrow; it is used to go to the settings section. The interval is reset as follows:
- Turn on the ignition.
- Press the switch located under the steering wheel down and wait until the main menu opens.
- The switches on the steering wheel will be used as arrows when navigating through the menu.
- You must select the “Settings” item, then go to the “TO” section.
- Next, you need to click on the inscription “Reset”, when the request appears on the screen, answer “Yes”.
If an LCD information display is installed, you need to go to the menu to get information about how many kilometers are left before the service. To do this, you need to go to the “Settings” section. The operation is performed according to the same scheme as on the Fabia model with an LCD screen.
For the Skoda Superb 2 model, produced from 2008 to 2015, you can use two methods. The first is to use the multifunction steering wheel. To find out the procedure for carrying out operations, you can see the instructions presented above for cars manufactured in 2008 and later.
The second way is to use the buttons on the windshield wiper switch, if included. Below is a short guide:
- Turn the ignition key.
- Now you need to find the “Settings” item in the menu. To switch between menu items, click on the upper or lower half of the switch located on the right. This button is used instead of the arrows to move up or down.
- To enter, select “Settings” by clicking on the bottom button on the left.
- From the submenu that opens, you need to go to the “Service” section.
- Select “Reset” and click on the bottom switch located on the left.
- Click again to clear the TO memory.
- Turn off the ignition.
Sources
- https://autoimperia-orel.ru/ekspluatatsiya/sbros-to-shkoda-jeti.html
- https://miravtovaza.ru/ekspluataciya/sbros-to-shkoda-jeti.html
- https://mobile-dvr.ru/diagnostika-i-remont/kak-sbrosit-servisnii-interval-na-shkoda-yeti.html
- https://rinkball.ru/kak-sbrosit-inspekcionnyj-servis-na-shkoda-jeti/
- https://avtoskill.ru/remont-obsluzhivaniye/kak-sbrosit-servisnyiy-interval-na-skoda-octavia-rapid-fabia-superb-yeti.html
- https://avto-mekhanik.ru/sovety/kak-sbrosit-mezhservisnyj-interval-na-shkoda-jeti.html
[collapse]
How to reset the counter after changing the oil?
If there was a single step-by-step guide to resetting the service interval for all cars, it would look like this:
- Turn off the ignition.
- Click the appropriate button.
- Turn on the ignition.
- Hold/press the button.
- Wait until the interval is reset.
- https://www.peugeotsos.ru/service/peugeot/to/to-308
- https://ls-motors.ru/to/peugeot_308
- https://peugeot-avtomir.ru/service/soderzhanie-to-peugeot/308/
- https://avtika.ru/pezho-308-kak-sbrosit-zamenu-masla-v-dvigatele-na-paneli/
- https://lkard-lk.ru/avtolyubitelyu/sbros-servisnogo-intervala-dlya-avtomobiley-peugeot-308
- https://mobile-dvr.ru/diagnostika-i-remont/kak-sbrosit-to-na-pezho-308.html
- https://remam.ru/raznoe/sbros-servisnogo-intervala-peugeot-308.html
- https://lemzspb.ru/peugeot-308-kak-sbrosit-schetchik-to/
- https://varebux.ru/pezho-308-sbros-nastroyek/
- https://adensamara.ru/remont-avto/kak-sbrosit-schetchik-to-na-pezho-308.html
- https://mzoc.ru/uhod-za-avtomobilem/kak-sbrosit-to-na-pezho-308.html
- https://avto-mekhanik.ru/sovety/kak-sbrosit-mezhservisnyj-interval-na-pezho-3008.html
- https://vector-auto.ru/ekspluatatsiya/kak-sbrosit-gaechnyj-klyuch-na-pezho-308.html
Models E82, E90, E92 and E93
On late 2000s models, the reset procedure is also different. This sequence of actions should work on e82, e90, e92, and e93 models, but many report that this does not reset the first time. So if it doesn't work, try again.
First you need to go to the service menu
1. Insert the key into the ignition.
2. Without pressing anywhere (without squeezing the clutch or pressing the brake), press the start/stop button.
3. Wait until the service reminder disappears on the display.
4. Immediately after the indicator disappears, press and hold the odometer reset button (daily mileage). A warning triangle will appear. We continue to hold the button for another 2-3 seconds until the triangle disappears and the service menu icon appears on the display. If you wait too long and the service menu icon disappears, start over.
Now reset the Oil Service indicator
5. Use the up/down switch on the turn signal lever to navigate through the service menu.
6. Scroll until the oil can symbol appears on the central display.
7. Press the BC button on the tip of the turn signal lever. “Reset” will appear on the display under the oil can icon.
8. Press and hold the BC button for 2-3 seconds until the clock indicator appears. The service indicator has been reset.
If you know the procedures for resetting the service interval on other models, describe them in the comments, or write to us and we will add to the manual.
What else needs to be considered
The on-board computer issues messages as soon as something goes wrong in your car. Here are some basic examples of Renault Fluence error messages.
Error messages during operation - they appear immediately when problems occur. If you do not follow this recommendation, you risk damaging your vehicle. They disappear when you press the display select key or after a few seconds, and are saved in the computer's log. The warning icon remains on.
- CHECK ESP - indicates a malfunction in the traction control system.
- CHECK FUEL FILTER - Indicates that there is water in the diesel fuel, contact your mechanic as soon as possible.
- CHECK GEARBOX - indicates that there is a malfunction in the gearbox; Contact your mechanic as soon as possible.
- CHECK AUTO LIGHTS – indicates a malfunction of the automatic lighting; contact the service station.
- INJECTION FAULT - indicates a serious engine malfunction.
- ENGINE OVERHEATING – indicates engine overheating.
- GEARBOX OVERHEATING - indicates gearbox overheating.
When determining when your car needs servicing, driving style and traffic conditions are much more important factors than simply completing a predetermined mileage. For example, a car that is constantly used for short trips on congested roads will require more frequent maintenance than a car that is primarily used for highway travel.
The service interval indicator monitors fuel consumption and tells you when an oil change or inspection is required based on the amount of fuel consumed. Thus, fuel consumption gives a very accurate idea of the stress and strain that the engine experiences. By recording fuel consumption and making service recommendations for a given amount of fuel consumed, the Service Interval Indicator uses a highly accurate assessment of the driving conditions your vehicle has been subjected to and makes service recommendations that are both informed and effective for your vehicle and your wallet. If you have already reset the service indicator yourself, tell us about it in the comments below the article.
How to reset the on-board processor
To reset the Renault Fluence on-board computer, follow these steps:
- Insert the key into the ignition (or place the special service chip in the slot provided for this purpose).
- Start the car.
- Scroll through the on-board computer menu using the button on the wiper control handle until the display shows the menu or the on-board computer reset icon.
- Now hold down the select button for about 10 seconds (the text will start flashing, then will be lit again).
Release the button and check all the parameters of the on-board computer, and proceed to reset the service interval.