The Chevrolet Lanos fuel pump is necessary to create pressure in the engine fuel system. That is why, if the pressure in the fuel system is insufficient or absent, the engine on the Lanos will not start or will work intermittently.
- Difficulty starting the engine - this is due to the fact that the fuel pump on Lanos cannot create sufficient pressure in the fuel system, so sometimes you have to turn the ignition key twice before starting the engine.
- Increased or extraneous noise when the Lanos fuel pump is running - the reasons are obvious, wear and tear on the electric motor of the fuel pump. Most often this happens due to time, mileage, or frequent driving with an almost empty tank. The point is that the fuel pump is cooled by gasoline and if it is not there, it constantly overheats.
- The engine stalls after starting or does not start at all (the hum of the fuel pump is not heard when you turn the ignition key) — problems with the wiring (connection) or with the fuse (or Chevrolet Lanos fuel pump relay) in the fuel pump circuit cannot be ruled out.
- Reduced power of the Lanos engine - most often due to a clogged fuel pump grid
Not all faults can be solved by replacing the fuel pump, so diagnostics of the fuel system is necessary.
For information, the article number for the Lanos GM fuel pump is 96344792 , but you are unlikely to find it new on sale. For example, now it’s 2022 and it’s temporarily out of stock on exist.ru. But there are a great many analogues, I’ll leave a link to the existential one.
Mostly, owners install the following fuel pumps on Lanos:
- Bosch 1987580030
- Denso DFP0105
- Marco 22512
- Stellox 10-01693-SX
- FSO 580453453
- TSN 7.2.21
- SK 070/SK0580453453
- Japan Line FJP 058045 J
Replacing the fuel pump for Daewoo/Chevrolet Lanos
Description of the process of replacing the gasoline pump on Lanos. The main subtleties and nuances of the procedure. Photo and video material. Analysis of the main points. Recommendations for car enthusiasts
Video materials
The video will tell you how to properly replace the fuel pump on a car, and also tell you about some of the tricks of the operations.
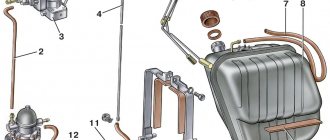
Fuel system composition
A standard injection system, the heart of which is four injectors, which are solenoid valves. The injectors operate using a control unit containing special firmware. Firmware is a program that monitors a lot of data about engine operation, and systems operate on their basis. To change the engine power, it is enough to change the opening time of the injectors. Accordingly, fuel consumption will also change.
The fuel rail to which the injectors are connected is under a certain pressure when the engine is running. This pressure is created using an electric fuel pump installed directly in the fuel tank of the car. True, there is a pressure regulator between the ramp and the fuel line. If it were not there, then the pressure in the ramp would constantly change, but due to the regulator it remains constant.
Replacement process
Let's start with the fact that the fuel pump is sold assembled, which simplifies the replacement process. With special tools, you only need a puller key to remove the disk, but you can make do with improvised means so as not to waste money.
So, let's proceed directly to the process:
We carry out the work to replace the fuel level indicator sensor, the resistor of the fuel reserve indicator lamp or the fuel module assembly. Relieve pressure in the power system. Disconnect the wire terminal from the negative terminal of the battery. Inside the car, raise the rear seat cushion. Using a slotted screwdriver, pry off the cover of the fuel module hatch and remove the cover.
To disconnect the engine management system wiring harness block from the fuel module cover connector, move the engine management system wiring harness block blocker (orange)…
...and, pressing the latch at the rear of the wiring harness block...
Squeeze the clamp on the tip of the drain pipe...
...and remove the tube tip from the fitting of the fuel module cover.
We remove the fuel module from the opening of the fuel tank.
The connection of the fuel module cover with the flange of the tank opening is sealed with a rubber ring.
Pump selection
Source
Checking the fuel pump directly
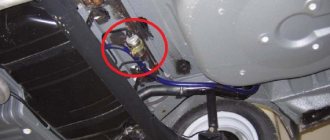
Having suffered a fair amount, it’s time to suffer even more... To gain access to the fuel pump cover, you need to “pull” the rear sofa: it is attached in two places to the floor (seen in the photo above), approximately in those places you need to pull. We removed the sofa - we unscrew the cover with a screwdriver and see the fuel pump connector (in the photo above on the right). To check the fuel pump directly , excluding all other elements of the car's electrical wiring, you need to apply voltage to the fuel pump directly from the battery. To do this, you first need to find which contacts in connector C901 are responsible for powering the fuel pump.
The picture above shows a connector (or, as people say, a chip) of a fuel pump (view from the pins). I didn’t remove the fuel pump from the gas tank, I just used a long wire to connect it to the battery. The fuel pump turned out to be alive!
Having experienced some bewilderment in connection with the diagnostic information received ( the pump is working, the fuse is working, the relay is working - all the obvious participants in the circuit are working! ), I decided to use a tester to check the voltage on the second half of the fuel pump connector (C901), coming from the bowels of the car. There was tension on him! That is, voltage was supplied to the fuel pump, the fuel pump was working, but did not work! How is this possible, you ask?
Why this situation has arisen and what transient contact resistance is, I will tell you in the next part of my adventures as a car enthusiast: Lanos (Lanos 1.5) will not start, part 2: the “Check” does not light up, the fuel pump or “C301 connector” does not hum
Step-by-step instructions for replacing the fuel pump on Lanos, Sense and Chance
The fuel pump plays a key role in the design of the car, and if it malfunctions, it will need to be replaced. If the device is faulty, the engine will experience unstable operation, and if it fails completely, the engine will not be able to start. In this case, you will need to resort to replacing the fuel pump on the Lanos, since this element is irreparable and, in the event of a breakdown, must be replaced. The process of replacing the device is the same for Chevrolet, Daewoo, ZAZ Lanos (1.4, 1.5 and 1.6), as well as Sens and Chance.
How drum brakes work
In addition to the pads and drum, the components of the devices in question include:
- working and main cylinders, inside of which the pistons are located;
- compression and return springs;
- spacers;
- racks for supporting brake pads;
- parking brake mechanism.
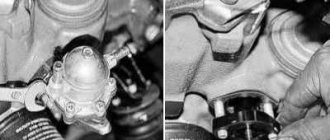
Lanos is equipped with rear drum brakes with two cylinders, the efficiency of which is higher than that of single-cylinder ones. Below is the appearance of a working brake cylinder with two pistons with its component elements, from which it is not difficult to understand how the mechanism works.
One of the main roles in the design of the working cylinder of drum brakes is played by sealing cuffs.
How to determine a faulty fuel pump on Lanos
The main sign of a fuel pump malfunction is the absence of the characteristic buzzing of the electric motor when the key is turned in the ignition. However, in this case, you should not rush to buy a new electric pump and install it in place of the existing one. After all, the absence of signs of inoperability can be caused by a burnt-out fuse link F10 under the hood. The first step is to check the serviceability of the fuse, and if the fuse link burns out, the element should be replaced.
A fuel pump malfunction can be caused by a failure of the relay, which is also located in the mounting block under the hood of the Lanos car. The relay rarely fails, but if the fuse is working, you should check it. The surest way to check the serviceability of the relays is to swap them. If, after replacing the relay, the fuel pump starts working, this means that a new relay needs to be installed, and this will complete the entire repair.
If the fuse and relay are working properly, you can judge that the fuel pump has failed. Moreover, its malfunction is of two types:
If in the case of a complete failure of the device everything is clear, then with a partial failure things are more complicated. In this case, there is no need to rush to change the pump until it is clearly established that it is faulty. Interruptions in the operation of the fuel pump may occur for the following reasons:
Before resorting to replacing the fuel pump, you should eliminate the above symptoms. Characteristic features of an electric pump malfunction are the following:
It is not recommended to drive a car with a faulty fuel pump, as at any moment it may stop functioning altogether. In this case, it will be impossible to drive a car, so at the first sign of a malfunction of the device in question, it should be replaced.
Checking the fuel pump directly
Having suffered a fair amount, it’s time to suffer even more... To gain access to the fuel pump cover, you need to “pull” the rear sofa: it is attached in two places to the floor (seen in the photo above), approximately in those places you need to pull. We removed the sofa - we unscrew the cover with a screwdriver and see the fuel pump connector (in the photo above on the right). To check the fuel pump directly , excluding all other elements of the car's electrical wiring, you need to apply voltage to the fuel pump directly from the battery. To do this, you first need to find which contacts in connector C901 are responsible for powering the fuel pump.
The picture above shows a connector (or, as people say, a chip) of a fuel pump (view from the pins). I didn’t remove the fuel pump from the gas tank, I just used a long wire to connect it to the battery. The fuel pump turned out to be alive!
Having experienced some bewilderment in connection with the diagnostic information received ( the pump is working, the fuse is working, the relay is working - all the obvious participants in the circuit are working! ), I decided to use a tester to check the voltage on the second half of the fuel pump connector (C901), coming from the bowels of the car. There was tension on him! That is, voltage was supplied to the fuel pump, the fuel pump was working, but did not work! How is this possible, you ask?
Why this situation has arisen and what transient contact resistance is, I will tell you in the next part of my adventures as a car enthusiast: Lanos (Lanos 1.5) will not start, part 2: the “Check” does not light up, the fuel pump or “C301 connector” does not hum
Causes of fuel pump failure
If the Lanos car engine does not start, then do not rush to conclusions. Even the absence of a characteristic sound in the area of the fuel tank does not mean that the device is faulty. One of the important elements in a car is the crankshaft position sensor. If it is not working properly, then the engine will not be able to start. When the ECU does not receive data from the DPKV, no power will be supplied to the electric pump. The driver may think that the fuel pump is faulty and resort to replacing it, but after successfully completing this procedure, the effect when starting the engine will be identical. That is why it is important to first establish the exact cause of the malfunction, and only then resort to eliminating it.
Checking the fuel pump directly
Having suffered a fair amount, it’s time to suffer even more... To gain access to the fuel pump cover, you need to “pull” the rear sofa: it is attached in two places to the floor (seen in the photo above), approximately in those places you need to pull. We removed the sofa - we unscrew the cover with a screwdriver and see the fuel pump connector (in the photo above on the right). To check the fuel pump directly , excluding all other elements of the car's electrical wiring, you need to apply voltage to the fuel pump directly from the battery. To do this, you first need to find which contacts in connector C901 are responsible for powering the fuel pump.
The picture above shows a connector (or, as people say, a chip) of a fuel pump (view from the pins). I didn’t remove the fuel pump from the gas tank, I just used a long wire to connect it to the battery. The fuel pump turned out to be alive!
Having experienced some bewilderment in connection with the diagnostic information received ( the pump is working, the fuse is working, the relay is working - all the obvious participants in the circuit are working! ), I decided to use a tester to check the voltage on the second half of the fuel pump connector (C901), coming from the bowels of the car. There was tension on him! That is, voltage was supplied to the fuel pump, the fuel pump was working, but did not work! How is this possible, you ask?
Why this situation has arisen and what transient contact resistance is, I will tell you in the next part of my adventures as a car enthusiast: Lanos (Lanos 1.5) will not start, part 2: the “Check” does not light up, the fuel pump or “C301 connector” does not hum
Features of replacing the fuel pump on Chevrolet and Daewoo Lanos
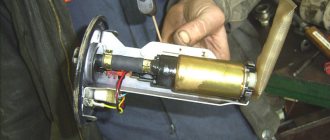
The fuel pump for Lanos is a cylindrical part that is placed inside a plastic flask. Many people do not want to waste time dismantling the fuel pump, so they buy an assembled fuel pump module. As a result, you have to overpay a lot. If the fuel pump on a Lanos is faulty, but the module is not damaged, then only the failed part needs to be replaced.
A module or block is a device that consists of a fuel intake, a fuel pump, a fuel gauge sensor and a low level alarm, as well as a filter. The need to replace the module arises in rare cases when the plastic flasks of the device are damaged. When it comes to replacing the fuel pump, the insert itself or the electric motor with the impeller changes.
When purchasing, it is important to consider one feature - the diameter of the gas suction hole. Today, manufacturers are releasing a new type that has a hole diameter of 11 mm. If Lanos or Sens were produced before 2002, then pumps with a hole diameter of 22 mm were installed on them. However, you can install a new type of fuel pump instead, but you will also need to buy a new filter mesh.
Models of radiators for Chevrolet and Daewoo Lanos by manufacturer
If a malfunction of the stove radiator occurs if it is damaged, it is recommended to replace the device. Do not use liquid sealants that are recommended on the market. These sealants not only clog the damaged areas of the tubes, but also reduce the permeability of the tube channels. As a result of the slightest blockages, not only of the heater radiator, but also of the engine cooling, malfunction of these devices occurs.
Having understood the technical issue of which is the best heater radiator to choose for Lanos, you should pay attention to the manufacturers. You have to choose among the following manufacturers for Lanos, Sens and Chance cars:
- Delphi are original Polish radiators, with which Daewoo Lanos were originally produced, and subsequently Daewoo Sens cars.
Such devices are no longer produced, but Delphi brand heat exchangers can still be found on sale. The devices were made of aluminum and consisted of 21 tubes. They are distinguished by quality, affordable price and reliability - NRF is a Dutch company that produces aluminum heat exchangers.
The devices consist of 18 tubes of increased diameter with turbulators. They are distinguished not only by high performance, but also by build quality - DAC is a Korean company that produces tubular-band heater radiators.
Among the models there are devices that are suitable for Lanos, Sens and Chance cars. The quality and performance are not inferior to the original devices - Profit are Czech heat exchangers that consist of 25 aluminum tubes with honeycomb strips.
The device can be described as a high-quality radiator, manufactured in compliance with standards. After manufacturing, the devices are tested and then go on sale. - LUZAR (Luzar) are Russian radiators that consist of 16 aluminum tubes.
Judging by the number of tubes, it is clear that the device is inferior in terms of heat exchange to the above models. It is characterized by low cost and a fairly long service life - GROG (Grog) - consists of 22 aluminum tubes, and is distinguished by its affordable price, high-quality workmanship, and also popularity.
The tanks on the device are made of aluminum - KMC is a product of the Korean company Korea Motor Company.
Despite the low cost, the radiator is of high quality, but its main drawback is the use of only 17 main tubes, which negatively affects performance - Tempest is a Taiwanese company that produces quality products.
The devices have 25 main tubes and are also distinguished by high-quality workmanship. The products have a special design - reduced height and increased width of the tubes - AVA - Ava brand stove radiators are on sale.
This is a budget option made in Holland, which has 17 main tubes. Manufacturers claim that the devices are made only from high-quality materials, but in practice this is far from the best option. - Nissens is a heat exchanger consisting of 18 tubes.
The radiator tanks are made of plastic. The Danish company produces high-quality products, and despite the fact that the design has only 18 tubes, the heat exchanger is highly efficient. Customer reviews indicate that the radiator does not fit in size and has a different shape. During installation, it is necessary to cut out the side of the heating system housing
Heat exchangers of the Nissens and NRF brands are produced with plastic barrels. From experience it follows that if you change the heater radiator on Lanos, it is better not to save money and buy a high-quality heat exchanger that will last at least 4-5 years. Replacing a device is a time-consuming process, and it's unlikely you'll want to return to it every year. There are other manufacturers of the devices in question, in particular - AURORA, SHIN KUM, LSA ECO, AT, Van Wezel.
This is interesting!
The service life of the heater radiator is affected not only by the frequency of use of the heater, but also by the use of high-quality coolant and antifreeze. It is not recommended to use antifreeze at all. What is better to fill in the Lanos cooling system - coolant, antifreeze or antifreeze, as well as their types, differences, advantages and disadvantages, are described in this material.
How to replace the fuel pump on Lanos, Sense and Chance
The process of replacing the device in question is not difficult, however, its implementation must be carried out with strict adherence to the sequence of actions. To replace the fuel pump on a Lanos, you will first need to remove the fuel module, then disassemble it and install a new fuel pump in place of the faulty device. Let's look at how to do this correctly below.
All subsequent assembly operations are carried out in the reverse order of removal. When assembling, it is important to take into account one point - cleaning the surface of the tank near the hole for installing the module. The module is attached to the tank through a rubber sealing gasket in the form of a ring.
It must be cleaned or replaced if deformed. The area around the hole should be cleaned, and this should only be done with a clean cloth. Using a vacuum cleaner or other types of electrical appliances is strictly contraindicated.
After replacing the fuel pump, you can install the fuse and relay in their places, and also connect the minus terminal to the battery. We turn on the ignition and wait until the new fuel pump pumps fuel into the tank. We start the engine and enjoy its operation.
Where is the relay located?
The part on cars is installed mainly together with all the fuses, but in some brands of cars there is also a different arrangement of devices. In cars with an injector, the relays can be located both under the hood and under the instrument panel. Most often, the fuel pump relay is located in the following places:
- Near the ABS blocks.
- Near the fuel injection control unit.
- Under the dashboard. Most often it is installed on the passenger side under the dashboard.
Since the fuel pump relay ensures the supply of fuel, it is sometimes worth diagnosing the part so that an unpleasant breakdown does not cause a premature end to the trip.
Manufacturers of fuel pumps for Lanos - what to choose and how much they cost
It is recommended to install an original General Motors fuel pump on Lanos. This item has an article number - 96344792. The main disadvantage of the original fuel pump is that it costs more than $300. Alternative fuel pump options for Lanos, Sens and Chance cars:
You can find many other manufacturers, but the most important thing when purchasing is to consider the price of the fuel pump. On average, a high-quality electric fuel pump for Lanos, Sense and Chance costs about $100. It is not recommended to purchase devices that cost 10-30 dollars, since they will soon need to be replaced again.
In conclusion, we must summarize and note that the process of replacing an electric fuel pump does not take much time, and every car owner can complete the procedure. By following the sequence of actions described in the material and adhering to the safety instructions, replacing the fuel pump on Lanos, Sense and Chance will be done correctly and quickly.
Design and types of fuel level sensors
The fuel level sensor on Lanos cars is located directly in the gas tank. This device is a potentiometric device or variable resistor, which has a number of advantages:
- Simplicity of design
- Reading accuracy
- Reliability
- Low cost
Among the disadvantages, it can be noted that due to the simplicity of the design, the device tends to wear out during operation. This wear is especially accelerated when the driver adheres to the refueling method when the gas tank is completely empty. To understand why the device fails, let’s look at its design.
A potentiometric device consists of a group of contacts, some of which are movable. Due to this mobility of contacts, the filling of the gas tank with fuel is determined. When the moving contact (slider) moves, it rubs against a fixed scale, consisting of conductive marks made of resistive material. During the friction process, the fixed scale wears out, which causes malfunctions such as incorrect readings or a complete malfunction of the fuel gauge on the Lanos instrument panel. The photo below shows the design of a potentiometric fuel level sensor, which is used on Chevrolet and Daewoo Lanos cars. Such sensors are called lever sensors, but there are other types of such devices.
FLS on cars, installed directly in the gas tank, are of the following types:
- Lever or float
- Tubular
The principle of operation of both types of sensors is the same, and it is based on the fact that the float connected to the moving contact of the sensor takes the corresponding position on the fixed contacts. As the gas tank empties, the position of the float decreases, which means that the moving contact moves along a fixed scale. The amount of fuel in the tank is measured due to the fact that an electric current flows through fixed contacts. By changing its position with the moving contact, the resistance increases or decreases, on the basis of which the level of gasoline in the container is determined.
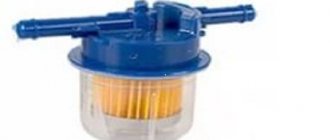
If a lever sensor is a block consisting of a fixed resistive scale and a moving contact connected to a float, then a tubular sensor is a separate container. This container is presented in the form of a tube, which is filled with gasoline. Inside the tube there is a float that changes its position depending on the fuel level in the tank. The float is connected to a movable contact that moves along a fixed resistive scale. The advantage of a tubular sensor is that it is possible to determine the amount of fuel in the tank more accurately than when using lever devices.
This is interesting!
The disadvantage of a tubular fuel level sensor is that it is not suitable for use in all cars, which depends on the geometric parameters of the tank.
Lanos cars with nameplates from various Chevrolet, ZAZ and Daewoo factories, as well as Sens and Chance, use lever-type fuel level sensors. They are located directly inside the gas tank, and they are attached to the fuel pump module.
https://youtube.com/watch?v=UVK_Ce83wcw%3F
Chevrolet Lanos 【Ruby ♦ Red】 › Logbook › Replacing the fuel pump mesh
“Cleanliness is the key to health!
Order comes first!” The Tale of the White Ice.
1974 Good afternoon, dear Drayvovites! I'll try not to write too many letters.
I bought a mesh for 100 re.
First, you need to relieve the pressure in the fuel system - in the fuse box under the hood, remove the fuel pump relay:
Next, start the engine and wait for it to stall. To be safe, let's turn it a little with the starter.
Now you need to remove the rear seat. For convenience, I also removed the left backrest to make it easier to get to the bolt that holds the seat. The back and seat are held by 12 bolts, two on the back and 1 seat. Next, we forcefully pull out the brackets along the front edges of the seat; you can pry them off with a screwdriver or a key.
We see the cover under the seat:
We pry it off with a screwdriver and see the pump itself:
We thoroughly blow and wipe everything so that dirt does not get into the tank after removing the pump. We disconnect the wiring block (1), and the fuel pipelines (2 and 3). To remove the wiring block, you need to pull out the orange clamp, marked with a dot, a little, as shown by the arrow, that is, towards the pipelines. The blue dot shows where you need to press to pull out the block. To remove the hoses, you need to press the white clips.
Then you need to remove the retaining ring that holds the fuel pump. We take a screwdriver, place it on the rings and alternately tap with a hammer on one side or the other, unscrewing it counterclockwise until it comes out of the grooves. Because Some gasoline still leaked out of the hoses, I wiped the surface as much as possible, and knocked out the ring, placing a cloth under the screwdriver to prevent a spark.
Next, we take out the pump itself, slightly bending the upper iron part - it is on a spring, nothing bad will happen. The pump is full of fuel, so you need to carefully drain it back, turning it upside down. Be careful.
We remove the float so that it does not interfere; to do this, remove the clip:
Then, using a pair of screwdrivers, we open the flask, which is held on by three latches. Using screwdrivers, scrape out the lid of the flask.
We also need to pull out the wiring block, otherwise we will not be able to remove the fuel level sensor.
Now the fun part - you need to remove the inner flask. You will need a hook. I stopped by a car service center and asked for a pair of electrodes. I bit the top layer of the electrode with pliers, processed it with a file, and it turned out to be a decent twig.
This hook needs to hook onto the protruding plastic of the inner flask. I also preheated the body with a hairdryer. I strained a little and the flask gave in. I thought it would be more difficult. In general, by prying the flask from different sides, I pulled it out.
I was unpleasantly surprised by what was going on inside the pump - sand, dirt and some particles. I washed it with water and dried it with a hairdryer.
Next, remove the old mesh, having first removed the retaining ring:
We install a new mesh, securing it with the same retaining ring (or better yet, a new one). Well, let's put everything back together in reverse order.
For comparison, new and old mesh. Out of curiosity, I opened the old one.
I had more problems installing the pump in the tank than removing it. The retaining ring did not fit into the grooves at all. Still, I tightened the ring and discovered that my fuel level sensor on the dashboard had died... To put it mildly, upset, I thought it was worth removing the pump - maybe the float was caught or not seated correctly. I was right. After moving the pump, everything worked.
Update:
I'll add one more point. When installing the pump, adjust the rubber ring-gasket and make sure that it does not move anywhere. It turned out that the gasket did not fit correctly and I had difficulty locking the ring. As a result, there was a terrible smell of fuel all day.
Now it feels like I didn’t notice any global changes, but the car began to pick up speed more smoothly. Doesn't jerk when switching. Maybe she became a little faster. Still, it’s nice when you know that this unit is in order!
Thank you all for your attention, I hope it will be useful to someone.
Source
What fuel pressure in the rail should be
Normal pressure is considered to be 2.5 atmospheres at idle. When gas is added, the pressure briefly increases to 3-3.2 atmospheres - this is a kind of imitation of an accelerator pump, like on a carburetor. These indicators are influenced by several factors:
- rail pressure regulator;
- fuel pump performance.
If the fuel pump does not provide the proper pressure, then there will be no pressure in the ramp. But within certain limits, the ECU will be able to compensate for this by increasing the injection time. But at low pressure, the accelerator pump imitation will not work, which will lead to failures.
A working fuel pump gives a pressure of about 5-7 atmospheres. But then how does 2.5-3 stay on the ramp? It's simple - the pressure regulator in the fuel rail is responsible for this. This is a small bypass valve, which is located on the rack, in the area of the fourth cylinder. Structurally, the pressure regulator is made in the form of a spring-loaded valve, which is also connected to a vacuum membrane.
You've probably seen that the rail pressure regulator is connected by a thin tube to the intake manifold. If it is disconnected from the manifold, it will maintain pressure due to the spring, and it will be equal to 3-3.2 atmospheres. And when the vacuum tube is connected, not only the spring, but also the membrane acts on the valve stem. Thus, the regulator has the ability to further adjust the fuel pressure in the rail due to changes in the vacuum in the manifold.
Chevrolet Lanos Good bye may love › Logbook › Replacing the fuel pump mesh and fuel filter
Hello to all readers of my blog!
After reading the drive, I learned that the fuel pump has a mesh, a la “Tea bag”. I looked at the reports of the people who changed it: its condition was deplorable even among those who changed it after a mileage of 40 thousand km. My mileage is approaching 97 thousand km. Before me, only women owned the car, and I think they didn’t get into it...
I ordered the net from existential and received it. She lay at my house for a week and a half. And now I have matured))
Well, let's go) To access the fuel pump you need to remove the rear seat seat. We unscrew the bolt located approximately in the middle of the seat with a 12mm head.
You can't just unscrew it - you need something like an extension for the key. I didn’t have one - I folded back the seats and unscrewed it from the trunk.
Sharply and with force
pull the seat on the passenger side - the fastening will come out of the hole. On the driver's side, I had to lift the seat from the back, move it in different directions and pull it out with the same jerk.
Cleaning the injectors
Cleaning and washing the engine injectors, as well as replacing the fuel pump mesh on a Chevrolet Lanos, is necessary every 30,000-35,000 mileage (and with the current quality of gasoline, even more often). There are several washing options:
Flushing the injector with specialized fuel additives is the easiest and most affordable cleaning option, but also the most questionable. These additives become effective when regularly added to gasoline; Cleaning without removing from the engine
– instead of the factory power supply system, a unit is connected to the injectors that supplies a special cleaning solvent, and the engine runs on it for 20-30 minutes.
The efficiency of this method is very high; all deposits are removed from the injectors without leaving any residue; Cleaning on an ultrasonic stand
is considered the most effective way of washing and cleaning. The advantage is that there is no need for an expensive solvent, but you have to remove the injectors from the engine;* We also recommend reading the article “How to wash injector injectors.” Everything is explained there in detail.
There are also ways to wash it yourself; with the right approach, it will be no less effective, but we’ll talk about that separately.