A car owner who independently maintains equipment needs to know how to determine early or late ignition on an engine. If adjusted incorrectly, the power unit loses power and consumes more fuel. Please note that adjustment is only possible on some types of motors equipped with a mechanical pulse distributor.
The car driver needs to be able to determine late and early ignition.
Early or late ignition: what is it?
When a gasoline engine is running, the spark must jump between the electrodes before reaching top dead center. The advance is set manually or programmed in the control unit.
... about the value of the ignition timing
A broken angle causes premature or late ignition of the mixture, which negatively affects the operation of the power plant.
An identical problem is possible on a diesel engine due to incorrect fuel injection timing.
The importance of correct ignition adjustment
The fidelity of the set ignition on carburetor engines is carried out using a strobe light
The quality and efficiency of engine operation depends on the nature of the ignition installation . Therefore, it is the installation of the ignition that is an important action that allows you to configure the power unit. If the ignition is installed incorrectly, both in the direction of increasing the advance angle and in the direction of decreasing it, the engine immediately feels a negative impact.
That is why setting the ignition timing should be approached responsibly and very carefully.
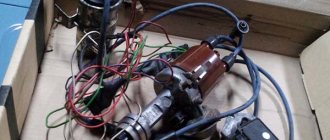
Ignition operating principle
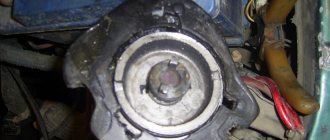
A gasoline engine has certain factors that affect the quality and timing of the spark required to ignite the combustible mixture. These factors are combined into a separate mechanism called a distributor; it is also sometimes called a distributor-breaker.
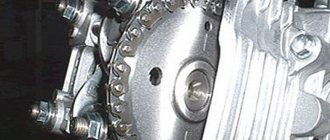
Classic ignition circuit
It is installed in the area of the cylinder block; the distributor shaft is driven by the engine camshaft. There are cams located on the distributor shaft, they open the circuit at the required moment, and then a spark is formed.
Distributor diagram
The main disadvantage of the distributor is its tendency to mechanical wear, as a result of which the quality changes, as well as the timing of the spark..
Of course, this affects the performance of the engine, which will require further intervention and adjustment.
Operating principle of the ignition system
Regardless of the type of power system, candles are used to ignite the mixture; a high-voltage discharge pierces the air gap. In autodiesel engines, the air is pre-compressed, which allows the temperature to reach +600°C. The fuel injected by the nozzle ignites and the expansion stroke begins, accompanied by the downward movement of the piston.
On the injector
On engines with an early type injector, a contactless system with a distributor and a Hall sensor is found. Later, they began to use a control unit that determines the position of the shafts and automatically adjusts the advance angle. It is impossible to say unequivocally which ignition is better, since each of the systems has its own advantages and disadvantages.
On the carburetor
On engines with a carburetor, a mechanical distributor is used that distributes current pulses among the cylinders. Instead of a contact group, a switch can be used that works with a Hall sensor and controls the operation of the coil. But the distribution of high-voltage pulses is carried out by a mechanical device. Spark discharges appear after the starter starts turning the engine shaft. After successive flashes of the mixture, the power unit will start working.
On engines with a carburetor, a distributor is used to adjust early or late ignition
Consequences of driving with incorrect settings
In addition to deteriorating vehicle performance, ignition too early causes other detrimental consequences:
- Detonation is the worst enemy of the engine. Due to constant impacts on the pistons, the fingers become loose and play forms in the connection. As a result, the connecting rod bushings are broken and the production of cylinders is accelerated.
- Shooting at the carburetor damages the bushings on which the valve axles rotate. The latter do not close tightly, causing the engine to suck in excess fuel at idle.
- The power unit tends to overheat and if the cooling system malfunctions, the cylinder-piston group may fail.
Modern electronically controlled engines are equipped with knock sensors. When the element detects vibration, the control unit automatically adjusts the ignition timing.
Early injection of diesel fuel into a diesel engine is fraught with damage to the high pressure fuel pump (HPF) and injectors. Imagine: a pump pumps fuel in one direction, and it is counteracted by a piston moving towards TDC. It's not hard to guess who will get the hit.
Signs of late ignition are no less dangerous. Ignition of the fuel mixture at the expansion stage leads to a decrease in engine efficiency and an increase in the load on the main parts - pistons with rings, cylinders and connecting rods. The result is easy to predict - intense heating and accelerated wear.
Shooting into the exhaust tract, caused by delayed sparking, destroys the walls of the exhaust pipe and the muffler partitions. Elements will have to be repaired by welding, or even replaced.
How to determine early and late ignition
The following are signs of incorrect setting of the ignition timing on engines:
- with forced ignition (liquid and gaseous fuel);
- with ignition of fuel from compression.
On gasoline
Signs of early combustion of the mixture:
- difficult starting with attempts of the crankshaft to start rotating in the opposite direction;
- unstable operation in idle mode;
- drop in dynamics and detonation combustion of fuel (with the correct octane number).
A sign of early ignition of the mixture is a drop in dynamics.
With late ignition, the car owner notices an increase in fuel consumption while maintaining the standard driving style. The engine warms up quickly, the cooling system fan operates more often. Many drivers note a decrease in power, which negatively affects the dynamics.
On diesel
Diesel engines differ from gasoline engines only in the way the mixture is ignited. If the timing of the start of fuel injection is incorrectly adjusted, malfunctions appear that are identical to problems caused by incorrect adjustment of the ignition system on gasoline engines.
... about adjustments on a diesel engine
It should be noted that on a diesel engine, the injection timing is adjusted according to the marks on the fuel pump drive.
On a car with HBO
When using gaseous fuel, it is necessary to set the ignition early to reduce emissions of the burning mixture into the exhaust manifold. Signs of mistuning are no different from those on gasoline engines.
Reasons for disappearing factory settings
Even if your car has a button instead of a lock, sooner or later you will still have to adjust the ignition. Before you do everything yourself, let's look at the reasons why this need arises. First of all, the reason for this is the driver himself, who for various reasons could dismantle the ignition distributor. And with its further installation, the ignition timing (ignition timing) was not properly adjusted.
The reason why the ignition timing is set lies in the marks on the components. When dismantling the distributor, these marks are lost; accordingly, the car owner simply destroys the factory settings. So before carrying out any work related to the breaker, you need to note the location of all the marks.
Adjustment of the interrupter unit for setting the SOP
Consequences of an incorrectly set ignition
With early or late ignition, symptoms are observed:
- drop in engine power and vehicle acceleration dynamics;
- difficulty starting the engine (the problem progresses as the air temperature drops);
- increased fuel consumption;
- unstable operation in idle mode;
- overheating and combustion of the working mixture in the collectors;
- the appearance of engine detonation during fuel combustion, destroying pistons and rings.
Late or early ignition increases fuel consumption.
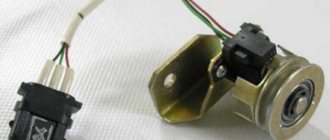
Fine tuning: weights and springs
The adjustment of the weights begins after this. This is already called fine adjustment of the distributor. In this case, the UZ is being adjusted, for which the proofreaders - TSNTR and VK - are directly responsible.
The first, centrifugal regulator contains two weights and two springs. When the distribution rotor rotates, the weights, under the influence of the CNTR forces, diverge to the sides. During this process, the shaft with cams or the shutter moves (if the ignition system is contactless). Thus, the contacts operate noticeably earlier.
Distributor weights and springs
Two springs act as counteraction to the CNTR force, on which the effective functioning of the entire ignition system depends. The springs themselves are different, and this is done this way for a reason.
- The first spring is longer, it is responsible for the moment the CNTR regulator, which carries out tension, comes into play. At the same time, this spring adjusts the right angle up to 1.2 thousand revolutions per minute, ensuring rigidity.
- The second spring is shorter, but it is much stiffer than the first. Corrects the breaking moment, ensuring free movement.
Experts insist that the second spring must be provided with free movement. However, some car enthusiasts believe that this results in unstable operation of the internal combustion engine at low speeds. It is supposedly regulated by the tension of this spring.
As for the VK or vacuum corrector, it contributes to the occurrence of advance only during the operation of the first chamber. In other words, when it comes to partial load on the power plant.
By itself, this advance regulator cannot create advance either at high speeds or under loads. This should be understood. And on XX, by the way, too.
Video below about the operation of weights on a distributor
Methods for setting the ignition timing on a car
To configure the following methods are used:
- using a special device;
- connecting an incandescent lamp;
- by the sound of work;
- by spark.
By strobe
A stroboscope is an optical device that allows you to control the moment a spark is fired.
...about diagnostics using a strobe light
To adjust, you need to set the marks on the crankshaft pulley to the required angle and check the position of the slider in the distributor.
Then you should connect the device to the battery (observing polarity) and install the sensor on the wire of cylinder 1. Before checking the correct angle, you must connect an additional cable to the ignition coil terminal connected to the breaker or switch.
Algorithm for adjusting early or late ignition when using a strobe light:
- Clean the surfaces of the pulley and engine crankcase from any dirt covering the ignition adjustment notches. The position of the marks depends on the car model.
- Start and warm up the engine to operating temperature.
- Remove the distributor cap and make sure the slider is in the correct position.
- Press the button on the side of the device and direct the light mark onto the pulley; the applied mark should not jump and be perceived as stationary. Assess the position of the light spot relative to the notch on the front cover.
- Adjust the angle (if necessary) and recheck the settings.
The stroboscope controls the moment of spark supply when determining early or late ignition
According to the control light
In the absence of special equipment, the owner can set the ignition using a light bulb. The technique is characterized by reduced accuracy and is used for repairs on the road. To perform the work you will need a 12 V incandescent lamp, a socket with wires 400-500 mm long and a set of wrenches.
To find out when the spark is fired, you need to:
- Set the piston in cylinder 1 to the upper position (for example, according to the marks on the gas distribution mechanism drive or along the notches on the crankshaft pulley or flywheel).
- Connect the light bulb to the terminal on the coil connected to the breaker or switch.
- Connect the opposite wire to the negative terminal of the battery or body.
- Loosen the distributor, turn on the ignition and rotate the assembly until the lamp turns on.
- Tighten the fastener and check that the settings are correct.
Aurally
When adjusting, the technician detects signs of early or late ignition by rotating the distributor relative to the base with the engine running and warm. It is necessary to achieve maximum idle speed without dips, and then tighten the distributor mounting bolt.
... about hearing diagnostics
The technique is not highly accurate, requires experience and good hearing from the tuner, and is used in case of roadside repairs.
By spark
The technology is identical to adjustment using a lamp, but involves removing the spark plug from 1 cylinder (the piston is at the top point). Then you need to turn on the ignition and rotate the distributor, determining the moment the spark appears. Then you should tighten the fastening, install the spark plug in the well and check the correct operation.
Two main ways to configure the distributor
Let's start with the first method. Before installing the distributor in place, be sure to set the 1st cylinder of the power plant to the TDC position. Use your finger to plug the hole into which the NW of the 1st cylinder enters, and TDC is determined by the felt pressure of the expelling compressed air.
Distributor setup
To put the distributor in this position, you will need to rotate the crankshaft until the mark on the shaft wheel matches the mark on the cylinder block. You can find out which risk is TDC from the motorist's manual.
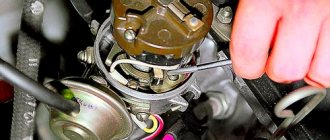
Be sure to remove the cover from the distributor. After this, turn the slider so that it is directed towards the contact in the cover of the 1st cylinder. It is in such an exposure that the distributor housing is placed in the internal combustion engine.
Attention. If a gear drive is installed on the distributor, it should be rotated thirty degrees counterclockwise, and only then installed in the engine.
During the process of installing the distributor in the internal combustion engine, the slider should be moved in the direction of emergency and against it in order to distribute it normally in place. It happens that the distributor sits in place, but the slider does not receive the correct direction. In this case, you will have to dismantle the distributor and then put it in place, taking into account the previous error.
Correct, competent adjustment of the distributor for the 1st cylinder is carried out as follows:
- The main armored wire should be removed from the distributor and then grounded to ground.
- Rotate the crankshaft to the mark until TDC.
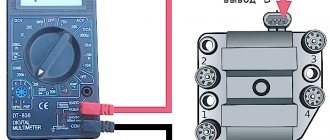
- Connect the multimeter to the distributor, setting the device to 20 V direct current.
- Diagnose the gaps of the contact group, as well as the condition of the surfaces.
Note. It will be necessary to rotate the distribution first according to the emergency situation until the multimeter indicator lights up at 0.45. Then turn the distributor in the opposite direction to 12 V. In this case, you may also hear a spark click to ground.
This is the moment of truth. In this position, the distributor is considered adjusted; it should be fixed and the cover put in place. You should also remember to put the armored wire in place.
The second method of adjusting the distributor is carried out on cars fueled with super or 93 fuel. This method is recommended to be carried out with a running internal combustion engine.
Installation of UOZ
So, the distribution turns when the engine is running against emergency conditions. In this case, the speed of the power plant will instantly increase, but if you continue to rotate, the engine will function unstably. And it is at this moment, when the engine no longer increases speed, that the distributor must be slowly turned in the opposite direction.
Note. Experts recommend turning the distributor in the opposite direction exactly 2 degrees - no more and no less. And in this position the distribution should be fixed.
You can check the work done by yourself as follows. Accelerate the engine sharply - it should not stall or stop for a few seconds.
Checking for correct installation
After setting the angle is completed, it is necessary to check:
- Warm up the power unit to operating temperature and drive onto a flat, straight section of the highway.
- Accelerate with gear shifts up to a speed of 50 km/h.
- Stabilize the movement, and then sharply press the throttle pedal.
If the settings are correct, a brief knock will appear, indicating detonation combustion of the mixture. The absence of sound indicates a delay in the pulses, and prolonged detonation indicates an early spark. In this case, it is necessary to make additional adjustments and recheck the result.
Ignition performance monitoring
The results of the ignition adjustment must be tested while the car is moving. Before this, pre-warm the engine and after accelerating 45-50 km/h, engage 4th gear and vigorously press the gas pedal. If the ignition is adjusted correctly, at this moment characteristic popping noises as a result of detonation should appear briefly (1-2 seconds) and immediately disappear, followed by a vigorous increase in speed. If this does not happen, turn the distributor body 1 position counterclockwise. When detonation continues for more than 2 seconds, the housing must be turned clockwise by 1 division.
How can I tell if it is installed correctly?
It is not difficult to carry out such a check. Find a flat section of the road and accelerate your car on it to a speed of 45 kilometers per hour. Engage fourth gear and observe the behavior of the car.
If at that moment a detonation occurred, which subsided after a few seconds, then everything was installed correctly. If the detonation has to wait, it means that the arson occurs too early.
If there was no detonation at all, it means the car has a late ignition that needs to be adjusted.
Contacts
If the car has a standard ignition option, then before tuning, it is recommended to clean the distributor contacts with a file. After such cleaning, the condition of the contacts is diagnosed - first of all, you should make sure whether the contacts are in contact with each other across the entire plane or not.
In some cases, contacts need to be adjusted. The crankshaft rotates until the distance between the contacts becomes optimal. The contact retaining screw on the bearing plate can be unscrewed.
A spacer is introduced, the size of which varies within 0.4 mm. Entered between contacts. The exposure is then ensured so that the stylus moves neither too freely nor too tightly. This position must be fixed.
Note. The gap size can be checked with two spacers. A large spacer should not fit between the electrodes, a thin one should move without much resistance.
Required UZSK value
The crankshaft is turned using a special key. You can also do the following: put it in 4th gear and gently push the car. In this case, it will not be possible to use the starter, since it will be impossible to form the correct turn, but the required size of the distributor gap will give the required UZSK value. And in this case, we must not forget that it is not the angle that is critical, but the gap itself. For this reason, diagnosing the adjustment is very important. The value should be within 55/3 degrees.
The simplest alternative is to use an electric tachometer with a measurement option. In order to use this device, you need to assemble the distributor and then start the internal combustion engine. The electric tachometer itself is placed in the measuring position.
The gap adjustment is repeated if difficulties arise. There is another way, but it requires measuring the angle. It will be necessary to pull out the main armored wire and hook it to the ground. Some craftsmen may not pull out the wire when doing the work this way. However, in this case, the risk of breakdown in the coil increases.
Regarding the indicator:
- If you check the ignition on a standard ignition system, then everything should happen as written in the paragraphs above.
- But while working on the old-style ignition, the indicator will not blink due to the absence of a current limiter.
Attention. In such cases, the multimeter is replaced with a volt device. It shows either 12 V or - 0.
The crankshaft rotates according to emergency conditions, turning until the contacts are closed. This is discussed in more detail above.
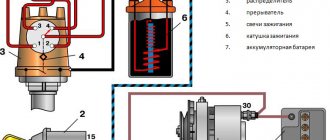
Ignition systems on gasoline internal combustion engines: device
Without this system, the operation of any engines is simply impossible. It is responsible for igniting the fuel mixture in the combustion chambers at a certain time. There are several types of such systems. The first is contact, in which impulses are created at the break of contacts.
There is also a contactless system. Here the pulses are created using electronic commutators. You can also select a fully electronic system controlled by a microprocessor. Such a contactless system is installed on the Urals. You can find out below how to adjust the ignition of a Ural motorcycle.
For two-stroke units, which can most often be found on walk-behind tractors, mopeds and scooters, a magneto is used as a device for creating a spark. The EMF principle works here. A permanent magnet rotates in a coil, and this is how a pulse is generated.
Any system includes several basic elements. So, a battery is used as a power source, and if the engine is running, a generator is used. The switch is a mechanical lock. It often performs several functions. The energy storage device is either a coil or a capacitive storage device. Candles are also used in the system. They have two electrodes a short distance apart. The candle is a porcelain insulator that is mounted on a thread. In the central part there is a conductor-electrode, and a thread is used as the second electrode. How to adjust the ignition? It is not difficult.
Walk-behind tractors
Manufacturers install contactless electronic systems on modern walk-behind tractor models. They consist of a magnetic circuit in the flywheel, a coil, a high-voltage cable and a spark plug. All settings are set at the factory and often do not require adjustment. How to adjust the ignition on a walk-behind tractor with electronic ignition? By analogy with automotive systems.
You can also adjust the gap between the coil and the magneto element. This gap is adjusted using two screws and the displacement of the coil. On modern walk-behind tractors, the gap should be no more than 0.8 mm.
On some models of such agricultural machines, adjustments are not provided at all. For example, in DM type engines the manufacturer did not provide the opportunity to regulate anything. But modern technology provides such an opportunity. How to adjust the ignition on a walk-behind tractor - by changing the gap between the magneto and the coil.