Audio system in the car
AvtoVAZ constantly strives to make certain improvements to its products. At the same time, the plant often focuses on consumer advice, and the recommendations of the majority of owners of previous Lada models were no exception. As you know, audio preparation was not provided in the VAZ-2110 and VAZ-2112 models, so the owners of these versions of the Lada had to completely re-equip the interior to accommodate acoustics.
In the Lada Granta car, the installation of music was provided for during the design of the model. All the necessary wires for the acoustics are already included in the stock assembly of the car. The multimedia system can be placed in a specially designated opening on the dashboard. There is wiring for the radio, as well as the front and rear speakers. All this ensures a fairly simple connection of the desired audio system. In this case, you can carry out the installation yourself if you allocate some free time and understand the electronics of the machine.
The stock Grant assembly is designed for the size of a 1-DIN audio recorder. Below is an example of placing just such acoustics in the dashboard console.
To install a 2-DIN radio, you will have to cut the partitions inside the console. If necessary, you will need to cut out a suitable cantilever frame. Implementing such an idea is more difficult than installing a 1-DIN radio. It is recommended to entrust this matter to a qualified specialist. Otherwise, there is a possibility of damaging the interior trim, as well as the overall appearance of the console.
Installation of acoustics on Granta
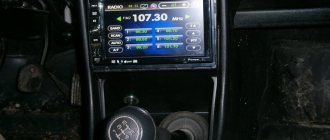
Speaker in the car door
First of all, you will need to dismantle the plastic pocket that covers the compartment for the stereo system. Use a screwdriver for flat type screws. When the pocket is removed, you will see that behind it there are special sockets where ISO plugs from the future speaker system will be placed.
After this, you need to remove the protective metal frame from the radio. We install it in the vacated opening under the plastic pocket. Successful fixation of the equipment is usually accompanied by a characteristic click.
Now you will need to connect the plugs in accordance with the existing ISO standard, to which the electrical wiring of all international format radios meets. Incorrect connection of the audio system connectors can lead to malfunction of all electrical devices in the car, including the radio.
It is worth noting that many car radio manufacturers make individual connectors for them. In this case, the kit almost always includes a special adapter for ISO standard plugs. If your radio does not comply with the ISO standard and does not come with an adapter, you can consider cutting the wires from the radio plugs or from the car's electrical wiring. After this, you will need to properly solder the wires in accordance with the color pinout.
It is strictly not recommended to resort to simply twisting the wires with adhesive insulating tape. This type of connection is impractical, since in winter the tape freezes and cracks, which can cause the wiring to short out and electrical appliances to fail. For a high-quality connection, you can use terminals that are designed for clamping wires.
ISO standard connectors are prepared only once. After this, you will not have to deal with selecting plugs and pinouts when installing a new radio. This procedure should take no more than 3 minutes.
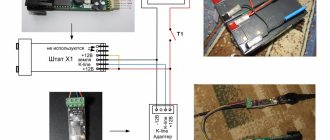
The ISO standard uses 2 types of connectors: brown and black. The first is intended to ensure the operation of all the acoustics of the car. The second is for special functions of the stereo system and its electrical power supply. The pinout diagram for ISO is shown in the figure.
ISO pinout diagram
How to install 2 din in grant norm or standard
- dismantle the center console trim - unclip the fastenings, move it forward and disconnect the buttons and heater handles;
- cut out a vertical plastic partition that will not allow you to install a 2 din device;
- file the plastic casing of the central air duct;
- try on a new acoustic unit, adjust the fastenings if necessary;
- install adapters from the delivery kit on the wiring (if required);
- install the device;
- if we leave the old center console trim: we cut out the partition, try it on, put it in place with the buttons and handles connected, adjust the decorative frame of the control unit, install it;
- if we put a new trim on the console under a 2 din device: replace the heater control unit and buttons from the old trim, install it in place, put a decorative frame on the control unit.
Features of audio system installation
When connecting the stereo system wiring, it is necessary to take into account certain features of the electrical supply. This is provided using red and yellow wires. The first is responsible for remembering the audio system settings, the second is for turning off the radio, which is controlled by the car’s ignition.
It is recommended to use a parallel connection type for both wires so that the audio system can only be turned off manually. In this case, it will not be affected by the car’s ignition key, but there will be a problem of excessive electricity consumption in parking mode, which is solved by installing a special regulator for the red electrical wire. With its help, you can turn off the radio by hardware when leaving the car for a long time. This regulator can be connected to the alarm system, that is, when the vehicle is locked, the audio system will turn off automatically.
The disadvantage of this system is the extra current consumption, but in any case it is much less than the indicators that provide power to the radio during standby mode.
If the audio system suddenly turns off due to excessive volume, display flickering, or high-pitched sounds, it is not due to a power failure. This situation occurs when the car battery is discharged and the current ceases to be constant. The problem is solved by connecting an additional capacitor, which provides constant power to the radio.
Once you have successfully connected all the necessary connectors to the car's electrical wiring, you can begin installing the front and rear speakers.
Hidden text
With a greater installation depth, you will have to come to terms with the protrusion of the control unit above the surface of the console, compensating for it with appropriate design. You also don’t have to waste time searching for a PG intended for standard installation in any specific car model. Without a major rework of the console, nothing will be installed.
Nothing is known yet about any GI produced specifically for Grants. Although anything can happen, because there was one (MyDean) for Kalina2. There are changes to this paragraph. MMC TRINITY appeared for Granta. A little expensive, but maybe there will be other options. Wait and see.
Audio preparation Grants of different configurations
In the “standard” configuration, the Lada Granta has pre-installed power wiring harnesses, which are located in the console opening. Electrical wires are connected only to the radio, so don’t be surprised if you don’t find them in the doorways. To wire to the doors, you will need to pull power wires, which are located under the console panel. In this configuration of the Lada Granta, the stereo system can be installed independently if due attention is paid to it.
In the Lada Granta Norma, the power wires coming from the console are already routed to the doorways. You only need to connect the audio system in accordance with the assembly diagram. It's not uncommon for the stock door wiring to not match up with some speaker connectors. To solve this problem, you need to purchase suitable wires and replace them in the doorway. Lada Granta Norma has a trim with a special pattern for the speakers. Based on it, you can cut the opening yourself.
During assembly at the factory, the Lada Granta luxury version is equipped with a touchscreen multimedia system and speakers. The improved radio tape recorder is complemented by Bluetooth function and a 5-inch display with line output. In addition, the built-in radio allows you to connect a USB 2.0 flash card, through which you can listen to recorded music.
The design of the Lada Granta Lux allows for replacement of the audio system, including speakers. It may be necessary to adjust the opening for the columns in accordance with the instructions.
When buying a car, every motorist is interested in installing car acoustics. These days, every driver spends a huge amount of time behind the wheel of his own car, preferring to listen to music while driving. Often in nature, fishing, or on vacation, music becomes something that many people simply cannot do without. Listening to music for each of us is passive relaxation and expression of inner experiences.
The abundance of car radios is great; choosing one is becoming increasingly difficult. The perfect choice of car radio depends entirely on certain rules. First you need to make sure that the car has a special connector for this type of equipment. If there is one, you need to find its dimensions and only later go shopping.
Next, the driver must familiarize himself with the functions of modern equipment: the ability to reproduce audio recordings, receive radio signals, and broadcast television programs. The latter is not welcomed by car owners, because there is no full ability to watch the TV while it is moving, and the quality of the signal leaves much to be desired.
Most modern car radios have additional functions: reading information from a flash drive, connecting a laptop and other devices, Bluetooth, navigation, remote control and almost everything else. Therefore, when buying a radio, you can get not only the opportunity to enjoy your favorite music on the road, but also many necessary and exciting functions.
The car radio is the main element of a car's stereo system; the sound quality depends on it. The subwoofer will provide surround sound. It must be chosen in accordance with the desires and requirements for the quality of music playback. All devices are divided into two types: 1 din radio tape recorders with a height of 50 mm and 2 din radio tape recorders with a height of 100 mm. One or another model is selected taking into account the opening on the car control panel. In this case, an adapter frame will help in installing the radio.
How to install a 2 DIN radio in Lada Granta FL 2018
Radio capabilities
On the right side of the radio there is a USB connector, which is designed to connect:
- USB Flash card (USB 2.0 and 3.0 up to 64 GB);
- USB Flash player with a memory capacity of at least 1024 MB;
- USB HDD with FAT32 file system;
- Mobile phone (only in charging mode).
On the left side of the radio there is a slot for SD cards. SD Memory Card Slot: Supports SD, SDHC cards of size 32 X 24 X 2.1 mm. SDHC up to 32 GB, SD up to 32 GB.
The file allocation table (FAT) of the connected device must be version FAT16 (2 GB). The maximum number of primary partitions should be no more than 4. It is advisable that the directory tree of the connected device have no more than eight levels. There should be no more than 1000 files in one directory.
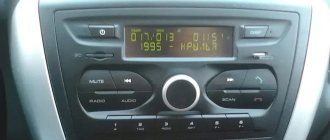
While playing files, the display shows all the necessary information about the track. The playback source is selected using the AUDIO button on the left side of the radio. The radio has equalizer presets (JAZZ, POP, CLASSICAL, VOCAL and USER). The range of timbre adjustments for bass, treble, balance, front/rear balance is from “-7” to “+7” units.
The radio has Bluetooth and Handsfree functions. You can connect your phone by long pressing the handset button. When pairing on the phone, the inscription “MMC12” should appear in the list of found devices, the default password is “0000”. After successful connection, the BT icon will appear on the display of the radio. There is no phone book on the Kalina 2 and Grant radio, but it is possible to save up to 6 numbers in the radio’s memory. The audio system also remembers the last outgoing and incoming calls. The manufacturer does not guarantee operation of a phone in Handsfree mode that uses two or more SIM cards.
The radio allows you to listen to audio files from your mobile phone. To do this, you need to connect your phone to the radio via Bluetooth and launch the player on your phone. The manufacturer states that certain cell phone models may not work correctly with this radio, but this is not a sign of a malfunction.
The Kalina 2 and Granta radio has its own battery, which allows you to save user settings after disconnecting the battery for 10 days.
What to choose for Grants
Granta can be equipped with a 1 or 2 Din head unit with a touch or standard display. When using alternative equipment, it is necessary to purchase or independently manufacture a decorative frame framing the body of the radio. This is especially true for 2 Din systems, since small head units are equipped with a standard frame that fits the Grant instrument panel. The final choice of car radio remains with the car owner.
AvtoVAZ produces a special 2 Din radio for the Lada Granta, equipped with a touch screen.
The advantage of using such equipment is the identical backlighting of the control buttons and other elements on the dashboard.
To install a standard radio, you need to purchase an original decorative panel on the center console, since the standard mounting socket is not designed for such equipment.
Description of general settings
General settings of the radio can be made after pressing the “Settings” menu button. They include setting the screen saver (only works in conjunction with the radio), the current date and time. All the necessary functional buttons are present on the screen during radio operation or music playback, which allows you to quickly switch to the required operating mode. Operating instructions for the radio are not supplied by official dealers, so you will have to figure out all the nested menus using a simple “poke” method.
https://youtube.com/watch?v=AM02w_hDBaA
https://youtube.com/watch?v=AM02w_hDBaA
The simplicity of the interface and all the inscriptions and names are in Russian save the situation. This greatly simplifies the familiarization process. A standard device for Granta with a liquid crystal display 2190 can be purchased by ordering it via the Internet or in a retail chain. The firmware on it will be standard, although the manufacturer claims that they are updated all the time. The functions of the radio can be supplemented with new firmware, then the device will have navigation and the ability to connect a rear view camera.
| Not everyone knows that depending on the configuration of the Lada Grant, the standard radio can be 1 din or 2 din. This option is rare for a Russian car, the new product arouses great interest, and therefore we decided to test the Granta luxury radio. |
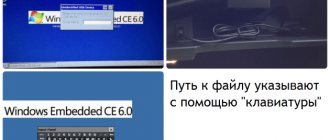
The text is based on reviews from car enthusiasts who have a standard luxury radio (2 din) in their Lada Granta. So, the Itelm radio runs on WinCE 6.0.0.3. and it takes a couple of seconds to turn it on.
USB screen
SD cards. An 8GB memory card was tested, there were no problems with identifying or playing music. The manufacturer warns: The USB and SD connectors are designed to connect SD cards and USB flash drives. Connecting other devices may damage the radio or the connected device.
Hands free. The standard radio of the Lada Granta even has such a function as pairing with a phone via bluetooth. We managed to connect a couple of phones (android 2.1 and WM 6.5), but you have to wait to load the phone book. In addition, you can play audio via bluetooth. However, it’s difficult to call the work of the phone-radio combination stable, and remembering two phones on the list is a whole epic.
Video
Photo. There is support for viewing photos. Supported formats: JPEG, .JPG, .JPE, .BMP, GIF, .PNG. If a 1MB 800x1397px photo takes 1 second to open, a 1978x3456px 7MB photo will take as much as 9 seconds to load the radio.
Antenna Settings
- General settings (screen saver that only works with the radio, factory reset, language settings, date settings, clock settings).
- Phone settings
- Sound settings
- Display settings
- Photo viewing settings
- Video player settings
- Radio settings
luxury radio manuals
There is no option to connect a rear view camera.
The standard speakers are 13 cm, obviously weak for a luxury radio, so it is recommended to install speakers in the rear doors and replace the existing ones. Installing soundproofing will make the sound in the cabin even clearer.
In conclusion, we can say that you shouldn’t expect much from the Granta luxury radio; it is still far from a full-fledged multimedia system. The slow processor (even though it is declared Dual Core), the meager amount of RAM memory (128MB), the lack of AV output and navigation are upsetting. The positive aspects include a simple and intuitive interface, support for USB and SD memory cards and the ability to play video clips (albeit only in a strictly limited format, but the option itself is quite rare). The good news is that AvtoVAZ has work in this direction, and this means a lot.
«>
How to install and connect
To install a radio on Grant, you need:
- Remove the decorative plug in the front panel by lifting it with a mounting spatula. Wires with ISO standard connectors are located in special routings on the back.
- Place a 1 Din mounting shaft in the rectangular hole and press firmly.
- Use a screwdriver or other object to bend the metal corners that will keep the part from falling out.
- Open the glove box lid to find the antenna cable, which is located under the floor sound insulation near the front passenger's feet.
- Connect the power adapter (depending on the type of head unit). Route the cables through the installation shaft.
- Install the speakers in their original places. The doors of the basic configuration do not have cables for connection; there is only a connection plug located near the clutch pedal. In this case, the cables should be installed independently, passing them through the corrugated protective channels located between the stand and the door.
- The laid wires are wrapped in foam rubber, which is secured with tape or insulating tape. This manipulation allows you to avoid extraneous sounds caused by the contact of cable insulation on the metal door panels.
- When using speakers with a diameter of more than 13″, it is necessary to make wooden or plywood podiums that will allow the equipment to be installed in a standard hole.
- Connect the plugs to the head unit, which is then inserted all the way into the mounting shaft.
- Check the operation of the radio receiver and player in different modes.
- Install the decorative frame in its original place.
To install a double-din head unit you need:
- Using a mounting spatula, remove the air conditioner control knob.
- Pry up and remove the plastic cover of the central part of the instrument panel. When dismantling, it is necessary to disconnect the wiring plugs to the control buttons for additional equipment.
- Using a hacksaw and a construction knife, cut out the central jumper in the instrument panel. At the same time, the transition channel for the central interior ventilation deflectors is shortened by 4-5 mm.
- Install the radio in the shaft using modified mounting brackets. The device is attached to standard points located in the instrument panel.
- Mount the modified decorative frame onto which the deflectors have previously been rearranged.
If the head unit supports a low-frequency speaker, then a separate wiring is laid to it, which runs under the trim on the thresholds. When using an active subwoofer with a bass reflex, it is necessary to route the power cables, equipped with a separate fuse, into the luggage compartment.
Dismantling a standard music center
The general feelings of owners who have a standard radio in their car are positive. The display is informative and easy to read. The touch keyboard functions flawlessly. The standard radio itself is capable of high-quality reproduction of sound programs from micro-SD cards. However, using USB format media can be challenging.
The device also has some nice options:
- equalizer;
- activated replay mode;
- random sequence of playing tracks (“Random”).
The standard speakers of the LADA Granta disappoint many, since even at a 45 percent volume level they emit wheezing, characteristic of bass overload. Some timid music lovers are alarmed by volume jumps when switching to “radio” mode.
Here is a list of shortcomings that provoked many Grantavods to purchase an alternative version of the radio. Today, the progressive version “2191” claims to replace the outdated standard device “2190”. The new device will please you:
- improved sound;
- interface for connecting with a rearview camera;
- navigation complex;
- integrated input for connecting a subwoofer.
Not every minimum configuration of a car today will please you with the presence of a standard radio. If, nevertheless, such a device is present in the database, it is far from a fact that it can please you with its informative interface and sound quality. If your version of the car has a push-button radio, then, as we found out from the article, installing a more modern radio, as well as the subsequent connection of the radio, is not a difficult matter, the main thing is to approach everything correctly.
The LADA Granta model also did not acquire the role of an exception in this list. After all, the trend of a modern car suggests the owner’s ability to carry out exciting measures to improve and tune his “iron horse,” and you shouldn’t be upset, because a push-button radio is easily replaced with a modern one.
Many motorists face the problem of removing the radio in their car. Some people cannot remove the standard device installed at the factory, others inherited the music along with the car, and others simply lost special keys. There are also plenty of reasons for dismantling - from repairing wiring to buying a new stereo system.
Often, standard head units (aka radios) are removed using the method described above, since they are attached to 2 or 4 clips. For example, the factory player on a Lada Priora car is held on by two latches, and to unlock them, thin steel strips must be inserted between pairs of radio channel switching buttons “2” - “3” and “5” - “6”.
To remove car radios that are fastened with screws, you need to prepare a simple set of tools:
- thin flat screwdriver or knife;
- Phillips screwdriver;
- set of small sockets (from 6 to 10 mm).
With this mounting option, the factory turntable must be unscrewed using the heads
On different brands of cars, standard players can be mounted in different ways, but the principle is approximately the same: the device is screwed to brackets that are covered from the outside with a plastic lining. As an example, we propose to consider removing the radio on a Korean Hyundai Solaris car, performed in the following order:
- Use a flat-head screwdriver or knife to pry up the lower corner of the plastic decorative panel framing the stereo. Pull the edge and grab it with your hand.
- Gently pull it towards you and release the first latch, and then move around and unlock the rest.
- Holding the panel with both hands, remove it and, if necessary, disconnect the connectors located at the bottom.
- Unscrew the 4 mounting screws with a Phillips screwdriver and pull out the radio.
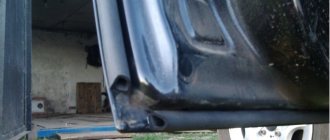
30% to ideal level or puttying and painting
For puttying, you should purchase a two-component putty for plastic bumpers; after thinking about it, I decided that this is the best and most suitable option for my frame and yours. And for priming - acrylic primer (it is sold in sprays).
It is recommended to clean and degrease the surface of the frame itself, respectively, if you have already completed all the work on smoothing out large irregularities with sandpaper.
We will also need a spatula; it is not advisable to take one that is too large and hard. I would recommend using rubber. After puttying, carefully smooth out the unevenness with sandpaper No. 120.
Putty? Aligned?
I am sure that now our creation called Granta 2 din frame looks almost perfect and you have a desire to finish the job you started as soon as possible.
So, it's time for the primer. To do this, treat the surface of the frame with sandpaper No. 340 and degrease. Three layers of primer will be enough to obtain the texture we need on our 2 din frame.
Finally, the final stage of our work is painting. For my transition frame for the radio, I used matte black alkyd enamel; it most closely matched my interior interior; of course, black is a neutral color and is suitable in most cases. But.…
Reviews
| Module type | Price, rub.) |
| Standard 1-DIM (push-button version) | from 3500 – 3700 |
| Standard 2-DIM (sensor) only for Lada Granta liftback | from 7500 – 8000 |
| Third party manufacturers, depending on configuration and specifications |
| № | Positive |
| 1. | Victor, 39 years old: after buying the car, he did not change the radio, despite the push-button control option. The sound quality is good, the radio reception is excellent, that's enough for me. |
| 2. | Konstantin, 41 years old: bought the car second-hand, second owner. I didn’t change anything, I left the original radio. The functionality is good, the build quality is also good, it reads from a flash drive. |
| 3. | Vasily, 44 years old: I listen to the radio more, the reception in the city is good. True, it causes interference near metal structures, but this is natural. |
| 4. | Kirill, 36 years old: I work as a taxi driver, on wheels all day. The standard tape recorder saves the day, it works properly. My friends recommended replacing it with a touchscreen model from the new Granta, but so far the old one hasn’t failed. |
| Negative | |
| 1. | Victor, 38 years old: the standard audio module, although not bad, seemed to me not enough, so I replaced it with a foreign one and supplemented it with an amplifier. Now the volume is good, the quality is high. |
| 2. | Mikhail, 42 years old: I work as a courier, I drive for the entire shift. I expected more from the standard radio, so I had to replace it with a new one. The volume suits me, I plan to connect an amplifier - a crossover. |
| 3. | Ivan, 33 years old: I bought the car second-hand, immediately replaced the audio module, the reviews are not good. New and high-quality equipment from Trinity, no problems. |
| 4. | Vladlen, 40 years old: friends gave me a gift in the form of a radio with touch control for our anniversary. Before this there was a push-button one. Can't compare, quality, sound, control, functionality at a high level. |