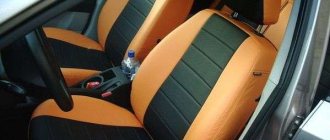
Acoustic shelves for Lada Priora models are expensive. And the factory elements do not have the proper quality. Therefore, most motorists try to make structures with their own hands. Self-made acoustic installations are much stronger and more durable. In addition, a shelf made at home can be decorated at the owner’s discretion. This solution is relevant for lovers of unique designs in car interiors.
In addition to appearance, homemade shelves significantly increase sound quality. It all depends on the materials chosen to create the acoustic shelf.
Acoustic shelves and podiums in the trunk
Especially in order to provide the car interior with average-level acoustics, very inexpensive, often homemade, acoustic shelves and podiums were invented. The shelves, in particular, very successfully replace the standard ones, and due to this alone the sound quality characteristics are significantly improved. And even the simplest-looking acoustic shelf can give an average sound to a music lover.
What can acoustic shelves and podiums provide?
So:
- The overall level of sound quality inside the car will improve.
- Extraneous sounds will disappear when playing music, especially clearly audible at high volume levels.
- It will become possible to install dynamic heads of various sizes that simply do not fit into the standard places prepared by the automaker.
Note. The presence of acoustic shelves and podiums will allow you to install large and heavy speakers in your car, the sound power of which is not comparable to small speakers.
- Installing acoustic components will make it possible to correctly mount speakers for a car radio and build entire acoustic scenes.
- The aesthetic component of the car is significantly improved.
An acoustic trunk shelf is not just an effective way to transform a car into a modern vehicle with all the amenities, but also a clear improvement in comfort, noticeable when traveling long distances. Listening to music on the road is pleasant, and listening to good music is doubly pleasant.
Note : The trunk of a VAZ 2114 car can not only be used to install an acoustic shelf, but itself act as an entire acoustic center. The speakers can be embedded into the trunk floor, in the corners and even on top, creating a real ensemble.
Like any acoustic system, the trunk of a car after modernization must meet the following requirements.
Speakers embedded in the sides of the trunk
- Have sufficient rigidity of the panels, thereby eliminating resonance phenomena that negatively affect the purity and strength of sound. Large speakers have considerable weight and, when playing at full power, must have reliable support underneath them.
Note. The design must be made in such a way that it minimizes almost all resonance phenomena, including rattling and so on. This is achieved by using a panel of sufficient thickness, the presence of stiffeners and the absence of flat areas with a large area.
- A tightness must be created, which will eliminate the occurrence of an acoustic short circuit, reduction in sound quality, etc.
Taking into account these above factors, a competent acoustic environment is created in the trunk of the VAZ 2114. Basically, typical acoustic trunk shelves should be made of wood or chipboard, but samples made of carbon fiber and carbon fiber are also known, which are no less effective. In addition to rigidity, sufficient thickness and good fastening, the acoustic shelf and podiums must be combined with the appearance of the interior. Because of this, they are covered with the same skin as the interior itself. Carpet most often plays the role of cladding. The shelves themselves in the trunk can have different types of designs, but today only two options are common:
- Single shelves in the trunk, which are more often used in sedans and are popular in VAZ cars. It is a simple panel with special holes for speakers.
- A prefabricated acoustic shelf, which already consists of three parts, and most often, this design is applicable in hatchbacks and station wagons, but is also suitable for the VAZ 2114. The main part of such a shelf is the central part, which folds down or is removed when loading luggage. As an addition, there are two fixed shelves on the side, into which the speakers are built.
Store shelves already have special holes for speakers, but an ardent music lover who expects strong sound and pure acoustic effect will not be satisfied with this option. Often shelves are made by hand, using multi-level acoustic podiums.
What to do?
There are three ways to solve this problem. The choice in favor of one option or another directly depends on your requirements, wishes and sometimes financial capabilities.
| Solution option | Explanation |
| Completely dismantle the sides and shelf | Nothing will make noise in this situation, but you will deprive yourself of space to install an audio system. You can forget about high-quality sound inside the car |
| Purchase a ready-made podium for durable material with holes for speakers | A good option that requires certain financial costs. All you have to do is install it in place. Disadvantage - it is not always possible to find a shelf that is ideal for all parameters |
| Make a podium with your own hands | This option provides minimal financial costs and the opportunity to create a shelf that will meet your smallest requirements. The downside is that you have to do the work yourself, which not everyone can handle. |
Having a stronger and thicker shelf not only eliminates noise, but also improves the sound quality of the audio system. The thick shelf acts as a highly efficient enclosure.
Today we will look at how you can create an acoustic podium with your own hands, which will be placed on factory sidewalls. You can also try to make an option with your own sidewalls, but it is much more complicated and extremely difficult for a beginner to cope with. Let's not make things difficult for you. The option with standard sidewalls is very good.
Rib compression
Compression is characterized by compression of the rib in the ventrodorsal direction. This can occur from microtraumas, with constant work loads on the sternum and ribs. As a result, the rib becomes shorter in the ventrodorsal direction and wider in the lateral direction.
Diagnostics: ventral displacement of the posterior angle of the rib - upon palpation, a “pit” is determined at the site of the rib angle; dorsal drowning of the anterior end of the rib - a depression is palpated at the junction of the bony part of the rib with the cartilaginous part; Laterally, along the axillary lines, the protrusion of the rib - the tubercle - is palpated. This dysfunction is possible on the 3rd-6th ribs.
Right rib compression
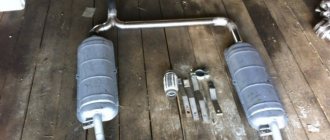
Lada Priora Hatchback › Logbook › Installation of an acoustic shelf with “regiontekhtorg” sidewalls
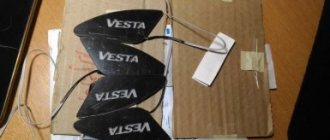
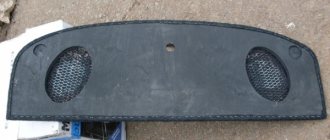
From the moment of purchase, when driving even at small speeds, my car behaved like a rattle, the sounds from the trunk were especially disturbing! I accidentally came across the regiontekhtorg website one day and saw that same shelf with sidewalls! My girlfriend and I ordered without hesitation! At the same time, what we really liked was that we could choose the following parameters: - size of holes for speakers - carpet: imported or domestic, color of carpet - installation of speakers hidden or open (we wanted open speakers, but with such a design we would have to always remove the seat belts, what didn’t suit us, we go to work every day through the traffic police post, we took the hidden ones and didn’t regret it one bit)! As a result, we ordered this shelf with sides (7.8 kg) for 1,600 rubles. + prepayment for postal services 800 rubles + 177 rubles commission!
And so she came to us from Tolyati to Gorodets in about five days! Brought in a white bag in perfect condition with a fresh paint smell!
I took a screwdriver and unscrewed the old shelf, the problem arose of how to get the belt out of it, the solution was this: unscrew the belt where it is attached to the side of the rear seat, and pulled the belt out of the hole in the shelf! I removed the second shelf in the same way! Then I screwed the speakers onto the new shelf and messed up in this place: I had to first prepare the clearing for the self-tapping screws with a drill using a 3.6 drill, but that’s how I drove it :-) Cracks started to spread, but it was still firmly fixed!
I started trying it on in the car and was stunned! Not a single hole, not a hole, to somehow screw it on, I thought everything would be simple there, but I didn’t expect this! Panic! I went to Google and found a video about shelves for two! And I got the main point! One side panel is attached with only 3 self-tapping screws: - two holes on the sides for the seat belt! For one screw in the piece of iron there is already a hole with a clamping plastic, but for the other there is not, so I took a drill + a 3.6 drill and drilled - one from the bottom up into the finished clamping plastic for a long self-tapping screw (only in the shelf design, for this screw there is air space, we had to make special wooden caps and build up the structure for fastening)
Fixing the rib in the exhalation position like a “pump handle”
This dysfunction is characterized by fixation of the rib in a lowered position, which corresponds to its movement during the exhalation phase. In this state, the rib freely exhales, but cannot fully inhale.
This technique is performed for the 3rd-6th ribs. The goal is to restore the bucket handle component of the movement that is stuck in the rib exhale position.
Patient position: supine. The arm on the side of the affected rib is bent so that the wrist is in contact with the forehead.
Position of the osteopathic doctor: standing next to the patient on the side opposite the affected rib.
Position of the osteopathic doctor's hands: the doctor takes the patient's elbow and wrist with the forearm of one hand. With the bent fingers of the other hand, grab the affected rib by the back with a “hook”.
Correction:
- The osteopathic doctor induces rotation of the patient's head in the direction opposite to the affected rib by 15-45° (the lower the rib is, the greater the rotation).
- The doctor asks the patient to take a breath. While inhaling, raise the elbow and head up, as if the patient wants to sit against resistance, for 3 seconds, creating a state of tension.
- After 3 seconds, the doctor asks the patient to exhale and relax. In this case, as you exhale, the doctor pulls the posterior arch of the rib downwards and laterally, increasing the rotation of the head from the rib and abduction of the elbow.
- The entire cycle is repeated three times.
Shelf reupholstery
Upholstery material
Reupholstering the acoustic shelf on a VAZ 2109 can be the most problematic part of the job. That is why we devoted a separate chapter to it in our publication. Every owner of a VAZ 2109 dreams of making the interior of their “nine” more comfortable and attractive. An acoustic shelf is not only an element that serves a practical purpose, but also a separate component of the entire interior. For this reason, she needs to be able to give a style that is beautiful and consistent with the overall design. The material most often used is carpet. On the other hand, if the interior itself is covered with leather or a substitute, or maybe Alcantara, covering the shelf with the same material will come in very handy.
What should an acoustic shelf be like?
Before we move on to the process of making the shelf, let's find out its structure. Any shelf must meet the following requirements in order to be called acoustic:
- Have sufficient rigidity of the panels to eliminate the occurrence of resonance phenomena and to firmly fix the speakers (see How to choose speakers for a car radio on your own), which sometimes have a fairly large mass;
- Ensure sufficient tightness to exclude the occurrence of an acoustic short circuit, which significantly reduces the volume level and sound quality;
- Be properly designed to minimize various resonance phenomena and eliminate rattling.
Rear acoustics VAZ 2107
Note. The last point is achieved through the use of fairly thick material (mainly plywood) with stiffening ribs. In addition, the design of the acoustic shelf should not have large flat surfaces.
A typical acoustic shelf, either home-made or purchased, is a wooden panel (MDF/plywood) 20-25 mm thick.
Note. In some cases, shelves are made of carbon or carbon fiber.
The dimensions and shape of the acoustic shelf must follow the lines of the standard VAZ 2107 shelf to ensure accuracy and tightness of installation. In addition, the shelf must be covered with textile material (carpet), which provides an aesthetic role.
Varieties
- As a rule, an acoustic shelf is installed on the VAZ 2107 - a single panel. This is installed on all sedans, but this design is especially popular on domestic VAZ “classic” cars. The single panel is a simple shelf with holes into which the speakers are installed;
- In station wagons and hatchbacks, a prefabricated shelf is installed, consisting of 3 parts: a folding part and two side ones. The folding part is removed or raised if you need to put something in the trunk.
Acoustic shelf for hatchback
Note. Thanks to the wooden structure, it is possible to cut holes in the shelves for any speakers. This refers not only to size, but also to shape. In addition, acoustic shelves make it possible to install speakers in an open design (on the outside) or in a hidden version (on the inside). The second option involves preserving the shelf sheathing covering the holes. Acoustically, the casing is considered “transparent” and does not affect the sound quality in any way.
Making a shelf with your own hands
Acoustic shelf for VAZ 2109
So, if we decide to make a shelf with our own hands, then go ahead. A ready-made acoustic shelf costs about 1,000 rubles in a store. Why waste extra money if you can make everything yourself, spending some of your time and receiving inexpressible pleasure from the process. A homemade shelf has advantages over a purchased one, and it’s simply impossible not to notice.
Materials
You will need:
- Plywood or MDF.
- Macroflex.
- Glue (one can is enough).
- Several meters of carpet.
- Self-tapping screws.
- Polyurethane foam.
- Sanding paper.
- Standard rear shelf made of plastic.
- Small nails (furniture).
- A simple pencil.
- Tape measure or simple ruler.
- Screwdriver.
- Drill with drills.
- Brush.
- Construction stapler.
Tools
Note. As mentioned above, the ready-made standard shelf of the VAZ 2109 is used as a model. Therefore, it will need to be removed. A simple screwdriver, a little patience and time - the shelf is dismantled.
So:
- We place this very shelf, cleaned of dirt and dust, on a flat table.
- We lay a sheet of chipboard on top.
- Take a pencil and carefully trace the edges intended for the seat belts.
- Draw ovals for the speakers with a pencil.
How to mark an acoustic shelf
Main stage of work
Acoustic shelf for VAZ 2109
This includes the manufacture of acoustic podiums, the construction of a box for seat belts, pasting and much more.
Podiums
So:
- We also make the base of the podiums from chipboard.
- We work with a jigsaw.
- To give the structure additional rigidity, you need supports made of bars measuring 20x40 mm. There should be several pieces of bars and they are inserted between the ovals using screws.
Note. The podiums, as mentioned above, are made on a separate piece of chipboard.
- We place the podiums on a standard shelf and trace them with a pencil.
- We also mark with a pencil the places of the round holes intended for air intake from the trunk.
- Between the bars of the podium, voids appear that need to be filled with sealant. As for the holes inside the product itself, they are covered with cardboard. This will prevent the foam from falling out during the drying process.
- Fill with polyurethane foam.
DIY shelf
- We wait until the foam dries completely.
- Take a sharp knife and carefully cut off the excess.
- We process the surfaces with sandpaper.
- Now we impregnate a piece of nylon with epoxy glue and wrap it around the entire structure. This is done for strengthening and strength.
How to make an acoustic shelf for a VAZ 2109
Making a box for belts
Note. When making a box, the following point must be taken into account: the belts must enter the box from the side.
- We outline the places with a pencil.
- Cut with a jigsaw.
Covering with carpet
- Pasting can be done using clothespins.
Note. After these operations, the boxes are assembled and screwed in place.
The final stage of work
- The final stage involves installing the manufactured shelf in place. Bolts attached to the metal part of our “nine” can be used as clamps. The nuts must be attached to the trunk side.
Rear shelf of Lada Granta: features, DIY assembly
The standard rear shelf of the Lada Granta does not have any equipment. What should music lovers do? Of course, improve it a little for the acoustic system. The convenience of such work is that it does not take much time and effort, and the process is quite easy, so anyone can handle it.
Correct assembly with your own hands
The acoustic rear shelf for the Lada Granta can be purchased ready-made. This will make it possible to choose any color in accordance with the desires of the motorist and the existing interior. But you can do it yourself. Automotive experts note that the best option for such purposes would be a wooden shelf.
The trunk space itself will serve as an acoustic box. In this option, it is better to mount music speakers on top. Additionally, decorative grilles will be installed on them. In this case, the brake light will begin to be removed from the shelf. A homemade shelf for the Lada Granta will be created from the following materials:
- carpet; To maintain exact dimensions, measure the dimensions of the factory shelf
- sheet of plywood;
- glue;
- fabrics;
- screws;
- drills;
- saws.
The work begins with the manufacture of the ceiling product. First, a life-size sketch is created on hard cardboard. Once it is compared in size to the interior of the car, it can be transferred to plywood. The sides located near the window are made obliquely, and the ends are well ground.
In order to create a sketch that is correct in size, the rear of the car, or more precisely, the factory shelf of the Lada Grant itself, is measured in length and width. Next, based on the numbers obtained, they make a sketch on cardboard.
After the calculations are completed and the drawing is transferred to plywood, you should work on the holes for the speakers. The circles are cut out exactly to the diameter of the inserted beepers. The radio itself can be disguised using fabric.
You should also think about the pocket in advance. It can be used to store various items. For this design, it is necessary to cut out an vent in the ceiling panel.
All segments are connected and given a day for them to stick together and dry.
When the shelf is dry, it is covered with carpet or another fabric of your choice. The mounting location for the trim should be as close as possible to the latches on the back seat of the Lada Granta.
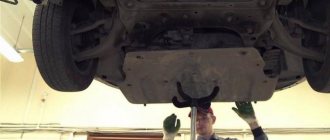
High-quality sound insulation
Soundproofing the rear parcel shelf, and indeed the entire car, is a very important step. It will provide a more comfortable stay inside the cabin, and street noise (while driving) will not interfere with enjoying music.
Sound insulation of the shelf is carried out in two layers
First you need to remove the factory shelf on the Lada Granta. To do this, remove the rear seats, after which the seat belt fastenings are dismantled so that they can also be removed. Next, the attachments for the child car seat are removed. To remove the panel itself, you need to snap off the plastic clips.
Sound insulation is performed using two materials. For the first layer, take those that can absorb vibrations well, for example, it can be vizomat, vibroplast, ECO, BiMast, etc. For the second case, use those materials that have good soundproofing properties: accent, bitoplast or isotone.
For the first layer, the material is cut into pieces of the required sizes, after which they should be heated with a hairdryer and only then laid on the surface of the shelf. Using a hard roller, the material is rolled out. The surface area can be covered entirely or partially, but not less than 2/3 of the entire shelf.
For the second layer, the material is glued. But in this case the plates must cover the entire shelf
At this stage, it is important to select the thickness of the material, otherwise problems with attaching the shelf may arise if it is too thick
With high-quality sound insulation, noise from the rear arches and the trunk itself will no longer bother the driver. In addition, the acoustics themselves will be better.
Manufacturing process
You will need: 2 sheets of 10 mm plywood, a tool, a jigsaw, a drill, furniture corners, carpet, glue or a furniture stapler.
We cut out a shelf from plywood according to the drawing. The sides will be more accurate if you remove the plastic sides from the car and trace them in the place where the shelf will fit.
The side part of the shelf is an optional part of the acoustic shelf (if you buy a ready-made rear shelf, this element is not present). We fix it at an angle to the shelf using furniture corners. We bend them in place on the car.
We make another copy of the shelf template without a lid, only leaving small protrusions that will hold the lid. We fasten two sheets of plywood together with glue and screws. The lid is held in place by these hinges.
All that remains is to tighten the rear shelf with carpet using glue or a furniture stapler.
We install the resulting structure into the car, securing it around the perimeter in four places in the trunk.
The result is a non-removable, acoustic shelf with sidewalls. This drawback can be solved by using simpler fasteners, or by using a different design where the side parts will remain standard. Let us remind you that if you decide to leave the standard rear parcel shelf, but it creaks terribly, follow these recommendations.
How wonderful it is to listen to good music in the car. However, for this you also need to work hard first. The fact is that it provides for the installation of only two speakers. In car doors, at the bottom, and in the hinge area. However, modern music systems for cars sound much better in the quad configuration. That is, if there are 4 columns. And it’s best when two additional speakers (speakers) are located in the rear of the cabin.
Correct installation of ovals
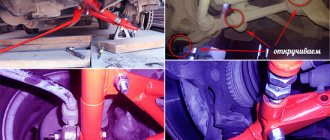
How to properly install such speakers? We must remember that they should be installed only in sedans, since in such a car the trunk is separated from the trunk. In hatchbacks, station wagons and other single-volume bodies, it is very difficult to achieve good sound from “ovals”, and it simply does not make sense to do this.
The installation site must be as rigid and durable as possible, without rattling or vibrating. If there were no holes in the shelf, you need to cut them to fit the mounting size of the speakers, if possible, between the metal stiffeners.
The metal of the shelf must be properly glued with vibration and noise insulation. To do this, you can use vibration-damping materials with a thickness of 3 or even 4 mm as the first layer and noise-insulating material as the second layer. Sound insulation must be selected according to thickness so that plastic cladding can be installed on top, if any.
The interior must be completely separated from the trunk, without cracks or gaps. You can also use plywood, which is cut to the size of the shelf and firmly installed on it. The plywood itself, for a more aesthetic appearance, can be covered with carpet, leatherette or painted.
The speakers should be installed by screwing them through plywood to metal. It is better to use bolts and nuts rather than self-tapping screws. If you don’t want to mess with plywood, you can use spacer rings made of the same plywood or MDF. The speakers must be fixed firmly, rigidly and without distortion.
After installation, you need to configure the sound correctly. When oval speakers are the only ones in the system, you can only slightly change the equalizer settings. If you also have front speakers, then it is advisable to shift the balance a little forward, thereby dragging the “scene” there.
It’s even better to make a “cut” on the radio, if it allows it, by forcing the oval speakers to play only low frequencies. In this case, this will allow you to achieve the effect of a subwoofer. If the head unit does not have an LPF, you can simply remove the midrange component and tweeter from the pancake, achieving the same result.
Anatomical features of the ribs
Anatomical features of the structure of the chest
There is nothing complicated in the anatomy of the human ribs; it is a simpler element than the spine or small bones of the feet and hands. The ribs have a curved design, they are quite long, and consist of bones and cartilage. The thickness of the bone elements reaches 5 mm. There are a total of 12 pairs of ribs connected in the chest. They differ in names, sizes, and are not even always the only elements in this system.
The numbering of a person’s ribs starts from top to bottom; the closer to the pelvic area, the softer and thinner these bones become. The 10th rib in humans is located just below the xiphoid process, and the 1st is located near the collarbone. The plate of these bones contains 3 main elements: the head, the body and the neck. With the help of the head and neck, the rib is attached to the spine. They provide articular connection. The body of the first 7 pairs gradually turns into cartilaginous tissue and connects to the chest. The main feature of this growth from bone to cartilage is the high mobility of the joint.
Other features of the costal system include:
- the first, most powerful 7 pairs are called true, and 8, 9 and 10 are called false ribs, since they are connected to each other by cartilaginous plates;
- The 11th and 12th pairs are movable, or free ribs, which got their name due to their maximum mobility; they are attached only to the spine;
- the upper part of the bone tissue is rounded, and the lower part is sharp;
- Nerve fibers and blood vessels pass through the groove on the lower, reverse side.