The VAZ 2107 stove creates and maintains a comfortable air temperature in the cabin and prevents the windows from fogging in cold and humid weather.
It consists of:
- heater;
- fan;
- control unit.
Outside air enters the casing of the air intake chamber located in the engine compartment under the windshield through an opening in the hood. It is then sent to the heater, where most of the moisture it contains condenses. However, until the radiator is completely warmed up, slightly humid air will enter the cabin.
The heater radiator is heated by coolant coming from the cooling system. The temperature is regulated by a special tap that partially blocks the flow of hot coolant going into the heating system. The more heated liquid enters the heater radiator, the warmer it will be in the car. The position of the tap is changed by a regulator from inside the cabin using a flexible rod.
Air enters the cabin using a heater fan, the rotation speed of which is regulated by a special resistor. When the vehicle is moving at high speed, the heating system can operate without the fan turned on. The air flow entering under the hood creates increased pressure in the air intake box and forces warm air into the cabin.
The heating system of the VAZ 2107 is quite simple (warm air flows are indicated in orange, cold air flows in blue)
Through an air duct system, heated air is directed to different parts of the cabin, as well as to the windshield and side windows, preventing them from fogging in cold and humid weather.
The operation of the stove is controlled using several knobs on the instrument panel. The upper handle regulates the position of the heater tap (the extreme left position is the valve is completely closed, the extreme right is fully open). Using the middle handle, the position of the air supply cover is changed. By turning it to the right and left, the intensity of the warm air supply increases and decreases accordingly. The lower handle regulates the dampers of the heated window ducts. In the right position, the air flow is directed to the side windows, in the left position - to the windshield.
Through the air duct system, heated air is directed to different parts of the cabin, as well as to the windshield and side windows
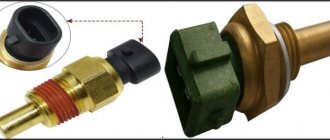
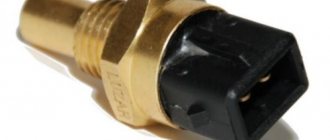
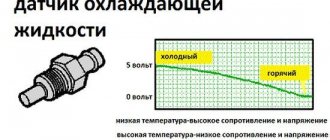
Coolant temperature sensor (DTOZH)
Coolant temperature sensor (DTOZH) VAZ-2104, VAZ-2105, VAZ-2107
To perform work on checking the VAZ coolant temperature sensor you will need: a multimeter, a thermometer (with a measurement limit of at least 100 ° C), a small heat-resistant container with a volume of about 0 .5 liters for water and about 0.2 liters of water heated to boiling point.
Sequence of work to check the coolant temperature sensor VAZ-2104, VAZ-2105, VAZ-2107
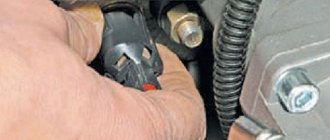
1. Release the clamp of the wiring harness block and disconnect it from the coolant temperature sensor.
2. Connect the negative voltage probe of the VAZ engine.
3. Having turned on the ignition of the VAZ car, use a voltmeter to measure the voltage at terminal “A” of the coolant temperature sensor wiring harness block. The voltage at the coolant temperature block terminal must be at least 12 V. If voltage is not supplied to the block, this indicates a malfunction in the power circuit or the computer.
4. Turn off the ignition on the VAZ-2104, VAZ-2105, VAZ-2107.
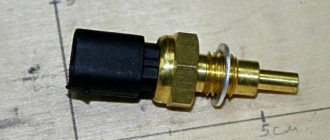
5. Using a 19 mm wrench, unscrew the coolant temperature sensor and remove it together with the sealing washer from the engine cooling system pipe housing.
6. Connect an ohmmeter to the terminals of the coolant temperature sensor.
7. Fill the container with hot water and immerse the working part of the coolant temperature sensor into it. We record the readings of the device at a temperature of about 90 “C. As the water cools, we measure the resistance of the coolant sensor at temperatures of 80, 60, 40, 30 and 20 °C.
The resistance of a working coolant sensor should approximately correspond to the data shown in the table:
| Coolant temperature, °C | Coolant temperature sensor resistance, Ohm |
| 90 | 250 |
| 80 | 340 |
| 60 | 670 |
| 40 | 1500 |
| 30 | 2250 |
| 20 | 3500 |
If there are large discrepancies in the data, replace the coolant temperature sensor.
Installation of a coolant temperature sensor on a VAZ-2104, VAZ-2105, VAZ-2107 car
1. Installing the coolant temperature sensor on a VAZ car is performed in the reverse order.
2. Start the VAZ engine and make sure there is no coolant leakage from under the sensor. If necessary, additionally tighten the sensor. If it was not possible to eliminate the leak in this way, reinstall the coolant temperature sensor by applying a heat-resistant sealant to its threaded part.
Source
How to start a Zhiguli without a key
You need to know how to start a VAZ classic without a key in the event of a breakdown of the ignition switch (jamming, burnt contacts, etc.), as well as if there is a breakage/loss of the key. You can start the engine simply by wires, with two options. The first way is to correctly connect those on the lock. The second will allow you to do without a lock - by shorting the wires under the hood.
How to start a Lada with wires
There are 5 wires connected to the ignition switch on a Zhiguli, one of which (red) starts the starter, and four more close the on-board circuits (ignition, light, etc.). By disconnecting the wires from the ignition switch and connecting them to each other in the same way as the lock usually does, you will be able to start the VAZ without a key.
Step-by-step instructions on how to start a Zhiguli without an ignition switch:
Video on how to start a Lada without keys
- You need to remove the terminals of all wires from the back of the lock.
- Check the colors with the diagram. This is necessary in case, after repairs, someone before you changed them without observing the factory colors.
- Close the white and green terminals (according to the diagram) to turn on the ignition.
- Connect the terminals of the black and brown wires to turn on the lighting equipment.
- To turn on the starter to start the Lada, all you have to do is strike the connection of the white and green wires with the red terminal.
As soon as the motor “grabs”, you must immediately remove the red terminal to the side in order to disengage the bendix from the ring.
How to start a Lada with wires without an ignition switch
How to start a Zhiguli with wires: video instructions
An alternative way to start the engine of a carburetor classic without an ignition key is with wires under the hood. To do this, you will need a piece of single-core cable, about 1.5-2 meters long. The startup order is as follows:
- We connect the “+” terminal of the battery to the “+” terminal of the ignition coil using a wire of about 1.5 meters.
- We also connect the second segment, 50 cm long, to the positive side of the battery, but take it in our hand.
- We disconnect the ignition terminal going to the starter from the interior braid and touch this terminal with the second end of the short wire.
Unlocking the steering wheel without a key
If the key is lost, but the steering wheel lock is turned on, then in order to drive normally without keys, it is not enough to start the car with wires. What to do if the steering wheel is locked?
There are three ways to unlock a locked Zhiguli steering wheel:
- saw through the locking tab with a metal saw;
- ask another “giver” for help;
- go to the auto store.
How to unlock the steering wheel on a classic VAZ
To unlock the steering wheel without vandalism, you will need a working lock (which you need to borrow from other Zhigulis or buy), as well as a flat-head screwdriver. The order of work is as follows:
- Using a screwdriver, remove the metal plate from the lock cylinder (secret).
- We pry and take out the larva.
- Similarly, we remove the cylinder of the lock to which there is a key.
- We insert a working cylinder and unlock the steering wheel by turning the key.
Replacing the coolant temperature sensor on a VAZ 2101-VAZ 2107
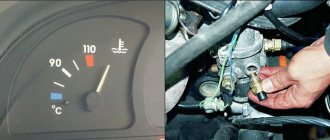
Welcome! Coolant temperature sensor - thanks to it you find out what temperature the coolant is in the engine of your car, and you find out by looking at the dashboard on which there is a separate indicator scale that shows the temperature of the liquid itself, some people also call this scale “engine temperature scale”, but in fact this is not entirely true, because the sensor only reads the heating of the liquid itself and not the entire engine as a whole, but over time this sensor fails and if the car is an injection type, then the car begins to emit it into the atmosphere there are much more harmful substances and its fuel consumption also increases, why will the consumption increase and more harmful substances will be released into the atmosphere, you ask?
The thing is that this sensor on injection cars, in addition to simply showing the temperature of the coolant, also makes the mixture richer and leaner, that is, if your engine is still cold, the sensor detects this and sends information to the brains themselves, which tune the car by increasing its speed a little so that it simply heats up faster, and when the engine warms up, this same sensor reports to the brain that as soon as the engine has warmed up, the speed can be reduced a little, and after the speed is reduced, the mixture itself will become slightly leaner and as was said a little earlier, the exhaust will become cleaner due to the fact that the mixture will be leaner. (For more information on what a lean and rich mixture is, see the article entitled: “What is a poor and rich mixture”)
Note! In order to replace the liquid temperature sensor, you will need to stock up on the following tools: Firstly, you will need to take with you a very large socket wrench, about 21, or if you don’t have such a wrench, then take a deep socket with an extension that will go with it, or just take the most ordinary wrench to unscrew the sensor itself and you will also need to stock up on a small container so that you can drain into it some of the coolant that will pour out of the cylinder head during replacement!
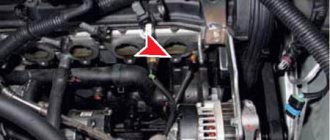
Where is the coolant temperature sensor located? It is located in the cylinder head and is protected from dirt by a protective cover; in this very cylinder head, by the way, there is also a special hole just for this very sensor, in this hole there are also risks along which the sensor itself is screwed in, more detailed You can see its location in the photo below:
When should I replace the coolant sensor? It is replaced, as mentioned earlier, if it begins to give incorrect readings, on carburetor engines this sensor does not play a special role, but on the injector the brain will be given completely incorrect information due to which the car will start to work incorrectly, so For example, if your engine is cold and the sensor at this time shows that the engine has already warmed up, then you will take longer to warm it up in cold weather since the engine will operate in a supposedly warmed-up mode and the speed will not increase, but why should it increase? if the sensor shows that the engine is warm, the controller itself cannot understand that the engine is still cold, since it only receives information from the sensor and that’s it.
Methods for checking temperature sensors
If the driver wants to make sure that the cause of problems with the car is the antifreeze sensor, then he will have to carry out a simple checking procedure. But before you start, you need to make sure the integrity of the car wiring. As mentioned above, for the sensor to work normally, it must be continuously supplied with a voltage of 5 volts. To make sure that the supplied voltage does not deviate from this value, you should start the car, and then remove the wires from the sensor and connect them to a multimeter. If the device clearly shows 5 volts, then there are no problems with the wiring and you can begin to examine the sensor itself. There are two verification methods. Let's list them.
Hot water test
The sequence of actions in this option is simple.
- The sensor is placed in a pan of cold water. An electronic thermometer is also placed there (it is much more convenient than a regular one, because the measured temperatures will be quite high).
The thermometer and sensor are placed in a container of water - A multimeter is connected to the sensor (it should be switched so that it measures resistance).
- A saucepan with a sensor and a thermometer is installed on a gas stove.
- As the water heats up, the thermometer readings and the corresponding resistance values given by the multimeter are recorded. Readings are recorded every five degrees.
- The obtained values should be compared with the figures given in the table below.
- If the readings obtained during testing deviate from the table values by more than 10%, it means that the sensor is faulty and needs to be replaced.
Table: temperatures and corresponding resistances, characteristic of serviceable VAZ 2106 sensors
| Temperature, °C | Resistance, Ohm |
| +5 | 7280 |
| +10 | 5670 |
| +15 | 4450 |
| +20 | 3520 |
| +25 | 2796 |
| +30 | 2238 |
| +40 | 1459 |
| +45 | 1188 |
| +50 | 973 |
| +60 | 667 |
| +70 | 467 |
| +80 | 332 |
| +90 | 241 |
| +100 | 177 |
Checking without an electronic thermometer
This method of checking the sensor is simpler than the previous one, but less accurate. It is based on the fact that the temperature of boiling water reaches one hundred degrees and does not rise higher. Therefore, this temperature can be used as a reference point and find out what the sensor resistance will be at one hundred degrees. The sensor is connected to a multimeter switched to resistance measurement mode, and then immersed in boiling water. However, you should not expect the multimeter to show a resistance of 177 ohms, which corresponds to a temperature of one hundred degrees. The fact is that the temperature of water constantly decreases during the boiling process and averages 94–96 °C. Therefore, the resistance on the multimeter will vary from 195 to 210 ohms. And if the numbers produced by the multimeter differ from the above by more than 10%, the sensor is faulty and it’s time to change it.
How to replace the coolant temperature sensor on a VAZ 2101-VAZ 2107?
Note! Before you start replacing, be sure to remember that you need to replace this sensor only on a cold engine, since after you remove it from that same hole, coolant will immediately flow from this hole, and if the engine is very hot (When hot engine, the pressure in the system increases very strongly), then coolant will not flow from this hole, but will simply splash out under very strong pressure, and it will also be very hot and if it suddenly gets on you, it will possibly cause burns, therefore, with a given temperature liquids, be very careful!
And one more thing, before buying any sensor, look at the markings on your old sensor and use it to buy a new sensor, because they will have to converge with each other and, by the way, most classic cars use a coolant temperature sensor liquids like TM 106, so keep this in mind before purchasing!
Before you start work, also de-energize the battery to 100% protect the wires from short circuits, otherwise if moisture gets on them then they can burn out, so be more careful! (For more information on how to de-energize the battery, see the article: “Replacing the battery” in paragraph 1)
Removal: 1) At the very beginning of the operation, remove the protective cover from the sensor and disconnect the wire that is still connected to it, then pick up a wrench, or a socket wrench, or a head and use them to unscrew the sensor itself by the threaded nut that goes as one unit with the sensor.
2) Then, when the sensor is almost unscrewed, put all the tools aside and, using one hand, gradually begin to unscrew the sensor, and when the sensor is about to be unscrewed, then pick up either just a new sensor, or simply plug the hole with your hand so as not to liquid leaked out, after you make a decision, do the following, then turn out the sensor itself completely and after it is turned out, sharply remove it and in its place you can immediately put a new one, or simply plug the hole with your hand.
Note! If you want to prevent coolant from flowing out of this hole, then drain it from the system to such a level that it is below this sensor and, accordingly, below the hole itself! (For information on how to drain the liquid, see the article: “Replacing coolant in a VAZ”)
Installation: Install the new sensor in its place in the reverse order of removal, but add coolant to the expansion tank.
Note! If you suddenly need to check whether your old sensor is working or not, then follow the link that will be indicated a little later and there will be an interesting article that describes in detail how to check the coolant temperature sensor for functionality! (For information on how to check the sensor, see the article: “Checking instrument sensors”)
Source
FakeHeader
Comments 21
I'll take note! I’ve been eyeing this place for a long time, but I liked your implementation
The option with the original radiator is ok. After installing the radiator 21045.1301.012 you will have to come up with something else...
I have almost a native one (Luzar sport).
You can also make a hole in the sleeve
I removed the original corrugation and left the original one with holes. I left after the repair exactly in the rain))) So my baptism of fire was over! And the intake was dry, although I was driving in a dense stream, the rain was pouring normally (not downpour), there were puddles but not deep.
I also stood like that (approximately), it was of no use, now there’s a tattered piece there
You can also make a hole in the sleeve
So if you do it at your own peril and risk) and the effect, together with the split gear on the stock camshaft, is noticeable!
Well, maybe the effect is mainly from the gear - from the adjusted phases...
By the way, the car became less dull in the heat, or rather it doesn’t get dull on the gas; it reacts cheerfully!
in hot weather it always stalls until it warms up, even with the corrugation outside...
Temperature device VAZ 2105 injector
Unread message byran » Sun Oct 23, 2011 15:04:33
Re: Problems with temperature indicator
Re: Problems with temperature indicator
Unread message byran » Sun Oct 23, 2011 03:17:34 PM
Re: Problems with temperature indicator
Re: Problems with temperature indicator
Unread message byran » Sun Oct 23, 2011 07:09:33 PM
Re: Problems with temperature indicator
Unread message andy » Sun Oct 23, 2011 07:14:38 PM
Re: Problems with temperature indicator
Re: Problems with temperature indicator
Unread message BORODA » Mon Oct 24, 2011 15:48:54
Re: Problems with temperature indicator
Unread message Susanin » Mon Oct 24, 2011 15:55:31
Re: Problems with temperature indicator
Re: Problems with temperature indicator
Unread message Susanin » Mon Oct 24, 2011 16:10:33
temperature sensor
Unread message by Alekha » Sun Mar 11, 2012 5:07:08 AM
Re: temperature sensor
Unread message by Alekha » Sun Mar 11, 2012 6:06:19 AM
Re: temperature sensor
Unread message by Randall » Sun Mar 11, 2012 6:34:16 AM
Re: temperature sensor
Unread message by Alekha » Sun Mar 11, 2012 6:58:43 AM
Offtopic:
so today is the country’s first working day
without emotions, as I described it. I go out in the morning, start the car, the car warms up and the temperature sensor shows heating. those. moving towards the green zone. those. works. will show. Got to work. turned off the car. and that's when I start the car again. The temperature sensor no longer shows anything. hangs in the zero zone. In general, the sensor only works in the morning when the car is first started, and after the engine is turned off and it is restarted. no longer shows. I ride for a day without seeing the temperature. Then I park the car overnight. In the morning I go out to start it. The sensor shows everything again. and once again, after warming up, you turn off the car, after the next start of the engine, the sensor again does not show anything. and so on every day
How to start a Zhiguli directly on the starter
If the problem is not in the lock, but in the wiring, and shorting the terminals does not help, you can try to start the Lada by supplying current directly to the starter, bypassing the lock, just as, for example, when the solenoid or starter relay does not work. This is done by closing the contacts using a screwdriver or a piece of thick wire.
How to start directly
Starting the starter directly with a screwdriver or pliers
There are two ways to start the car directly from the starter. The first, classic one, is to use a screwdriver to close the contacts of the power wire and the control of the solenoid relay. The second one is applicable if there are problems with the wiring; you need to supply power to the starter via a wire directly from the battery.
The first way to start a Zhiguli directly looks like this:
- Turn on the ignition, since it will not be possible to start the Lada with a screwdriver without supplying power to the coil.
- Open the hood to get to the starter, which is located below on the battery side.
- Using a screwdriver, close the power contact (thick wire from the battery) and the control contact of the solenoid relay (thin wire) at the starter.
- Quickly remove the screwdriver as soon as the motor starts running.
The second method is the same, but you will need a piece of wire. Need to:
- Open the hood, turn on the ignition.
- Connect a piece of wire with one end to the battery positive, and the other to the wire going to the starter retractor from the braid.
- Disconnect the wire when the engine starts.
VAZ coolant temperature sensor
The coolant temperature sensor allows you to find out the current temperature of the antifreeze located in the car's cylinder head. This sensor is sometimes called the “engine temperature sensor”, but this is incorrect. In certain parts of the engine, the temperature may differ significantly from the coolant temperature.
If the sensor fails, which creates certain problems for the operation of the injection engine: emissions of harmful substances and fuel consumption increase. The fact is that data on engine temperature is received not only by the indicator on the dashboard, but also by the electronic control unit. Depending on the temperature, the optimal composition of the mixture supplied to the cylinders is established. A cold engine needs a richer mixture, a hot one needs a leaner mixture. Also, when the engine is cold, higher idle speeds are maintained. If the sensor is faulty, the ECU will receive incorrect information about the temperature; accordingly, an over-rich mixture will enter the warmed-up engine, making the exhaust more “dirty.”
New VAZ 2107 models are equipped with injection engines, so a faulty sensor needs immediate replacement.
Signs of sensor failure
It is generally accepted that the temperature sensor on the VAZ 2106 is a reliable device, since its design is very simple. However, problems may occur. As a rule, all problems are associated with changes in the resistance of the thermistor. Due to the changed resistance, the operation of the electronic unit is disrupted, which receives erroneous data and cannot correctly influence the preparation of the fuel mixture. You can understand that the sensor is faulty by the following signs:
- severe oxidation of the sensor housing. As mentioned above, sensor housings are usually made of brass. This is a copper based alloy. If the driver, having unscrewed the sensor from its socket, found a green coating on it, then the cause of the breakdown has been found;
A green oxide film indicates a breakdown of the temperature sensor - significant increase in gasoline consumption. If the sensor resistance has changed, the control unit may overestimate fuel consumption, although there is no real reason for this;
- abnormal engine behavior. It is difficult to start it even in the warm season, it suddenly stalls, and at idle speed it is extremely unstable. The first thing to do in such a situation is to check the antifreeze sensor.
With all of the above problems, the driver will have to change the temperature sensor. It cannot be repaired, so going to an auto parts store and replacing the device is the only rational option. The price of sensors for a VAZ 2106 starts from 200 rubles.
Product delivery options
Note! Below are the shipping methods available specifically for this product. Payment options may vary depending on the shipping method. Detailed information can be found on the “Delivery and Payment” page.
Parcel by Russian Post
Available payment methods:
- Cash on delivery (payment upon receipt)
- Using cards Sberbank, VTB, Post Bank, Tinkoff
- Yandex money
- QIWI
- ROBOKASSA
Shipping throughout Russia. Delivery time is from 5 to 12 days.
Parcel by Russian Post 1st class
Available payment methods:
- Cash on delivery (payment upon receipt)
- Using cards Sberbank, VTB, Post Bank, Tinkoff
- Yandex money
- QIWI
- ROBOKASSA
Shipping throughout Russia. Delivery time is from 2 to 5 days. More expensive than regular delivery by Russian Post, approximately 50%. Parcel weight up to 2.5 kg
Express Parcel EMS
Available payment methods:
- Cash on delivery (payment upon receipt)
- Using cards Sberbank, VTB, Post Bank, Tinkoff
- Yandex money
- QIWI
- ROBOKASSA
Shipping throughout Russia. Delivery time is from 3 to 7 days. More expensive than regular delivery by Russian Post, approximately 100%.
Transport companies
Available payment methods:
- Using cards Sberbank, VTB, Post Bank, Tinkoff
- Yandex money
- QIWI
- ROBOKASSA
Delivery is possible to any locality where there is a representative office of the transport company. Delivery time is from 2 to 10 days. Sending large parcels is approximately 50% more profitable than by Russian Post.
Pickup from our warehouse
Available payment methods:
- Cash upon receipt
- Credit, installments
- Using cards Sberbank, VTB, Post Bank, Tinkoff
- Yandex money
- QIWI
- ROBOKASSA
Pickup times must coincide with store opening hours.
For owners of VAZ and foreign cars injectors: some malfunctions and how to reduce fuel consumption by 20-30%
Technological progress moves inexorably forward and the injector, which has become the norm in the world for 20 years now, has become a mandatory norm in the production of domestic cars. I would like to say that VAZ, in general, makes pretty good cars, especially considering their maintainability and availability of spare parts, but due to the execution of small but very important parts, important characteristics of the car suffer. Today, almost all cars are equipped with injectors.
The injector is a system for injecting fuel into the intake manifold and the injector system is controlled by a small computer (not to be confused with what shows fuel consumption and mileage on the dashboard). The computer calculates when and how much fuel to inject based on data from various sensors - the angular position of the crankshaft, the volume of air and its density, the ambient temperature and the temperature of the engine itself (and a mass of other sensors). It’s the last one, the temperature sensor, that I would like to talk about.
Recently my 9 completely refused to start. After much effort, it finally started and through experimentation I found out that it was the cold start that was difficult. After the engine warmed up at least a little, the car started, as they say, with half a turn. After a short brainstorming, suspicions fell on malfunctions in the coolant temperature sensor, which is located in the upper coolant manifold. As it turned out, it was he who supplied incorrect data on the engine temperature, as a result of which the computer could not calculate the required composition of the fuel mixture for the engine. How to confirm? If your injection VAZ does not start when cold, splash hot water on this sensor (located near the thermostat). If after this the engine starts, feel free to change the sensor. During these experiments, one very, very important detail was revealed: After installing a new (from the market, “ashshidblyah factory sensor ma i eer!”) sensor, the on-board computer began to show fuel consumption at idle with a warm engine 1.2-1.3 liters per hour, although before that the consumption was 0.9-1.0 liters per hour, in other words, according to the on-board computer, fuel consumption increased by 20-30%, which By the way, a test drive confirmed it. There was no doubt that the reason was in the new temperature sensor - by reporting the incorrect engine temperature to the injector computer (that it was cold), the computer gave the engine more gasoline to warm up. After surfing the VAZ forums, this is what I found out: “Temperature sensor VAZ coolant is installed between the block head and the thermostat. The coolant temperature sensor has two contacts (unlike the single-contact temperature sensor for the instrument panel, which is located next to it, do not confuse it). The main functional purpose of the coolant temperature sensor is akin to the “choke” on the carburetor - the colder the engine, the richer the fuel mixture. Structurally, the coolant temperature sensor is a thermistor (resistor), the resistance of which varies depending on the temperature. Typical values: 100 degrees Celsius - 177 Ohm 25 degrees Celsius - 2796 Ohm 0 degrees Celsius - 9420 Ohm (9.42 kOhm) Minus - 20 degrees Celsius – 28680 (28.68 kOhm). Coolant temperature affects almost all engine control characteristics. The coolant temperature sensor is very reliable. The main malfunctions are a violation of the electrical contact inside the sensor, a violation of the insulation or a break in the wires near the sensor with a dangling throttle cable. Failure of the coolant temperature sensor - turning on the fan on a cold engine, difficulty starting a hot engine and a cold engine, increased fuel consumption." And here it is our handsome man himself:
Well, without hesitation, I bought a used sensor from a wrecked car (VAZ supplies excellent parts from the factory!), after installing which, fuel consumption decreased by 20-30%, i.e. at idle speed with the engine warm, the on-board computer began to show the usual 0.9-1.0 liters per hour. It should be noted that this advice applies to ABSOLUTELY ALL INJECTORS and not only the VAZ brand - as it turned out, such a malfunction is quite common in not new imported cars. So if you want to reduce fuel consumption on your injector - select normal coolant temperature sensors - experiments with the tester more than pay for themselves.
For carburetor systems
There are still many VAZ 2107 cars in use on the roads with a carburetor supply of the fuel mixture. As in the injector, engine cooling occurs thanks to the radiator and fan, only the process is regulated by a fan sensor.
Location and principle of operation
On older cars, additional cooling begins when the antifreeze reaches a certain temperature, usually 92 °C (there are differences for individual sensors). Carburetor systems are equipped with 2 coolant sensors - one to regulate fan operation, and the second sends readings to the driver’s instrument panel.
The sensor that turns on the fan is located on the bottom of the radiator panel, on the right side. To see it, you need to lift the hood and on the back you can see a “nut” with wiring. Usually these are modifications of the TM-108.
The principle of operation is to change the volume of the working fluid of the sensor when the temperature of its working fluid fluctuates. Inside the thick-walled steel housing is a working mixture covered with a flexible plate attached to a pusher that connects the contacts when the sensor is triggered.
In the steel case, the sensor heats up evenly, the working fluid expands and the contacts are connected, the fan is activated.
There are several modifications of the devices - TM108; TM108-10; 661.3710. The first is designed for operating temperatures: 92–99 °C (contact activation and disconnection). The second is designed for colder operating conditions: 87–92 °C. These sensors operate in a circuit with an additional relay and can withstand a current of 1 A. If a relay contact is not provided and the fan is connected directly to the sensor, then the latest 16 A model is used.
What to do if the carburetor freezes in winter?
The switch is in the Cold position when the partition inside the filter is open and the carburetor takes air from the street. This position is used in summer. The Hot position closes the access of air from the outside and opens it for the intake of hot air from the manifold. This position is used in winter and prevents ice from forming in the carburetor components described above. The intermediate position partially opens the partition and air is taken in both from the collector and from the street. Optimal position for the spring-autumn period. The OZONE 2107 carburetor air filter has a manual thermal switch. In some models from foreign manufacturers, the supply of hot air is automatically regulated. I will be pleased if you express your opinion about this post.
How to check readings
It is worth recalling once again that the temperature sensor is a kind of thermal resistor that changes its resistance depending on the temperature of the coolant or the cylinder head. Any thermistor decreases its resistance as the engine temperature increases. Resistance ratings for many sensors can vary markedly. This is due to the difference in engine types and cooling systems, so such figures must be looked for in reference literature.
An ohmmeter is used to check the sensor. As an example, we can take the most common temperature sensor, which has a standard of 290 Ohms at an engine temperature of 75 degrees Celsius. To do this, the car is heated to the required temperature, and a measuring device is connected to the terminals of the device. If the readings deviate greatly from the normalized values, it means that the sensor is in a faulty state. In this case, it will need to be replaced. Only minor errors of 1-2 Ohms are allowed in the operation of the device.
The operating principle of the heating system is as follows
- Air for heating comes from outside, through the hood “grill”.
- In the rear part of the engine compartment there is a special box insulated with a rubber seal for air supply.
- In it, the air flow is directed to the heater, separating it from rainwater in the event of a downpour on the street. You can use the heater during rain, but the air in the cabin will be humid until the radiator warms up.
- Next, the air is heated by the heater, or more precisely, by its radiator, which is fed by the liquid of the car’s cooling system. The degree of heating is regulated by the amount of hot liquid, which is regulated by the heater tap. The heater valve is controlled by a flexible rod coming from the control lever.
- Air can passively enter the cabin at high vehicle speeds, as it is displaced by cold air entering the engine compartment, creating a high-pressure zone, or it can be carried away by turning on the heater fan. Therefore, you can use the heating system at high speed without additional load on the power supply. This activation is carried out by clicking the fan switch, which has three positions - neutral and two speeds: low and high. When tuning the interior, a button can be installed instead of a switch. These speeds are provided by a resistor, which increases the resistance of the circuit and reduces the speed of the impeller. You should use forced air circulation at low speeds, as well as when standing in traffic jams.
- The fan “drives” the air flow through the air duct system to the sides, into the side windows for viewing the rear-view mirrors, and the warm air comes out of the deflector grilles, whose direction can be changed for better airflow. Warm air also exits through the air duct to blow over the windshield.
The figure shows in blue the circulation diagram of cold air flows, and in orange the diagram of the movement of heated air. Let's list the main parts of the heating system in the “profile”
1-air distribution cover;
2 – fan electric motor (motor);
3 – “Carlson”, impeller housing;
4 – heater tap.
15 – copper jacket (radiator housing);
The heater is controlled:
- Changing the position of the air distribution cover of the fan casing using a lever (up and down);
- Changing the position of the levers of the control unit handles (air supply cover, heated windshield flap and side windows).
DIY replacement instructions
To replace the sensor, do the following:
- First, open the hood and disconnect the battery.
- Remove the coolant expansion tank cap and unscrew the cap from the radiator unit. This will prevent the formation of high pressure in the system.
- Next, place a container under the radiator assembly - the antifreeze will pour into it after removal. Turn off the tap and wait until the liquid drains.
- When these steps are completed, you will need to disconnect the wiring connector from the device. Next, using a 30mm wrench, you will need to unscrew the sensor and remove it from its seat. When dismantling, do not lose the steel seal, and before further installation it will be necessary to treat the installation site with sealant. It is important that the sealant itself is high-temperature - treating the seat with it will prevent leakage of consumables.
- When the device is installed, it is necessary to reinstall the plug on the radiator assembly. Further assembly is carried out in the reverse order - first you need to fill in the coolant, then connect the battery terminal.
- To diagnose the performance of the device, you need to start the power unit and warm it up to operating temperature so that the fan turns on.
Photo gallery “Changing the sensor ourselves”
How to remove and repair
Dismantling the starter on the “six” is carried out as follows:
- dismantle the air intake by loosening the clamps and removing the hoses;
- remove the heat-resistant panel that protects the PU from the high temperature of the exhaust system;
- remove all wires from the starter and traction relay;
- loosen and pull the unit up - secured with three bolts.
To be able to repair the starter, you need to disassemble it and properly repair it:
- remove the pigtail wire from the lower nut of the solenoid relay - connects the relay to the starter;
- Unscrew the relay fasteners connecting the unit to the electric motor;
- separate the adhesive;
- remove the relay spring by hand;
- lift the armature of the solenoid relay and release it from the drive lever;
- Unscrew the latches of the PU back cover;
- pull out the locking ring and the rotor shaft washer;
- unscrew the coupling bolts;
- separate the cover from the body - halve the device;
- unscrew the fastenings of the current coils;
- remove the insulating tube;
- disconnect the back cover;
- separate the jumper from the brush mechanism;
- remove coals;
- press the rolling bearing out of the rear cover;
- remove the cotter pin of the starter drive lever;
- remove the lever axle;
- remove the plug;
- release the lever arms;
- dismantle the anchor with the coupling;
- pull the drive lever out of the cover at the front;
- move the washer on the rotor shaft;
- Unclench and release the locking ring;
- disconnect the coupling from the shaft;
- Press the bearing out of the front cover.
Defect means:
- measuring the carbons (brushes) with a caliper, replacing them with new ones if they are severely shortened or damaged;
- installing new bushings if wear is noticeable on the old ones;
- inspection of the rotor coil, replacement of the armature or the entire starter if there are burn marks on the windings;
- checking the integrity of the stator windings with a multimeter - normal resistance is 10 kOhm, if the values do not match, the elements must be replaced;
- inspection of the rotor surface - if defects and signs of wear are detected, clean the part with fine-grained abrasive paper.
Temperature sensor VAZ 2107 Injector Where is it located
Replacing the antifreeze sensor on a VAZ 2101-VAZ 2107
Welcome! Antifreeze sensor. this allows you to know the temperature of the coolant in your car's engine and you will know it by looking at the dashboard, of course, at the separate indicator bar that shows the temperature of the coolant itself, which people also call this gauge. The “engine temperature scale”, unfortunately, turns out to be different, because the sensor only reads the heating of the fluid itself, and not the entire engine; unfortunately, over the years, such a sensor burns out in the case of an injection-type car, it begins to emit much more harmful substances into the atmosphere, and fuel consumption also increases, why will consumption increase, and you emitted more harmful substances into the atmosphere, you ask?
Everything that exists. this is that this sensor on cars with injection, which today is only used to show the temperature of the antifreeze, also makes the mixture leaner and richer, then of course if your engine is still cold the sensor
it detects and sends information to the very brains that regulate the car, increasing its speed slightly so that it simply warms up faster, and when the engine warms up, the same sensor tells the brain how warm the engine is, and the option decreases slightly if the rpm decreases , then the mixture will lean a little and, as stated earlier, the exhaust will become cleaner because the mixture will be leaner. (What is a lean and rich mixture, see more in the title of the article that says: "What is a lean and rich mixture")
The VAZ 2107 injector temperature sensor is where it is.
The note! To replace the fluid temperature sensor, you should stock up on the following tools: all you need is a very large wrench for about 21, or if you don't have a wrench, get a deep head cap with an extension that will go along with it, or get a standard one wrench to unscrew the sensor itself, and you still need to stock up on a small tank. If you set the target, you can pour some antifreeze into it, which will flow out of the cylinder head when you replace it!
Where is the coolant temperature sensor located? It is located in the cylinder head and is protected from contamination by the ingress of additives by a protective casing into the same cylinder head, when, of course, there is a special hole under such a sensor at the same time, in this case there are also risks for which the sensor itself is screwed on, you can find out more about its location see in the photo below:
Stove tuning
The design of the VAZ 2107 stove is far from perfect. Therefore, car owners modify it in a variety of ways. First of all, attempts are being made to improve the tightness of air ducts, especially at joints. This allows you to slightly increase the efficiency of heating the interior.
VAZ 2107 owners modify the heating system in a variety of ways
Fan replacement
Often, to improve the operation of the stove, car enthusiasts replace their original fan with a more powerful one, used in other VAZ models (for example, VAZ 2108). The factory fan motor is mounted on plastic bushings, which wear out quickly. As a result, shaft play appears, and a whistling noise becomes audible in the cabin when the fan is operating. Repair and lubrication of bushings in this case, as a rule, do not bring the expected effect. The VAZ 2108 fan electric motor is mounted on bearings. Therefore, installing it in the VAZ 2107 stove will not only increase the efficiency of heating the interior, but will also make the operation of the fan more reliable.
Usually, along with the fan electric motor, a number of other elements of the stove control unit are also changed. The rotation speed of the VAZ 2107 factory fan at a current of 4.5A is 3000 rpm. The VAZ 2108 electric motor consumes 14A at a frequency of 4100 rpm. Therefore, when replacing, you should install the appropriate fuse, resistor (usually from a Niva) and speed switch (for example, from a Kalina).
To dismantle the fan you will need:
- flat and Phillips screwdrivers;
- keys for 7 and 10;
- round nose pliers.
The fan is removed in the following order.
- The instrument panel, shelf and glove box are dismantled.
- Use a 7 key to loosen the casing of the air damper control cable. The cable loop is removed from the lever.
- Use a 10mm wrench to unscrew the nut securing the heater housing.
- Use a flat screwdriver to remove the left and right air ducts from the heater body.
- Use a flat-head screwdriver to remove the latches that secure the fan to the stove.
- The wire terminals are disconnected.
- The fan is removed from the stove body.
- The impeller is removed. If necessary, use pliers.
The size of the new fan (from VAZ 2108) is slightly larger. Therefore, its installation will require some changes in the design of the stove. If only the motor is changed, it will be necessary to make an additional hole in the grille through which warm air enters the lower part of the cabin. If this is not done, the motor housing will rest against the grille.
Replacing the stove body
When installing a fan from a VAZ 2108, you will need to make a new frame, usually from plexiglass. This is quite labor-intensive and will require certain skills.
The material for a homemade frame when modifying the stove can be plexiglass
When making a new frame, all dimensions must be strictly observed. The slightest inaccuracies can lead to vibration or failure of the new fan. Having assembled the structure, you should lubricate the joints with sealant and install the new housing in place. After this, the noise level in the cabin usually decreases, and the stove begins to heat the air better.
The air intake should ALWAYS be from the street, especially in winter, otherwise the windows will sweat (and freeze in winter). Air intake from the cabin is done only when the air conditioning is turned on (in the seven this issue does not arise). The fact that one “sleeve” is not blowing is possible: a) when tampering with the stove, the sleeve did not fit into the right place and the stove is blowing somewhere under the panel, b) some kind of crap got into the nozzle (foam rubber or something like that ).
When making a new frame for the motor, all dimensions must be strictly observed.
What other tuning options are there?
Sometimes the design of the air ducts is modified. Additional holes are made in the stove body into which plumbing hoses are inserted. Through these hoses, connected to the side and bottom air ducts, when the engine is running, an additional flow of warm air is created onto the windows and into the legs.
Often the cause of poor interior heating is a clogged heater radiator. The coolant begins to circulate more slowly or completely stops circulating through the heating system, and the efficiency of air heating decreases noticeably. Usually in these cases the radiator is replaced with a new one.
A clogged heater radiator leads to a decrease in the efficiency of heating the interior.
Instructions for removing and replacing the power supply with your own hands
To replace the DTOZH, you need to do the following:
- Open the hood and find the controller. Disconnect the terminals with wires from the battery.
- Antifreeze should be drained from the power unit cylinder block. The liquid is drained until its level is below the sensor installation location.
- Next, you will need to slide the protective cap on the connector and also disconnect the wire connected to the sensor.
- Using a 21mm wrench, you need to unscrew the device and pull it out of the seat. It is more convenient to use a spark plug wrench or socket for this purpose.
- Dismantle the device and replace it with a new one; further assembly is performed in the reverse order.
Source
Malfunctions: signs and diagnosis
All problems with the starting unit are divided into 2 groups: electrical and mechanical. In the first case, these are wires, terminals and all other conductive components. Mechanical damage is often associated with wear of various PU parts.
To correctly identify a malfunction, you should distinguish the main symptoms:
- the electric motor and the solenoid relay do not work - it can be assumed that the terminals are oxidized, the battery is completely discharged, the wiring is broken and other electrical faults;
- the traction device makes repeated clicks - a strong voltage drop, poor contact, short circuits and other causes of electrical properties;
- the starter crackles or hums when the ignition is activated - the bendix is broken, the drive gear is worn out;
- the starter rotates slowly, the engine does not start - the control cables are loose, the commutator is burnt out, internal breakdowns, sticking brushes.
Most faults can be fixed without much expense. But if the commutator burns out or the winding is shorted between turns, it is more advisable to replace the entire starter, since the percentage of damage is very high.
Mandatory diagnostic measures include:
- thorough inspection of the battery, its terminals and charging status;
- checking the connections and wires on the section of the circuit between the external power battery and the starter - eliminate oxidation, breaks, and weak tightening;
- ignition switch diagnostics;
- control of the PU fixation bolts - eliminates loosening and crooked installation;
- checking the bendix and drive gear.
The traction relay is checked separately. Its main purpose is to engage the starter shaft with the flywheel crown for a short period of time. Therefore, most often, due to high loads, it is the retractor motor that is damaged, and not the electric motor. Most often this node is exposed to:
- burning of contact nickels;
- breakdowns in windings;
- various mechanical damages.
The main symptom of a traction problem is the absence of clicks when the ignition is activated. This means that the electromagnetic mechanism did not work. It is also possible that there is no voltage from the circuit - therefore this fact is determined immediately.
If there is no doubt that the solenoid relay is faulty, it must be removed and tested in its disassembled position. If there are no noticeable defects, the relay is connected directly to the power source and tested for core displacement.
As mentioned above, it is not at all necessary to replace the PU in case of malfunctions. There are a lot of necessary spare parts on sale that are suitable for the VAZ-2106 starting device. To restore the functionality of the starter, it must first be removed from the car.
| Signs | Causes |
| the traction relay does not operate, and the armature itself does not rotate | battery is discharged; poor contact of the battery terminals, due to oxidation or poorly tightened nuts of the terminal contacts; short circuit in the coil of the solenoid relay; the wire of the traction relay or ignition switch is disconnected; The contact part of the ignition switch is faulty |
| the traction muzzle is activated, the anchor rotates or rotates very slowly | faulty starter or armature winding, possible breakage or short circuit; defect or wear of the brushes, burning of the brush commutator; short circuit of the brush in the brush holder to ground |
| unnatural noise when starting the starter | excessive wear of bearing bushings or armature shaft journals; the starter mount is loose or the protective cover on the drive side is broken; There was a misalignment when installing the starter; the teeth of the drive gear or flywheel ring are broken or damaged; jamming of the clutch on the splines of the armature shaft and the inability of the gear to disengage from the flywheel |
Bottom line
As you can see, replacing the coolant sensor on a VAZ 2114, VAZ 2106 or VAZ 21124 does not differ enough to describe each model separately.
The difference in engine types - carburetor (injection of the fuel mixture due to the difference in pressure) or injection (nozzles through which fuel is injected into the combustion chamber) - is not fundamental - the DTOZh works the same everywhere and also fails according to the same scenario.
There is no need to be afraid of breakdowns, even if you are a novice car enthusiast. Domestic cars are designed so intuitively that even someone who has spent less than a year behind the wheel can cope with replacing the sensor.