Good day to you! Recently we brought a VAZ 2101 in for repair; it was necessary to carry out a major overhaul of the brake system in a penny. And after looking a little at what they write about this on the Internet, I decided to write some instructions for repairing brakes.
Brake repair VAZ 2101
I'll try to do everything quickly and to the point. My opinion is that the braking system in a car is not something you can save on, but as always the budget... Oh the budget...
It’s the same with my repairs, they brought me in and said that we are changing everything to the minimum, repair kits for all cylinders, etc... Well, that’s how it should be. Diagnostics showed:
- The front cylinders were almost jammed, the hoses had cracks
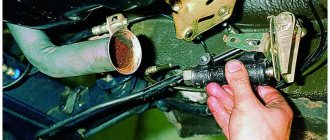
- The main brake cylinder was extremely worn out and was leaking
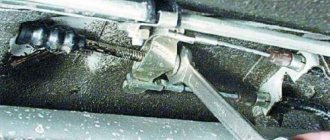
- The handbrake cable is stuck
- Rear cylinders were leaking
Not only that, but the short-lived repairmen also mixed up the tubes on the master cylinder, the rear circuit was connected instead of the right front wheel, and the right wheel was on the rear circuit :) And the car drove...
In general, repairing brakes on a penny is not too complicated, although there is a lot of work and it includes the following sections:
- Repair or replacement of the main brake cylinder
- Front brake repair
- Rear brake repair
- Bleeding the brake system of VAZ 2101
- Adjusting the hand brake
And now everything is point by point.
Brake system VAZ 2101
Any car is equipped with a braking system, and the VAZ “kopek” is no exception. Its main purpose is to slow down or completely stop the vehicle at the right time. Since brakes can fail for various reasons, their performance and the condition of their components must be periodically monitored. Therefore, it is worth dwelling in more detail on the design of the braking system, problems and their elimination.
Brake system design
The Zhiguli brakes of the first model are made of working and parking systems. The first of them consists of the following elements:
- master brake cylinder (GTC);
- brake wheel cylinders (RTC);
- hydraulic drive reservoir;
- hoses and tubes;
- pressure regulator;
- brake pedal;
- brake mechanisms (pads, drums, brake disc).
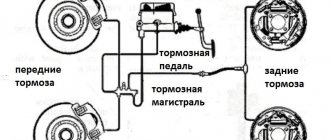
Diagram of the VAZ 2101 brake system: 1 - front brake protective casing; 2, 18 — pipelines connecting two cylinders of the front brake caliper; 3 - caliper; 4 — hydraulic drive reservoir; 5 — brake light switch; 6 — parking brake lever; 7 — adjusting eccentrics of the right rear brake; 8 — fitting for bleeding the hydraulic drive of the rear brakes; 9 — pressure regulator; 10 - brake light; 11 — rear brake wheel cylinder; 12 — lever for manual drive of the pads and expansion bar; 13 — adjusting eccentric of the left rear brake; 14 — brake pad; 15 — rear cable guide; 16 — guide roller; 17 — brake pedal; 19 — fitting for bleeding the hydraulic drive of the front brakes; 20 — brake disc; 21 - main cylinder
The parking brake (handbrake) is a mechanical system that acts on the rear pads. The handbrake is used when parking a car on a slope or on a descent, and also sometimes when starting off on a hill. In extreme situations, when the main braking system has stopped functioning, the handbrake will help stop the car.
Operating principle
The principle of operation of the VAZ 2101 brake system comes down to the following actions:
- When the brake pedal is applied, the pistons in the turbocharger move, which creates fluid pressure.
- The fluid rushes to the RTC located near the wheels.
- Under the influence of liquid pressure, the RTC pistons are set in motion, the pads of the front and rear mechanisms begin to move, as a result of which the discs and drums slow down.
- Slowing down the wheels leads to overall braking of the car.
- Braking stops after the pedal is released and the working fluid returns to the GTZ. This leads to a decrease in system pressure and loss of contact between the brake mechanisms.
The principle of operation of hydraulic brakes on the VAZ 2101
Brake system malfunctions
The VAZ 2101 is far from a new car and owners have to deal with malfunctions of certain systems and troubleshoot problems. The braking system is no exception.
Low brake efficiency
A decrease in the effectiveness of the braking system can be caused by the following reasons:
- violation of the tightness of the front or rear RTCs. In this case, it is necessary to inspect the hydraulic cylinders and replace worn-out parts, clean the brake elements from dirt, and bleed the brakes;
- presence of air in the system. The problem is solved by bleeding the hydraulic drive system;
- The lip seals in the GTZ have become unusable. Requires disassembly of the master cylinder and replacement of rubber rings with subsequent bleeding of the system;
If the sealing elements of the GTZ have become unusable, the cylinder will have to be completely disassembled for repair. - damage to flexible pipes. It is necessary to find the damaged element and replace it.
The wheels do not release the brakes completely
Brake pads may not fully release from the drums or rotors for a number of reasons:
- The compensation hole in the gas turbine engine is clogged. To eliminate the malfunction, it is necessary to clean the hole and bleed the system;
- The lip seals in the GTZ are swollen due to oil or fuel getting into the liquid. In this case, it will be necessary to flush the brake system with brake fluid and replace damaged elements, followed by bleeding the brakes;
- the piston element jams in the GTZ. You should check the functionality of the cylinder and, if necessary, replace it, and then bleed the brakes.
Braking of one of the wheel mechanisms when the brake pedal is depressed
Sometimes a malfunction occurs when one of the car’s wheels spontaneously brakes. The reasons for this phenomenon may be the following:
- The tension spring of the rear brake pads has failed. Inspection of the mechanism and elastic element is necessary;
- RTC malfunction due to piston sticking. This is possible when corrosion forms inside the cylinder, which requires disassembling the mechanism, cleaning and replacing worn-out parts. In case of significant damage, it is better to replace the cylinder completely;
- an increase in the size of lip seals due to fuel or lubricant entering the working environment. It is necessary to replace the cuffs and flush the system;
- There is no gap between the brake pads and the drum. The handbrake needs adjustment.
The car skidding or pulling to the side while pressing the brake pedal
If the car skids when you press the brake pedal, this indicates the following malfunctions:
- leakage of one of the RTCs. Replacement of cuffs and bleeding of the system is required;
Fluid leaks on the inside of the wheel indicate a leak in the brake system. - jamming of the piston element in the working cylinder. It is necessary to check the performance of the cylinder, eliminate malfunctions or replace the assembly part;
- a dent in the brake pipe, which led to blockage of the incoming fluid. The tube needs inspection and subsequent repair or replacement;
- The front wheel angles are not set correctly. Angle adjustment required.
Brakes squeal
There are times when the brakes squeak or make a squealing sound when you press the brake pedal. This may occur for the following reasons:
- The brake disc has uneven wear or excessive runout. The disc needs to be sanded, and if the thickness is less than 9 mm, it needs to be replaced;
- oil or liquid getting on the friction elements of the brake pads. It is necessary to clean the pads from dirt and eliminate the cause of leakage of lubricant or liquid;
- Excessive wear of brake pads. Elements that have become unusable need to be replaced.
How to bleed the brakes on a VAZ 2107 yourself Video, photo
The brake system, like all automotive systems, requires periodic inspection and maintenance. In addition to monitoring the condition of the brake pads, it is necessary to periodically remove air bubbles that appear in the brake fluid. To remove air, the system must be bled. The operation can be performed without contacting service station specialists. This does not require special knowledge or qualifications. You will need a special tool and an assistant.
When is it necessary to pump the brakes of a VAZ 2107
It is necessary to bleed the brake system in four cases:
- Replacing brake fluid. Brake fluid has a limited service life. Over time, it absorbs moisture from the air, which can cause corrosion of the surface of the brake cylinders and their failure. Water also worsens the main property of brake fluid - it reduces the boiling point.
- The recommended service life of brake fluid on VAZ cars is 2 years, after which it is worth replacing it. This applies to standard glycol-based brake fluid.
- Troubleshooting the brake system. When replacing brake hoses and cylinders, brake fluid leaks and air enters the system. Therefore, after repair work, the VAZ 2107 brakes must be bled.
- Air ingress during operation. This manifests itself in deterioration in braking efficiency, a “soft pedal” or uneven braking of individual wheels.
What is needed to bleed the brake system
It is almost impossible to bleed the brake system yourself. The work is carried out by two people. One person (“mechanic”) works with the brake system, unscrews the fittings. The second (“partner”) is located inside the car and must press or release the brake pedal on command.
You also need the following tools:
- 8/10 socket wrench;
- a PVC tube or rubber hose, the inner diameter of which corresponds to the diameter of the fitting;
- container for collecting waste liquid.
- Brake fluid is also needed.
If cars are equipped with 8-mm wrench fittings, it is better to replace them with similar 10-mm hexagon fittings. The latter will subsequently be easier to unscrew without tearing off the edges.
How to bleed the brakes on a VAZ 2107
For ease of work and to ensure free access to the brake cylinder fittings, you should use an inspection hole. The design of the front brake mechanisms requires removal of the wheels to bleed the brake system.
Before starting work, it is necessary to fill the brake reservoir to the maximum, and during bleeding, you must ensure that it is constantly filled with brake fluid. If you miss this moment, air will get into the working cylinder and you will have to start work again.
The procedure for each of the 4 working cylinders is as follows:
- Remove the protective cap from the fitting.
- Loosen the fitting using a spanner. If the fitting has not been unscrewed for a long time, significant effort may be required. You must be especially careful not to damage the edges, otherwise the work may become very difficult, even to the point that the brake cylinder will need to be replaced.
- Place the tube on the fitting and lower it into the brake fluid container.
Direct pumping is performed as follows:
- The “partner” sitting in the cabin, at the command of the “mechanic”, presses the pedal all the way.
- The “mechanic” unscrews the fitting half a turn so that the liquid, along with air bubbles, comes out into the container through the inserted tube. The brake pedal “sinks” to the floor.
- The “fitter” tightens the fitting, and the “partner” releases the pedal on command.
The procedure is repeated until no more air bubbles come out of the tube. During bleeding, the end of the tube must be constantly lowered into the brake fluid so that air does not enter the cylinder.
In this way, all four working brake cylinders are pumped. A certain sequence should be followed when bleeding the cylinders. They are pumped “from far to near”:
- Right rear.
- Left back.
- Right front.
- Left front.
After completing bleeding of each cylinder, it is necessary to tighten the fitting and put on the protective cap.
Bleeding the brakes of a VAZ 2107 is quite feasible at home and does not require expensive special tools and devices. No special qualifications are required either. Even a child can release and press the brake pedal at the “locksmith’s” command.
Often, owners upgrade the brake system by installing more efficient, high-quality and expensive parts. However, this does not change the bleeding method in any way and does not eliminate the need for periodic work to replace the brake fluid.
https://youtube.com/watch?v=Zz5lBYsXajo
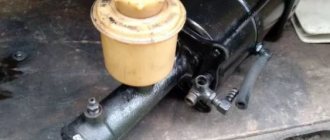
Master brake cylinder
The GTZ of the VAZ “kopek” is a hydraulic type mechanism, consisting of two sections and designed to operate a system with two circuits.
The master cylinder creates fluid pressure throughout the entire brake system.
If problems arise with one of the circuits, the second, although not as effective, will ensure that the car stops. The GTZ is mounted to the pedal assembly bracket.
Design of the GTZ VAZ 2101: 1 - plug; 2 — cylinder body; 3 — rear brake drive piston; 4 — washer; 5 — front brake drive piston; 6 - sealing ring; 7 — locking screws; 8 — piston return springs; 9 — spring plate; 10 — pressure spring of the sealing ring; 11 — spacer ring; 12 — inlet; A - compensation hole (gaps between sealing ring 6, spacer ring 11 and piston 5)
Pistons 3 and 5 are responsible for the performance of different circuits. The initial position of the piston elements is ensured by springs 8, by means of which the pistons are pressed into screws 7. The hydraulic cylinder is sealed with the corresponding cuffs 6. In the front part of the housing is plugged with a plug 1.
The main problems with the GTZ are wear of the lip seals, the piston or the cylinder itself. If rubber products can be replaced with new ones from the repair kit, then if the cylinder or piston is damaged, the device will have to be completely replaced. Since the product is located under the hood near the clutch master cylinder, replacing it does not cause any difficulties.
Video: replacing the GTZ with a “classic”
When product replacement is required
Both the front and rear wheels are characterized by the use of 4 brake pads to ensure effective braking. These products differ only in design, although the principle of operation is similar.
The rear pads of the VAZ 2107 are presented in the form of an arched steel structure, on the outer part of which a friction layer is applied. It is due to the friction of this layer against the inside of the drum that the car stops. If you do not replace the brake elements in a timely manner, this will be fraught with the development of unpredictable consequences, because the most important thing for any car is the serviceability of the braking system.
It is necessary to change the rear brake pads on a VAZ-2107 when the friction lining wears down to a thickness of less than 1.5 mm. It will not be possible to determine this fact without removing the wheel and dismantling the drum. But this is one of the main ways to determine whether the brake system is faulty. There is a second option, which is more convenient and does not require dismantling the rear wheel. To do this, you need to listen for signs of squeaking of the rear wheels, as well as grinding and lack of braking effect, but this can lead to damage to the drum itself. You can squeeze the handbrake while standing on a slope and check that it is working correctly. Of course, the cable on the handbrake may become loose, but if you tighten it and still have no effect, then it’s time to start replacing the pads. If the rear brakes are not functioning, then it is time to change the pads. It is recommended to change them as a set on both rear wheels, since they are often worn out at the same time. What is the process of replacing rear brake pads on a VAZ-2107 will be determined further.
We recommend: What to do if the fan of the VAZ-2112 stove does not work
Features of replacing rear pads
At the beginning of the work, it should be noted that the handbrake must initially be lowered to its lowest position. This will allow you to dismantle the brake drum and thereby get to the worn parts. To begin replacing the brake pads of a VAZ 2107, it is necessary to remove the rear wheel:
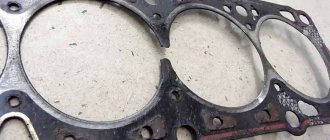
Tubes and hoses
Brake pipes and hoses of the braking system of the VAZ “kopek” are used both front and rear. Their purpose is to connect the GTZ and RTC to each other and supply brake fluid to them. Sometimes connecting elements become unusable, especially hoses, due to aging rubber.
Damage to the hose leads to fluid leakage and depressurization of the brake system.
The parts in question are attached using a threaded connection. There are no difficulties in replacing them. You just need to unscrew the fasteners on both sides, remove the worn element and install a new one in its place.
Video: replacing brake pipes and hoses on a “classic”
Repair
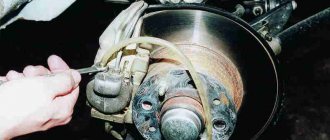
Replacing rear brake cylinders on a VAZ 2109
If the brake cylinder is leaking, it must be replaced. But you don’t always have to buy a new one to do this. You can simply repair the old one. To do this, you need to buy cuffs in advance. As a rule, they are sold together with a boot and a pump. To do this, you need:
Raise the car using a jack.
Note: To prevent the car from rolling away, place bricks on both sides under the wheels.
Remove the wheel, but before doing this it is advisable to unscrew all the nuts that hold it in place. The key for 19 will help with this.
Note: the removed wheel must be put in its place, but not vertically, but horizontally. To equalize the height of the wheel with the height of other wheels, you can place some objects. Now you can lower the car and put the jack aside.
Then the disk is removed.
Replacing the rear brake cylinder of a VAZ 2109
Note: under no circumstances should you hit the edge directly with a hammer, as you may break off the shells. It is advisable to do this through some kind of attachment (this is a small object that is adjusted to the edge, and then hit with a hammer).
Unscrew all the nuts that hold the drum. Afterwards you can easily remove it.
Note: The brake cylinder will now be accessible.
- Remove the brake cylinder.
- Before you start repairing it, you need to lubricate the cuffs and boot with brake fluid so that they become slippery.
Replacing rear brake cylinders on a VAZ 2109
Replace old cuffs with new ones. Insert the boot into place.
Note: After this, tighten it using a pump that was created specifically for this (it is included in the kit).
Return the cylinder to its place.
Note: You need to press it lightly. To make it easier to fall into place, it needs to be shaken a little.
You can twist it. To do this, you need to use a key of 10.
Note: the disadvantage of the rear cylinder is that there is no way to screw it with a head, which would be much easier.
- After this, you need to take a flat-head screwdriver and place the cylinder straight.
- Then you need to start screwing on the brake pads.
Note: The ends of the shoes must connect to the holes in the cylinder.
- Screw the pads so that they are stationary. The pads must be connected using springs.
- Return the drum, disc and wheel itself to their place.
Brake pedal
The main control element of the VAZ 2101 braking system is the brake pedal, located in the cabin under the steering column between the clutch and accelerator pedals. The pedal transmits the muscular force from the driver's legs to the GTZ. If the brake pedal is adjusted correctly, the free play will be 4–6 cm. When you press it and travel the specified distance, the vehicle begins to smoothly slow down.
Free play of the brake pedal: 1 — master cylinder; 2 - pusher; 3 — brake pedal; 4 — brake light switch buffer; 5 — switch nut; 6 — brake light switch; 7 — pedal release spring
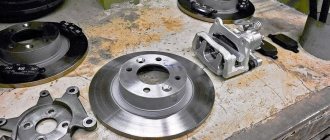
Replacing brake pads. Instructions for replacing front and rear pads with your own hands
Brake pads are a working element of the brake system, which slows down the speed of rotation of the wheels by braking torque due to friction against the surface of the wheel or brake disc. Replacing brake pads is not a complicated procedure and can be done even by a novice car enthusiast, even without experience in such a procedure.
Each part of the car has its own working life, which decreases over time. The wear of brake pads depends on many factors and in each individual case the brake pads will have to be replaced after a different time.
The causes of brake pad wear will be:
- the quality of the roads on which the car is operated;
- driving style;
- temperature conditions throughout the year;
- If the brake pads have already been replaced, then the quality of such work affects the service life of the parts.
Front pads wear out faster because most of the inertial force that the brakes dampen falls on the front of the car. So the front pads should be changed two to three times more often than the rear ones.
The pads need to be changed in pairs - immediately changed either on the front wheels or on the rear. The pads on a pair of wheels should not be allowed to have different degrees of wear. It is also necessary to change the pads on time; worn pads severely damage the brake discs and, most likely, the cost of repairs can then increase several times.
When replacing brake pads, you need to pay attention to the degree of wear of various elements of the brake system. First of all, you need to examine the degree of wear of the brake discs; you also need to check the rubber covers and guide boots for integrity
When replacing pads, the brake hoses are also checked.
First of all, you need to examine the degree of wear of the brake discs; you also need to check the rubber covers and guide boots for integrity. When replacing pads, the brake hoses are also checked.
All this is done so that if there is a leak, its cause can be eliminated before something irreparable happens on the road.
It is quite difficult to describe the entire process of replacing brake pads in detail, since the procedure for replacing rear brake pads and replacing front pads is slightly different, especially if there is a disc and drum system, and in addition, each car model has its own nuances. However, there are still some general points:
- the hood opens and the brake reservoir cap is unscrewed;
- the wheel is removed;
- the brake mechanism is cleaned of dirt;
- the bolts (caliper guides or brake drum bolts) are unscrewed in order to get to the pads;
- use a screwdriver to remove the pads (brake mechanism);
- pads are changed in pairs;
- The brake system is being pumped.
Nuances of pumping
During the deflation process, it is also recommended to check the condition of the brake discs, pads and hoses.
It is important to ensure that there is no damage, cracks or other defects.
Be sure to pay attention to the rear drums. The brake pads located near them need periodic adjustment
Without the latter, efficient operation of the circuit is impossible.
If the system is pumped correctly, then an absolutely identical force will be applied to each side of the car. When a VAZ moves away from the straight line during braking, this means that there is air in the circuit. Ignoring this sign is very dangerous.
Please note that drift to the right indicates the presence of bubbles in the brake elements located on the left, etc.
The weaker the locking on one side is, the more powerful the car is pulled in the opposite direction.
On the VAZ-2106, pumping begins from the front circuit, and upon completion of work, switches to the rear circuit.
If partial deflation is necessary, then it is done along the entire axle, and not at all along one of the wheels installed on it.
Dismantling and replacing the gas turbine engine requires full bleeding of all circuits.
It is advisable to work in pairs with an assistant - it is quite difficult to carry out all the procedures alone, because you will have to simultaneously press the brake pedal and loosen the fittings on the caliper.
Let's sum it up
As you can see, it is possible to improve the braking system even on a vehicle that was produced several decades ago. However, tuning brakes is a very responsible job; your safety on the road and even your life may depend on the result. And also remember that any interference with the brake system of a vehicle is prohibited by law.
Proceed with tuning the brakes only if you are completely confident in your strengths and capabilities.