Preparing a part for body repair is one of the most critical processes. It is grinding that largely influences how well the vehicle will be painted. In this regard, many car enthusiasts have a question about how to properly sand the putty on a car. This is exactly what we will talk about in this article.
Preparing the body for painting
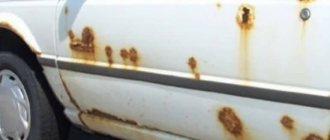
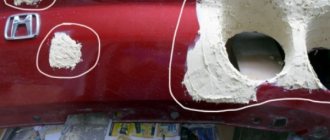
Vlad recommends that you always start preparing your car for painting with the most complex part. On this car, these are the rear fenders. As you can see in the video, the wing has already been puttied and the putty has already been partially rubbed off, a new layer has been applied. And the main thing is that there is rust on part of the wing that needs to be sanded off.
The appearance of rust occurred due to the fact that the old owner began to independently prepare the car for painting. His mistake was that after puttingty and sanding the car, he was driven out onto the street, where he stood in the rain. Due to the presence of moisture, the places where there was and is bare metal became covered with corrosion, and the putty itself became covered with dust and dirt, which is unacceptable for further work.
The area where the car body is sanded must be primed and at least completely covered with putty.
As a result, the owner of the car did not complete the work and gave it to the master Vlad to finish it, so that he would completely prepare the body for painting and paint it.
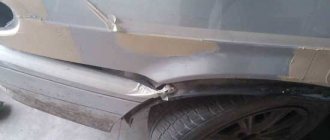
First, the wizard will need to correct previous errors. Putty the wing part again and remove the rust. The rust needs to be removed in order to get rid of it and prime the metal, then apply putty. Because, in principle, you cannot apply putty to bare metal.
If you do not remove the rust and apply putty, then over time the rust will tear it apart, in the form of spiders on the surface. That is, the putty will begin to crack as it swells.
Tools and materials needed for work
Before we start, let’s figure out what we need for body repairs.
This is a standard set for sanding putty:
- A small block (hard);
- The block is softer (for complex planes);
- Several types of sandpaper:
Paper P80, P150, P220 (80 for rough initial processing, then 150 to remove the mark from 80 sandpaper and 220 removes the mark from 150 before applying the primer). In this case, the sandpaper can be in rolls, sheets, or in strips or circles, which are convenient to “stick” with Velcro to the bars during work.
How to display the plane of the wing arches on a car - the theoretical part
We have sorted out what we need for body repairs and we can start working directly.
Before starting work, let's understand a little theory. Since we have to process the wing arches, and they have a rather complex shape, consisting of several planes. There are several points to consider here.
First of all, it is necessary to understand what the wing itself consists of and what planes it has. To begin with, it is that flat places need to be counted from below.
The first flat place is the flange of the wheel arch (the inner part of the edge of the arch), the very appearance of the entire arch directly depends on it. Because an arch represents a radius and if the radius is curved, it will affect the appearance of the entire arch. Plus, if the flanging “goes” in waves, then you will no longer be able to correctly display the following planes.
Before you start working on the wing, you need to step away from the car and see how smooth your arch is in order to immediately pay attention to problem areas in the flange plane. If there are irregularities, they must be straightened to give the correct shape, and only then proceed with putty.
The second flat place is the outer edge, which should go at right angles to the inner plane and repeat its radius. As a rule, the plane should be the same width throughout, for example, starting from the rear edge, where its width is, say, 2 cm, it should also end with a width of 2 cm. Some models may have their own nuances in terms of width.
The third flat place is the plane of transition from the edge to the wing itself at an acute angle with a smooth transition.
The fourth flat place is the wing itself, which should also have no defects in the plane.
Therefore, before starting to work with putty, it is necessary to check all the listed flat areas and bring them to normal if necessary.
How to display the plane of the wing arches on a car - the practical part
So, let's get to the practical part. In order to sand the old putty, take a hard block and P80 sandpaper. In this case, the block must be rigid, since we are creating a plane, and if we take a non-rigid block or, generally speaking, start rubbing by hand, then the entire surface will be uneven. An uneven surface will immediately catch your eye after you paint the car.
The plane can be sanded using a machine. However, we do not advise beginners to do this, since you need to be able to operate the machine. It removes quite a lot of material and some practice is needed to work correctly with the latter. By grinding by hand under a hard block, you work more evenly and are less likely to ruin the very plane of the part.
In our case, before starting work, we open the door so as not to touch it during work. We begin work from the surface of the wing, where putty has already been applied (before us).
We do not move the block forward and backward in a straight line, but in the form of a herringbone (clearly visible in the video) so as not to rub the recess, since the plane is small in size. Video by master Vlad ShchCh: It can be seen in the video that, having started to grind the plane of the wing, the master “entered” the previous plane, violating its geometry. It is not recommended to do this, says Vlad, because when working with one surface of the body you cannot “enter” the adjacent surface.
We move on to another plane, which needs to be polished differently. The block must be guided along the plane, repeating the radius of the arch. In this case, the block is a little wide for the plane, and therefore slightly touches the upper plane. You need to take a narrower block, or grind it more carefully, trying not to “run into” the adjacent plane.
Vlad also shows how the plane of the edge is polished, simply with an even movement along its entire plane. In this case, the block does not need to be “piled” onto the adjacent plane, as this may change its width.
Features of manual grinding
This solution is suitable in the absence of special equipment. In addition, hand sanding is necessary when working in hard-to-reach areas. In the course of such activities, a number of features should be adhered to:
- using a long block you can smooth out defects that cannot be felt even after touching with your hand;
- using a block, make passes crosswise, up and down and back and forth five times in each direction. You should not sand one place, otherwise this will lead to the appearance of indentations;
- Use only clean sanding paper. Its operation is suitable until you feel that the material is being cut;
- It is important to gradually switch from coarser abrasives to fine ones (40-60 at a time, for example, from 120 to 180). As a result, you will save your time and effort;
It will also be interesting: Tuning VAZ 2104: basic ideas for tuning
- Apply masking tape to the adjacent panel to protect it from unintentional damage;
- no need to wait for the putty to completely harden. Within 5-10 minutes after its application, you can begin sanding work. If you use medium abrasives, you need to wait for the surface to completely harden;
- Keep in mind that in modern cars the body can be very thin, due to which the metal will bend during work. Take this fact into account to avoid removing too large a ball of putty;
- For rounded surfaces, elastic bars can be used.
HOW TO CORRECTLY PUTTY A CAR?
HOW TO CORRECTLY PUTTY A CAR?
Putty is a two-component product used to fill small imperfections in the body of a car. When the two components are mixed, a heat-generating reaction occurs that changes the chemical properties of the putty and it hardens.
Puttying is used to level out residual surface irregularities of the repaired body part.
Before starting puttying, the repair area must be cleaned down to “bare” metal with P80 abrasive. To do this, you can use an eccentric sander with a suitable grinding wheel. Next, you need to smooth out the sanding marks so that before puttying the surface has a scratch from the P120 abrasive.
To stir the putty, use a non-porous surface and a plastic or metal spatula. Do not use cardboard as a surface to stir putty. The cardboard will absorb some of the putty components. You can use plastic, metal, glass and other non-porous surfaces.
The putty and hardener have different colors. You need to mix the putty with the hardener until you get one color. It is better to mix it by stretching it with a spatula in one direction. If you stir in a circular motion, bubbles may form, which will then appear as defects on the putty surface.
How to sand putty on a car using a sander
The use of special equipment will be especially relevant in the initial stages, when you need to remove large balls of putty. Finishing work is done by hand. At the same time, when working with equipment, you should adhere to the following rules:
- Avoid high speeds, this will make it easier to control the process. In addition, high speeds can lead to overheating of the device;
- Do not press hard on the equipment, otherwise the grinding efficiency will decrease;
- using a soft substrate you can reduce the level of pressure on the surface, which will allow you to process the body more efficiently;
- when working with a grinder, the risks will not be as large as with manual grinding;
- Under no circumstances should the machine be stopped in one place; it should be constantly moved. Movements should be smooth, without sudden jerks. New passages should overlap the previous ones by 50% of the length;
- You should not sand with one edge of the sole, especially when using a coarse abrasive. It is important that the angle is as small as possible.
Applying putty to the repair area
You have 5 to 10 minutes (depending on the type of putty and ambient temperature) to apply the putty before it begins to harden. As soon as it begins to harden, immediately stop puttingty, as you will no longer be able to apply it normally.
The putty is applied in two stages:
- The unevenness itself is filled. Use a spatula to press the putty well. This will reduce further drawdown. Next, we wait for the putty to dry and sand it. After sanding, remaining irregularities are revealed.
- Apply a second layer of putty to the entire repair area.
Putty rules:
- The putty should be applied to a cleaned and degreased surface.
- It is necessary to dose the required amount of putty and hardener for a specific putty. This skill is developed through experience. Another article about applying putty to cars shows how to properly dose putty with hardener. You can also use electronic scales. Excessive amount of hardener does not speed up the curing reaction, but may cause a defect in the future.
- Use a clean spatula. Do not use the same spatula that was used to mix the putty with the hardener. Particles of putty not mixed with the hardener on it can cause defects to appear on the repair surface when painting.
- If you need to fill a large defect with putty, then instead of one thick one it is better to apply several thin layers. The thick layer is not dense and contains many air bubbles.
- In the interval from 15 minutes to 1 hour, you can apply the next layer without preliminary sanding.
- When filling a large area, you need to apply the putty with a medium spatula and level it with a wide, large spatula.
Matting materials
Preparation begins with abrasive numbers ranging from P320 (hard ground or wet-on-wet). In most cases, numbers P800-P1200 are sufficient. However, polishing the surface around the damaged area requires P2000 sandpaper. Matting gels and pastes can help save abrasive and time, and to make work easier, sandpaper blocks are used.
Degreasing before matting is usually not necessary, but sometimes incorrectly applied alkyd enamel can prevent the use of fine abrasives. In this case, it is necessary to degrease the surface with anti-silicone. Clogging of abrasives with old car paint occurs in different ways, and much in this case depends on the manufacturer: you should not switch to coarser sandpaper, but rather focus on proper degreasing.
Coarse polishing pastes are used for the same purposes as abrasives from P600, but there are pastes for polishing only. The latter are often intended to remove scratches without applying paint. Abrasives on a non-woven, felt basis – Scotch-Brite – are deservedly popular. The material has a high degree of elasticity, which allows it to process the surface without changing the shape of the part and reach hard-to-reach places. Scotch Brites are used without a bar and are usually colored according to the aggressiveness of the material: from red to green (copper, gray).
Recommendations:
- Mix the putty and hardener thoroughly. A hardener that does not react with the putty will subsequently appear through the coating layers in the form of spots.
- In hot weather, the amount of hardener that needs to be added to the putty is approximately halved.
- In order to dilute the thick putty, you can add a little polymer from the fiberglass repair kit to it.
- The jar of putty must be tightly closed during storage to prevent the putty from drying out, otherwise it will lose its elasticity.
- The roof, hood, and doors are body elements that are affected by increased vibration. On these elements you need to use elastic putty to avoid cracks. Putty with aluminum powder and putty with carbon fiber are suitable.
Drying automotive putty:
To dry the putty, the temperature in the workshop must be at least 20 degrees.
Putties do not harden at low temperatures. If you add more hardener than required, the excess hardener will not react with the putty, which will worsen the quality of the coating. Thus, it is important to observe the temperature regime and mix the putty with the right amount of hardener.
You can use infrared drying. At the same time, you get an advantage in the speed of hardening of the putty and reducing its further subsidence.
Surface matting
Matting should begin by sanding large flat surfaces with coarse sandpaper and a sander or plane.
Treated and embossed surfaces are carefully processed by hand. In the process of high-quality matting, the old coating is removed and an even, polished thin layer remains.
The final stages of matting are:
- grinding;
- visual inspection of work quality using developing powder;
- rinsing with clean water;
- wiping with a sponge or felt;
- drying;
- degreasing.
It is better to check the quality of work with side lighting. Detected defects are marked with a marker and processed again. The quality of matting determines the reliability of adhesion of the paintwork to the surface of the car. At the same time, the matting of ordinary surfaces and transport soil are significantly different, so they should be considered separately.
Matting a normal surface
Matting is carried out at all stages of car painting. To apply primer, putty and paint, the surface is treated with abrasives of varying grits to improve the reaction between layers.
Before priming, the surface is sanded with sandpaper with a grain size of approximately P320. Before painting, treatment is carried out with less aggressive abrasives, within the range of P800-P1200, or using a special paste. For local repairs, the edges of the area are polished with a thin abrasive sponge P2000. For high-quality polishing, several abrasives of different grain sizes are used alternately in the same place, first for sanding and then for polishing. Matting is carried out dry, for example for polyester putty, or with wetting with a moderate amount of water to remove dust.
Matting of transport soil
To deliver new parts for sale, they are often protected from damage with a special protective layer. The transport primer is applied by electrodeposition and is characterized by high hardness. Before using such a part, the protective layer must be removed and standard automotive paintwork applied. When painting new parts, matting will be required if, in addition to the primer, there is a shipping coating. A solvent that reacts with any coating other than the base primer will help determine its presence.
It is almost impossible to carefully remove the transport primer by hand, so you will need to use a grinding machine. Removing transport soil requires, due to its hardness, a specific approach. You will need a special grinding wheel made from mineral components. It has a standard P320 gradation, but can handle increased grinding loads. Also included are matting gel and paste.
Can putty be applied to paint?
It is not recommended to apply putty to sanded paint. According to technology, putty must be applied to bare metal. It is allowed to apply putty to the old paintwork, but it must be factory-made. That is, the surface should not be repainted. Otherwise, it will disrupt the technology and quality of repairs.
What can happen?
What can happen if you apply putty to a repainted surface? Here we can give an example of a house on a foundation. A house is only as strong and good as its foundation. If the technology is violated, adhesion problems may arise.
Experts from 3M believe that putty should not be applied to sanded paint. This can cause contouring and further development of repair marks (subsidence). The putty's chemicals may react with the paint layers. This may cause the putty to lift up along with the paint.
What are the benefits of applying putty to paint?
When applying putty over factory paint, you get an advantage in speed of repair. There is no need to remove layers of paint and primer. This speeds up repairs.
Another benefit is that the zinc coating, if present, is not damaged. Also, no moisture gets on the bare metal. Factory coating is good protection against corrosion. Conventional filling primer does not provide anti-corrosion protection.
If applied to factory paint, you need to carefully prepare it by sanding it with p80 - p180 abrasive.
The advantage of applying putty to bare metal is that it ensures guaranteed adhesion to the surface.
When applying putty to paint, there is no guarantee that further adhesion problems will not occur.
Matting a normal surface
Let us note right away that sanding can and should be carried out before applying any coating, be it primer, putty or paint. But the latter material requires a particularly precise approach, since applying paint is a finishing touch. Before priming, the main surface is sanded with P320 sandpaper - for hard-to-reach places, an abrasive on felt is used.
The edges of the damaged area are treated with an abrasive sponge of the “Micro Fine” category, i.e. very thin. This part of the matting of the car extends over an area larger than the painting area. Polishing is necessary to make the transition from one layer of paint to another less noticeable. Ideally, it is necessary to use several types of “skins” on the car, gradually reducing the grain size of the abrasive and expanding the grinding limit. If the part needs to be “trimmed” a little, then you should start with P600, but usually the first “wash” is made with the number P800, and in the interval between “800” and “1200” the ZM development is applied to the surface.
Preparation of the surface of the transition zone is carried out only dry, although for some wheels (with a foam base) the use of a small amount of water is acceptable. In this case, the dust extraction must be turned off. Specific instructions must be obtained from the manufacturer from the instructions for use or from the official. website. For example, if we are talking about the popular circles of the ZM company, then manual preparation of polishing for varnish is recommended to be carried out with an abrasive with a number starting from P3000. You should also take into account the recommendations of the varnish manufacturer, and after finishing work, remove dust and thoroughly degrease the surface with a solvent.
Applying automotive putty to the ground
The only primer on which it is recommended to apply putty is epoxy. It is recommended to do this if the car has been standing for a long time, stripped to bare metal. This is usually done during restoration work. Even indoors, with prolonged interaction with air, “bare” metal oxidizes. Epoxy primer provides good anti-corrosion protection.
If the repair is carried out in a short time, then it is not necessary to apply epoxy primer. It is necessary, as described above, to prepare the damaged surface by stripping it down to bare metal, degreasing and filling.
Finishing layer of automotive putty
The finishing coat is applied to the entire repair area. This is a thin layer of putty. You can add some polymer from a fiberglass repair kit to the putty. Approximately the same amount is added as the hardener from the tube. Next, add putty hardener and stir. The resulting putty is easily applied in a thin layer and is well leveled. When curing, a slightly sticky layer may form on top of the putty surface. You can remove it with a solvent and start sanding.
What types of automotive putty are there and what does it contain?
In the life of an ordinary motorist, sooner or later a moment arises when one has to get acquainted with body repair work for the first time. And the first thing that requires a conscious purchase in this case is car putty. Since there are many products in this category on the market that differ markedly in composition and characteristics, it makes sense to first thoroughly understand this issue.
The quality of car body repair work also depends on the quality of automotive putty.
Stages of car puttying
Do-it-yourself car putty can be rough and finishing. It must be remembered that the thickness of the putty layer should not exceed 2-3 mm. If there are serious defects on the car body, then it is better to contact a straightener to eliminate them, but under no circumstances apply a thick layer of putty, as sooner or later it will turn into a crack.
The first, rough layer is applied with coarse putty using a rubber spatula. A pink hardener from a tube is usually added to this layer, after which the mass should be thoroughly kneaded with a small spatula until the pink veins completely disappear.
The question arises: how to putty a car with scratches? When performing such work, it is necessary to grind out sharp-angled scratches, giving them a semicircular shape. The rounded scratch will be completely filled with putty and will not be noticeable after painting.
As the rough layer dries, you need to carefully monitor the resulting irregularities, since the putty immediately begins to harden, it should become like rubber, but not be too loose. It is at this time that the dents are tinted with putty, and the bumps are cut off with a knife.
There is no need to try to fill a deep dent in one go, using a large amount of putty.
To eliminate gross damage and deep dents, automotive reinforcement putty is used. It is produced in the form of a coarse powder mixed with glass fibers and applied to a well-sanded surface.
When the surface is well leveled with a rough layer (or rather layers), it must be thoroughly sanded with fine-grain and then medium-grain sandpaper.
The putty of the car will be reduced to zero if you are careless about the surface grinding process, which can be done using developing powder and a plane for large, flat surfaces - the roof or hood. The process itself is simple: P120 sandpaper is attached to a plane and sanded, pressing lightly.
The process must be carried out until the surface feels absolutely smooth to the touch, without transitions or joints. You can apply a metal ruler to determine the irregularities; they are clearly visible under the metal edge of the ruler.
The convexities of the putty are carefully processed with a plane, putty is added to the depressions using a developing rub in the form of black powder. Puttying is done using a foam sponge, using light movements.
After applying the developing powder, the surface is again processed with a plane. The point of using developing powder is to track uneven areas: the surface of the plane does not enter the depressions, and they remain dark. If the plane encounters a bulge, it grinds them off. The erased powder will show how much putty was removed and where.
putty the sidewall
By leveling the surface, less and less putty is added, and the grain of the abrasive used P120-P180-P240 is reduced, from coarse to fine. Here you also need to take into account that when sanding you cannot jump over more than 100 units (meaning sanding paper). For example, after working with P80 sandpaper, you should not immediately switch to P180. It’s better to start with the P120 and then move on to the P180.
Finishing is done on a well-leveled surface; for this purpose, fine-grained car putty is used, also diluted with a hardener. This putty copes well with small cracks and damage to the body coating.
The finishing putty is cleaned using sanding paper P220-240, or you can use a grinding machine and abrasive wheels on a sticky base, which makes it possible to sand the scratch more efficiently. Finishing putties are usually one-component: they do not need to be mixed, they are immediately ready for use. Such putties are applied in a very thin layer, due to the high shrinkage rate.
Types of automotive putties
There is no official classification of automotive filler pastes. But in fact, they can be conditionally divided according to two criteria: method of use and composition.
The functional purpose determines the division of putties into:
Depending on the composition, putties are either one-component or two-component. In the first case, as a rule, this means the putty itself and the so-called hardener or activator, which causes the polymerization process, that is, hardening of the composition some time after application. As for one-component pastes, they do not require a hardener.
Video review of types of automotive putty - what they are
Also, based on the chemical composition of the putty base, they can be divided into four main groups:
- nitrocellulose;
- acrylic;
- polyester;
- epoxy.
Reinforcing with fiberglass (fiberglass)
For places where the body has severe damage, through corrosion and holes of other origins, a reinforcing paste containing fiberglass is used. For its specific filler, which resembles hair, the putty was popularly nicknamed “hair.” It is characterized by increased strength, the ability to level large irregularities at a time and is used exclusively as a starting putty, since it is not subject to finishing grinding. One of the reasons: when processing fiberglass, harmful fine dust is released into the air.
If you need to add putty
A-Smith Blog Do-it-yourself sandblasting machine or collective farm is a voluntary matter
If, during sanding, deep unevenness is discovered that is not compensated by the thickness of the soil, then you are out of luck - you will have to putty and level the surface again. Then you prime again, apply development, and continue finishing. For a beginner, this process can be quite long, but believe me, your efforts will not be in vain.
It will be much more offensive if you give up on everything and start painting the car without bringing the surface to condition. You will regret it at the very moment when, after applying the paint, all your flaws will appear in full view. Therefore, you need to pull yourself together and finish the job to the end.
In this case, it is not advisable to apply putty (especially thick layers) directly onto the filler primer. According to technology, the soil from these places must be cleaned off and only then putty.
Although many manufacturers of putties allow their application to 2K acrylic primers, they set one essential condition - complete curing of the primer. However, we must keep in mind that complete polymerization is not as fast a process as it seems. It does not end after the conventional 6 hours of air drying specified in the instructions for the primer. And when applying putty to a soil that is not completely cured, problems with adhesion and contouring will not take long to arise.
Try to remove all defects at the puttying stage, that is, before applying the filler. Level the surface until there is not a single defect left on it - only then can you apply primer-filler and then paint with a clear conscience.
Our surface has been cleaned and is almost ready for painting, for which we congratulate you. In the next article we will talk about the final preparations that should precede the application of enamel.
Novol and Body products: how much they cost, reviews
If we talk specifically about brands, the product lines Novol (Poland) and Body (Greece) have recently gained particular popularity. These are complex solutions, including reinforcing, filling, universal, finishing pastes, as well as putties for plastic. The basis of the two-component composition is polyester resins.
Novol and Body putties use polyester resins as a base.
The cost of a 500-gram jar of Novol universal putty with a tube of hardener (15 g) will be 420 rubles. You can buy a liter jar of Body universal paste for a price starting from 250 rubles. Reviews for the products of these brands are approximately similar: good strength, elasticity, adhesion, ease of application and processing. Among the disadvantages, only the harmful fumes during hardening are indicated, which is why it is recommended to work in a well-ventilated area and store the paste in a tightly closed jar.
How to use: instructions for using putties
The putty is applied only to a sanded and degreased area of the body. Sandpaper of P80-P120 fraction is usually used for cleaning. If a two-component polyester paste is used, it is better to calculate in advance the volume of mixture required for a certain area, since after mixing the components they must be used in only 1.5-4 minutes.
The moment of connecting the putty with the hardener is also important. It is very important to maintain the correct proportion (read on the packaging). As a rule, the activator is taken about 2-3% of the weight of the putty. If there is less hardener, the paste will not “set” normally; if more, the opposite effect is observed and there is a risk of cracking of the layer.
Mix the components with a spatula. In this case, the reinforcing putty with fiberglass is first mixed in a circular motion, then by pulling without strong pressure. Other putties are mixed using a regular broach. When applying the paste to the body, the spatula should be held at an angle of 30-60º. If the treatment area is large, it is recommended to use at least two spatulas of different sizes: one tool applies the mixture, the second one smoothes it out.
For polyester putties at a temperature of 20-25ºC, complete polymerization (hardening) occurs after 15-20 minutes from the moment of application. This indicator depends on the thickness of the applied layer.
Each layer is sanded and degreased again before applying the next. Everything is done dry - it is forbidden to use water. The paste, which begins to “set” before application, cannot be diluted with any liquids (it is no longer suitable). After the finishing layer has hardened, the area is sanded and can be subsequently primed, painted and varnished.
Matting tools
To easily matte your car, sanding and polishing tools are useful. The choice depends on the area of the surface to be painted. For a complete repaint of the body, a sanding machine will be an indispensable assistant. An economical alternative for smooth surfaces are sandpaper blocks, also known as planes. With their help, it is easier to manually process the surface of the car.
Manual matting is required in difficult and uneven areas. When matting embossed parts, Scotch Brites are useful. These are flexible and elastic felt-based abrasives that allow you to process hard-to-reach areas without changing shape. They differ in the degree of aggressiveness of the material in color - from red for rough work to green for polishing.
Manual matting
When manually processing the surface when matting, adhesive tape or flexible sandpaper is used. These materials allow you to efficiently process complex relief areas
At the same time, it is important to remember about changing the sanding trajectory during bending and take it into account for uniform matting
When working with abrasives manually, sanding with water greatly simplifies matting. A wet sponge is used to wet the body. An important condition for high-quality processing is the purity of the water, so it should be changed frequently. Adding liquid soap to the water will help to avoid varnish and shagreen smudges. After matting, the surface is washed with plenty of running water and wiped dry with a lint-free cloth.
Matting with a plane
When manually matting smooth surfaces, it is more convenient to secure the abrasive on a plane. This is a wooden block that is convenient to hold during the matting process. When working, you should securely fasten the sandpaper and regularly change the direction of the plane for uniform polishing.
Matting a car using a sander
The universal choice of sanding machine for matting a car body is an eccentric, also known as an orbital sander. The grinder will significantly speed up matting work in the following cases:
- complete removal of old paintwork;
- processing of transition zones of individual sections of the body before painting;
- leveling putty areas;
- removing the shipping primer.
Use the sander effectively on all flat surfaces. For high coating hardness, surface grinders or special attachments with mineral abrasives are used.
When machining, it is important to ensure that the pump and dust removal hose are in good working order. To prevent clogging of the abrasive, it is recommended to periodically tap the sole of the machine.
When working, it is unacceptable to put pressure on the machine and allow the surface to overheat. Also, bent, curved or thin parts should not be machine matted.
Matting of the car body and parts is necessary at all stages of applying protective and paint coatings. To work, you will need a set of abrasives of different grain sizes. Different elements of the body are processed with different tools - smooth surfaces can be sanded with a grinder, thin metal must be processed with a plane, and hard-to-reach places can only be polished by hand.