Motorcycle Features
The IZH Plante 5 motorcycle has the original name IZH 7.107. Just like the IZH 6, it belongs to the middle class of motor vehicles, designed for movement on roads with any surface. The main feature is the use of an oil pump; when refueling there is no need to add oil to the tank, as well as a contactless ignition system that operates independently of the battery.
It became possible to start a motorcycle from a pusher. To do this, you need to turn on the ignition, second gear and, when pushing the bike forward, the engine starts. True, without a battery, operation is possible only during daylight hours.
The Fifth Planet can be equipped with a cargo trailer and a passenger stroller. To reduce the clutch release effort, the bike has a clutch consisting of 7 pairs of discs. Vibration dampers are installed on the cylinder ribs. An important feature of this series is the presence of hydropneumatic suspension with disc brakes, which contributed to a smooth ride. The power is 22 horsepower, the maximum possible speed is 120 km/h. The volume of the two-stroke single-cylinder engine is 346 cm3. The power unit has good traction at low speeds.
ELECTRICAL EQUIPMENT
The electrical equipment of the car is made according to a single-wire circuit: the negative terminals of the sources and consumers of electricity are connected to the “ground” (the body and the main units of the car, which act as the second wire). The on-board network is a constant current with a voltage of 12 V. When the engine is not running, all users are powered by a battery, and after starting the engine, by an alternating current generator with an integrated rectifier and an electric voltage regulator. When the generator is running, the battery is charged.
Most of the electronic circuits are protected by fuses installed in the mounting block. The fuse rating and the circuit it protects can be found in the tables (for mounting blocks of the old and new standard). The electric motor of the windshield wiper gearmotor is protected by an automatic reusable bimetallic fuse. Fuses are NOT installed in the ignition, starter, or battery charge circuits. Massive users (starter, headlights, cooling fan motor, etc.) are connected via electromagnetic relays.
Electrical circuits? - even a schoolboy can figure it out!
When I first encountered a schematic electrical diagram of a car, I realized that the principles of its construction and the designation of elements on it are standardized, and those elements that are present in all cars are designated the same way, regardless of the car manufacturer. It is enough to figure out once how to read such electrical diagrams, and you can easily understand what is shown on it, even if this is the first time you have seen a specific diagram from a specific car and have never even climbed under the hood of it.
Graphic designations of circuit elements may differ slightly; in addition, there are black and white and color versions. But the letter designation is the same everywhere. In addition to schematic electrical diagrams, it is useful to have diagrams that indicate the physical location (in space) on the body of various harnesses, connectors and grounding points - this will help you quickly find them. So, let's take a look at examples of such circuits, and then proceed to describe their elements.
An example of a car electrical circuit diagram
The circuit diagram does not indicate the physical relative positions of the elements, but only shows how these elements are connected to each other. It is important to understand that if two elements on such a diagram are shown next to each other, on the body itself they can be in completely different places
Schematic arrangement of electrical components on the body
Such a diagram carries another type of information: the routing of the cable braids and the approximate location of the connectors on the body.
Three-dimensional accurate diagram of the location of electrical components of the car
There are also diagrams that show exactly how and where the cable routes go in the car body, as well as grounding points.
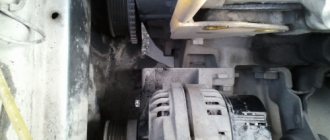
Generator UAZ
Installation of a 90 Amp UAZ 469 generator
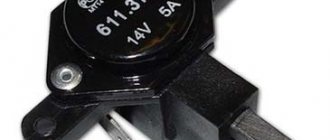
After the first use of the winch, the native (USSR) 40A generator stopped charging the battery. A 90 Amp generator from a steer was found in the garage. The mount is the same as on the UAZ. This generator has been sitting for 5 years and it is not known what condition it is in. If you don't put it, you won't know. A voltage regulator (hereinafter referred to as RN) from Volga (13 3702) was purchased. In order for the new generator to fit correctly into place, you need to install a pulley from the old generator on it. It was not possible to remove the pulley from the Soviet generator manually and using a screwdriver.
I bought a bearing puller and removed the pulley.
Next, we cut the wires, attach the terminals, and connect them to the LV.
Now, we install and connect the new generator.
So why did I redo the wiring for the generator, and not connect everything to the new one as it was before?
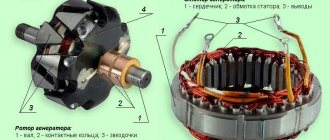
The fact is that my old generator schematically looked like this:
The new one from the 90 A bull looks a little different:
90 A generator from Bychka
Because Since we get different terminals of the brush assembly, the connection diagrams will be slightly different.
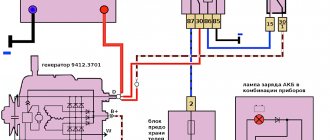
I used this connection diagram:
Scheme for connecting a generator with a two-pin output from the brushes
Result: the voltage, as expected, is 14 V. But, when the headlights are turned on, it drops to 13 V. My fault is that: 1. Used generator. 2. I left the pulley from the old generator, and it is slightly smaller in diameter, this also affects the voltage depending on the speed. 3. The idle speed of the UAZ is low compared to other cars. 4. According to experienced people, this problem (voltage drop) is observed on almost all Soviet cars, so many install running lights and drive without a neighbor during the day. I think I'll do that too.
Transfer of the generator to the top of the UAZ-469 (417 Engine) UAZ 3151
— Generator 90A BATE — 1 pc. 4300 rub. — Alternator belt Klinova 1225/10 200 rub.
The old generator stopped holding a charge, and I decided to repair it and carry it as a spare, and buy myself a more powerful one with 90A and immediately raise it higher from the future water level, so that it would live with me a little longer than the one that constantly floats in the water, yes and have some charging when you’re standing up to your knees in water... I found a corner from a friend, bought a 1225/10 belt, bought a 90A BATE generator and off I go! First, I removed the old generator, I had no problems, except that the new Volgov barrel for the snorkel was a little in the way. I marked and drilled on the corner and tried it on the engine, everything seemed to be going according to plan, then I drilled two more holes on the other side of the corner for attaching the genes and we put everything together and put it in place. I thought everything worked out, but after putting on the alternator belt, we see how the belt passes under the thermostat, and it gets in our way. We try to re-drill the holes 1 cm lower in the corner and it doesn’t give us anything - it still hurts a little. Then my friend said, this is all nonsense and we need to do it right - throw out this corner! I took a piece of cardboard and scissors and began to make a pattern for the future part, crumpled something there, bent it, and here it is - a work of art. We trace it onto the metal, and I, with a grinder in my hands, begin to shape it from a rough and ugly piece of metal into a high-quality and processed, almost factory-made part, even if you put a stamp on it for sale! As a tuning, I would add a cutout on top and, of course, paint it red, but since there was little time, we were content with what we had!