4.1/5 — (54 votes)
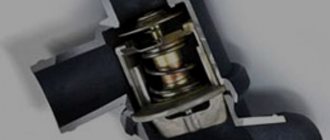
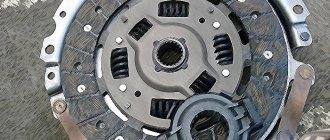
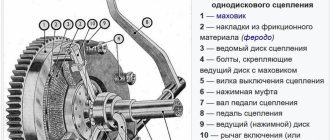
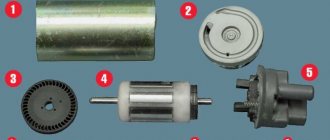
1 - clutch housing, 2 - working cylinder rod, 3 - fork, 4 - adjusting nut, 5 - lock nut, 6 - return spring, 7 - friction linings, 8 - driven clutch disc, 9 - steel casing, 10 - drive disc ( basket).
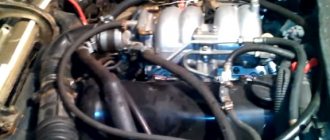
Today, the article will talk about procedures such as replacing and adjusting the 2106 clutch with your own hands. As we like to repeat, everything can be done without the help of car service specialists; there are no difficulties in repairing VAZ cars and there cannot be any. Often, drivers try to solve all the problems with the car on their own, because the cost of maintenance is absurdly high.
Even despite the fact that the VAZ 2106 has not been produced for ten years. And we will try to help as much as possible with the repair. If you have any questions, leave comments, share your experience, and describe unusual situations. After all, the topic is quite interesting and rich.
Replacing the clutch disc on a VAZ-2104-2107
Clutch kit The clutch is the most important component of a car, without which it is impossible to imagine the operation of the gearbox mechanism, as well as the car’s performance of such operations as starting and braking to a final stop.
In other words, the clutch is a necessary mechanism of any car, which is a kind of transfer point between the engine and the drive axles. This unit includes:
- driven clutch disc;
- clutch basket and release bearing with clutch.
So what is this component of the clutch mechanism? This is a disc with spring plates and friction linings that are not connected to each other and are made of a material comparable to the material of the brake pads, i.e. abrasion resistant. In the center of the disk there is a hub with a splined connection.
Malfunctions
As a result of vehicle operation, the clutch disc, like any consumable material, can become unusable - the springs weaken, the friction linings wear out and become thinner. Manufacturers do not indicate a specific service life of the disk, because it depends only on the driver: one “clutch” can last only 5,000 km, while another can last 100,000. Increased clutch wear can result from:
- sudden starting at high speeds;
- slip;
- incorrect adjustment;
- participation in racing events;
- leakage of foreign liquids.
Usually there are two faults for which it is worth considering repairs:
- the clutch “slips”;
- the clutch “drives”.
When slipping, the driven disk is not pressed completely against the flywheel. What does this mean? If you sharply press the gas pedal while the car is moving, you may notice an increase in engine speed, but there will be no increase in speed. In the end, the car will someday just stand up and only towing or muscle power can set it in motion. Therefore, the issue of replacing the driven disk should not be shelved.
When the clutch “drives”, uncharacteristic sounds and noises are observed when changing gears, gears are difficult to engage. In this case, the driven disk, on the contrary, does not completely “separate” from the flywheel. In this case, pumping the hydraulics and adjusting the free play of the clutch helps, which can be easily done by anyone in a garage. If you ignore this malfunction, you can run into expensive gearbox repairs.
Features of clutch functioning
In general, although the approximate service life of the VAZ 2106 clutch before its replacement is about 150 thousand km for the basket and about 70-90 thousand vehicle kilometers for the driven disk.
Prerequisites for repair:
- clutch;
- incomplete disengagement (clutch terminals);
- the appearance of extraneous noise generated by the release bearing, fork or basket;
- malfunctions in the hydraulic clutch system.
Clutch slip is characterized by loose engagement of the driven disc on the surface of the flywheel and pressure plate of the basket with the clutch pedal fully released in the cockpit. In this case, the engine speed increases with increasing load on it, but in some cases the car cannot move at all at the beginning of the movement or weakly, uncharacteristically slowly increases its speed while driving. This malfunction is clearly visible when driving uphill, overtaking, or trying to jump sharply. This occurs when the friction lining of the driven disc is worn or the clutch drive is not adjusted correctly.
Clutch kit price
Now, in the era of the development of the Internet, there is no need to run to stores and look for the necessary spare part. It is enough to have access to the World Wide Web and you will have any detail in a couple of clicks. Prices for clutch discs for the VAZ-2107 vary from 470 to 2000 rubles. The cost of replacement work in Moscow and the Moscow region is 2–2.5 thousand rubles.
What advice can you give when choosing a disk? First, rummage through the forums and read reviews. Secondly, when purchasing a disc, do not be lazy to inspect it. Examine the splines especially carefully - there should be no nicks or burrs there, otherwise there is a risk that the disk simply will not fit on the shaft or will not be removed during the next replacement.
Take a look at the friction linings: they should all be uniform in composition and free of cracks. Another point is the quality of the riveting. The key to quality here is the identical dimensions of the flange. Try to swing the damper springs; if there is play, then you should refuse the purchase. And the last thing worth paying attention to is the presence of markings on the damper plate.
Replacing the VAZ 2106 clutch with your own hands
It is quite difficult to imagine a car engine without a clutch. The main task of a car clutch is to ensure a smooth engagement of speeds by briefly disconnecting the engine from the transmission. Thanks to the clutch, the car can move off smoothly without overloading the engine and preventing premature wear of all its parts, as well as gearbox parts. Overloads are caused by inertial moment, which is formed due to the rotation of engine parts during a sudden sharp slowdown in crankshaft speed.
Replacing the VAZ 2106 clutch disc, as well as the clutch basket, is usually done at the same time. This process is not simple and requires certain skills and dexterity, so if you have only recently learned how to change spark plugs yourself, it is better not to take risks and entrust the work to specialists. Replacing the clutch can be done in two ways, with or without removing the gearbox; it is this less labor-intensive and convenient method that we will use today. This work is carried out on a lift or inspection pit.
Shifting gears without clutch
Not every driver of a VAZ 2110 imagines how to not only start, but also drive a car without using the clutch pedal. Of course, this skill is very specific, but it can be vitally important when the clutch cable breaks at the most inopportune moment.
Driving for a long time in first gear can cause the engine to overheat. If there is a considerable distance to be covered, it is better to learn how to shift higher gears without using the clutch, for which:
- release the gas pedal and, at the moment of least resistance, switch off the gear, moving the transmission lever to the neutral position;
- then engage the next gear, continuing acceleration.
The proposed algorithm for downshifting in the event of a non-working clutch requiring replacement is somewhat different:
- Having switched to neutral gear, we revise the throttle, thereby increasing the speed of the input shaft;
- and only then switch to a lower gear.
Replacing the VAZ 2106 clutch with your own hands
- Secure the vehicle with wheel chocks.
- Disconnect the cardan shaft from the gearbox, as well as the clutch slave cylinder.
- Remove the reverse light switch wires from the contacts.
- Disconnect the clutch cover from the side of the cylinder block, unscrew the yoke from the bottom side.
- Using a socket on “13”, unscrew the two fastening nuts that secure the gearbox mount, then remove it.
- Move the gearbox as far as possible from the engine until the shift lever rests against the rear of the bottom hole.
- The transmission will hang from the downpipe of the muffler as a safety net, install an additional support under the rear of the box.
- Grasp the flywheel with a mounting tool and unscrew the 6 bolts securing the clutch basket using a 13mm wrench. Continuously turn the crankshaft to ensure you have access to the bolts.
9. Move the clutch basket towards the box, using the resulting opening, remove the clutch disc.
10. After this, move the basket towards the engine and remove the clutch basket.
11. After pulling it out of the clutch housing, remove the clutch fork and remove the release bearing from the transmission input shaft.
Installation of clutch parts is carried out in reverse order. Before installing them, you need to wipe the working surface of the basket, flywheel, and clutch disc with a clean rag soaked in gasoline. Center the clutch disc in relation to the bearing at the end of the crankshaft, using a special mandrel that imitates the splined part of the transmission input shaft. When you are finished tightening the basket mounting bolts to the flywheel, pull out the mandrel; it should come out easily by hand.
Apply a thin layer of CV joint-4 lubricant to the splines of the input shaft, then install the box in place. After replacing the VAZ 2106 clutch disc is completed, it is necessary to adjust the stroke of the clutch working cylinder rod; it should be free.
Watch also the video on how to replace the clutch on a VAZ “Classic”
Home
Source
Replacing the release bearing on a VAZ 2101-VAZ 2107
Welcome! The release bearing seems like such a small part in the clutch drive, but sometimes it causes so many problems! It even gets to this point: the clutch on the car stops working altogether. Let's look at a few main questions about this bearing and find out how to properly replace it on a car.
Note! You will need the following tools: a screwdriver and lubricant “LSTS-15” or “Litol-24” to lubricate the splines of the input shaft, but more on that a little later. Replacing the bearing requires removing the box, so the list should be supplemented with tools from the “Removal” section.
Summary:
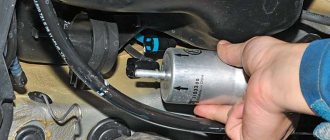
Release bearing location
It is located in the box, or rather in the part where the box connects to the clutch. An example is shown in the photo below, the red arrow indicates the location of the bearing:
Replacing the clutch of a VAZ sixth model with your own hands
Russian car enthusiasts often ask how to change the clutch of a VAZ 2106 on their own, without involving the efforts and resources of repair authorities. In this case, you need to know that sometimes replacement is required due to wear and tear of individual components and mechanisms of this unit. This type of clutch repair can be carried out either as a whole or individual components.
For example, replacing a VAZ 2106 clutch disc of the driven type, as well as the drive disc, is usually carried out in one step. Technological operations of this type are considered quite complex, requiring special skills and a certain dexterity. In the absence of repair practice and poor knowledge of the “six” structure, it is better to take the car to a service center and carry out the necessary work there. This clutch replacement is carried out in 2 ways:
- with removal of manual transmission;
- without removing the gearbox.
Similarly, without removing the manual transmission, the VAZ 2106 clutch fork is replaced, although such repair operations in the service station workshops are carried out with the removal of these transmission elements. If you remove the clutch in full, it will take a long time. If these repair operations are carried out at a specialized service station for passenger cars or at a regular VAZ service center, then it will be quite expensive.
To replace a VAZ 2106 clutch, you must have certain skills for performing plumbing work and have on hand the necessary set of tools and a new product to be replaced. Let's consider the procedure for removing the clutch without dismantling the manual transmission, which is carried out in compliance with the following repair operations:
- We place the car on a level surface and support the wheels with anti-tilt stops. At the same time, we leave the manual transmission in first gear so that the driveshaft and wheels are relatively stationary.
- We disconnect the cardan transmission and manual transmission, and perform the same actions with the control center.
- We open the contact group for connecting the stern light.
- We unscrew the clutch protective cover from the engine side and disconnect the chassis crossbar from the bottom.
- We dismantle 2 fasteners of the gearbox support.
- We shift the manual transmission to the maximum permissible distance.
- Taking into account the fact that the gear shift unit will rest on the resonator, it is necessary to install a safety support under the stern of the gearbox.
- With the pry bar resting on the flywheel, use a wrench to unscrew the clutch basket fasteners.
- By rotating the engine crankshaft, we create a comfortable position for removing the fasteners.
- We move the basket to the previously moved gearbox and use the freed space to dismantle the driven disk and then remove it.
- Next, if necessary, we replace the clutch fork and remove the release bearing from the primary gearbox shaft.
- Subsequent clutch installation follows the opposite scenario.
- Before installing the unit, you need to clean it and wipe all removable components with a fresh cloth.
- We center the pressure plate in relation to the end bearing of the crankshaft using a removed similar primary shaft or a specially shaped mandrel, which can be purchased at specialized outlets selling accessories and auto parts.
- At the final stage, we tighten the fasteners of the clutch basket to the flywheel.
On the Internet you can watch a video “replacing the clutch of a VAZ 2106”, which clearly shows the sequence of operations performed.
Repair and replacement of coupling
Hydraulic system repair involves identifying and eliminating the malfunction. Thus, if the working fluid leaks, it is necessary to eliminate the cause of the leak. This could be a worn cuff, a development on the cylinder running surface, or a sludge hose. 2106 hose coupling , respectively. In any case, after repairing the hydraulic clutch
, it is necessary to remove air from it. pumping the system.
The situation with direct coupling repair is more complicated. This type of work involves partial or complete dismantling of the checkpoint, which cannot but affect the duration and complexity of the repair work, so it is better to carry it out with an assistant.
Start work by installing the car on an inspection pit, overpass or on an elevator. After this, to ensure access to the coupling, the following preparatory work is carried out approximately in this order:
- In the cabin, the gear shift lever is disconnected from the gearbox;
- in the luggage compartment from the battery, the terminals are removed, the starter mounting bolts are loosened.
Also, if the car is on a lift. he rises. Then, in order:
- the terminals from the backup sensor are disconnected;
- from the resonator. exhaust pipe;
- from the gearbox housing. clutch control cylinder;
- the driveshaft, traverse and starter are dismantled;
- The clutch cover and mount bolts on the gearbox are loose.
Preparations for removing the gearbox are complete, and after that there are two options: remove the gearbox completely (which is more labor-intensive) or simply move it to a distance that allows you to unscrew the bolts securing the clutch basket to the flywheel. I must say that if the need to replace the clutch fork or release bearing of the VAZ 2106 is not available, then the option of incompletely disassembling the gearbox is quite suitable. In this case, the box will rest on the receiving tube after the change.
After this, after unscrewing the bolts, the basket is moved away from the flywheel, the clutch drive disc is removed, and after moving the basket towards the engine again, it can be removed from the input shaft of the gearbox. By removing the basket, in addition to inspecting the drive disk for faults, you can check the condition of the release bearing and clutch fork. More details about replacing the VAZ 2106 clutch can be found by watching the video on the Internet.
Reassemble in reverse order. When installing a driven drive, it is important not to make mistakes. its protruding side relates to the gearbox. Before screwing in the basket bolts, a mandrel is used as a guide, which facilitates the centering of the clutch elements, which is the end of the gearbox input shaft.
After assembly is complete, if the repair does not affect the hydraulic clutch system, you only need to adjust the free movement of the clutch slave cylinder pusher. Finally, we can say that when replacing a VAZ 2106 clutch during its service period, the price of the product will be affected, which in most cases indicates quality.
Preparing for repairs
Before putting the car in a pit and removing the box to replace the clutch, you need to visit the store and buy all the necessary spare parts:
- Clutch disc.
- Basket (drive disk).
- Release bearing.
- If necessary, clutch fork.
- If there is significant wear, the crown on the flywheel will also need to be replaced.
- Bolts securing the basket to the flywheel.
It is also important to have a good set of tools on hand, WD-40 penetrating lubricant, sometimes even a gas torch is necessary (if the bolts and nuts are very rusty).
It is advisable to carry out all the work in an inspection pit or overpass (it is unlikely that the average driver of a six will have a lift in the garage, so we do not mention it). If everything goes smoothly and the nuts unscrew well, you will complete all the work very quickly.
Checking and replacing the hose on the clutch cylinder
The hose on the clutch slave cylinder is an extremely critical part that is exposed to high brake fluid pressure. Therefore, the car owner must monitor its condition especially carefully.
The clutch cylinder hose is a very important part, the condition of which must be carefully monitored
Here are signs that indicate that the hose should be changed urgently:
- cracks and other mechanical damage visible to the naked eye have appeared on the hose;
- the hose looks intact, but there are visible leaks of brake fluid on it (this means that it is still damaged and microcracks have appeared on it, which the driver simply cannot see);
- The threads on the hose ends are partially or completely stripped.
If you notice any of the above, the hose should be replaced immediately. It is better to install standard VAZ clutch hoses, their catalog number is 2101–16–025–90, and the cost is about 80 rubles.
Hose replacement sequence
Before starting work, you should stock up on an empty plastic bottle and two open-end wrenches: 17 and 14 mm.
- The car is driven into the pit and secured with wheel chocks. Open the hood and find the place where the slave cylinder hose is screwed to the clutch hydraulic tube.
- The main hose nut is held firmly with a 17 mm wrench, and the fitting on the hydraulic tube is unscrewed with a second wrench - 14 mm. After unscrewing the fitting, brake fluid will flow out of it. Therefore, there should be a container in the inspection hole to collect it (a small basin would be the best option).
- The second end of the hose is unscrewed from the working cylinder body using the same 17 mm wrench. There is a thin O-ring in the cylinder under the hose nut, which is often lost when removing the hose. This ring should also be changed (as a rule, new seals come with new clutch hoses).
- A new hose is installed in place of the old one, after which a new portion of brake fluid is added to the hydraulic system.
So, even a novice driver can change the working cylinder on a six. All you need to do for this is to carefully prepare the necessary tools and strictly follow the above recommendations.
Replacing the clutch cylinder VAZ 2106
This replacement of the main clutch cylinder is carried out in the following order:
1. Place the vehicle on a vehicle inspection pit, overpass or electric lift. 2. Using a special bulb made of rubber alloys or a similar product, we select brake fluid from the clutch drive hydraulic reservoir. 3. Slightly unscrew the rubber clamp securing the expansion tank to contain antifreeze and move the product onto the plane of the power plant. 4. Unscrew the fitting hole of the metal tube with a wrench set to “13”, disconnect it from the inlet channel of the GCS and move it for ease of repair work. 5. Unscrew the metal band-type clamp a little and tighten the GCS fitting hose. 6. Using a “13” socket wrench with a knob, unscrew the 2 fasteners of the GCS and release it from the fastenings. 7. We install the repaired or new GCS and all previously unscrewed spare parts in the reverse order. 8. Pour “brake fluid” into the clutch hydraulic reservoir to the required amount and bleed the clutch on the vehicle.
When all these stages of the technological process are completed, the replacement of the VAZ 2106 clutch cylinder is considered complete.
The number of owners of cars of this brand is constantly updated and increased. Therefore, it makes sense to address this topic again and again. Although a lot of material has already been written on how to carry out such operations with a machine.
Vehicle mileage alone cannot determine the service life of a car's clutch. Here, an important role is played by the magnitude and nature of the load, which is transmitted to the drive wheels from the motor. Operating conditions are no less important. The friction linings of the driven disc wear out more often if the clutch itself is engaged more often. The working surfaces of the flywheel and pressure plate also follow this rule. The need for repairs arises at the moment when the engaged clutch begins to slip.
Adjusting the clutch of a VAZ 2107
If you notice that when you engage the clutch, the car begins to jerk, the pedal travel increases, decreases, or it begins to sink, or there is play, then it’s time to adjust the clutch.
If you don’t do this, then you are at quite a risk for two reasons:
- firstly, the wear of transmission parts increases - the clutch fork, release bearing, drive and driven disks;
- secondly, the car may simply become uncontrollable, since you will not be able to change gears normally, this is especially dangerous if you are overtaking, driving downhill or descending from it.
Today we will talk about adjusting the clutch on the VAZ-2107. If you have a VAZ-2108-21099, then you can read the corresponding article on our portal vodi.su.
Clutch device VAZ-2101-2107
Before you start, make sure you are at least somewhat familiar with the device.
The clutch on the VAZ-2107 is a dry single-disc clutch. Directly below the pedal is the main hydraulic drive of the clutch cylinder. By pressing the pedal, we move the pusher, which fits into the piston socket of the master cylinder. Because of this, hydraulic fluid is squeezed out of it and moves through the pipeline to the working cylinder.
The slave cylinder, in turn, is connected to the clutch fork via a pusher. When we press the pedal, the fork moves the release bearing along the bushing and separates the pressure and support plates. Thus, the rotational movements of the crankshaft are no longer transmitted to the transmission and we can change gears.
It is clear that if there are any malfunctions, shifting gears will become problematic. If, for example, when trying to switch from second to third, you feel slipping, an unpleasant smell and twitching of the car, this may indicate not only the need to adjust the hydraulic drive, but also wear on the ferro-friction linings of the driven clutch disc. This should never be allowed, otherwise the rivets will scratch the flywheel and the clutch basket itself.
Clutch adjustment VAZ-2107
First we need to check the clutch pedal travel. We have already written on Vodi.su about how to do this using a ruler. The pedal free play can vary between 0.4 and 2 mm. The working stroke is 25-35 millimeters. Our task is to adjust the free play, because if it is within the normal range, then the limiting screw of the clutch pedal will not allow it to drop lower.
If there is no free play at all, or it is more than 2 mm, you need to find the pusher bracket under the pedal; the position of the pusher on it is adjusted using a nut, a lock nut and a limiter. We hold the limiter with one wrench, and with the other we loosen the lock nut a little - by one and a half to two turns. Then we measure the free play of the pedal, pressing it with the palm of your hand - if it is within 0.4-2 mm, then everything is done correctly.
The next point is checking and adjusting the free play of the working cylinder pusher. To find this very cylinder, we will have to look under the bottom, so it is better to carry out this work on an overpass or inspection hole. The cylinder comes out of the gearbox and connects to the clutch fork. There is also a return spring attached here, which returns the fork to its original position when the clutch is disengaged.
Measuring it is quite easy - disconnect the spring and, pressing on the fork, remember how far it can move. If within 4-5 mm, then everything is fine. Otherwise, use the nut and locknut on the pusher to set the correct stroke.
Note that you will first need to loosen the lock nut while holding the other nut with another wrench. Then the pusher needs to be fixed with pliers and the lock nut must be loosened another one and a half to two turns.
Then turn the adjusting nut to set the desired pusher stroke. After this, all that remains is to tighten the locknut.
If everything is done correctly, then the free play of the pedal and pusher should be within normal limits. It is clear that you need to check the operation of the clutch mechanism in working order.
It is recommended to check it like this:
- start the engine and let it idle for a while;
- shift into reverse by squeezing the clutch - no extraneous sounds should come from the gearbox;
- then try to switch to first gear and drive onto a flat road;
- accelerate, alternately moving to higher speeds - everything should work fine.
If problems still remain - slipping, grinding, jerking, etc. - this means the problem is either in a worn Ferodo disk or in the hydraulic drive itself.
(2 ratings, average: 4.00 out of 5)
Malfunctions
As a result of vehicle operation, the clutch disc, like any consumable material, can become unusable - the springs weaken, the friction linings wear out and become thinner. Manufacturers do not indicate a specific service life of the disk, because it depends only on the driver: one “clutch” can last only 5,000 km, while another can last 100,000. Increased clutch wear can result from:
- sudden starting at high speeds;
- slip;
- incorrect adjustment;
- participation in racing events;
- leakage of foreign liquids.
Replacing the clutch on a VAZ 2106: preparation and signs
If there is no free play in the pedal, this also indicates the need to carry out a procedure such as replacing the clutch yourself . Then it is no longer possible to improve the performance of this part of the car only through adjustment.
Inspection ditch, overpass, lift - replacement can be conveniently carried out using any of these mechanisms. To get to the clutch from below in field conditions, you simply need to lift the car. The main thing is that the driver or mechanic himself is safe.
The negative terminal of the battery must be disconnected before starting work.
Bleeding the system
Draining fluid from the clutch drive system is very simple:
- Using a blower, pump out the liquid from the expansion tank.
- Unscrew the fitting on the working cylinder and wait until all the fluid is gone.
- Press the clutch pedal several times to remove any remaining brake fluid.
- Change tubes if necessary.
- Tighten the fitting.
- Fill the reservoir with fresh brake fluid.
- Place a transparent tube onto the fitting.
- Have an assistant press the clutch pedal several times. With the last press, you need to hold it in the extreme position.
- Unscrew the fitting half a turn, allowing fluid and air to escape.
- Repeat the procedure until liquid begins to flow without air bubbles. Don't forget to monitor the level in the expansion tank.
In fact, two or three passes are enough to get rid of air in the system. As you understand, pumping the clutch on a VAZ 2106 is not difficult. The procedure is very similar to bleeding the brakes, only it is much faster - the line is very short.
After replacing the clutch, it will need to be adjusted. Pay attention to the working cylinder rod - it has a thread along which you can move the nut. It is by moving it that the clutch is adjusted on VAZ 2106 cars and the rest of the classic series. It is also possible to adjust the free play of the clutch pedal; for this purpose, a special bolt is provided directly above it.
Clutch drive system
There are only two main components in the VAZ-2106 clutch system. The clutch master cylinder allows pressure to be created in the pipes using the driver's muscular strength. The worker acts on the fork, which drives the release bearing. Briefly, the operation of the entire system can be described as follows:
- When you press the pedal, the rod in the master cylinder moves. Since the system is closed, the pressure rises sharply.
- Under the influence of this pressure, the piston is extruded in the working cylinder, which is installed on the clutch housing.
After releasing the pedal, the reverse process occurs:
- When the pedal is released, the master cylinder rod returns to its initial position, as a result of which the volume inside the system increases and the pressure decreases.
- A return spring acts on the working cylinder, which allows the rod to move to its initial position.
- The system has an expansion tank into which liquid is filled.
DOT-3 type brake fluid is used as the working fluid. It contains many additives, they contribute to the normal operation of the mechanism. These additives have a beneficial effect on the metal and allow the cylinders to cool better.
Try to fill the system only with those fluids recommended by the manufacturer. Effective operation depends directly on the quality of the liquid that is poured into the system. Never allow the level to drop to the minimum level. Add fluid if necessary.
Replacing the clutch on a VAZ 2106: do it yourself
Removing the air filter housing and cover are the first steps in the replacement. The three “starter” mounting screws are unscrewed using a key set to “13”. It is more convenient to unscrew from below the part that is located below. The covers must be removed from the gear shift lever in the passenger compartment.
The locking sleeve from the groove on the rod must be removed from its hole. This is done with an awl or a thin screwdriver, while pressing down on the lever rod. As you can see, this procedure is complex. So over time, the clutch master cylinder will also need to be replaced.
The elastic, spacer and locking bushings are removed from the gear shift lever.
The rear propeller shaft on the machine is attached to the rear axle shank flange using four bolts and nuts. The latter must be unscrewed using the same key at “13”. As you can see, such a key should be in the arsenal of everyone who has to do repairs at least occasionally. Even a process such as replacing a clutch fork requires this tool. What can we say about such a procedure as, say, replacing the clutch cable.
Work under the car
This is perhaps the most difficult part of the entire repair, since there are many more steps to be taken here. So make yourself comfortable and proceed to the following operations:
- Unscrew the last (lower) nut securing the starter and remove it. This nut is the nastiest, since it is difficult to get to it using simple wrenches; you will need to use a socket, a ratchet and a cardan. True, it was possible to work with an ordinary open-end wrench installed in the end.
- Unscrew the suspension bearing mount.
- Disconnect the cardan and rear axle flange. Hold the bolt head from turning with a 12mm open end wrench.
- Apply sharp blows to the driveshaft to dislodge it from the rubber coupling on the transmission shaft. Move the cardan to the side.
- Unscrew the mounting of the pillow, install a support under the gearbox.
- Remove the slave cylinder from the clutch fork. Be careful not to lose the bar underneath and the spring.
- Remove the speedometer cable.
- That's all, now all that remains is to unscrew the four bolts that secure the box to the engine block.
Remove the gearbox carefully, try to move it as far as possible from the engine block. The fact is that you can damage the VAZ 2106 clutch drive disc. And this is quite easy to do.
If we take nines and newer VAZs as an example, then the clutch drive discs on them are more reliable and durable. It is advisable to set the gearshift lever to the position corresponding to the third speed.
Replacing the VAZ 2106 clutch
To replace the clutch on a VAZ 2106, you need to remove the gearbox, not even remove it, but move it away, disconnect the cardan drive from the gearbox, remove the wire ends from the terminals of the reverse light switch, disconnect the clutch housing from the cylinder block, and the cross member of the rear support of the power unit from the body, unscrew the starter
Using a 13mm socket, unscrew the two nuts securing the support and remove it from the gearbox. We move the gearbox back until the gear shift knob stops at the rear of the floor hole. The VAZ 2106 gearbox will be held suspended by the exhaust pipe of the muffler. We additionally place a reliable support under the back of the box
Holding the flywheel with a mounting blade, use a 13mm wrench to unscrew the six bolts securing the clutch basket, turning the crankshaft to access them. Move the clutch basket, remove the disc and clutch basket
By pulling outward from the crankcase, remove the clutch release fork, remove the VAZ 2106 clutch release bearing from the drive shaft of the gearbox. Installing the VAZ 2106 clutch without removing the gearbox is performed in the reverse order of removal. Before installation, wipe the working surfaces of the flywheel, pressure and driven disks with a cloth soaked in gasoline. We center the drive and driven disks relative to the bearing at the end of the crankshaft, using a mandrel that simulates the end of the gearbox input shaft. After tightening the bolts securing the clutch housing to the flywheel, the mandrel should be freely removed from the bearing by hand. Before installing the gearbox, lubricate the splines of the input shaft with a thin layer of CV joint-4 grease. Having installed a new clutch, we adjust the free play of the VAZ 2106 clutch slave cylinder with a rod.
Replacing the release bearing on a VAZ 2101-VAZ 2107
Removal: 1) At the very beginning of the operation, you will have to remove the box from the car. (see details in the instructions: “Replacing the box on a VAZ”)
2) Now take a screwdriver in your hands and remove the springs securing the bearing to the fork.
3) Gradually pull along the shaft, in other words, pull the release lever towards you - it is removed from the shaft.
4) After removing the bearing, unclench the ends of the spring attached to the gear shift fork. After decompressing, simply remove this spring. If you find the bearing is in good condition, but the spring is not, replace the spring with a new one and continue to use your bearing. The spring is fine, but the bearing is not - take the spring and insert it into the new part.
Note! Please note that sometimes the bearing is still intact, but has already traveled quite a few kilometers, so you should not exclude the possibility of failure in the near future.
Installation
The new spare part is installed on the vehicle in the reverse order of removal.
Note! Before installation, it is necessary to lubricate the splined part of the input shaft, indicated by the arrow, with the lubricant described in the set of necessary tools, because over time the lubrication of the shaft disappears, and malfunctions with the splined part may occur due to friction between non-lubricated parts.
Below is a link to a video with a visual demonstration of the replacement process:
Source
Work on top of the car
So, a start has been made, the goal is to remove the gearbox to replace the clutch. On VAZ 2106 and similar cars this is done quite quickly, it is only important to follow a certain sequence:
- Inside the car, remove the gear shift knob. It is attached using plastic latches. Sometimes difficulties arise with dismantling, and it gets to the point where the latches break off. The price of a new set of fastenings is no more than one hundred rubles, and you can purchase it even after repairs have been carried out. Therefore, do not be afraid if you suddenly break the plastic antennae.
- Go to the engine compartment, unscrew the four nuts that secure the exhaust pipe to the manifold. The fact is that the exhaust pipe will interfere with the removal of the box, but it is enough to move it a little to the side.
- Disconnect the battery and remove it from the car.
- Unscrew the two top bolts of the starter, disconnect the power wires for the windings and the solenoid relay from it.
- Disconnect the ground wire that goes to the gearbox.
Carefully inspect whether there are any “upgrades” on your vehicle specifically that will interfere with the removal of the transmission. If there are any, then make sure that they do not complicate further repairs.
About the selection of clutch master cylinders
If the owner of a “six” starts having problems with the clutch and decides to purchase a new cylinder, then he will inevitably be faced with the question: which cylinder is better to get? The answer is simple: the clutch master cylinder on all VAZ “classics” from VAZ 2101 to VAZ 2107 has undergone virtually no changes. Therefore, on the “six” you can easily install a cylinder from a “penny”, from a “seven” or from a “four”.
Drivers consider the best option to install standard VAZ cylinders on the “six”.
The cylinders on sale are also universal; they fit the entire range of classic VAZ cars. As a rule, car enthusiasts try to install original VAZ cylinders. The problem is that the VAZ “classic” was discontinued a long time ago. And there are fewer spare parts for it every year. This rule also applies to clutch cylinders. As a result, car owners are forced to use products from other manufacturers. Here they are:
- FENOX. This is the most popular manufacturer of spare parts for VAZ “classics” after VAZ. Cylinders from FENOX can be found in almost any major parts store throughout the country. These cylinders are reliable and in constant high demand, despite their somewhat inflated price. If a driver can purchase a standard VAZ cylinder for 450 rubles, then a cylinder from FENOX can cost 550 rubles or more;
- Pilenga. Cylinders from this manufacturer are much less common on store shelves than FENOX products. But with due diligence, you can still find such a cylinder. The price for Pilenga cylinders starts from 500 rubles.
And these are all big ones today. Of course, today there are many other, lesser-known brands on the aftermarket. However, contacting them is strongly discouraged. Especially if their cylinders cost half as much as the above ones. There is a very high probability of buying a fake that will not last very long. In general, clutch cylinders for “classics” are often counterfeited. Moreover, in some cases, fakes are made so skillfully that only a specialist can distinguish them from the original. But for the average car enthusiast, the only criterion for quality is price. You should understand: good things have always been expensive. And clutch cylinders are no exception to this rule.
As for installing cylinders from other cars on a VAZ 2106, such experiments are almost never practiced by car enthusiasts. The reason is obvious: the clutch cylinder from another car is designed for a different hydraulic system. Such a cylinder differs both in size and technical characteristics, the most important of which is the ability to create pressure. The level of pressure created by the “non-original” clutch cylinder may be either too low or, conversely, too high. Neither in the first nor in the second case does this bode well for the hydraulics of the “six”. Thus, the installation of “non-original” cylinders on a VAZ 2106 is an extremely rare occurrence. And this is done only when it is completely impossible to get a normal VAZ cylinder.
Also check out
- Move the clutch basket towards the box. Remove the clutch disc.
- Move the clutch basket towards the engine and remove it.
- As soon as you manage to pull the basket out of the clutch housing, remove the clutch fork. The release bearing must be removed from the transmission input shaft.
Wipe the basket, clutch disc, and flywheel with a clean rag moistened with gasoline. Reinstall the clutch parts in reverse order. Using a special mandrel that imitates the splined element of the transmission input shaft, center the clutch disc in relation to the bearing of the end part of the crankshaft. After tightening the bolts that secure the basket to the flywheel, you need to pull out the mandrel.
It is worth applying CV joint-4 lubricant to the splines of the first shaft. After completing the clutch replacement, it is necessary to adjust the stroke of the clutch slave cylinder rod (this element must be free).
Source
Major clutch failures
Diagnosing clutch malfunctions is quite simple; you need to pay attention to the behavior of the car when driving. If the clutch is slipping, then you can indicate an accurate diagnosis - excessive wear of the friction linings
There are two ways out of this situation. The choice depends on how long ago the clutch disc was installed and what the operating conditions were.
Part replacement
- If the disc is fairly new and the operating conditions are normal (rare off-road trips, in traffic jams), then adjusting the VAZ clutch will help. For this purpose, the VAZ sixth model has a special nut on the rod of the working cylinder.
- If the disc has been changed quite a long time ago, and the operating conditions are on the verge of extreme, then first we adjust the position of the rod. If this does not help, the clutch is repaired and replaced.
Operating a VAZ 2106 with a deteriorated clutch disc is extremely undesirable, as you can get into big trouble. When the friction linings wear out, rivets are exposed, which can ruin the surface not only on the basket, but also on the flywheel. If a layer of metal is removed from the flywheel, it will cause an imbalance in its weight. The result is increased vibration from the engine.
Another problem is related to the release bearing. This small detail can create a lot of problems. Firstly, the noise level will be high, as the bearing makes a strong noise. Secondly, when you press the clutch pedal, grinding and squeaking noises may be heard. It is imperative to change this part when replacing the clutch.
You can make a short list of what should be done when disassembling the clutch:
- replace the disk;
- change cart;
- install a new release bearing;
- Take a quick look at the ring on the flywheel.
The last point is optional. But it’s worth looking at the crown to protect yourself from troubles associated with starting the engine. If there is significant wear on the teeth, you need to either install a new crown, or knock off the old one and, after heating it up a little, put it on the other side.