Fog lights can be installed on the Priora yourself
Many car owners want to know how to install fog lights on a Priora, because... The climate of our country is predisposed to the periodic occurrence of fogs, especially in the morning and evening. In non-ideal road conditions, the presence of such an accessory will help you better navigate in poor visibility, since the wide beam of standard headlights can “illuminate” a large space, creating a kind of light curtain for both the motorist and oncoming cars.
Installation Guide
Before installing and connecting fog lights on Priora 2, weigh your strengths. If installing fog lights on a Priora 2 or restyling may cause difficulties, then it is better to contact an electrician. A specialist, like no one else, knows how to install headlights on a Priora and how to connect fog lights. If you decide to do everything yourself, then first prepare the necessary tool. To do this, you only need a set of keys and screwdrivers, as well as pliers (the author of the video about choosing fog optics for the Priora is the Simple Opinion channel).
Algorithm of actions
To ensure that installing fog lights on a Priora SE or 2 does not cause difficulties, simply follow the instructions:
- First you need to disconnect the battery, remove the negative terminal from it, and then disconnect the front bumper clips. Self-tapping screws for its dismantling are located on the sides, bottom and top. You need to unscrew them and remove the bumper.
- Next, you can move on to the stubs. The plugs are also fixed using self-tapping screws, but to unscrew them it will be more convenient to use a short screwdriver with a Phillips blade.
- Fog lights on Lada Priora 2 are mounted instead of previously removed plugs. To ensure that the lights are securely fixed, they can be secured using the same screws.
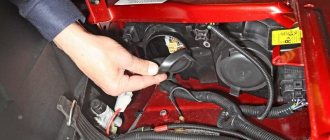
- After completing these steps, you need to find the longest cable in the PTF kit. This wire is connected to the left headlight, after which it is routed to the right headlight. And then the wire must be pulled from the battery side into the engine compartment.
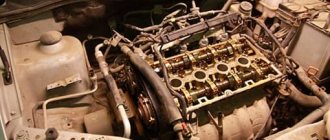
- Using an AN 10 wrench, it is necessary to dismantle the expansion tanks in the engine compartment, which will interfere with the process. Having done this, using a 13mm wrench you will need to unscrew the fastenings of the windshield wiper blades. Eventually you will need to gain access to the left edge of the trim, and to do this you will need to remove the guard itself. When these steps are completed, the pipe can be moved to the side, and then loosen the clamp. The upholstery can then be completely removed.
- Your task is to lay and stretch the wires from the lights through the plug into the vehicle interior, and then secure them with a clamp. This clamp should be included in the kit for the PTF Priora 2.
- When the PTFs are installed on the restyled Priora, all elements are assembled in the reverse order. Don't forget to connect the wires to the crankcase protection screws.
Connection diagram
The installed fog optics will need to be connected.
The PTF connection diagram is as follows:
- First of all, in the car interior, under the steering column, you will need to remove the protective cover. To do this, the three latches should be rotated 90 degrees.
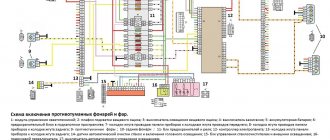
- Having done this, under the mounting fuse block you will be able to see a self-tapping screw - you need to unscrew it, after which you will have access to dismantling the block. In any case, the anti-fog optics kit should come with installation instructions and it must contain a connection diagram. Please use this as a guide during installation.
- Next, you can move on to the torpedo. On the center console, you need to remove the plug, as well as the button for activating the rear window heating system. These components are installed near the clock.
- Next, you will need the fog light button that comes with the kit. The blue wire must be connected to the mounting block, and all other wires are connected to the heating button. This can be done using special clamps, which are also included in the kit.
- At the final stage of connection, you will need to install the relay responsible for the operation of the fog lights in the unit. When performing this task, be careful - the wires that come from the engine compartment must be connected to F18 and F17, and the yellow cable should also be connected to the same contacts. The connection procedure is described in more detail in the diagram.
Basic Setup Aspects
After the fog lights are installed, their luminous flux will need to be properly adjusted so that the operation of the optics is most effective. Adjustment of fog lights should be carried out in conditions that are closest to real ones. Therefore, make sure that there is a spare tire in the trunk, the tank itself is fully filled, and the tire pressure should be the same. In addition, for greater realism, a load weighing about two hundred kilograms can be placed in the car interior.
When all these conditions are met, you can begin adjustment. First of all, the vehicle must be placed on the most level surface, this will allow you to get the most accurate result. If this condition is not met, the adjustment will be incorrect. The setting is done in front of a wall or garage door, this is a prerequisite.
To begin the adjustment, measure the distance from the ground to the middle of the lantern. After this, you should draw a straight line on the wall or garage door that corresponds to the distance measured earlier. Having done this, you will need to draw another stripe - it should be 5 centimeters lower, while the first line can be erased. The anti-fog optics should be adjusted so that the upper limit of illumination is located on the horizontal strip that you draw on the network.
Video “How to independently install xenon in Priora foglights?”
If you are interested in how to install xenon lamps in the fog lights of a Lada Priora car, then detailed instructions for this process are presented in the video below (author - Sergey M).
Do you want to install fog lights on a Priora instead of the standard front optics? Today, this can be done by every car enthusiast who has experience in servicing electrical systems. If the installation is carried out with your own hands, then the only cost can be attributed to the purchase of a PTF kit. After reading this material, the car enthusiast will learn how to dismantle old headlights and connect new fog optics. High-quality photographic materials and a diagram will help with this.
The maximum configuration of the Lada Priora comes with fog lights, so you don’t have to buy optics for other models. Buy a PTF kit in advance, which will cost about 2 thousand rubles. Also examine the dashboard for a button to turn on the fog lights. If it is not there, then you will need to purchase a kit with wires, a button and a relay. The kit also includes a diagram for installing fog lights.
Fog lights allow you to move safely in poor visibility conditions. In fog and rain, the flow of light is distributed along the entire road, which also helps other road users. The “base” does not have fog lights. The scheme is quite simple if you have already installed additional equipment on the Lada Priora.
Standard fog lights on Priora: cost, article number
The automotive company AvtoVAZ connects fog lights to its Lada Priora, if provided for in the package, manufactured by Avtosvet (Kirzhach) and Bosch. They have a difference. The installation depth of Bosch fogs is as much as 40 percent greater than that of similar products produced by the company from Kirzhach. In the “Lux” package, fog lights from Bosch are required, and from “Avtosvet” they are installed as standard. There are 2 options for the kit - for the pre-restyling Priora and for the post-restyling model. What is the difference? The installation point and the shape of the headlights themselves. Among other things, headlights can be purchased separately or as a set.
For Lada Priora:
- The Bosch headlight set has the article number 21700-3743010-54. The cost of the kit varies in the range of 1.6-1.9 thousand Russian. rub. The cost of one headlight will be about 900 rubles.
- A set of fog lights “Avtosvet” costs 700-800 Russian. rub. Article 21700-3743010-52. One headlight will cost the buyer approximately 500 rubles.
For Lada Priora 2:
- A set of Bosch fog lights costs 1-1.2 thousand Russian. rub. Article: 21700-3743010-50. One headlight will cost buyers approximately 600 rubles.
- The set of headlights "Avtosvet" has the article number: 21700-3743010-53. The cost of the kit varies in the range of 800-900 Russian. rub. The cost of one headlight will be about 500 rubles.
Plus, you will need to buy a special set of wires or a so-called installation kit, without which installation of the PTF is impossible. This kit includes a relay and a button. The cost of the set is about 600 Russian. rub.
Installation of PTF
Priora needs to be driven into the inspection hole and checked whether all the necessary components for modernization are at hand:
- PTF and wiring kit.
- Pliers.
- Set of screwdrivers and keys.
Installing headlights
- We disconnect the negative terminal from the battery and move on to the front bumper fastenings - the screws are located on the top, bottom and side. Remove the Lada Priora bumper;
Electrical connections in the cabin
- Under the steering column of the Lada, you need to remove the protective plastic - turn the three latches 90 degrees;
- Under the safety block you will see a self-tapping screw - unscrew it and pull out the block. The PTF kit includes instructions that contain a detailed connection diagram;
- Now let's move on to the central panel. Take out the plug and the button for turning on the heated rear window, you will find these elements to the left of the clock;
- Take the PTF button from the kit. The blue wire goes to the safety block, the rest need to be connected to the heating button - you can do this using the clamps that come in the kit. Here is the connection diagram:
- We need to install the PTF relay in the block. It is important here not to confuse: connect the wires coming from the hood to F18 and F17, also connect the yellow wire to these sockets, black and red go to A86 and A30, insert the fuses from F18, F17, connect the blue wire to A. Understand The diagram will help you with this.
Adjustment
You managed to install the PTFs, but in order for them to perform their task, they must be configured. Place the Lada Priora on a flat surface. There should be a wall opposite the front bumper; motorists usually use a garage for this. Check the tire pressure - it should be the same.
Now you need to measure the distance from the ground to the middle of the headlight. On the wall, draw an even strip corresponding to the distance from the coating to the middle of the PTF. Draw another strip 5 cm below, the top one can be erased. The fog lights need to be adjusted so that the upper limit of the light is located on the horizontal line that we drew on the surface. As you can see, the headlight adjustment scheme is quite simple.
Fog lights can be installed on the Priora yourself
Many car owners want to know how to install fog lights on a Priora, because... The climate of our country is predisposed to the periodic occurrence of fogs, especially in the morning and evening. In non-ideal road conditions, the presence of such an accessory will help you better navigate in poor visibility, since the wide beam of standard headlights can “illuminate” a large space, creating a kind of light curtain for both the motorist and oncoming cars.
How to choose the right PTF for the Lada Priora. Quality criteria
In order not to later regret the money spent on fog lights, it is important to understand their main purpose and evaluate the product from the point of view of both its operating conditions and the design features of the PTF. Understanding what ensures high-quality illumination of the road surface in bad weather with fog lights, you can cut out low-quality goods in the store or in your garage, without waiting for an experimental test in conditions of poor visibility on the road
And for this it is important to know just a few basic points.
The first is the tightness of the purchased fog lights for the Lada Priora. Needless to say once again that the product is located in maximum proximity to the road surface, and therefore is extremely susceptible to pollution, high humidity and even impacts from small gravel stones. The problem of corrosion and poor sealing is one of the main reasons for the premature failure of most PTFs.
The second equally important aspect is the type of optics installed. Fog lights on Priora with lens optics are good in terms of the clarity of the generated beam of light and the brightness of the glow. But this type of technology also has its own significant drawback associated with the useful surface of the light source. Limited by the area of the optical lens, the lampshade will be extremely susceptible to contamination. As a result of this factor, even the smallest particles of dirt that get on the optics can result in a huge dark spot on the road, significantly reducing the efficiency of the Lada Priora PTF.
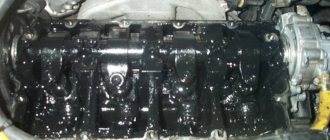
Fog lights Lada Priora
As for the geometry of light, there are also clear standards here. The beam of light formed by the fog lights must have a clear horizontal cut. The light should spread along the road surface without being reflected from the smallest particles of rain, fog or snow in the air. Good Lada Priora fog lights should also cover the side of the road. By shining it in the garage or on the street in the evening on a horizontal wall, the fog lights will form a clear light picture, reminiscent of a bowl, where the upper limit of the light cut should not be higher than the horizontal line drawn from the PTF, provided that the Priora itself is standing in the “horizon”.
The color of the filter is also of fundamental importance. A white or transparent filter allows the entire spectrum of possible light wavelengths to pass through. Thus, the light produced by such fog lights is more natural and makes the eyes less tired. However, if fog, rain and snowfall are not uncommon in your region, it may be better to choose a PTF for the Lada Priora with a yellow filter. Such headlights do not transmit short wavelengths of light and provide slightly better visibility in bad weather, but they cause more eye fatigue.
How to install PTF correctly, and why do you need to replace standard lamps?
Fog lights on Priora, as well as on any other car, are installed quite low, at a level of 0.3-0.7 meters from the road level. In this case, a narrow beam of light enters an area free of wet condensation and actually improves visibility.
But located on the roof of the trunk (additional lighting is often installed on jeeps), they are absolutely useless in a curtain of rain, in fog or during a dust storm. Therefore, fog lights used to be placed under the bumper (for old-style metal structures), but today they are placed directly into it (for modern integrated parts).
Fog lamps must comply not only with traffic regulations, but also comply with UNECE standards. The latter suggest that the fog beam on the Priora and any other car must have a special wide-angle light distribution, with a clearly defined upper limit and dispersion of up to 70 degrees horizontally. Only compliance with these parameters gives the required anti-fog effect.
The most common today are fog lights with halogen lamps with a power of 55 watts. They create a luminous flux of 1.1 thousand lumens, which is enough to illuminate a space of 25-30 meters in front of the car.
Replacing conventional incandescent lamps with them is almost always required, because... old-style lamps provide the necessary illumination at a distance of about 8-10 meters, which is clearly not enough for modern driving conditions.
How to choose fog lights?
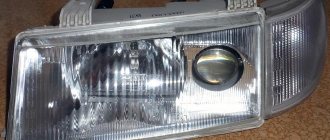
This is how this headlight shines
Installation of fog lights is preceded by purchasing them at the store. In this case, you must first look at the integrity of the glass of each light bulb, the matching of the headlights and mounting systems.
Compliance with the UNECE is confirmed by the presence of the “E” stamp on the diffuser; it is also desirable to have a GOST terminal, TU, date of manufacture and manufacturer. When we choose fog lights, Priora as a model allows us to purchase articles of predominantly round shape, while the latest fashion is considered to be slit headlights, which have small vertical angles (about 30-50 degrees) and are very well suited as fog equipment.
Fog lights can be produced in:
The first options almost always do not have certification data and have a lot of power, which only causes harm on the road (blinds oncoming drivers). Japanese and European models have moderate power, but are quite expensive. Therefore, when purchasing, it is better to focus on domestic models that comply with GOST standards and are relatively inexpensive.
The installation of fog lights begins for Priora owners by disconnecting the ground wire from the battery (needed to prevent a short circuit). Then the protection is removed from the engine crankcase. To do this, you need to take a key for “10” and two keys for “19”. The usual front crankcase protection has 5 “studs”, but the reinforced one can be attached to the front beam with two half-clamps. Removing the protection is a sequence of simple steps - first, use keys “19” to unscrew the nuts attaching the levers. (The second key is used to keep it from turning). Then use a 10mm wrench to unscrew the five nuts. Installation of protection is carried out in the reverse order.
Installation of anti-fog equipment
It is impossible to install PTF without dismantling the previous headlight model. For these purposes, the plugs are removed from the bumper, the old headlights are taken out, purchased ones are put in their place and secured with screws. If the size of the holes is not enough for installation, then it is necessary to disconnect the bumper and carry out installation work. If the bumper did not previously have places for fog lights, then they can be made using a sharp knife.
Then you need to lay the wires from the headlights along the cable under the hood in the form of a bundle, which is secured with a clamp. It should be shorter on the left side than on the right. The output of the wires to the control panel is most often installed through the hole behind the fuse box.
The negative wires need to be connected to the car body, after which the crankcase protection (and bumper) is secured in place.
Imported kits often do not include wires, connectors, and plugs, without which it is impossible to install the PTF, so they need to be purchased additionally.
Relays and fuses
The PTF relay from Priora must be secured with an eyelet under any fastening nut so that the wires do not “dangle” and are not pulled under the hood too much. The relay has four contacts, which are labeled: 85, 86, 30 and 87.
- The 86th contact is connected to the negative side of the battery;
- The 30th contact is connected to the “plus” of the battery;
- The 87th contact is connected to the “plus” of the fog lamp;
- Pin 85 is connected to the button with a blue wire through the PTF fuse on the Priora.
Source
Connecting fog lights
Installing a PTF will not take much time if you understand car electrics. Connecting fog lights at the next stage of work assumes that the car owner will independently fix the headlight switches on the front panel of the car. For these purposes, you need to open the decorative panel covering the steering column by turning the locks ninety degrees. Remove the plug, which is located to the left of the clock equipment. Underneath it will be found the wires to which the switch is connected. To connect the fog lights, you need to connect short wires to the contacts of the same name, and carry out the same actions with the heated glass buttons.
Connection diagram for headlights and other lighting devices
The fog light connection diagram included with the standard equipment kit usually contains detailed information on the headlight installation process, including the possible colors of each wire. Therefore, equipping Priora with this equipment with your own hands is not difficult. To connect the fog lights to the mounting block, you need to mount the “K10” relay, and also install two fuses.
Replacing old or installing new headlights is completed by returning the mounting block to its original location. After which the negative wire can be connected to the battery and checked how the fog lamp connection diagram, which we made ourselves, functions. Note that replacing the PTF using this scheme does not imply an indication of the operation of the headlights on the dashboard.
Connection diagram for fog lights
If the fog lights have already been replaced, and now you want to start connecting them, then first you need to fix their switches on the front panel of the car. To do this you need:
- Remove the decorative panel that obscures the steering column (turn all locks ninety degrees);
- Remove the plug located next to the clock equipment (under it you will see exactly the contacts to which you will need to connect the headlights);
- Connect contacts of shorter length with wires of the same color. A similar operation will also need to be carried out with the glass heating system.
PTF connection diagram
As a rule, any set of fog lights for a Priora contains a detailed diagram of their connection installation, and therefore any motorist who reads it carefully can cope with this task. If you want to connect fog lights to the mounting block, then you will have to install a K-10 type relay, as well as replace or install fuses (two pieces).
Adjusting the luminous flux from PTF
A car enthusiast needs to know not only how to install and connect fog lights, but also how to adjust their luminous flux. To do this, you need to check the tire pressure, load the car with cargo close in weight to the total weight of the passengers, fill the tank with gasoline, and put on a spare tire.
Then the car (Priora se or another modification) is placed on a flat area opposite a steep smooth wall at a distance of five meters, and the fogs are turned on. Next, the distance from the center of the headlights to the ground is measured, and a line is drawn on the wall five centimeters lower than this distance. After this, you need to adjust the light spot so that its upper boundary is at the level of the drawn line.
The work is carried out for each headlight separately (with one of the headlights closed), after which the results are compared, and the position of the light spots is replaced until both are at the same level. Domestic-made headlights are adjustable only in the “up” and “down” positions; all work with them is done using a long or Phillips screwdriver.
We learn to change headlights and adjust their light on a Priora without outside help
Optics on a car is one of the components of the safety of the driver and passengers; visibility on the road depends on its quality. Like any car part, the optics on a Lada Priora car sometimes require replacement. The article describes the reasons for replacing optics, how to properly replace and adjust the headlights on a Priora.
In what cases is it necessary to replace and adjust headlights?
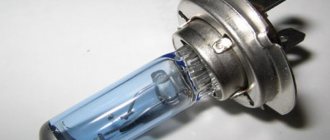
The main reason why optics are replaced is their failure and the inability to perform their functions: high-quality road lighting. In addition, the lamps in the lanterns are changed. Bosch lamps are in demand. Bosch brand xenon produces better quality light and has a longer service life.
Bosch xenon lamps
Optics should be changed for the following reasons:
- the headlight sweats, its ventilation is impaired;
- cracks, chips on glass;
- reflector malfunction;
- faults in electrical connectors;
- defects in fasteners;
- tuning
During the replacement process, you can not only restore the functionality of the flashlight, but also improve its performance characteristics by replacing halogens with xenon. Using xenon in lamps, the driver receives better lighting. At the same time, tuning of the headlights is also carried out: lens glass is installed, black headlights look impressive. LED lamps are installed in the parking lamps, as well as in fog lamps.
Front lights with lenses
To make your car tuned, you need to know how to remove the front and rear optics.
Replacing headlights from A to Z
The toolkit for the procedure for replacing headlights on a car consists of:
- socket wrench to “10”;
- Phillips screwdriver;
- flat screwdriver.
Replacing a headlight on a Priora begins with disconnecting the negative terminal of the battery (the author of the video is the channel In Sandro's Garage).
Before removing the headlight on a Priora, you need to remove the bumper. Then you need to remove the headlight covers from above. Next, pressing the latch, the block with wires is disconnected. When the headlights are removed, you can change the bulbs, for example, with Bosch xenon ones. The glass version of the optics can be replaced with a lens one.
The rear lights of Priora 2 are removed in the same way. The upholstery is dismantled and the wires are disconnected. Now you can remove the rear lights of Priora 2.
Tail lights on Priora
To disassemble and replace the headlight glass, you will need the following materials and tools:
- industrial dryer;
- thin screwdriver;
- new glass;
- new lamp;
- sealant.
Before disassembling the headlights on the Priora, you need to place them on a clean, dry surface. Then heat the glass until the sealant begins to melt. Next, the glass should be pryed off with a screwdriver and separated from the body. The next step is to remove the old sealant.
Before changing the light bulb and replacing the headlight glass, the seat must be lubricated with a fresh layer of sealant. Then the glass is carefully placed and pressed firmly. After 12 hours you can assemble the lantern.
Features of headlight adjustment
To adjust the optics, the machine must be placed on a flat horizontal surface.
It is advisable to place an assistant in the driver's seat or place a load weighing about 75 kg. The vehicle's tires should be well inflated and the tank at least half full to bring its weight closer to the weight at which it is driven daily.
The adjustment is carried out on a vertical wall or stand on which markings are applied. To correctly adjust the optics, it should be possible to move away from the wall at a distance of 5-10 meters. This makes it possible to create an imitation of lighting on the road.