What are the reasons for the charging failure, how to fix the problem on the road or in the garage - this is discussed in this manual.
The electrical circuit of the LADA Niva 4×4 is built according to a classic layout and has undergone virtually no changes since the start of production. Why, knowing its weak points and moving from the obvious to the complex. You will quickly find the root cause.
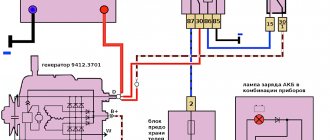
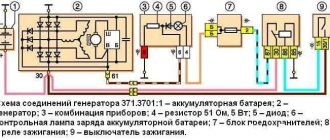
Generator connection principle, drawing:
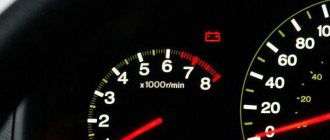
Basic information about the state of the charger can be obtained from the behavior of the instrument cluster - flashing of the indicator, emergency operation of electrical equipment (headlights, interior lighting, heater) and the engine.
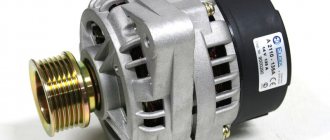
Installation of a three-level generator relay-regulator and repair of the Niva generator brush assembly
The content of the article:
Installation of a three-level generator relay regulator for Niva
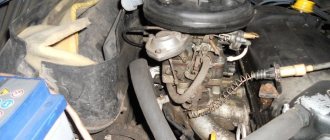
The generator has stopped working. No charging. Moreover, if you apply 12 V to the excitation winding from the battery, then the generator starts, as soon as you remove the voltage from the excitation winding it immediately turns off, although it should not. And the contact that comes from the panel didn’t turn on at all, although the charging light was off, the voltage from both the panel and the battery was the same. As a result, I had to remove the generator and examine it for malfunction. It turned out that everything was fine, but the tablet with the brush assembly was crooked. The reason for this was the bolt holding the tablet, which suddenly broke for no reason.
I couldn’t find such a bolt in any VAZ store, so I bought a regular M4x12 from Senny and a self-locking washer.
But this did not solve the problem! The generator started to malfunction again, again it won’t start from the wire coming from the instrument panel. I decided to change the relay regulator... it didn’t help. Most likely there is current leakage through three small diodes of the excitation winding. But I installed a three-level regulator. I really wanted to try this device.
The tablet inside is empty. It only has leads and two soldered wires.
This is how the wire comes out
This is the regulator itself with a switch. It needs to be screwed onto the body so that there is mass on the body.
Internal. The board is hermetically sealed with something like epoxy.
For now I attached it to the mudguard. Then I’ll take it to the salon. The advantage is that now the transistor is in gentle conditions. And now, unlike the original one, there is protection against short circuit in the field winding.
Instructions from the box. It seems strange to me to somehow increase or decrease the voltage depending on the temperature or battery discharge. But it is written that it seems to extend the life of the battery.
I didn't notice any differences in performance. Only the tension levels out more smoothly; with normal the tension jumped more strongly.
But back to our sheep. Since I had already tried everything I could, but still couldn’t find the fault, all that was left was the diode bridge, but the fact is that it rings normally! Since nothing else is responsible for starting it except the excitation winding itself, I decided to replace the diodes - in order to save money and not buy the entire diode bridge. My father brought 3 imported Schottky diodes from work. I cut off the old ones and soldered in new ones. I put the generator in place and... Lo and behold, it started working!
Repair of the brush assembly of the Niva generator
It was necessary to replace the front bearing of the generator, and at the same time I inspected the brush assembly. One brush was broken off at the base where the wire was embedded. The brush assembly is not sold separately; everything is sold assembled with a relay regulator for 550 rubles.
In this post I will tell you how to repair the brush assembly. To disassemble the brush assembly, you need to drill out two rivets and unsolder the leads. Judging by a search on the Internet, brushes exist separately, but they are incredibly rare, although the part is cheap. In any case, I could not find the original brushes. I bought a wide two-lead brush at the market, which I sawed and made 2.
Mounting blocks for Lada 4×4 2022
The main and additional units are located in the cabin to the left of the steering wheel, under the instrument panel. The blocks contain fuses of the “Cylinder” size, ten and six fuses, respectively. The ratings and purpose of the fuses are indicated in Table 4 “Circuits protected by fuses”:
Fuse block of standard size “Standard”. The block is located on the left side under the upholstery and contains fuses that are designed to protect engine control system devices. The ratings and purpose of the fuses are shown in Table 5:
The fuse and relay box is located on the left side of the steering column under the instrument panel. The block contains two “Standard” size fuses, which are designed to protect the circuits of the electric fuel pump, electric windows and electric mirrors. The ratings and purpose of the fuses are shown in Table 6:
The fuse and relay box is located on the right side of the steering column under the instrument panel. The block contains one “Maxi” size fuse and two “Standard” size fuses, which are designed to protect the circuits of the hydraulic unit of the anti-lock braking system. The ratings and purpose of the fuses are shown in Table 7:
Which TRN is suitable for LADA
| Generator, article number | Automobile | TRG, article number |
| 26.3701, 37.3701, 371.3701, 372.3701 | VAZ-2107, -2108, -2109, -2110, OKA | 67.3702-01 |
| 3002.3771, 332.3771, 3202.3771, 3212.3771, 4302.3771, 94.3701, 9402.3701, 9422.3701, 3740.3771-38, 3743.3771-61, 3747.3771- 93, eld-a-21214, LG01214 | VAZ, GAZ | 67.3702-02 |
| 4052.3701, 409.3701, PRAMO “ISKRA” 5102.3771, -10, 5112.3771, -10, 5122.3771, -10, -30, 5142.3771, AAK 5727 | VAZ, GAZ, UAZ with generators PRAMO “ISKRA” 5102.3771, 5122.3771 | 67.3702-04 |
| G222 | VAZ-2104, -2105, -2107 | 67.3702-09 |
| 26.3701, 37.3701, 371.3701, 372.3701 | VAZ-2107, -2108, -2109, -2110, OKA | 67.3702-11 |
| 3002.3771, 332.3771, 3202.3771, 3212.3771, 4302.3771, 94.3701, 9402.3701, 9422.3701, 3740.3771-38, 3743.3771-61, 3747.3771- 93, eld-a-21214, LG01214 | VAZ, GAZ | 67.3702-12 |
| generators with an additional three diodes, the excitation winding of which is connected to the positive circuit | 673.3702 |
Identifying problems
Repairing the Niva Chevrolet generator can be useful only in certain cases, when replacing parts does not solve the problem. There are several signs after which it is worth checking the serviceability of the generator unit. They are the following:
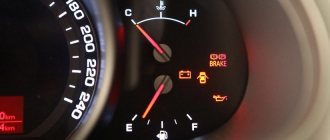
- After starting the engine, the indicator light indicating the battery should go out. If after starting the engine the signal is still working, it means the battery is not being charged, the generator voltage is not enough to charge.
- When the engine was on, the headlights became dim. Although there is a charge from the battery, it is very small to maintain the normal operation of electrical devices in the car; the measuring instruments demonstrate low voltage properties - 12 V.
- There is noise coming from the motor, and points 1 and 2 are observed. The sounds may resemble the collision of iron surfaces or a whistle. Most likely, the bearing has broken and needs to be replaced.
Installation and connection instructions
For Lada cars (except Vesta, XRAY)
, photo author:
2.
Remove the plastic casing of the generator. To do this, first disconnect the generator excitation wire. Then unscrew the nut from the stud (10mm wrench) and move the power wire to the side. Next, 3 latches on the plastic casing are unfastened.
3.
Remove the standard voltage regulator from the generator. To do this, unscrew two screws ("8" key) and disconnect the wire.
4.
Install a three-level voltage regulator on the generator instead of the standard one.
5.
Output 2 wires for the control module. The module itself should be mounted in conditions of reliable contact with the “ground” and as far as possible from the possibility of moisture ingress. For example, on a hairpin near the right headlight.
For Lada Vesta, XRAY cars (with Valeo TG12C209 generator).
Nuances of moving a generator
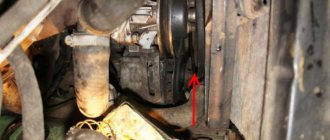
The disadvantage of domestic Niva SUVs is the location of the generator unit - at the bottom of the engine compartment. It constantly gets contaminated when driving off-road, and coolant constantly drips. The problem is solved by moving the generator upstairs (the author of the video is SARTANETS).
To transfer, you will need a set of keys, a bracket, mounting bolts, and a V-belt. You can make a generator transfer bracket with your own hands according to the drawing below.
Drawing of a homemade bracket
Sequence of actions during transfer:
- We dismantle the propeller, pump and remove the belt.
- By unscrewing the standard bracket, you can remove the generator.
- We cut off the bead around the side of the cylinder head and on the cylinder block.
- Then you should unscrew the two bolts and two studs.
- Next, the assembly is installed on a new bracket and final assembly is performed.
Thus, moving the generator unit upstairs is not difficult.
Checking the work
- Switch position “min” - for operation at high ambient temperatures (above 20ºС), as well as during operation in particularly difficult conditions (traffic in traffic jams, long climbs in the mountains, etc.);
- The middle position of the switch is for operation at ambient temperatures from 0ºС to 20ºС;
- The “max” switch position is for operation at low ambient temperatures (below 0ºC), as well as for recharging a discharged battery.
Average load (PTF, dimensions, music and heater fan at first speed)
:
Maximum load, maximum number of consumers activated
:
Will you be installing a three-level voltage regulator on your car? Take part in the survey and leave your feedback in the comments.
Let us remind you that another reason for low voltage on the on-board network may be a bad ground.
Share on social networks:
Found an error? Select it and press Ctrl+Enter..
Source
Engine Control Relay Box
Below the main and additional fuse blocks there is a relay block for the engine management system, which consists of five relays and one fuse:
| №1 | Ignition relay |
| №2 | Main relay |
| №3 | Right cooling fan relay |
| №4 | Left cooling fan relay |
| №5 | Fuel pump relay (fuel) |
| №6 | Fuel pump fuse F5, 15A |
On some vehicle versions, a starter relay may be located under the additional unit next to the ignition relay.
Installation of a three-level generator relay-regulator and repair of the Niva generator brush assembly
Installation of a three-level generator relay regulator for Niva
The generator has stopped working. No charging. Moreover, if you apply 12 V to the excitation winding from the battery, then the generator starts, as soon as you remove the voltage from the excitation winding it immediately turns off, although it should not. And the contact that comes from the panel didn’t turn on at all, although the charging light was off, the voltage from both the panel and the battery was the same. As a result, I had to remove the generator and examine it for malfunction. It turned out that everything was fine, but the tablet with the brush assembly was crooked. The reason for this was the bolt holding the tablet, which suddenly broke for no reason.
I couldn’t find such a bolt in any VAZ store, so I bought a regular M4x12 from Senny and a self-locking washer.
But this did not solve the problem! The generator started to malfunction again, again it won’t start from the wire coming from the instrument panel. I decided to change the relay regulator... it didn’t help. Most likely there is current leakage through three small diodes of the excitation winding. But I installed a three-level regulator. I really wanted to try this device.
Specificity of operation
The generator on the Chevrolet Niva works thanks to the effect of electromagnetic induction - when a moving electromagnetic field produces alternating current. The design has several coils that make the field. Also a receiver that removes electricity from them.
The relay regulator often breaks down. After a run of 100 or even 120 thousand km or more, this part has the risk of practically falling apart at any moment if it is not replaced in time. Relay regulator 2123 KZATE series C3, article number 845.3702, is suitable for replacement.
Replacing the belt
The belt is part of the transmission system between the engine and the generator, so its condition directly affects the operation of the generator set. During operation, it may break, which will stop the production of current in the machine. This should not be allowed, because if it is damaged, it must be replaced with a new one. To perform the replacement you will need the following tools:
- mount;
- screwdriver;
- a set of keys;
- jack to lift the car.
The replacement process is as follows:
- Disconnect the battery, then use a Phillips screwdriver to unscrew the crankshaft sensor fasteners.
- Loosen the belt fastening nut.
- Place the right side of the car under a jack, raise it, and engage 4th gear.
- We rotate the right wheel and first pull the belt off the pump pulley.
- We install the newest one in reverse order. The belt is located on the crankshaft pulley and only at the end is secured to the generator.
- We rotate the wheel so that the belt is tensioned and takes the required position.
- The fastening nut is tightened. The crankshaft sensor is installed.
- The belt is placed on the part in this order: crankshaft, then the upper tension roller, the lower right pulley, the lower tension roller, the pump, the generator.
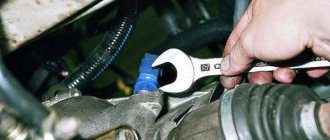
Removing the voltage regulator
The voltage regulator can be removed from the Chevrolet Niva for replacement using a flat-head screwdriver and a 8-mm wrench. The procedure is as follows:
- It is worth doing this if the voltage in the system does not correspond to the norm - less than 13.5 V.
- Disconnect the wire from the negative side of the battery.
- Disconnect the generator block with terminal D+. Turn the rubber boot to the side and unscrew the nut.
- Disconnect the wires from the stud.
- We unscrew the nut securing the generator excitation circuit terminal, and then remove the terminal itself.
- We loosen the 3 screw-shaped fastenings of the plastic casing of the generator set and remove the case.
- Then there are 2 more mounting nuts that secure the voltage regulator.
- We disconnect the screw securing the terminal to the D+ bus from the rectifier, after which you can finally remove the voltage regulator itself.
The generator on the Niva works for a very long time and will remain in operation for a couple of years without any special problems. Over time, its power drops noticeably, and then it is worth replacing several of its parts or the entire assembly. If after replacing the problem with a drop in power could not be eliminated, you should go to a service center for diagnostics.
Source: korchim.ru