What are the reasons for the charging failure, how to fix the problem on the road or in the garage - this is discussed in this manual. The electrical circuit of the LADA Niva 4×4 is built according to a classic layout and has undergone virtually no changes since the start of production. Why, knowing its weak points and moving from the obvious to the complex. You will quickly find the root cause.
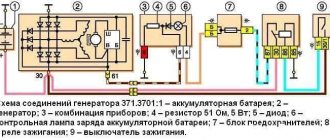
Generator connection principle, drawing:
Basic information about the state of the charger can be obtained from the behavior of the instrument cluster - flashing of the indicator, emergency operation of electrical equipment (headlights, interior lighting, heater) and the engine.
Where to start checking
If the VAZ 2107 battery icon does not light up, the voltmeter gives normal readings, but the battery does not charge, which means there is no (or insufficient) contact at the terminals. Their severe oxidation can cause the voltage from the generator to the battery simply not to flow. Therefore, it is necessary to remove the terminals, thoroughly clean them, as well as the battery terminals, then reconnect the battery to the on-board network and check the functionality of the charging system.
In the case when the voltage on the VAZ 2107 battery is still below normal, you need to measure it at the output from the generator with the engine running. Is there a big difference between the readings on the terminal and on the battery? Try cleaning the contacts and checking the wire connecting the battery to the generator. Broken - requires replacement.
The next element that is checked is the generator drive belt. If it becomes loose, it will slip along the pulley, which is why the generator will not be able to generate the required amount of electricity. And although charging will be carried out (provided the circuit is in good condition), it will not be enough. At the same time, the engine is running, the voltmeter shows the norm. However, if the system is loaded a little more - for example, by turning on the headlights - then the voltage drops sharply. Then, if the battery charge on a VAZ 2107 disappears, this indicates that the tension belt is loose and slipping. The belt should be tightened; if it wears out during operation, replace it. But you can’t overtighten either: excess belt tension puts an overload on the pumps and generator bearings.
The third component of the circuit that is checked during the initial diagnosis is fuse No. 10 (in the fuse box). It is he who is responsible for supplying voltage to the battery: the VAZ 2107 battery charging fuse has blown - the system will not work.
Replacing the power supply with your own hands
If any electrical circuit fails, the first thing you need to do is check the condition of the fuses and relays. This simple operation can be performed independently. The driver needs to know where the Niva Chevrolet fuse box is located and the purpose of the fuse links installed in it.
To protect electrical circuits on cars, fuses are used, located in a special mounting block. On a Chevrolet Niva VAZ 2123, this block is located inside the instrument panel, to the left of the plastic steering column cover.
In addition to the main unit, the Chevrolet Niva has an additional unit that is responsible for the operation of the car’s engine. This safety element is located in the passenger compartment and is located on the right side of the instrument panel behind the glove box.
The placement of blocks in the cabin is the same for cars of all years of manufacture.
The main blocks of machines are divided into two types - before 2009 and after. These devices are not interchangeable. The blocks behind the glove box are identical in design.
On a 2005 car, you can easily install a block from a 2011 car. The designation of the fuse rating is marked on the body; on the assembly itself there is a number of the fuse link and a pictogram of the purpose.
There are no fuse markings on the main unit cover.
If any electrical circuit in the vehicle fails, the condition of the fuse must be checked.
If it is necessary to replace parts, it should be taken into account that the VAZ 21214 fuses on the Niva injector belong to two different types:
- in the main block there are cylindrical inserts (inherited from the Zhiguli);
- and in the injection system blocks - modern, knife type.
Therefore, when you go on a trip, you need to take with you spare inserts of different types.
If, for example, a cigarette lighter fails on the road, you must:
- Turn off the ignition.
- Open the cover of the additional unit.
- Visually check the condition of the PR14 16 ampere fuse, which is responsible for the cigarette lighter circuit.
- Remove the burnt insert with your fingers and replace it with a spare one taken from the reserve socket PR15. It is prohibited to use homemade inserts, as they are not able to protect the circuit from overloads. The consequence of this may be overheating of the elements and fire.
- Check the functionality of the circuit. If the insert immediately burns out again, then the reason lies in damage to the wiring, which must be carefully checked.
The remaining fuses and relays on the VAZ 21214 are changed using a similar scheme.
In case of burnout or mechanical damage, it is necessary to repair the unit by replacing its components or the entire assembly.
To replace the main unit, follow these steps:
- Disconnect the battery from the on-board network.
- Remove the box cover and unscrew the two 8 mm nuts securing the block. Then you need to pull the box towards you and remove it from the fastening studs.
- Write down the markings and position of the wires on the old unit.
- Disconnect the cables from the plugs of the old unit and connect them in the same sequence on the new one.
- Check fuse ratings and wire installation.
- Secure the replaced block with nuts.
- Connect power to the on-board network and check the functionality of the circuits.
The photo shows some stages of dismantling the block.
Unscrewing fasteners
Removal from studs
Disconnecting the wiring plugs
Other fuse or relay blocks on the VAZ 21214 are replaced in the same way.
Below we will look at the process of replacing the power supply with your own hands. To replace, you will need a new power supply and a socket head set to “8”.
- First, open the hood and disconnect the battery.
- Now, under the instrument panel, find your power supplies. Using an “8” socket wrench, unscrew the two main nuts.
- Having done this, pry up the power supply and remove them from the studs.
- If you are replacing an old component with a new one, you must mark all the wires before doing so. Or take a new power supply unit and insert the wires from the old unit into it one by one. To remove the idle wires, pull them by their plugs.
- To check the functionality of the new power supply, reconnect the battery.
In addition to the main unit, the Chevrolet Niva has an additional unit that is responsible for the operation of the car’s engine. This safety element is located in the passenger compartment and is located on the right side of the instrument panel behind the glove box.
The placement of blocks in the cabin is the same for cars of all years of manufacture.
On a 2005 car, you can easily install a block from a 2011 car. The designation of the fuse rating is marked on the body; on the assembly itself there is a number of the fuse link and a pictogram of the purpose.
https://www.youtube.com/watch?v=SqqIBAU8osQ
There are no fuse markings on the main unit cover.
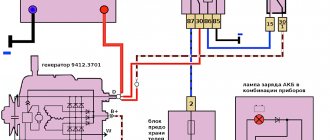
Relay and fuse box:
Please note that in the schematic diagram of the block, two rows of fuses are located at the bottom, and the relay is at the top. Under the panel cover, the fuses will be located opposite the top, so do not confuse the numbering. If you notice a discrepancy in the numbering of fuses or relays, then you have a different Chevrolet Niva model, newer or older, in this case, find the corresponding diagram and troubleshoot using it.
K1 - Relay for monitoring the health of lamps.
K2 - Windshield wiper relay. If the wipers do not work, check this relay and fuse F9. If they are working properly, the problem may be in the wiper motor, its brushes, mechanism and gears, as well as in the interior switch and its contacts.
K3 - Relay interrupter for direction indicators and hazard warning lights. If the turn signals do not work, check fuses F16, F19 and this relay. Also check the contact of the wire going to ground. Located to the left of the fuse box, in the back (to access you need to remove the mounting block panel).
Another issue could be the steering column switch, its contacts and connector. If the emergency lights do not work, check the button for turning it on, its contacts, as well as the lamps in the turn signals; there may be a short circuit somewhere or the lamps have burned out.
K4 - Low beam headlight relay. If the low beam in one of the headlights does not work, check fuses F2 and F12, as well as the lamps in the headlights themselves. If both low beam headlights do not work, check this relay, as well as the light switch and its contacts. Also note that the low beam headlights only work when the ignition is on.
K5 - High beam headlight relay. If the high beam in one of the headlights does not work, check fuses F3 and F13, as well as the lamps themselves. If both high beam headlights do not work, check this relay, as well as the steering column switch and its contacts.
K6 - Additional relay.
If you have problems turning on the ignition, check this relay, as well as the contacts in the ignition switch and the contact group.
Fuses and relays Niva Chevrolet, electrical diagrams
If you are the owner of a Chevrolet Niva SUV, then sooner or later electrical problems may arise, just like with any other car. When any device fails, you need to correctly determine the cause of the failure.
First of all, if the current is exceeded or there is a short circuit, the fuses and relays of the Niva Chevrolet fail. Therefore, you need to know which of them are responsible for what and carry a set of spare ones with you. This article describes the main causes of electrical faults and will help in diagnosing and troubleshooting problems.
The relay and fuse box is located under the dashboard, to the left of the steering wheel. To get to the fuses, you need to open the cover. To do this, you need to unscrew 2 screws with a screwdriver.
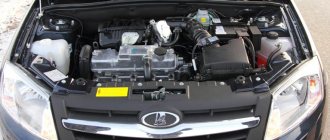
Generator operation
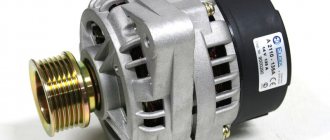
The Niva Chevrolet generator is responsible for the reliable and high-quality operation of the electronics system. The owner should identify possible malfunctions in a timely manner and carry out high-quality repairs, since the functioning of all lighting devices depends on its good condition. This also affects the battery charge. A continuous supply of current is provided by a generator.
Although it has small dimensions, the generator is very durable. To prevent damage and failure of the car regulator, the owner must follow the rules for operating the car.
Particular attention should be paid to how the Chevrolet Niva generator works. Malfunctions that led to a malfunction in its operation can be determined using automotive diagnostics. And the repair depends entirely on the degree of complexity of the breakdown.
Lost charging
niva 10/30/2005 — 09:44
The loss of charging on the Niva 21213 was clearly discovered only when it got dark. The charging control lamp glowed very faintly and to control it, I removed the minus from the battery - the reason became clear. The engine has stalled - so there is definitely no charging and it’s time to go to the garage for repairs.
Inspection of fuses, connectors and their cleaning did not lead to any results. No matter how much I wanted it, I had to remove the generator.
Everything was unscrewed surprisingly simply and quickly, the only inconvenient thing was to remove the protection and short wires to the generator.
Inspection after disassembly revealed that everything was clogged with fluff, feathers as if a flock of pigeons had been knocked down, and the connectors inside the generator were oxidized. After cleaning the insides, connectors, and brushes of the generator, I assembled and installed it.
I started it up and everything works. Took 2 hours with smoke breaks.
Therefore, we are not afraid, we fix it ourselves. Good luck to everyone!
Vorlock 10/30/2005 - 15:24
Well done! but checking for charging by removing the terminal leads to an active goodbye to the diode bridge, so it is not advisable to do this (from experience) ...
D_I_V 10.30.2005 - 16:35
That's why I like our cars
Battery lost charging reasons
What are the reasons for the charging failure, how to fix the problem on the road or in the garage - this is discussed in this manual. The electrical circuit of the LADA Niva 4×4 is built according to a classic layout and has undergone virtually no changes since the start of production. Why, knowing its weak points and moving from the obvious to the complex. You will quickly find the root cause.
Generator connection principle, drawing:
Basic information about the state of the charger can be obtained from the behavior of the instrument cluster - flashing of the indicator, emergency operation of electrical equipment (headlights, interior lighting, heater) and the engine.
Wiring and connections
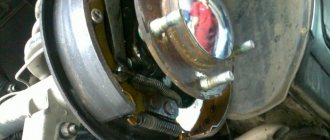
One of the weakest points in the power supply circuit of the Niva (and any other car) is the connection of the power wire to the generator. The device is located low and is practically not protected from water and dirt. Even if this connection looks normal, it makes sense to disassemble it and inspect the contact point. We disassemble, inspect, clean if necessary, apply conductive lubricant, and assemble.
The power cable lugs clearly require cleaning.
The next weak point is the connection of the negative wire of the battery to the engine. It is not located in the best place and is constantly dirty. As a result, the connection oxidizes and good contact is lost. We do the same thing: disassemble, clean, assemble.
Connecting the negative wire to ground on Niva
It is also worth inspecting the terminals on the battery terminals. They may be oxidized (white coating) or loose. Clean, apply conductive lubricant, tighten.
The terminal on the Chevrolet battery simply burst.
Otherwise, the wiring and connections on Nivas behave quite correctly, but this does not mean that all this will last forever. Let's not be lazy, inspect the connections and wires. If necessary, we call.
The belt has stretched or broken
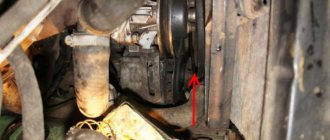
The drive belt for the generator and water pump from the engine shaft does not break very often, but it stretches regularly. As a result, it begins to slip on the pulleys, the generator, especially under load (high beams plus air conditioning, etc.), does not develop the required speed, and the voltage at its output drops. As a result, the battery is undercharged and may even be discharged, helping the “exhausted” generator and feeding the on-board network with its energy.
Poor belt tension is characterized by a drop in the voltage of the on-board network and a peculiar whistle when the speed increases sharply, especially in wet weather. The problem is treated quite simply. Find the generator mounting bolt on the tension bar. We loosen it, use a pry bar to move the generator to normal belt tension and tighten the bolt.
Bolt fixing the tension bar of the generator on NivaExpert opinionAlexey BartoshSpecialist in repair, maintenance of electrical equipment and industrial electronics.Ask a questionHelpful! An over-tightened belt is just as bad as a loose one. It can tear, leaving you spending the night on the road, and will very quickly stretch again. So you shouldn’t tighten the belt “for future use”. Its tension force should be approximately the same as indicated in the diagram below.
With normal belt tension, deflection A under a force of 10 kgf should be within 10-15 mm, and deflection B within 12-17 mm
Warning lamp
Why can this light be on while charging is in progress? In the VAZ 21213 there is only one reason that voltage is not supplied from the additional diodes to the control unit. This may be due to a broken wire running from the 61st terminal of the generator to the 6th terminal of the instrument combination assembly or contamination of the connecting blocks. We inspect the connections, ring the wire.
In VAZ 2121 there are not much more reasons:
- the warning lamp relay is faulty;
- voltage (negative) is not supplied from the generator to the control relay.
We remove the relay, apply 12 V to its winding from the battery and check whether it works and whether the contacts are disconnected. Well, problems with the absence of negative voltage are still the same broken wire going from the generator to the relay, or poor contact in the blocks of this circuit. We call and clean the terminals.
Expert opinion Alexey Bartosh Specialist in repair and maintenance of electrical equipment and industrial electronics. Ask a question Once again, we draw your attention to the fact that the above malfunctions relate to the control unit and do not in any way affect the normal charging of the battery.
The battery charge indicator light is constantly on.
The phenomenon indicates that the generator has stopped its normal operation; at this moment, the BS is powered by the battery. With a normally charged battery, you have 30-40 km of mileage left to get to the repair site. Disconnect consumers as much as possible, arm yourself with a multimeter and a set of keys.
A) Belt break.
Pay attention to the presence of a belt on the pulleys of the water pump and generator. To return it to its place, you will need 17 or 13 socket wrenches, depending on the year of manufacture of the car, as well as a strong flat-head screwdriver
Disconnect the HF position sensor (for example, on 21213,21214).
Loosen the nuts securing the tension bar and slide it to the side towards the cylinder block.
Place the belt on your seat.
Upon completion of installation, adjust the tension, controlling the deflection when pressing with your thumb on the belt gap between the generator and pump pulleys - 10-15 mm, pump and crankshaft - 12-17 mm. Failure to comply with this requirement may result in the belt slipping with further damage and rupture.
B) Burnout of wires, poor contact in the circuit.
C) The charging relay-voltage regulator has failed.
To initially check the performance of the LV, use a multimeter (voltmeter), which allows you to record the voltage directly at the battery terminals. Normal voltage is considered to be in the range of 13.85±0.35V. If it is different from this, we diagnose the element. The location where the charging relay is located near the Niva is determined by the age of the car. Thus, a remote relay can be found on the right fender liner of a car with a classic engine compartment layout; more modern modifications of generators are equipped with a LV combined with a brush assembly.
The element is not repaired, but replaced completely. To assess the condition, you will need power supplies of 12-14 V, followed by replacement with 16-22 V, and also an incandescent lamp of 1-3 W. According to the diagram drawing, apply current to the voltage regulator in series. If the first test is characterized by the operation of the lamp, and the second - by the absence of glow, then the LV is working.
If there is a break, the lamp will not light up at all; if there is a breakdown, it will glow constantly. In addition, weak charging, as well as its absolute absence, is often explained by abrasion of the brushes (residual height less than 5 mm) and slip rings of the generator. If the first part is changed along with the brush holder, then the second is restored by grinding, grooving or removing the remains of the old rings and pressing in new ones. It is recommended to supplement the disassembly of the unit with a total cleaning.
D) Diodes or rectifier unit are faulty
To assess the condition of the mentioned components (negative, positive and additional diodes), arm yourself with a low-power lamp and battery. Diodes are indicated by numbers in the diagram: 1. Positive
Performance is determined by connecting “+” to terminal 30 of the generator (for positive), bolts of the rectifier block (for negative) or to 61 (for additional), and “-” to its body (for negative) or to any of the bolts of the rectifier block ( for positive and additional). The glow of the lamp indicates that the diodes have been shorted, which leads to the conclusion that the diode bridge will have to be replaced. Be attentive to the indications on the instrument panel. Often the icon lights up half-heartedly and is not noticeable in bright light.
Removing the generator
For this process you need to take a Phillips screwdriver. In addition, you need to use a car tester or ohmmeter, a 10mm wrench and a test lamp.
To change the generator, it must be removed from the engine compartment. First, disconnect the wire and terminal of the battery with a negative charge. Next, disconnect the block with wires and the generator output, and take out the protective cover from there. Then, unscrewing the nut, disconnect the wires on the generator contact bolt. Then unscrew the bolt that secures the generator to the tension bar and pull it out. It is also necessary to unscrew the bolt-shaped fastening at the bottom of the generator.
Then you should remove the belt. After removing all the bolts, the generator must be removed from the bracket using a mounting spudger. To install a new one, you need to go through the entire process in reverse order.
After replacing the described electromechanical device, you need to inspect its drive belt and adjust its tension. But before you replace the old Niva Chevrolet generator with a new one, you need to make sure that the replacement is really necessary. There are times when you can do repairs yourself, without the help of specialists.
In order to avoid confusion, you need to note how the generator covers are correctly positioned. Next, you need to remove the plastic protective casing by unfastening the three latches on it. The voltage regulator and brush holder are removed together. In order to release the rectifier unit and capacitor, it is necessary to disconnect the wires from the regulator terminal. The stator winding has three terminals. And in order to carry out the operation to remove the rectifier unit and capacitor, you need to bend these leads a little. Use a flat-head screwdriver to pry off the side where the slip rings are located and remove the cover from the generator.
The signal lamp is blinking
Blinking of the battery indicator, as a rule, indicates problems in the brush assembly, as well as the occurrence of a short circuit in the “W” and “-” terminals of the voltage regulator. The brushes, in turn, can “freeze”, not reaching the rotor slip rings at low and medium speeds. You have already read how to fix them in our instructions. However, the reason why charging on the Niva 2121, 2131, 21214 and 4×4 Urban disappeared is not always the above-mentioned components under the hood. In particular, the culprit of weak charging or its complete absence is an unmaintained battery with an insufficient volume of electrolyte or closed banks, loose and oxidized terminals, broken and melted wires. Additional difficulties arise when dirt, dust, traces of fuel and lubricants, etc. accumulate on suspended equipment.
No battery charging reasons: 2 comments
When the ignition is turned on, all lamps light up normally. I start the engine, the lights go out (all), but there is no charging. The charging lamp is NOT ON. What could it be?
I accidentally screwed up some circuit on the instrument panel, the second fuse caught fire, replaced it, but now the charging lamp is on at the same time, and the generator starts working only after 5000 rpm
I think that many Niva owners have had to deal with such a problem when the battery lost its charge. Certainly. If you have only recently been using your car, you may not have had to deal with such a problem, but still, most drivers have already solved this issue more than once.
Based on my experience of owning a Niva and other domestic cars, I can give quite a few cases and reasons that are the main ones when charging fails. Here you can familiarize yourself with many problems: https://atlib.ru/blog/136-neispravnosti-generatora—priznaki-diagnostika-prichiny-proverka Below I will try to describe each of the problems in more detail.
VAZ 2131 no battery charging
A car has two power sources - a battery and a generator. The battery is used to start the engine and to supply 12 V electric current to the starter and other consumers when the engine is not running. When the engine is running, the main source of current - the generator - provides electric current to all consumers, including the ignition system, and charges the battery.
If the red battery charging lamp is on on the dashboard, it means that current is not flowing from the generator to the on-board network and the battery’s energy reserves are being consumed. This supply is limited and depends on capacity. If the battery is fully charged, you can drive to the garage without a generator, but it is better to try to fix the problem on the spot.
| EXECUTION ORDER |
1.
Check if the alternator drive belt is broken.
If the belt is intact, check its tension. Press the top of the belt with your thumb and see how much it bends. Normal tension is ensured when the belt deflects 10–15 mm.
Is the belt tension normal?
2.
Using a “17” wrench, loosen the nut securing the generator to the adjusting bracket, insert a mounting blade between the generator and the engine cylinder block and use this “lever” to move the generator away from the engine. Tighten the generator mounting nut.
3.
Check whether the corresponding fuse has blown. The location of the fuses and their ratings are indicated in this manual (see the section “Electrical faults”), in the vehicle repair manual, in a separate electrical diagram, on the cover of the mounting block and on the fuses themselves.
4.
Replace the fuse.
Do not install fuses designed for a higher rated current: this can lead to damage to electrical equipment and even a fire.
Start the engine and check if the battery charging lamp goes out.
Has the charging light gone out?
The wire came off the generator
There may be several reasons and it is better to eliminate them in a car service center or garage, and you just have to hope that the energy reserve in the battery is enough to get to them. To reduce current consumption when driving a car with a faulty generator, if possible, turn off the radio, unnecessary lighting devices, heater fan, etc. Experienced car enthusiasts can be advised to check the generator voltage regulator.
The operation of the voltage regulator is to continuously automatically change the generator excitation current so that the generator voltage is maintained within specified limits when the generator speed and load changes. Checking on a car To check, you must have a DC voltmeter with a scale up to class B, accuracy no worse than 1.0.
Niva Chevrolet: Generator is the most common problem
The voltage should be within 13.6 V. The diodes are indicated by numbers in the diagram: The glow of the lamp indicates that the diodes have been shorted, which leads to the conclusion that the diode bridge will have to be replaced. Be attentive to the indications on the instrument panel.
Often the icon lights up half-heartedly and is not noticeable in bright light. Video of current leakage and poor charging at the same time: The charging lamp does not light up.
Since the indicator on the instrument panel is a link in the generator excitation circuit, the absence of flashing when the ignition is turned on leads to loss of its functionality.
Charging circuit diagram and typical problems
Before finding out why charging disappeared on the Niva VAZ 2121, 21213, 21214 injector, 2131 and 2123 (aka LADA Niva and Niva Chevrolet), let’s look at the circuit diagrams of the charging circuit of these models and the principle of their operation. Otherwise, you will have to search at random, and this is a bad method.
VAZ 2121
Let's start with the oldest, because age must be respected. Let's take a look at the diagram below.
Electrical diagram of the charging unit for the Niva VAZ 2121 car
The numbers on the diagram indicate:
- - accumulator battery;
- – generator with built-in rectifier bridge;
- – relay-regulator;
- – ignition switch (lock);
- – fuses in the mounting block;
- – indicator lamp for lack of charging;
- – warning lamp relay.
When the ignition switch is turned on, the voltage from the battery through the fuse and the normally closed contacts of the voltage regulator relay is supplied to the generator excitation winding. The relay regulator does not operate yet, since the voltage in the on-board network is below the normal level for charging. At the same time, through the second fuse, the same voltage is supplied to the battery charging control unit, assembled on an electromagnetic relay with normally closed contacts.
Since the generator is not producing anything yet, there is nothing at its middle point of connection of the windings - all the rectifier diodes are locked, it seems to be hanging in the air. As a result, the control unit relay also does not work and the “no charging” lamp is on.
Now we start the engine, the generator begins to generate voltage, which is rectified, charges the battery and powers the on-board network. At this time, at the connection point of the windings, which is essentially the neutral wire, a low potential is established relative to the positive wire of the on-board network. The relay is activated and extinguishes the control lamp.
The voltage level from the generator is monitored by a relay regulator. As soon as it exceeds the critical value (14.2 V), the relay will operate, its contacts will open and a reduced voltage will be supplied to the excitation winding, which means the voltage in the on-board network will also decrease. It becomes below normal (13.5 V), the relay will release again, and the process will repeat.
What else to check
- Voltage regulator;
- Generator rectifier unit;
- Diodes;
- Generator for broken windings;
- Generator brush assembly;
- Contacts on the terminals of the generator, mounting block.
Let's continue... Diodes are checked with a test light or multimeter. If one of them is broken, the entire rectifier will have to be replaced.
To check the stator winding you need the same device. The resistance between the fasteners of the rectifier unit is measured. If there are no contacts between them, you need to replace either the winding or the entire generator.
The generator itself often fails due to wear on the brushes. To check them, you need to remove the brush assembly and measure the length of the elements. If it is 5 mm or less, the brushes must be replaced.
Almost all of the above system components are replaced when they fail, since they cannot be repaired. Only some of the generator problems can be repaired, but this can only be done by a qualified auto electrician.
The worst thing is if problems with recharging occur while on the road. Without recharging the battery, it will eventually run out completely. And even if you manage to find the cause of the breakdown and eliminate it, you will no longer be able to start the engine with the starter. It will be possible to start a VAZ-2017 with a dead battery only from a tug or pusher.
The charging lamp does not light up.
Since the indicator on the instrument panel is a link in the generator excitation circuit, the absence of flashing when the ignition is turned on leads to loss of its functionality. Whether the lamp is to blame or the reason lies elsewhere (voltage regulator relay, lock contact group), can be understood by disconnecting terminal 61 from the generator with the ignition on, followed by shorting the wire from the instrument panel to the car body. If it catches fire, check the serviceability of the rotor winding, brushes and “chocolate”. If the circumstances are otherwise, examine the performance of fuse No. 2 (8A) and the light bulb by replacing the ones mentioned with known good ones.
How to replace the tension roller
The design of the generator roller is quite simple. The bearing is its main part. If the belt loosens or slows down, you need to check the bearing itself by turning it by hand. A serviceable roller rotates quietly, without jerking or biting. If the roller is faulty, it is necessary to replace it, which is possible even in the garage, with a minimum set of tools.
Install a pry bar or other tool that can prevent the crankshaft from moving so that the clutch disc is blocked. By loosening the bolt that secures the roller, relieve the tension on the belt. Having completely unscrewed the axial bolt, the tension roller is removed. Then a new roller is installed and the belt tension is adjusted.
The charging lamp does not light up.
Since the indicator on the instrument panel is a link in the generator excitation circuit, the absence of flashing when the ignition is turned on leads to loss of its functionality. Whether the lamp is to blame or the reason lies elsewhere (voltage regulator relay, lock contact group), can be understood by disconnecting terminal 61 from the generator with the ignition on, followed by shorting the wire from the instrument panel to the car body. If it catches fire, check the serviceability of the rotor winding, brushes and “chocolate”. If the circumstances are otherwise, examine the performance of fuse No. 2 (8A) and the light bulb by replacing the ones mentioned with known good ones.
Engine control system fuses
It is located on the left side of the body, under the instrument panel, next to the diagnostic block. Consists of four fuses:
| F1 (30A) | Right electric fan relay contacts |
| F2 (30A) | Left electric fan relay contacts |
| F3 (15A) | Relay windings of the right and left electric fans, controller, injectors, ignition coil |
| F4 (15A) | Heating elements for control and diagnostic oxygen concentration sensors, phase sensor, mass air flow sensor, canister purge valve |
The battery charge indicator light is constantly on.
The phenomenon indicates that the generator has stopped its normal operation; at this moment, the BS is powered by the battery. With a normally charged battery, you have 30-40 km of mileage left to get to the repair site. Disconnect consumers as much as possible, arm yourself with a multimeter and a set of keys.
A) Belt break.
Pay attention to the presence of a belt on the pulleys of the water pump and generator. To return it to its place, you will need 17 or 13 socket wrenches, depending on the year of manufacture of the car, as well as a strong flat-head screwdriver
Disconnect the HF position sensor (for example, on 21213,21214).
Loosen the nuts securing the tension bar and slide it to the side towards the cylinder block.
Place the belt on your seat.
Upon completion of installation, adjust the tension, controlling the deflection when pressing with your thumb on the belt gap between the generator and pump pulleys - 10-15 mm, pump and crankshaft - 12-17 mm. Failure to comply with this requirement may result in the belt slipping with further damage and rupture.
B) Burnout of wires, poor contact in the circuit.
If the circuit opens at terminals B, V and Ш, tighten the nuts or replace the terminals with new ones.
C) The charging relay-voltage regulator has failed.
To initially check the performance of the LV, use a multimeter (voltmeter), which allows you to record the voltage directly at the battery terminals. Normal voltage is considered to be in the range of 13.85±0.35V. If it is different from this, we diagnose the element. The location where the charging relay is located near the Niva is determined by the age of the car. Thus, a remote relay can be found on the right fender liner of a car with a classic engine compartment layout; more modern modifications of generators are equipped with a LV combined with a brush assembly.
Replacing the alternator belt
To change the Chevrolet Niva alternator belt, you need to use the following tools:
In a Chevrolet Niva car, replacing the alternator belt is as follows:
- You need to remove the connector from the crankshaft position sensor.
- Unscrew and remove the bolt that secures the sensor.
- The nut securing the generator needs to be loosened slightly and moved towards the block. If the generator is displaced, its belt will loosen and can be removed without problems.
- Using a jack installed on the side where the generator is located, raise the car by engaging first gear.
- Pull the belt until it moves away from the pump pulley. Rotate the wheel so that the place of the guy moves onto the pulley.
- Then remove the belt from the other pulleys.
- The new one must first be put on the generator pulley and the crankshaft pulley, and only then put on the pump pulley.
- Turn the wheel until the belt is on the pulley.
- Put the generator in place, and tighten the belt, attach it to the bracket with a nut.
- Replace the crankshaft position sensor.
Failure of the rectifier unit (diode bridge burnt out)
This is the most common reason why there may be either weak charging or its complete absence. In order to find out whether this is the reason, you must perform the following steps:
- Remove the diode bridge from the device
- Test it with an ohmmeter to check for burnt diodes.
- Replace the rectifier unit if necessary
Usually, if one of the diodes burns out, the charging does not disappear completely, but becomes only slightly less than the nominal value. But even in this case, the generator will not be able to properly charge the battery and it will run out more and more often. If all the diodes burn out, which also happens quite often, then charging disappears completely.
Generator brush wear
Usually, brushes make themselves felt gradually and charging does not disappear immediately, but over time. That is, it becomes smaller and smaller with every kilometer traveled. Eventually, one day the brushes will wear down to such an extent that the generator will not be able to fully charge the battery, and you will have to recharge it from a charger. What should be done:
If upon measurement it turns out that their residual length is less than 12 mm, then this indicates that it is time to change them. Also, uneven wear is not allowed.
The signal lamp is blinking
Blinking of the battery indicator, as a rule, indicates problems in the brush assembly, as well as the occurrence of a short circuit in the “W” and “-” terminals of the voltage regulator. The brushes, in turn, can “freeze”, not reaching the rotor slip rings at low and medium speeds. You have already read how to fix them in our instructions. However, the reason why charging on the Niva 2121, 2131, 21214 and 4×4 Urban disappeared is not always the above-mentioned components under the hood. In particular, the culprit of weak charging or its complete absence is an unmaintained battery with an insufficient volume of electrolyte or closed banks, loose and oxidized terminals, broken and melted wires. Additional difficulties arise when dirt, dust, traces of fuel and lubricants, etc. accumulate on suspended equipment.
The charging lamp does not light up.
Since the indicator on the instrument panel
is a link in the excitation circuit of the generator; the absence of flashing when the ignition is turned on leads to loss of its functionality. Whether the lamp is to blame or the reason lies elsewhere (voltage regulator relay, lock contact group), can be determined by disconnecting terminal 61 from the generator with the ignition on, followed by shorting the wire from the instrument panel to the car body. If it catches fire, check the serviceability of the rotor winding, brushes and “chocolate”. If the circumstances are otherwise, examine the performance of fuse No. 2 (8A) and the light bulb by replacing the ones mentioned with known good ones.
Generator "Niva Chevrolet"
Depending on the type of current, generators can be either direct or alternating current. Owners of the named car sometimes do not know what generators are used for this model? The Chevrolet Niva was provided with an electromechanical alternating current device. There is a built-in diode bridge - rectifier. To provide work to electrical consumers, it converts alternating current into direct current. The diode bridge with the generator is one mechanism; they can be located both in the housing and in the cover of the generator.
The operation of the latter is affected by the speed of the vehicle and its engine speed, since the generator is connected by a belt to its crankshaft. To regulate the output current, a voltage regulator relay is installed. In addition, modern generators have built-in integrated voltage regulators.
The Niva Chevrolet generator may be subject to the following malfunctions:
If the malfunction is of a mechanical type, then it includes a breakdown of the fastening, housing, faulty condition of the pressure springs, bearings, belt drive or other breakdowns that are not related to the electrical system.
With the first type of malfunction, the winding may break, the brush may burn out or wear out, the rotor may break through, and a short circuit may occur between the turns. The diode bridge and the relay regulator may be faulty.
Sometimes signs appear indicating that the Chevrolet Niva generator is faulty, but this problem can be caused by completely different breakdowns.
The signal lamp is blinking
Blinking of the battery indicator, as a rule, indicates problems in the brush assembly, as well as the occurrence of a short circuit in the “W” and “-” terminals of the voltage regulator. The brushes, in turn, can “freeze”, not reaching the rotor slip rings at low and medium speeds. You have already read how to fix them in our instructions. However, the reason why charging on the Niva 2121, 2131, 21214 and 4×4 Urban disappeared is not always the above-mentioned components under the hood. In particular, the culprit of weak charging or its complete absence is an unmaintained battery with an insufficient volume of electrolyte or closed banks, loose and oxidized terminals, broken and melted wires. Additional difficulties arise when dirt, dust, traces of fuel and lubricants, etc. accumulate on suspended equipment.
Malfunctions that occur in the operation of the generator
The Chevrolet Niva generator, the photo of which is provided in our article, may have the following malfunctions:
- the pulley is damaged or completely worn out;
- current collecting brushes are worn out;
- rectifier failure;
- voltage regulator failure;
- the collector is worn out;
- the bearing is worn out or completely destroyed;
- The charging circuit wires are damaged.
The car owner needs to become familiar with the main reasons why generator malfunctions occur. In addition, you need to know how to fix these breakdowns, as well as preventive measures to prevent them.