Power units installed on Gazelle
When installing a new engine, many car owners doubt which engine is best for the Gazelle. Experienced mechanics advise first deciding what the Gazelle owner is going to do with his car. Based on the decision made, buy a diesel or gasoline engine.
For example, if a car owner wants to save money on a purchase, then experienced mechanics advise taking the ZMZ 402. What are the positive aspects of this engine:
- service centers sell many used motors of this model;
- eats any oil and works without changes for the worse if the quality of the lubricant changes sharply;
- When removing the original engine, the car owner will not need to redo anything.
But there are also negative aspects to this engine:
- weak dynamics;
- weak power;
- outdated type of engine;
- complex and capricious carburetor design.
Now let's take a closer look at each of the Gazelle engines described below.
Engine ZMZ 402
ZMZ 402 is suitable for Gazelle. It is also installed on the Volga model. Among the listed advantages that were described above, there are such disadvantages as:
- torn rear crankshaft oil seal. It vomits after two thousand revolutions are reached. Oil begins to pour out of the engine. After replacement, everything repeats;
- trembling and jerking of the engine at idle;
- motor overheating. Due to overheating, the washers begin to press in. Therefore, it is recommended to tighten all engine bolts every two thousand kilometers.
Otherwise, the ZMZ 402 engine will fit into the Gazelle like a native one. Nothing will have to be redone. In addition, parts for it can always be found. They are sold at a low price.
Engine ZMZ 405
The engine is generally similar to the 406. Only slightly edited. Added engine power. When installed on a Gazelle, it will give the minibus agility that it did not have with previous engines.
Otherwise there are many shortcomings. For example, such as:
- lubricant leak;
- high gasoline consumption;
- The engine stalls frequently. This happens because problems begin with high-voltage wires;
- noise and knocking due to hydraulic compensators. By the way, the latter are enough for only 50 thousand kilometers.
There are two series of engines: injection and carburetor. Injection is little better than carburetor. But experienced mechanics advise buying 405 if the choice is between the ZMZ 405 and ZMZ 406 power units.
Engine ZMZ 406
ZMZ 406 is considered the best among other engines. It is much better than 402, but inferior to 405. The aluminum block is replaced by cast iron. There are now 2 camshafts. These are upper and lower camshafts.
Hydraulic compensators are installed on the engine. Now car owners will not have to constantly reduce valve clearances. The engine has 16 cylinders.
Despite the described advantages, the power unit has the following disadvantages:
- timing wedge;
- timing chain damage;
- motor overheating;
- damage to oil scrapers and seals;
- knocking due to hydraulic compensators;
- problems with electronics.
With proper and constant care, the engine installed in a Gazelle will cover more than 300 thousand kilometers.
Engine ZMZ 409
ZMZ 409 is considered the best engine for installation in a Gazelle. Its cylinder block is cast from gray cast iron. The engine almost never overheats, because between the cylinders there are channels in which coolant flows.
The oil sump is located at the bottom of the BC. The cylinder head is made of aluminum alloy. The intake valves are on the right, and the exhaust valves are on the left. It has almost no disadvantages. Experienced mechanics advise undergoing regular preventive inspections. And then there will be no complaints about the engine.
Starter relay gazelle 405 euro 2 where is it located
The starter relay is located in the passenger compartment, on the driver's side. You need to remove the plastic cover near the left leg, the relay block will open. The starter relay is located just below the light switch relay. To put it simply, there are 7 relays, 4 small, 3 large, the ground is connected to one of the small ones with a wire that has a male-female connector in the middle, so it is the starter relay. If I’m not mistaken, then the marking on it should be 711.3747 or 711.3747-01 . Not to be confused with PC711, this is a light switching relay, it is larger and has more wires going to it.
Added after 2 minutes 34 seconds
__________________ If one person assembles it, another can always take it apart.
All newcomers to Russia will die near Smolensk. (c) “Formula of Love”
To view links or images in signatures, you must have at least 0 message(s). You currently have 0 message(s).
Anyone who disagrees with me can speak out. To view links or images in signatures, you must have at least 0 message(s). You currently have 0 message(s).
.
To view links or images in signatures, you must have at least 0 message(s).
You currently have 0 message(s). Source
Advantages of the old ZMZ-402 over modern engines
If someone happened to own a UAZ, Volga or Gazelle car from early years of production, he would definitely come across the ZMZ-402 engine or its Ulyanovsk analogues.
Once upon a time in our family there was a UAZ 469 produced in 1976, just the same with a ZMZ-402 engine for 76-80 gasoline, a working volume of 2445 cm3, a power of 76 l / s, with a compression ratio of 6.7 and torque of 160 Nm. Since then I have had the opportunity to drive different cars, including foreign cars. But the further I moved away from the 402, I realized how good it was.
To some, words of praise dedicated to the old engine, and some highlighted advantage over modern engines, may seem stupid, but it depends on how you look at it.
ZMZ-402 was produced from 1968 to 2022, periodically undergoing light modernization. As a result, 6,125,136 of them were produced.
The declared engine life is 250 thousand km before major repairs, but many owners of cars with a similar engine talk about 300 - 400 thousand km. In fact, this engine is eternal, as it has 5 repair sizes of the cylinder-piston group. By the way, the pistons with a diameter of 92 mm are exactly the same as on the V8 Gas-53.
In general, I would like to highlight the main advantages of the 402:
1. Relatively light. This reduces the overall weight of the vehicle and the load on the front axle. Thanks to the fact that the cylinder block and cylinder head are made of aluminum, its weight is only about 170 kg.
2. Very repairable. Due to the fact that the sleeves are removable, major repairs can be carried out right in the yard without any special skills. No special tool needed. Most operations can be performed with ordinary wrenches, with the possible exception of removing the crankshaft hub - you will need a puller.
3. Simple and clear design. Which cannot confuse you in any way. Knowing the general principles of operation of a four-stroke engine, you can easily find the cause of a particular malfunction yourself.
4. Good resource capacity. Especially when comparing modern engines, whose service life is comparable to the 402, they are usually thrown away and bought “contract”.
5. Your timing belt will never break, and therefore your valves will never bend. Because there is simply no belt. The camshaft is driven by a silent textolite gear directly from the crankshaft. The gas distribution mechanism itself is quite reliable. Periodically, only adjustment of the thermal gaps is required.
6. Grassroots motor. At the maximum possible 4400 rpm. the character of the engine is appropriate. The car starts easily at low speeds. Works great at medium speed.
7. Smooth operation in all modes. There is no “diesel” effect, as on the same Kalinas.
The disadvantages include: increased fuel consumption, not very stable idling, poor elasticity, low power and corresponding throttle response. Those cars that had this engine under the hood were quite heavy, so they all had an extremely low power-to-weight ratio. Overtaking and climbing are difficult.
Otherwise, this engine will take you home in any case. Even if on two cylinders, it will never die completely.
Source
Engine ZMZ 406
This is the next stage in the development of engines for the Gazelle, which replaced the ZMZ 402.
Despite the slight differences in numbers between them, this motor has undergone dramatic changes compared to its predecessor.
The main differences include the following changes:
- changing the location of camshafts;
- 16 valve engine;
- hydraulic compensators are installed, which avoids the constant need for their adjustment;
- a significantly improved timing drive, the service life of which is 100,000 km, but in most cases can withstand loads twice as large. The engine camshaft is driven by gears with helical teeth. At the same time, a steel gear is mounted on the crankshaft, and a textolite gear with a cast iron hub is mounted on the distribution shaft to ensure silent operation.
Tips for motorists
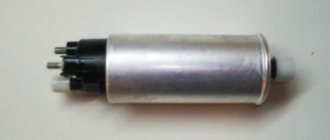
In the operation of the submersible electric fuel pump on a Gazelle car, the following take part: the main relay, the fuel pump relay, the electronic control unit, and fuses protect this electrical circuit. In addition, if the car has an anti-theft system installed, then another relay will be added to the circuit, which will cut off the voltage supply to the fuel pump terminals.
And those Gazelle cars that run on gas will still start on gasoline and in their electrical circuit of the fuel pump, an additional relay will also be installed that will turn off the operation of the gas pump at the moment the engine switches to gas.
Therefore, when troubleshooting problems associated with a non-working gas pump on a Gazelle, you need to start by checking the integrity of the fuses. You also need to check the condition of the contacts for oxidation. Next, we check the operation of all the relays that are used on this vehicle in the electrical circuit for supplying voltage to the fuel pump terminals. If this does not help, then you will have to check the wiring and connections from the electronic control unit to the main relay and the fuel pump relay.
Another common cause of fuel pump failure is oxidation or burning of the negative contact located on the fuel pump inside the tank. There is a white block there, but please do not confuse it with the block that is located on the surface of the gas tank. Typically, this malfunction initially manifests itself by periodically turning the fuel pump on and off. If this problem occurs, then these contacts will have to be periodically cleaned by removing the module or connected directly once and for all, bypassing the terminal.
Unfortunately, the driver is not always able to independently find faults associated with the failure of the submersible fuel pump on a Gazelle car and has to look for a competent auto electrician to solve this problem.
Posts: 1
January 9, 2013, 15:48 #1 123
Good afternoon everyone. Evening is already approaching, and in the morning I can’t start the gas 3110 d406i yesterday, but today it’s silent when starting (the gas pump doesn’t work), the fuse is intact, the relay contacts were cleaned, they tried connecting directly to the relay socket. The gasoline pump connected to the battery works. What could be the problem?
- Posts: 95
- From: Moscow Region, Chekhov
January 10, 2013, 21:37 #2 123
is there an alarm?
- Posts: 95
- From: Moscow Region, Chekhov
January 10, 2013, 21:39 #3 123
Does the check light come on when you turn on the ignition?
Posts: 1
January 25, 2013, 16:35 #4 123
Hello everyone. I have exactly the same problem. I got home, it won’t start in the morning. There’s no power to fuse 9. I got it from a neighbor, the pump started working, but the alarm won’t start. I called, please help me with advice
Posts: 4
March 31, 2013, 14:03 #5 123+ 2
Guys, hello everyone! I have gas 3110 ZMZ 406. There was a problem with the electric fuel pump! The relay works, there is no power, in short, everything is as described above! I figured it out. The thing is this: Neither the alarm system nor anything else like that has anything to do with it! Remove the right fuse block (which contains the fuse for the EBN 15A). Then remove 1 of the 4 small fuse blocks, again the one with the EBN, and carefully look at all the wiring coming out of it, there are 6-7 of them. Review all twists and connections! It’s twisted there, it’s dark, believe me. I had a barely noticeable break in one of them! good luck to all! If anyone wants to discuss anything else about the Volga, write to me by email
- Posts: 10185
- From: Angarsk
- Lada Niva 2131M Nissan Patrol
March 31, 2013, 15:37 #6 123
lubludorogu, March 31, 2013, 14:03, #5
It’s better here so that it’s accessible to everyone. Maybe it will come in handy
Resistor
If we talk about the resistor of the Gazelle stove, then it is responsible for the operation of the heater at speeds 1 and 2. For this purpose, a special resistance is provided that reduces the voltage, thereby allowing the electric motor to rotate at a lower speed. Since the last maximum mode has a direct connection, bypassing additional resistance, if the resistor fails, the stove starts working only at maximum speed. At speeds 1 and 2 the heater will not turn on.
Gazelle heater resistor
There is nothing complicated about replacing the heater resistor on a Gazelle. To do this, you will need to perform several sequential procedures:
- Lift the lid of the upper glove compartment located on the dashboard. Everything unnecessary should be removed from there, otherwise things will interfere with the dismantling procedure.
- There are 4 screws under the cover. They are the ones holding the glove compartment. Unscrew them one by one and set them aside for now.
- Since this is a Gazelle 3302 and not a new Business version, access to the electric heater fan, to which the resistor is connected, is much easier. There is another panel missing, due to which half of the torpedo has to be disassembled.
- Removing the upper glove compartment, you will see a plastic housing for the electric fan underneath. It is not necessary to remove it, although getting to the additional resistance block will not be so easy. For this it is worth saying thanks to the GAZ designers.
- Prepare a new resistor immediately. Before replacing the old element, it would be a good idea to make sure that the current resistance unit has failed.
- To the right of the driver on the motor is the required heater resistor.
- Squeeze your hand into the hole near the electric fan and remove the resistor connection chip.
- Disconnect the connector from the old resistor, take a new resistance and connect the chip to it. Now start the stove itself. If it turns on at speeds 1 and 2, the reason was definitely the additional resistance.
- It will not be possible to completely remove the old resistor in this position. You will have to halve the electric fan housing. To do this, you need a long head of 8. Using the tool, unscrew 2 fasteners.
- Now the electric fan housing can be pulled out from its seat.
- On the right side of the fan you will see a resistor that has completely failed, as proven by a recent test.
- Unscrew one screw that holds the additional resistance or speed control.
- Pull out the old resistor, and then install a new one in its place.
- Connect all the chips and assemble the unit in reverse order.
At this point, the replacement of the resistor or speed controller on the Gazelle 3302 can be considered successfully completed.
Resistors and fuses on Gazelle cars can break, burn out and fail. This doesn’t happen very often, but sometimes it’s worth starting the check with these elements. Access to them is relatively simple, plus replacing them will require much less effort and money than removing the same electric fan or dismantling the heater control unit.
GAZ 2705 | Checking the fuel pump relay
Checking the fuel pump relay
The fuel pump activation relay is located in the relay box located in the right rear of the engine compartment. It is used to control the operation of the electric fuel pump. In particular, the relay breaks the pump power circuit if the engine stops with the ignition on.
To turn on the fuel pump when the engine is stopped, you need to remove the relay and close contacts 30 and 87 on the connector with a short wire with a diameter of 1.5 mm. The fuel pump relay is brown on the 520i/525i/524td and orange on the 530i/535i.
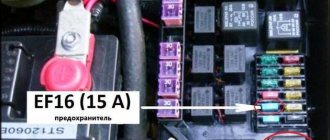
Attention: when checking the fuel pump activation relay, the battery must be charged. • Check fuse No. 23
• Check fuse No. 23.
• Remove the relay.
• Connect a voltmeter to pins 30 (*) and 85 (-) on the relay connector. The voltage should be around 12V.
• If this is not the case. connect a voltmeter to pin 30 and ground. If the voltage is about 12 V, check the electrical diagram to see if the brown-green wire is broken. If it is intact, check the red wire and replace if necessary.
• Turn on the ignition. Connect a voltmeter to pin 86 (+) and ground. The reading should be around 12V Otherwise, check the electrical diagram to see if the red/white wire is broken and replace it if necessary.
• Check the presence of a signal at the output of the crankshaft speed/angular position sensor (to do this, contact a service station).
• Connect a short jumper to pins 30 and 87. If the pump starts, replace the relay. Otherwise, check for an open and replace the green-violet wire if necessary.
• If the wire is OK, replace the fuel pump.
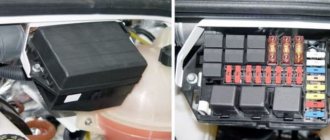
Block in the cabin
It is located under the panel on the left side, behind the protective cover.
Old style block
Scheme
Description
Upper block
| 1 | 16A Electric heater motor, electric heating pump (vehicles with two rows of seats) |
| 2 | 8A Reserve for the electric motor of the additional heater (vehicles with two rows of seats), relay for the electric fan of the engine cooling system (installed on parts of vehicles) |
| 3 | 8A Direction indicators |
| 4 | 8A Instrument cluster, parking brake warning lamp switch, EPH system, windshield wiper relay, reverse light, diagnostic warning lamp |
| 5 | 8A Hazard alarm |
| 6 | 8A Buzzer and lamp for onboard platform lighting, brake signal |
| 7 | 8A Radio equipment, remote battery switch, |
| 8 | 8A Electric motors for windshield wiper and washer |
| 9 | 16A Cigarette lighter , horn, portable lamp sockets |
| 10 | 16A Reserve |
Fuse number 9 at 16A is responsible for the cigarette lighter.
Bottom block
| 1 | 16A Fog lights |
| 2 | 8A Cabin lighting lamp(s), cargo compartment lamp (GAZ-2705, -27057), engine compartment lamp, lamps for the left row of passenger compartment seats and footrest lighting |
| 3 | 8A Instrument cluster illumination |
| 4 | 8A Rear fog lights |
| 5 | 8A Right front side light, left rear side light, license plate lights, side light warning lamp |
| 6 | 8A Left front side light, right rear side light, fog light relay |
| 7 | 8A Left headlight (low beam), electric headlight range control |
| 8 | 8A Right headlight (low beam), electric headlight range control |
| 9 | 16A Left headlight (high beam), high beam indicator lamp |
| 10 | 16A Right headlight (high beam) |
New sample block
Scheme
Designation
Upper block
| 1 | 25A Engine control system (ZMZ-40522, UMZ-4216) |
| 2 | 15A Hazard warning lights |
| 3 | 15A Ground switch (on buses), radio |
| 4 | 10A Electric motors for windshield wiper and washer, right row of bus interior lamps |
| 5 | 10A Headlight relay, ABS (for buses) |
| 6 | 10A Brake lights |
| 7 | 20A Horns, cigarette lighter |
| 8 | 20A Heater motor, additional heater electric pump |
| 9 | 15A Additional heater motor |
| 10 | 10A Instrument cluster, reverse light, speed sensor, parking brake warning light switch, wiper relay |
| 11 | 5A Oxygen concentration sensor (ZMZ-40522, UMZ-4216) |
| 12 | 15A Engine management system and fuel pump |
| 13 | 10A Direction indicators |
Fuse number 7 at 20A is responsible for the operation of the cigarette lighter.
| 1 | 25A Reserve |
| 2 | 15A Main beam of the right headlight, high beam indicator |
| 3 | 15A High beam left headlight |
| 4 | 10A Low beam right headlight |
| 5 | 10A Low beam left headlight |
| 6 | 10A Fog lights, fog light indicator |
| 7 | 20A Reserve |
| 8 | 20A Reserve |
| 9 | 15A Cabin lamp, lampshade (or lampshades on GAZ-2705, -27057 vehicles with one row of seats) of the cargo compartment, lampshade for lighting the bus steps, engine compartment lamp, left row of lampshades for lighting the passenger compartment of the bus |
| 10 | 10A Illumination of instruments, switches and cigarette lighter |
| 11 | 5A Reserve |
| 12 | 15A Side light on the right side, headlight range control, glove compartment lamp |
| 13 | 10A Side light on the left side, side light indicator, license plate light |
A relay is installed separately under the instrument panel on the left side - a turn signal switch.
Pump diagnostics and repair
The importance of maintaining the fuel pump in a constant working condition is that if it does not work correctly, constant breakdowns of other components of the GAZelle 405 car will begin, and the injector may not work correctly or even fail. To begin repairing a fuel pump, you need to determine what exactly the problem is, that is, diagnose it
The first alarm bell that the fuel pump is not working properly is that the GAZelle 405 injector moves unevenly, as if in jerks. If this particular symptom appears, then do not be discouraged - repairs are possible on your own. Also, if the GAZelle 405 engine takes a long time to start, and the injector usually always starts with half a turn, this is another bad sign that the fuel pump is starting to fail, although it is still far from complete failure
You need to start repairing the fuel pump by determining what exactly the problem is, that is, diagnosing it. The first alarm bell that the fuel pump is not working properly is that the GAZelle 405 injector moves unevenly, as if in jerks. If this particular symptom appears, then do not be discouraged - repairs are possible on your own. Also, if the GAZelle 405 engine takes a long time to start, and the injector usually always starts with half a turn, this is another bad sign that the fuel pump is starting to fail, although it is still far from complete failure.
You can check the fuel pump using a special indicator, which can be bought at any spare parts store for the GAZelle 405 injector. This device is installed on the gas pump and you can do it yourself, the main thing is to strictly follow the instructions and not make mistakes. The check takes place with the engine turned off; the device itself will do everything. If a significant decrease in pressure in the fuel network was noticed in less than 10 minutes, this means that the fuel pump is working properly, and either the pressure regulator or the injectors of the GAZelle 405 injector are to blame.
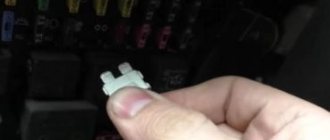
Replacing the central fuses of the vehicle's on-board network
Using your fingers, squeezing the latches on both sides, remove the block cover.
Using a “10” wrench, unscrew the two nuts and, removing the wires from the studs, replace the faulty fuse with a similar one (40 A or 60 A)
Spare fuses are stored under the cover plate
The lid is held on by two clips
Checking the serviceability of the fuel pump on the injector
When, when you turn the ignition key, you hear a slight buzzing, a slight hum, this is how the fuel pump works, pumping gasoline creates pressure in the system. If, when you try to start, there are no such signs of the fuel pump working, then you can assume a malfunction of the electrics, the pump itself or its individual parts. Therefore, let’s look at how you can check the operation of a gas pump using a step-by-step logical chain. Starting from whether power is supplied to the fuel pump and ending with whether the fuel pump pumps at all, and if so, what pressure is created in the fuel rail.
Step 1: Checking the fuse
Checking the fuel pump fuse involves inspecting the integrity of the conductive plate and, if broken, replacing it. But if there is no new fuse, then wind one strand of copper wire around the fuse contacts. If it burns out again, it means the problem may be in the wiring.
Stage 2: Checking the relay
To check the fuel pump relay, remove it from the socket and connect a 12 volt light bulb according to the diagram. If the light bulb works, the relay itself is also working properly. An alternative is to use a multimeter in ohmmeter mode to measure the resistance of the relay coil winding. One probe is connected to terminal 85, and the other to 86. The device will show a break if the relay has failed.
Make sure that the terminals are not oxidized - this will negatively affect the power supply to the fuel pump engine!
Stage 3. Checking the power supply to the BN
Checking the fuel pump voltage is done using a multimeter. The probes of the measuring device in voltmeter mode (from 0-20 volts) must be connected to the power terminals of the fuel pump. Turn on the ignition and take readings on the device. 12-12.5 volts is normal operating voltage. If there is voltage, but the pump does not work, check the electric motor.
Stage 4. Checking the fuel pump motor
To prevent damage to the electric motor, we supply 12 volts directly from the battery to the fuel pump terminals. It works - we check its performance, check valve, measure the pressure with a pressure gauge. If it doesn’t work, check the coil for a break.
When voltage is applied to the terminals of the gasoline pump, does it not work? Let's check the stator winding: take a tester (multimeter) and switch it to ohmmeter mode, it should show resistance, otherwise there is a problem with the winding and it needs to be replaced. If there is a resistance reading, the problem may be that there is a short winding on the fuel pump body. The tester probe goes to the positive terminal, the second one goes to the body. If it shorts, there will be no break.
Step 5. Checking the coarse filter
By removing the coarse filter (see vehicle technical documentation) from the fuel pump, you can even visually determine how dirty it is. If there is a large amount of deposits, it is recommended to replace the filters; if the problem occurs on the road, use a brush and gasoline to clean it.
Step 6: Check the check valve
The check valve must constantly prevent the movement of liquid in the opposite direction. During operation, its performance decreases, which reduces its technical characteristics.
1 way. Checking the check valve involves measuring the pressure with a pressure gauge. It needs to be connected to that part of the system that is directly involved in supplying fuel to the internal combustion engine. Pressure readings should not exceed 3 kg/sq.m. see (true for passenger cars). And when the engine is stopped, the pressure should not drop sharply.
Car starter malfunctions and their elimination | LifeGaz
The starter on the Volga is a very reliable thing, and any troubles do not happen to it often. As a rule, during operation it does not require any attention at all, but you and I know that anything can be broken, even if, as in the well-known case, it is pure hydraulics.
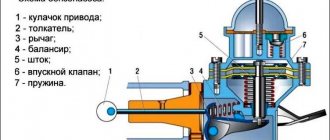
So, the starter is based on a DC electric motor. At the front end of its shaft there is a sliding coupling and a gear, which at the moment of start-up engages with the teeth of the engine flywheel. The movement of the clutch is ensured by a retractor relay located on the starter housing. At the moment of startup, the relay rod moves and pulls the fork, which pushes the clutch and gear into the position of engagement with the flywheel.
The traction relay coil has two windings.
- Retracting. Connects when the key is turned to the “start” position. It ensures movement of the relay rod. After the first winding is triggered, the rod moves and moves the contact “penny”, closing the contacts with it, including the starter motor and the second, holding winding.
- Holding. It is needed to keep the rod retracted as long as the key is in the “start” position.
Accordingly, all malfunctions come down to either problems with the retractor, or with the electric motor itself, or with the clutch.
As a rule, the starter refuses to start the car at the most inopportune moment and completely unexpectedly. That is, yesterday everything was fine, but today we turn the key to the “start” position, but it doesn’t turn, or turns but somehow not the way it should, or makes strange sounds. In any case, there is no need to wait for a miracle; it will not go away on its own. Let's try to find and fix the problem.
List of internal combustion engine modifications
Five modifications have been developed for the ZMZ 405 engine. The first version, 4052.10, appeared in 2000. The base was the 406 engine. The basis was modified first to meet the environmental requirements of Euro-2, and then to Euro-3 and 4. In 2013, a new engine model with a turbo engine appeared under the designation 4054.10.
Injector
All ZMZ 405 engine models are equipped with an injector. Modifications differ in power, requirements for environmental standards and adaptability to the class of machines:
- 4052.10 is installed on the Volga. The engine power is 152.5 hp, torque is 210 Nm. Meets Euro-2 class. Equipped with Mikas ECU;
- 40522.10 - similar to the basic version, but adapted for installation on GAZelle and Sobol trucks and minibuses;
- 40524.10 has been modified for GAZelles and Sobols for Euro 3 and 4 classes. Engine power is 140.5 hp, torque is 214 Nm. To improve ventilation, the design included valves that maintain a constant vacuum in the crankcase. An electronic gas pedal E-Gas has also been added;
- 40525.10 is installed on Volga of Euro-3 class weighing up to 2.1 tons. Engine power is 143.8 hp, torque is 213.5 Nm;
- 4054.10 is equipped with a petrol turbocharger and air cooler. Engine power is 195 hp, torque is 343 Nm. The cylinder size was reduced to 92 mm, the piston stroke became longer - 94 mm. The engine is installed in special vehicles for military and security services.
Carburetor
Among the ZMZ 405 engine models, carburetors are not found. However, the predecessor, the 406 engine, was carburetor. The prototype for development was the Swedish SAAB engine. The engine was in production from 1997 to 2008.
ZMZ 406 is a gasoline 4-cylinder 16-valve internal combustion engine, built according to the DOHC scheme with two camshafts. Engine capacity - 2.3 liters. Power - 100 hp, torque - 177 Nm. 92 gasoline is suitable as fuel. Despite the weak characteristics, drivers speak positively about the engine.
Replacing the central fuses of the vehicle's on-board network
1. Using your fingers, squeezing the latches on both sides, remove the unit cover.
2. Using a “10” wrench, unscrew the two nuts and, having removed the wires from the studs, replace the faulty fuse with a similar one (40 A or 60 A).
3. Spare fuses are stored under the cover plate
4. The lid is held on by two latches