The problem with clutch slipping on cars that are usually classified as domestic classics is quite well known. This defect not only causes serious inconvenience in driving, but also entails unplanned financial losses. Clutch slipping leads to fairly rapid failure of the release bearings, wear of the discs and combustion of the entire basket as a whole. This article is intended to answer the questions: why does the clutch slip and what needs to be done in a particular case?
How to determine this defect?
Clutch slipping can be easily detected independently, without the use of special equipment.
To do this, you need to perform the following series of simple steps:
- start the engine;
- engage neutral gear;
- apply the handbrake;
- press the gas pedal;
- depress the clutch;
- go to first speed;
- release the clutch pedal.
By all rights, as a result of these manipulations, the engine should eventually stall. If this does not happen, the engine continues to work, and even extraneous sounds or a burning smell appear, this means that the clutch is slipping and measures to repair it should be taken immediately. This is caused not only by financial reasons, but also by reasons of personal safety.
How does the clutch drive work?
The principle of operation of the mechanism is as follows.
- The driver presses the pedal.
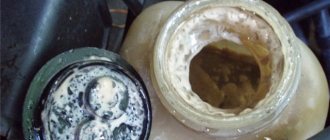
- The piston of the master cylinder pumps pressure into the system, excess fluid goes into the expansion tank.
- The contents of the system move along the lines and enter the working cylinder.
- The piston of the working part pushes the fork and opens the bearing.
- The clutch disc moves away from the basket and the engine is disconnected from the gearbox.
Causes of clutch slipping
There may be several reasons causing this effect. As a rule, they arise due to a characteristic driving style, which is commonly called sporty. Sharp acceleration and braking, frequent gear changes significantly reduce the working life of the clutch, although AvtoVAZ defines it as 75-85 thousand kilometers. In addition, experts say that the performance of a car’s clutch can be significantly affected by the use of trailers. It is believed that they are capable of significantly shortening the life cycle of components and mechanisms of an automotive element. Let's look at the most common actual causes of clutch slipping.
Diagnosis of clutch faults VAZ 2107
There are a number of breakdowns that indicate that the car requires urgent repairs.
Clutch slipping
This occurs during sudden acceleration. The engine steadily picks up speed, but the car is “late” in accelerating. The process may also be accompanied by jerking, jerking and extraneous noise.
The situation greatly wears out the friction disc and negatively affects fuel consumption.
Clutch leads
This is caused by improper adjustment or airing of the system. The friction linings do not move completely away from the basket and gears are difficult to engage.
Jerks when starting and changing gears
It requires pumping and adjustment of the mechanism, when the car jerks when you put it in gear. The disc may slip at the start or rapid acceleration due to its wear.
Oil ingress
Often, if the clutch slips, the reasons for this lie in oil or other technical fluid getting into the basket. Oil gets onto the surface of the release disc, flywheel or driven disc lining due to a leak in the rear crankshaft oil seal. Often the cause of a leak is an excessive oil level in the gearbox housing. In these cases, if the clutch slips, the VAZ-2107 can be repaired very simply. It will be enough to eliminate the cause of the leaks and clean those parts of the system that have received oil. This can be done using white spirit or gasoline. If liquid gets on the friction linings, they will also have to be cleaned with fine-caliber sandpaper.
Do-it-yourself clutch adjustment on a VAZ 2107
This procedure is performed similarly for all classic VAZ 2101-07 and 21214 models. The essence of the procedure is to adjust the clutch or play of the clutch working cylinder rod if it takes at the very end or with minimal pressure.
To perform repairs you will need the following set of tools:
- standard open-end wrenches;
- screwdriver or pliers;
- ruler;
- ticks.
Basically, the calibration process looks like this.
- The car is driven onto a viewing hole or lift.
- The battery terminals are disconnected, and the car is blocked from accidentally rolling away (relevant for a pit or overpass).
- The clutch pedal stop is located under the steering column. This element is responsible for setting the working gap between the rod pusher and the pedal. A backlash of 1-2 millimeters is considered normal; if the condition is met, no calibration is needed.
- Next, you need to check the backlash of the working cylinder. To do this, unscrew the pusher rod from the clutch fork and check the existing gap.
Tools and materials
To perform the operation you will need:
- set of wrenches;
- hydraulic fluid;
- flat screwdriver;
- container for draining waste;
- rags;
- ruler or tape measure.
Preparatory work
Before starting the procedure you should:
- Drive the car onto a flat surface, inspection hole or lift.
- Put the car on the handbrake.
- Clean the RB cover and all lines from dirt, external oxidation and bitumen stains.
- Prepare all tools for easy access to them.
Setting up the clutch of an injection VAZ 2107
Fundamentally, the repair procedure differs from the carburetor by the presence of an additional dirt-proof sheet. The structure is dismantled in this way.
- Using a socket head, 12 shield mounting bolts (A, B, C) are removed.
- Next, you need to unscrew the rear screws using a Phillips screwdriver or wrench No. 8.
- Reverse installation is carried out in mirror order.
- Otherwise, the sequence of actions does not differ from the standard procedure.
Adjusting the clutch of a carburetor VAZ 2107
Step-by-step instructions for adjusting a carburetor model look like this.
- The car is jacked up or driven into an inspection hole.
- The nominal free play position of the clutch pedal is set.
- Adjusting the release bearing play.
- Reverse fixation of the structure.
- Checking completed work.
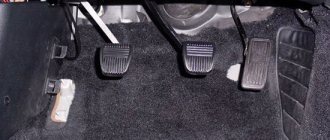
Adjusting the clutch pedal free play
To set the required clutch pedal travel, the following procedure is performed.
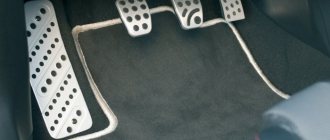
- Inside the car, you need to find the clutch piston pusher (located under the corresponding pedal).
- Check the working gap on the element itself; in normal condition, the gap is 0.5-2 mm. The most convenient way is to put a ruler and use it to measure the pedal stroke before the mechanism operates. If the thresholds are not met, calibration is required.
- Use a size 10 wrench to loosen the piston rod lock nut.
- Next, using the horn, turn the travel limiter nut by 13 (clockwise, decrease, counterclockwise, increase).
- When it reaches the required range, the structure is tightened in the reverse order.
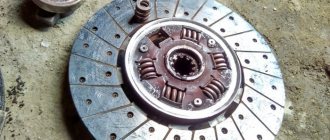
Disc lining wear
Friction linings on discs tend to wear out over time.
As a rule, this not only causes the clutch to slip, but also significantly reduces the free play of the pedal. In this case, there can be only one way out of this situation - replacing the entire clutch linings or discs. It must be remembered that if only the linings are replaced, then you need to pay careful attention to the condition of the gaskets. If they have damage or burnt areas, they also need to be replaced.
Causes of wear of the clutch mechanism
As car manufacturers assure, the average service life of clutch discs ranges from 75 to 80 thousand kilometers. A quiet driving mode and infrequent gearbox shifting help to extend the service life of the analyzed elements. Unfortunately, not all car owners adhere to such recommendations, and this, in turn, leads to rapid wear of the clutch mechanism. As a result, the worn mechanism slips while moving and at speed.
A clutch disc malfunction is manifested by incomplete engagement or periodic slipping.
In the first case, the pedal travel is too large. That is, if the pedal fails when the gearbox is turned on, and at the moment of shifting there is a kind of crunching sound, these are clear signs that the clutch discs are not fully engaged.
When slipping occurs, on the contrary, there is insufficient pedal travel, which can be completely released and free.
In any case, the operation of the clutch disc system should be adjusted as quickly as possible.
Insufficient pedal free play
The clutch often slips (the VAZ-2107 often suffers from this) also because the pedal has too little free play.
The manufacturer has established a value range of 25… 35 mm. This indicator can be easily measured with a simple ruler and adjusted if necessary.
There are other reasons why the clutch of VAZs of any model, and the “Seven” in particular, slips.
They are not as common as those listed above. But you still need to know about them. In particular, the following malfunctions can be mentioned:
- Detachment of the friction lining. The lining itself may not have visible damage or burnt areas. But as a result of delamination, it ceases to take the load over its entire surface, which leads to slipping.
- Overheating of the release disc. As a result of the temperature exceeding the maximum possible heat-absorbing characteristics of the clutch disc, it permanently expands, which causes a slipping effect. Of course, this defect cannot be determined on the fly. But it can be determined quite easily by the characteristic residue of burning and scale on the disk itself.
This article lists the main reasons why the clutch slips on domestic classics and on many other models of cars and trucks. It is important to remember that, whatever the cause of clutch slipping, it must be eliminated at the first appearance of symptoms of the defect. It is best to entrust such work to highly qualified specialists.
Disassembling, repairing and replacing clutch parts is quite labor-intensive work and requires fairly deep knowledge, extensive experience, as well as the availability of special tools and equipment.
In addition, when doing repair work yourself, there is a fairly high risk of violating the correct settings and adjustments, which will turn replacing parts into a Sisyphean task. Very soon the clutch will again begin to slip, make grinding and crackling noises, and the smell of overheated discs and linings will be clearly felt in the car's interior.
The design of the VAZ 2107 clutch mechanism
The seven uses a wet clutch mechanism. It consists of:
- directly the pedal, brought into the salon;
- master cylinder;
- pressure pipes;
- working cylinder;
- clutch fork;
- release bearing;
- clutch basket and disc.
Some car enthusiasts modify the mechanism by discarding the hydraulics and installing a dry drive. The process is justified by the greater accuracy of the modification and the absence of the need for frequent maintenance.
Signs of a slipping clutch
The driver can detect slippage as follows:
- Difficult gear shifting, a kind of crunching sound.
- The car moves poorly and begins to slip.
- When driving fast in lower gears it jerks (working jerks).
- Loss of power when climbing.
- Vibration or noise occurs.
- Pedal device failure.
Why is this happening?
To understand why the clutch slips on a VAZ 2107, you need to understand its structure and operating principle.
The entire mechanism consists of the following elements:
- crankcase;
- driven disk of the basket;
- riveted friction linings;
- diaphragm spring;
- pressure plate;
- hydraulic clutch release.
The parts are placed in a steel basket; The driven disk contains splines and damper springs that ensure smooth gear shifting.
The operating principle is based on friction between the working parts. The clutch connects the power unit and the transmission and transmits torque from the engine flywheel to the intermediate shaft of the vehicle's gearbox. When you press the pedal, the disc moves away, the connection between the motor and the gearbox is disconnected, and the rotation of the gearbox shaft stops. When the pedal is released, the flywheel and gearbox shaft are connected, and rotation is transmitted to the gearbox.
The coupling device slips for the following reasons:
- Oil leakage, liquid getting on the surface of the basket parts.
- Overheating of the drive disk. When the temperature is exceeded during use, the discs expand. This phenomenon is not noticeable on the go. It is determined during inspection of the part. Soot deposits and fumes are visible on the surface.
- Wear or delamination of friction linings. The elements not only wear out, but can also get burned. An unpleasant odor appears in the car interior.
- Damaged or worn compression spring. If there are defects, the spring is not able to create the required pressure on the disk.
- No gaps in the shutdown hydraulic drive.
- Reduced freewheel parameter.
Experts combine the reasons why this happens into 2 groups:
- The hitch does not fully engage (drive). Due to the increased distance of the pedal to the platform.
- The clutch does not fully engage (slips). The discs slip relative to each other, and the pedal stroke decreases.
How to check whether the clutch is slipping or not
To check the system yourself without special technical devices, perform the following steps:
- Turn on the engine and set it to neutral.
- Release the parking brake.
- Press the gas lever.
- Engage first gear.
- Squeeze the pedal.
- Squeezing is done several times.
When the assembly is operating correctly, the engine stalls. If the engine does not turn off, or there are extraneous sounds (clicks, creaks, knocks) and a burning smell, the clutch is considered faulty. Particular attention is paid to pedal travel. The lever should lower smoothly, without jerking or interruption.
What to do when the clutch slips
Depending on the cause of slipping, the progress of repair and restoration work is determined.
If the fault lies in the pressure spring, it must be replaced with a new one. When the friction linings are worn, the driven disk is replaced. When repairing or replacing some linings, be sure to inspect the gaskets. If they are damaged or have burnt spots, they are also replaced. If oily liquid gets on parts of the driven disk, it is necessary to treat the surface with kerosene or white spirit and clean it with fine-caliber sandpaper.
Grease may get on the surface of the flywheel and pressure plate if the fluid level in the gearbox housing increases excessively or if there is a leak in the rear crankshaft bearing. To solve the problem, carry out visual diagnostics and eliminate the cause of the leak, then clean the parts.
The car repair instructions will tell you what to do if there are no gaps in the hydraulic drive or insufficient free play of the lever.
The free stroke according to the specifications is 30-35 mm, the full stroke is 140 mm. Any deviation of the parameter is associated with a malfunction of the transmission system and requires adjustment work to change the pedal stroke and the position of the disk relative to the flywheel.
Considering the vulnerability of the clutch due to inept operation, experts recommend examining the amount of travel when undergoing maintenance. The parameter is checked using a measuring ruler. To do this, measure the distance from the pedal to the central part of the platform.
Repair work is carried out inside the car using open-end wrenches 13x17 mm and 17x19 mm. The M10 adjusting nut is screwed onto the tip. Tightening and unscrewing the element increases or decreases the distance from the pedal lever to the floor. The pusher should first be treated with a universal WD-40 aerosol to remove dried dirt. The pusher adjustment nut is turned with rotational movements to the required value, a 17 wrench is used to prevent rotation, and the control fastener is loosened with a 13 wrench.
What actions should be taken if the clutch slips?
First, let's try to extend the life of the disk. To do this, you can change the position of the disk relative to the flywheel accordingly. For this purpose, a special adjustment device is provided in the car interior or under the hood. By tightening the corresponding nuts, we can raise the pedal, thereby pressing the clutch disc harder against the flywheel. This method is recommended only for those who have not yet worn out the friction linings on the working part of the part. Therefore, it is not recommended to use it in all cases.
The most rational and correct solution is to replace the clutch, but before that, you need to get to the garage. This must be done with extreme caution. To avoid problems, you need to drive with the lowest number of revolutions. It is necessary to start moving “under load”. This means that the clutch needs to be released as smoothly as possible, but at the same time add a minimum of gas, or even not at all. Gear shifting should be performed according to the number of revolutions prescribed by the manufacturer.
Replacing the master and slave cylinders
The master cylinder is replaced in the following sequence:
- Liquid is drained from the reservoir. This can be done using an ordinary syringe, or by removing the hose from the master cylinder fitting.
- The pipe fitting leading to the clutch slave cylinder is unscrewed.
- Using a 13mm wrench, unscrew the two nuts on which the main cylinder is attached.
Replacing the working cylinder:
- The spring is removed from the working cylinder.
- Using a 10mm wrench, unscrew the tube connecting the master and slave cylinders.
- Using a 13mm wrench, unscrew the two bolts of the working cylinder and remove them together with the plate.
After replacement, the working cylinder must be bled.
Replacing the clutch yourself
When replacing the clutch, you should carefully inspect all the parts being removed; it is quite possible that you will not need to replace the entire assembly; it will be enough to change only some parts.
The clutch is replaced in the following sequence:
- The battery terminals are disconnected.
- The gear shift lever is disconnected from the transmission.
- The exhaust pipe is disconnected from the resonator, then the working cylinder is disconnected from the gearbox housing. The cardan is disconnected from the gearbox itself.
- The bolts securing the starter to the transmission housing are unscrewed, but before doing this, the two lower nuts that secure the transmission to the engine block must be loosened.
- The gearbox is removed, then the clutch basket is dismantled. After removing the basket, the clutch disc is released
- At this stage, if necessary, the master cylinder and other components are replaced, for example, the clutch fork or antennae on the basket are changed.
- Assembly and installation of the unit is carried out in the reverse order.
When assembling, all parts must be thoroughly washed, but under no circumstances should this be done in gasoline or oil. Lubrication is carried out only with brake fluid.
The clutch is one of the most important components in a car, without which it simply will not move. Therefore, this complex system requires proper attention and care. Malfunctions in the clutch operation can lead to spontaneous movement of the car, and this is a direct threat to the lives of others.
Not really
A few words about the principle of operation of the clutch. The operation of any engine in a car ends with the rotational movement of a heavy flywheel. By controlling the accelerator, you can only increase or decrease the speed of rotation of the flywheel. In order for the car to move, it is necessary to transfer this movement to a mechanical gearbox - a gearbox. It is very necessary to transmit this rotational movement, otherwise the engine will simply stall. The same operation - smooth disengagement of the transmission - is also necessary when stopping the car. The clutch is such a “soft” switch.
The operating principle of this device is easy to understand. Imagine two rotating discs the size of a small steering wheel. One of them is the engine flywheel, and the second is the clutch disc. If, while the flywheel is rotating, the disk from the gearbox is pressed tightly against it, the rotational motion will be transmitted and the car will begin to move. It seems very simple. Everything works like this, only the discs are compressed using special mechanisms, and special gaskets are installed between them.
The main faults may be poor disk compression or untimely partitioning. The clutch is said to be "driving" or "slipping."
Why and how to bleed the clutch on a VAZ 2107 in your garage
The reason for bleeding the clutch is air in the hydraulic system. Air bubbles tend to shrink, which reduces the performance of the device. It’s easy to bleed the clutch in a VAZ 2107 at home. To do this, it is enough to have a set of primitive tools and a little patience.
Motorists prefer to do their own repairs because the procedure is expensive, and performing the entire process on your own is not difficult.
Preparing to bleed the clutch system
To bleed the line and do it correctly, preparation must be done.
- Drive the car onto a viewing hole, overpass or lift, where you secure it.
- Clean the expansion tank cap and fitting from dirt. Garbage entering the system is unacceptable.
Stages of the clutch bleeding process
The procedure is performed in a certain sequence.
- The protective cap is removed from the fitting and the hose is put on it.
- The second end of the tube is lowered into a bottle with TJ previously poured into it.
- Brake fluid is also poured into the expansion tank to the maximum mark.
- Next, the assistant gets into the car and presses the pedal several times; during the last push, you should press the lever to the floor and hold it.
- After this, use wrench No. 8 to unscrew the fitting on the working cylinder and the waste with air bubbles is squeezed out into the bottle. After the pressure has dropped (the pedal has failed), the valve must be closed.
- The procedure is repeated until the air is completely removed from the system.
We fix problems
The following factors indicate that the VAZ 2107 clutch is starting to slip:
- unpleasant odor;
- the car accelerates hard;
- When climbing a mountain the engine lacks power.
In order to understand whether the VAZ 2107 clutch is slipping or not, you need to:
- tighten the handbrake;
- turn on the speed and begin to gently squeeze the gas, while at the same time releasing the clutch pedal;
- if the engine stalls, you can be sure that the clutch system is working properly;
- If the engine stalls and the car is moving, then we can say with confidence that the clutch of your car is slipping.
Replacing the disk
What to do in this case? First you need to check the VAZ 2107 clutches for ease of movement. Having identified problems, try to correct them by adjusting them. It is likely that the system is slipping due to worn-out clutches. In this case, you need to find out the degree of wear. If the wear is insignificant, then in order to eliminate slipping, it is enough to adjust the clutch travel. If the wear is significant, then it is necessary to replace the driven disk and linings. This is necessary if the distance between the working parts and the rivets is more than 0.2 millimeters.
Often, for various reasons, the linings become oily, mainly due to an increased level of lubricant in the gearbox or due to the fact that the flywheel drain holes are clogged. The way out of this situation is very simple: just wash the pads with a liquid like kerosene. Then all surfaces must be wiped and cleaned with sandpaper.
Clutch slipping can be caused by swollen rubber parts of the hydraulic drive. In order to prove or disprove this, you need to take the following steps:
- remove the cylinders, including the main one;
- clean the system with alcohol;
- replace swollen parts with new ones;
- thoroughly clean the expansion holes;
- add brake fluid;
- bleed the brakes.
In cars older than ten years, slipping often occurs due to hardening of the pressure springs, which ultimately weakens the pressure on the driven disk, which leads to difficulties with slipping. In order to determine the condition of the springs, you need to completely remove the clutch disc. If necessary, replace the springs or even the entire clutch.
Why does the clutch fail?
The clutch disc is a consumable item and sooner or later still needs to be replaced. It is impossible to repair a worn disk. The fact is that when it comes into contact with the flywheel, it begins to grind down for a while and only then the parts interlock with each other. Thus, the thickness of the clutch decreases and eventually the disc loses its function.
You can also “grind off” the clutch in a quick way. Many drivers, when starting to move, press the gas too hard and at the same moment quickly release the clutch pedal. At these moments, clutch wear increases significantly and then it will need to be replaced quite soon. Rapid disc wear is also achieved by driving quickly in low gears. At that moment, when the speed is high and the gear is selected too low, the clutch does not have time to transmit the required torque to the intermediate shaft and begins to slip. Thus, it receives additional “unnecessary” friction and wears out quickly.
Another reason is that engine oil gets on the working part of the disk. The problem is quite rare, but it also occurs. The fact is that when the rear crankshaft oil seal wears out, oil leaks to the engine flywheel. The oil remains on the clutch surface and friction is reduced, thus causing the disc to “slip.”