Modern domestically produced cars have moved away from the classics. Standard clutch adjustment of the VAZ 2114 and other vehicles of the family is performed by tightening the cable rather than by adjusting the hydraulic mechanism, which increases the reliability of the unit. This mechanism requires periodic adjustment - the steel cable tends to stretch under load, which disrupts the original characteristics.
The drive must be tightened in such cases.
- Violation of the accuracy of gear shifting - squeaks, crackles or other extraneous sounds emanating during manipulations with the gearbox.
- There is a dissonance between the increase in engine speed and the acceleration of the car. This is a clear sign that the clutch disc is slipping under load. A secondary symptom is a burning smell after sudden acceleration or dynamic acceleration.
- The pedal fails or spontaneously rises or falls relative to the reference value.
- The clutch engages early or late, which leads to the car jerking while shifting into gear.
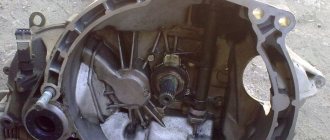
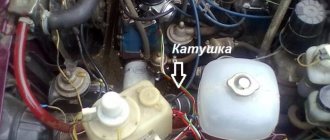
Clutch device VAZ 2114
Similar to tenth generation machines.
Mechanical traction is used here, where a steel cable is installed as a working element.
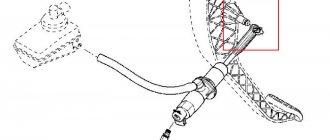
Clutch diagram
Sequence of elements in the clutch chain.
- Pedal.
- The hinge connecting the lever and the cable rod.
- Directly to the highway.
- Adjustment coupling.
- The coupling joint of the cable and the release fork.
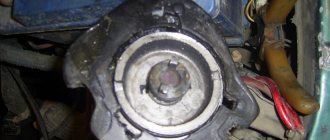
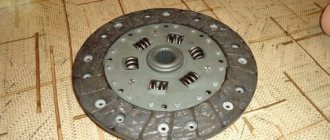
- Friction mechanism.
Briefly about the design of a friction clutch and its purpose
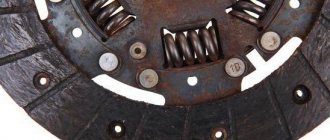
Consists of a basket, clutch disc, release bearing, friction linings.
A simple mechanism is designed to disconnect the gearbox from the engine to allow gear changes.
Clutch operating principle
Conventionally, the principle of operation can be described as follows.
- The driver presses the pedal.
- The cable is tensioned and drives the release device through the fork.
- The springs in the basket are compressed, and the driving part is disconnected from the driven part.
- The motor is disconnected from the gearbox.
Symptoms of a problem
When visiting a service station, users most often describe the following symptoms:
- presence of extraneous noise when shifting gears;
- the lever does not stick into position;
- at the start or during acceleration there are jerks and twitches;
- dynamics are lost;
- fuel consumption increases.
How to determine a breakdown?
If the pedal squeaks at the very beginning or at the end of its stroke, moves and grips poorly, or even fails completely, this indicates that there are problems in the functioning of the device.
As for the other “symptoms” of a breakdown:
- the driver has difficulty changing gears;
- the traction of the power unit has decreased, especially when driving uphill;
- new sounds appeared, grinding and creaking when pressing the pedal;
- incomplete switching;
- when the driver changes gears, the car slips.
Replacing the clutch mechanism
A complete replacement of the mechanism is required only if the friction device is critically worn or seriously damaged.
To remove the clutch you will need:
- drive the car onto a lift or inspection hole;
- remove the front left wheel, air filter and battery;
- unscrew the wires and cables coming from the gearbox;
- remove the gearbox and engine mount;
- next you will need to unscrew all visible bolts holding the box in place;
- carefully pulling out the gearbox, remove it and place it on previously prepared boards;
- On the dismantled unit, unscrew the clutch basket and all additional parts.
The new basket should be installed with a special guide, which will allow it to be secured evenly.
How to change and adjust the cable yourself?
We figured out why the pedal creaks, now let's talk about adjusting the clutch on the VAZ 2114.
Correct adjustment and tension of the clutch pedal cable on a VAZ 2114 8 valve is carried out exclusively on the working mechanism.
When there are problems in the functioning of the system, they must be eliminated. One of the most common problems is a broken cable. Therefore, if the pedal fails, then before properly adjusting and tightening the cable, it must be changed.
If you are experiencing problems with your pedal squeaking, check out the video that demonstrates the procedure for lubricating the device. Filmed by VikiNow.
Required Tools
To adjust the tension and replace the cable, you will need the following devices and tools:
- the cable itself;
- Litol lubricant;
- set of open-end wrenches;
- ruler;
- pliers.
How to replace it correctly?
To repair the cable, you need an assistant:
- Open the hood of the car and remove the bolts securing the battery terminals.
- You need to disconnect the connected cable from the pedal itself. Using a 17mm wrench, unscrew the nuts securing the bottom of the product. Then remove it from the retainer and remove it from the plug installed in the engine compartment.
- Further steps are carried out in the car interior. Move the carpet away from the driver's seat. There is carpet under the pedals, it needs to be removed. This will allow you to find the place where the cable is attached to the pedal; the clamp must be disconnected from it. There will be no problems, since this element is simply removed from the hook.
- After which the cable itself is removed from the seat. To do this, the device must be pushed away from you towards the engine compartment. When the product is difficult to push out, most likely its fastening has soured. Then lubricate the retainer with WD-40 and work it out a little, moving it in different directions. If you have an assistant, while you are developing the cable, he can pull it from the side of the engine compartment, this will speed up the procedure.
- After dismantling the product, a new one is installed. Before this, the bushing that secures the cable is removed from the clutch pedal. If its condition is poor, it is worn out, it is advisable to replace the bushing. The retainer itself is lubricated with Litol before installation.
Channel Sdelaj Sam! Pljus interesting! A video has been released showing the procedure for replacing a product with your own hands.
How to adjust free play?
After repairs, the cable is adjusted in height. If you do not adjust the stroke adjustment and adjust it, you will have difficulty changing gears. Before tensioning and adjusting the cable, it is recommended to test drive the machine. It will allow you to figure out how to properly tighten the pedal - raise or lower it.
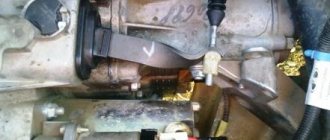
Position tension diagram:
- If the car begins to move at the end of the pedal stroke, open the hood and locate the cable attachment location. There are two nuts here that can be unscrewed with a 17mm wrench. To reduce the free play of the pedal, that is, lower it, the bolt located inside the bracket is unscrewed. The outer screw must be tightened with a wrench.
- If, when starting to move, you realized that the free play should be increased, that is, raise the pedal, then the inner screw on the metal clamp should be tightened, and the outer one should be loosened. If there is rust on the free play adjustment nuts, it must be removed using WD-40. If there is no fluid, motor oil or brake fluid is used.
- If the adjustment is successful, check the free play with a ruler. If the actions are performed correctly, its length will be from 12.5 to 13.5 cm. This distance will be directly from the pedal itself in the car to the floor.
The VikiNow channel published a video showing the process of changing the cable and further adjusting its free play.
Checking work
If everything was done correctly, then you should make sure that the task was completed correctly. To do this, you need to press the pedal all the way several times, then measure the free play again. After pressing, it may go astray. If this happens, adjust the stroke again. Ideally, the clutch should engage in the middle.
How to check whether all actions were performed correctly:
- The VAZ 2114 car is installed on a flat horizontal surface.
- The handbrake lever is activated.
- The machine engine starts, the shift lever is moved to the first gear position.
- Try to start, but don't press the pedal. When all the setup steps have been completed correctly, the machine’s engine will stall. If the car starts to move, the mechanism needs to be re-adjusted. In this case, all the steps described above are performed again.
Repair tool
You will need the following tools and accessories:
- Clutch kit - disc, release bearing, basket, bolts. It is imperative to change the driven disk. The leader (basket) is changed less often and has a much higher resource.
- A set of open-end wrenches, spanners, and sockets.
- Screwdrivers, pliers, chisels.
- Container for draining oil from the box. It will be necessary in any case, regardless of the substitution method you choose.
- Better than two jacks. The second one, when removing the box, should be installed under its crankcase to keep it at the same level and prevent it from falling.
- Supports for the car and wheel chocks.
- The presence of an overpass, pit or lift is welcome.
Having all these devices, you can begin the repair. If you have experience, then the whole procedure should take an hour or two. But if you are doing this for the first time, it will take more time.
Photo gallery
Photos of the procedure for changing the cable and adjusting the pedal position are shown below.
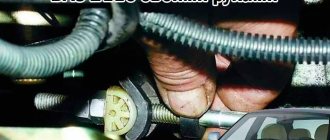
1. Unscrew the nuts securing the cable in the engine compartment
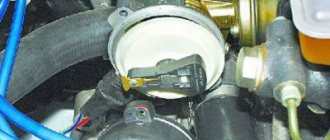
2. Disconnect the end of the product from the clamp
3. Install the new product and securely fix it in the installation location
4. Adjust the cable position
Briefly about the design of a friction clutch and its purpose
Any self-respecting motorist will study the design of the unit before adjusting the clutch on a VAZ 2114.
This will help you approach the issue wisely and avoid mistakes. The mechanical drive design is simple and reliable. Compared to hydraulics, the cable requires minimal maintenance, and changing it is not labor-intensive. The mechanical drive consists of the following elements:
- Adjustable sheathed cable.
- Control pedal.
- Clutch release fork lever.
- Bracket for fastening the end of the cable sheath.
- Brake and clutch pedal bracket.
The mechanism serves to transmit force from the pedal to the release fork, which, in turn, removes the friction disc from the flywheel. Using a cable drive avoids major problems such as fluid leaks and periodic bleeding of air from the clutch control system. The weakest link in this chain is the cable, the quality of which at times leaves much to be desired. Therefore, replacing a cable on a Samara is a fairly common occurrence.
Meanwhile, the question of how to adjust the clutch on a VAZ 2114 car remains relevant for the cable mechanism. Setting standard values guarantees optimal tightness of the driven disk to the plane of the flywheel and basket when the clutch is engaged. The design also ensures complete separation (switching off) of the above parts from the passenger compartment through the pedal.
Video “Setup Guide”
User Sergey Serge published a video that clearly demonstrated the procedure for changing the position of the pedal, indicating all the nuances of this task.
Do you have any questions? Specialists and readers of the AUTODVIG website will help you ask a question
Was this article helpful?
Thank you for your opinion!
The article was useful. Please share the information with your friends.
Yes (100.00%)
No
X
Please write what is wrong and leave recommendations on the article
Cancel reply
Rate this article: ( 7 votes, average: 4.57 out of 5)
Discuss the article: