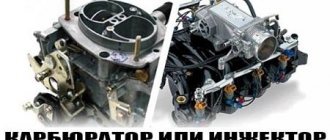
Over its 30-year history of mass production, the VAZ-2106 car has replaced several engines with a volume of 1100 to 1600 cm3. At the same time, the fuel system of these power units operated with the participation of different carburetors, and the most commonly used among them was the DAAZ 2107 “OZONE”. This unit is distinguished by the fact that it provides high efficiency in all operating modes, which is its indisputable advantage. But there are also some drawbacks, the most significant of which is low reliability. Owners of the “sixth” model often had to troubleshoot problems caused by clogged nozzles, broken springs and ruptured diaphragms. If each of the listed malfunctions occurs, the VAZ-2106 carburetor needs to be repaired and cleaned, and not necessarily in a workshop. All repair procedures can be carried out by the car owner himself - you just need to acquire a minimum set of tools and relevant information.
When should you clean your carburetor?
Before you clean the VAZ 2106 carburetor, you should study its design and become familiar with the main signs of failures that arise specifically because of this unit. After all, the car also has valves and a fuel pump; defects in them can also affect the stability of the internal combustion engine.
The main symptoms of a malfunction include:
- There is no idle, that is, the engine runs at high speeds of more than 800 rpm.
- The engine only runs when the gas pedal is pressed, and when released it stalls.
- The internal combustion engine operates unstably, jerkily, and vibrates strongly.
- The car will not start, although there is fuel in the pump and there is a spark.
- The smoke changed from white to black.
- Loud popping noises are heard during operation.
- Fuel consumption has increased (here is a summary table of fuel consumption for carburetor cars)
If any of the above is found on your car, then you should not put off repairing the VAZ 2106 carburetor until later. It is entirely possible to do it yourself; you just need to have the service manual in front of you when disassembling the unit.
All of the above symptoms may be the result of clogging and coating of its parts with soot, especially in front of the intake manifold. When contaminated with carbon deposits, the air damper may not close or open completely, which is why jerking occurs or the engine stalls.
In order to return the car to its previous performance characteristics, the carburetor must be thoroughly cleaned of carbon deposits and rinsed from small debris that got in with the fuel or through a clogged air filter; I reviewed the cleaning products here.
Good to know: There are several ways to repair a carburetor, but each of them involves a different level of maintenance, which can be performed in different situations. If the engine runs normally, but there are slight jerks, then cleaning is not necessary. Can be washed without disassembly. But if the internal combustion engine vibrates strongly and there is no idle speed at all, then repairs are required with disassembly and replacement of carburetor parts from a repair kit consisting of gaskets and jets.
Carburetor malfunctions, their causes and methods of elimination
According to the recommendations of experts, the VAZ-2106 carburetor must be subjected to maintenance at least once every 30 thousand km. mileage Thus, you will be able to promptly identify and eliminate various types of malfunctions in the form of torn diaphragms, breakdown of the accelerator pump, or incomplete opening of the second mixing chamber.
How to determine that the carburetor of a VAZ-2106 car has failed and needs to be restored? To do this, you just need to pay attention to the signs indicating this, described below:
- The presence of popping sounds when you press the gas pedal - the cause of the problem is micro-explosions of the air-fuel mixture, known as detonation. If detonation is observed in the intake manifold, one should conclude that the mixture is too lean, and popping noises in the muffler indicate too much gasoline in the combustible mixture. In both cases, the carburetor should be adjusted, although often the reason lies in a violation of the ignition timing.
- The engine is running unsteadily (the speed is floating) - if you notice this “symptom”, it means that you need to adjust the idle system.
- While driving, the engine does not pick up speed or picks up speed too slowly when you press the accelerator pedal - the presence of this problem may indicate that the drive of the second mixing chamber has failed.
- Slow, jerky increase in revolutions when upshifting and pressing the gas - if you encounter such a problem, then the accelerator pump needs repair.
You can perform carburetor cleaning and repair operations yourself.
Next, we will tell you in detail how to clean the carburetor and perform all the necessary repair operations yourself.
Types of carburetors
The technology for flushing and adjustment after repair depends on the design. Therefore, the first thing you need to do is determine which model of device is installed on your car.
Throughout the history of the existence and production of the VAZ 2106 and VAZ 2107, 3 types of carburetors were used:
| Carburetor photo | Name and description |
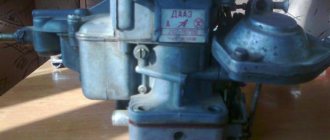
| DAAZ Weber - Dimitrovgrad plant produced a carburetor under license from Weber. They provided high speed, but consumed too much fuel. More than 10 per 100 km. | |
| DAAZ model “Ozone” is a second generation carburetor. It is more economical, environmentally friendly, but also complex in design, as it is equipped with a second combustion chamber. It uses a pneumatic valve, which can block the operation of the unit if it is dirty or incorrectly adjusted. Provided consumption of less than 10 liters per 100 km. | |
| DAAZ is the third modification of 21053. The device was produced under a Solex license. It is even more complex in design, since in addition to the second camera it also has feedback, which made it even more economical. But they were capricious about the quality of the fuel, because of which the jets quickly became clogged. |
Good to know: Regardless of the model, the carburetors used on the VAZ 2106 are two-chamber and consist of 3 main parts: the device cover (protects the fuel fittings from dirt), the housing (it contains chambers, diffusers, from which the mixture is transferred to the engine), lower part (the float chamber and throttle valves are located).
It is the small parts of the carburetor that play a very important role. Thanks to them, fuel enters the cylinders in certain proportions and is correctly mixed with air to form a high-quality fuel mixture.
But during operation, due to contamination with small particles or dirt, especially with regard to the accelerator pump and jets, the operating modes of the carburetor are disrupted, which leads to malfunctions and failures when pressing the gas or “sneezing” of the carburetor. Flushing consists of removing dirt from all channels and jets, thereby ensuring their stable operation.
How is a carburetor repaired and flushed?
Many problems can be eliminated by flushing the carburetor, but for it to be effective, the unit must be removed from the car. After which you will need to disassemble it to the required level so that you can gain access to absolutely all elements of the mechanism.
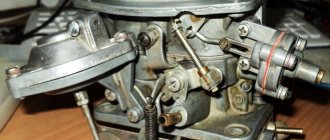
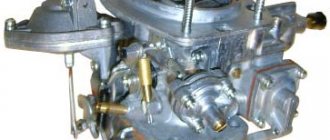
Parts of the carburetor body 2107-1107010 in the diagram: 1 - rod of the pneumatic drive of the second throttle valve; 2 — pneumatic drive housing; 3 - diaphragm; 4 — pneumatic drive cover; 5 — fuel jet of the transition system of the second chamber; 6 — fuel nozzle body; 7 — small diffuser of the second chamber; 8 — accelerator pump nozzle; 9 — screw valve of the accelerator pump; 10 — main air jet of the second chamber; 11 — emulsion tube of the second chamber; 12 — main air jet of the first chamber; 13 — emulsion tube of the first chamber; 14 — main fuel jet of the second chamber; 15 — main fuel jet of the first chamber; 16 — accelerator pump adjusting screw; 17 — fuel jet of the idle system; 18 — fuel nozzle body; 19 — return spring of the accelerator pump; 20 — accelerator pump diaphragm; 21 — accelerator pump cover; 22 — small diffuser of the first chamber; 23 — lever return spring; 24 — three-arm air damper control lever; 25 — connection rod with the throttle valve; 26 — throttle valve return spring bracket
Repair consists of the following steps:
- Dismantling the device.
- Flushing, which includes cleaning and purging of carbon deposits and adhering dirt.
- Replacement of faulty parts.
Important: You need to remove the carburetor if you are 100% sure that the problem is in the carburetor, because the problem in other components of the car’s fuel system is also possible.
Where does carburetor repair on a VAZ 2106 car begin?
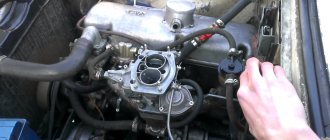
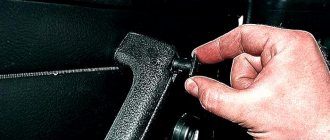
Do-it-yourself repair of a VAZ 2106 carburetor begins with its removal. To do this, you will need to remove the air filter, which will still have to be replaced with a new one, and dismantle its housing.
It is recommended to first seal the openings in the chambers with rags to prevent small objects from getting into them. After this, the hose going to the brake vacuum is removed from the pneumatic valve, the choke installation cable is unscrewed and the rod is removed from the gas pedal lever that controls the throttle valve.
If you have the latest Solex carburetor, then the wires from the throttle valve, air damper and economizer are disconnected, providing forced idle.
Next, remove the fuel supply and return hoses and the ventilation pipe. After disconnecting all suitable and supply elements, you can begin to remove the block itself. To do this, you need to unscrew the 4 fastening nuts and carefully remove the device from the studs. It is highly recommended to plug the hole in the collector with a soft rag.
Step-by-step instructions for removing the carburetor
For your convenience, I have compiled detailed step-by-step instructions for removing the carburetor from the photo:
Important to remember: Be sure to replace the gasket under the carburetor with a new one. To avoid air leaks.
What is included in the repair kit for carburetor VAZ 2106, 21061, 2121
Spare parts included in the carburetor repair kit for the VAZ 2106:
- Trigger diaphragm
- Jet body
- Idle jet - 2 pcs.
- Main air jet - 2 pcs.
- Main fuel jet - 2 pcs.
- Needle valve assembly
- Accelerator pump diaphragm
- Filter element
- Carburetor cover gasket
- Starter gasket
- Return spring
- Accelerator pump diaphragm spring
- Idle speed screw (adjustment needle)
- Ring sealing
- For R/K 2105-10, 2105-20, 2106, 2107-10, 2107-20:
- Acceleration pump nozzle
- Spray Valve
- Sprayer gasket - 2 pcs.
- Screw M5x0.8x20
- Screw M4x0.7x15
Carburetor malfunctions
These include:
- the presence of interruptions during operation of the power unit, both at idle and when accelerating the vehicle;
- uneven increase in vehicle dynamics;
- “ragged” operation of the gasoline engine and loss of power parameters.
The above points can be directly related to contamination of this product, so the question arises of how to clean the VAZ 2106 carburetor if the ignition system has been tested before.
The basis of preventive maintenance on the carburetor is that there is no need to dismantle the product if the carburetor needs to be cleaned, despite the fact that there is no need to replace it with a new spare part. After all, the main lines can be processed with the upper part of the device dismantled.
Work progress:
- Unscrew the top part of the air filter housing. At the same time, we record the condition of the housing for the presence of oil smudges and the level of clogging of the replacement filter. If the housing has heavy oil leaks, this indicates an excessive presence of gases entering the crankcase of the vehicle's power plant, which indicates the extreme degree of wear of the piston rings. A clogged replacement element indicates low carbon monoxide emissions at idle, which leads to uneven operation of the engine, both when starting to move and when the vehicle speed changes.
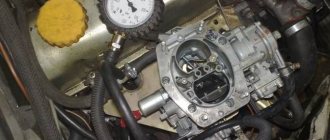
- We disconnect the spring rod of the starting device and, by unscrewing 5 screws, dismantle the upper part of the product. We inspect the fuel level in the float chamber. If the level is higher than normal, it is necessary to test the degree of tightness (blocking of the channel) of the valve needle. If not, then it needs to be replaced. We adjust the level by bending the float tongue.
- We use a blower to pump gasoline out of the product’s chamber and blow out all the jets and lines with compressed air.
A more complete cleaning of the VAZ carburetor of the sixth model is carried out by dismantling the device and completely disassembling the product. You need to do the following:
- Remove the part and place it on a clean rag.
- After disassembling the product, you need to remove all rubber and plastic products. Place the remaining parts of the product in a tank with acetone for 2-3 hours.
- After the specified period, we take out the carburetor parts and blow through the components of the product with a compressor.
- It is not recommended to clean jets and small channel holes with wire, as this may disrupt the calibration of the jets and the diameter of the special holes. In the future they will have to be replaced, because they are not subject to adjustment.
- Next, you need to test the condition of all rubber and plastic products, incl. gaskets for defects and maintaining integrity and elasticity. When parked for a long time, all rubber and plastic products are deformed and lose their physical and mechanical properties.
After cleaning the VAZ 2106 carburetor, you need to assemble it and install it on the power plant, after which you need to adjust the required idle speed level.
The carburetor is an important component of a car engine. The operation of all engine components depends on its settings, for example, fuel consumption, stable engine operation.
Malfunctions such as “the engine does not start” or does not start well, a very lean or rich mixture indicates that the problem is in the carburetor itself. It is best to try to fix the problem without removing it, but if this is not possible or it needs cleaning, then the following tips will help you.
How to clean a VAZ 2106 carburetor without removing it
The first cleaning method is to do it without disassembling the mechanism. The fact is that not every car enthusiast is able to disassemble and reassemble the unit. A special technique was developed for its washing. For this purpose, a special aerosol product in cans is used. Common cleaners include “ABRO”, “Mannol”, here I made an overview table of carburetor cleaners, perhaps it will be useful to you when choosing.
To clean, you will need to perform the following steps sequentially:
- Warm up the engine and turn it off.
- Remove the filter and its housing.
- To effectively flush, remove the solenoid valve by unscrewing it from the housing.
- Special nozzles are sold with the cans, which effectively distribute a powerful stream of product. All visible parts are treated with the substance.
- Afterwards, process the external parts of the device.
- Next, you need to wait from 5 to 8 minutes, which depends on the manufacturer. During this time, the product dissolves carbon deposits, after which it is easily washed out with gasoline and the dirt burns in the cylinders along with the fuel.
Cleaning a VAZ 2106 carburetor is usually accompanied by replacing the gasket, which is located between the carburetor body and the manifold. The manufacturer produced several types of gaskets made of paronite, metal and heat-resistant special cardboard. If you are not sure about modifying your carburetor, then take it to the market with a real material example.
To replace the gasket, the seating area should be thoroughly cleaned of dirt and wiped with a rag. Lay the new one in the same way as the old one was laid, install the mechanism on it and tighten the fastening nuts.
How to clean the carburetor on a VAZ 2106 using a solvent
One of the most accessible ways to flush the carburetor on a VAZ 2106 is to flush the carburetor with a solvent. The washing process is clearly shown in this video:
How to quickly blow out a carburetor with your own hands
If you do not have a compressor or any other specialized equipment for purging, you will need a regular car compressor, which can be bought in a store for pennies. How to blow through a carburetor on a VAZ 2106 with a car compressor in this video:
Carburetor repair on a VAZ-2106 car
A procedure such as repairing a VAZ-2106 carburetor does not require any professional skills and consists of dismantling, disassembling and cleaning it. And also, if necessary, replacement of failed and worn-out components and consumables is carried out. But first, you should dismantle it and purchase a repair kit in advance, which includes all the parts potentially required for replacement.
Below we will look at how to remove the VAZ-2106 carburetor, clean it and continue repair work. The procedure for removing the carburetor is as follows:
- Unscrew the three nuts on the air filter housing to remove the air filter cover.
- After this, you will have access to four more nuts, by unscrewing which you will be able to dismantle the air filter itself.
- Then disconnect all hoses, rods and wires that are connected to the carburetor.
- At the final stage of dismantling, unscrew the four nuts that secure the unit itself. This will allow it to be removed from the intake manifold.
To remove the unit, you will need to dismantle the air filter.
This ends the removal process and the next stage begins, but first we recommend covering the manifold hole with a clean rag to prevent foreign objects and dust from getting into it.
During the disassembly process, conduct an external inspection of all functional elements of the carburetor and, if necessary, replace them using new parts from a pre-purchased repair kit. Often, car enthusiasts dismantle and want to know how to clean the VAZ-2106 carburetor, solely for preventive purposes. If you had to resort to disassembly due to characteristic disturbances in engine operation, then you should pay special attention to the condition of the corresponding carburetor systems. For example, if acceleration problems occur, the accelerator pump is most likely faulty and its elements need to be closely inspected for wear and damage. At the same time, it would be a good idea to go through and wash the remaining parts of the carburetor.
If you encounter one of the malfunctions described above or intend to carry out regular engine maintenance yourself, but do not know how to flush the VAZ-2106 carburetor, use the instructions below:
- Lift the lower part of the telescopic rod up and disconnect it from the lever.
- Unscrew the screws securing the carburetor cover and, being careful, remove this part.
- When examining the central part of the unit, you will notice jets (yellow screws with holes) - they should be unscrewed with a screwdriver and placed in a container with acetone for about an hour.
- After the above time has passed, using a thin wire, remove contaminants from the nozzle holes, if necessary. And experts also recommend using compressed air to completely remove small particles of dirt both from the jets themselves and from the remaining fuel channels of the carburetor.
It’s hardly worth going into detail about how to blow out a VAZ-2106 carburetor. In specialized workshops, compressed air from a compressor is used for this. If you do not have such equipment, you can use a hand pump as an alternative.
After you have replaced worn and damaged parts, cleaned and purged the fuel holes, you can begin assembling and installing the carburetor. This process is performed in the reverse order of removal. Upon completion of the repair work, idle adjustment will be required, but this is a topic for another article.
Timely cleaning of the VAZ 2106 carburetor allows you to avoid many unpleasant moments in the operation of the vehicle, which ultimately lead to breakdowns.
Carburetor settings
After flushing and disassembling the VAZ 2106 carburetor, you will need to adjust the engine performance characteristics.
There are several points for this:
- Float mechanism tongue - when the float stroke is less than 8 mm, consumption and toxicity increase, power decreases.
- Quality screw – allows you to adjust the amount of incoming air to prepare the mixture.
- Quantity screw – adjusts the amount of the finished mixture.
These two screws adjust the idle speed according to the manual. But initially they are both screwed all the way and unscrewed 3 turns.
To adjust the thrust, you will need to set the thrust; there should be a distance of 80 mm between the guides. With these settings, the throttle should open fully when the gas pedal is pressed to the floor. If this does not happen, then the throttle assembly must be cleaned.