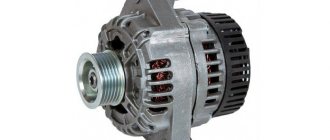
Generator type 94.3701 alternating current, three-phase, with built-in rectifier unit and electronic voltage regulator, right-hand rotation (drive side)
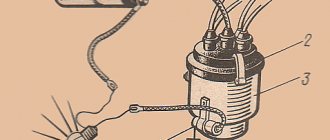
The generator connection diagram is shown in Figure 1
The voltage to excite the generator when the ignition is turned on is supplied to terminal “D+” of the regulator (terminal “D” of the generator) through indicator lamp 4 located in the instrument cluster.
After starting the engine, the excitation winding is powered by three additional diodes installed on the generator rectifier block. The “W” terminal of the generator is not used on vehicles of the VAZ-2115 family.
The operation of the generator is controlled by a warning lamp in the instrument cluster.
When the ignition is turned on, the lamp should be on, and after starting the engine, it should go out if the generator is working.
A brightly burning lamp or glowing at full intensity indicates a malfunction.
The “minus” of the battery should always be connected to ground, and the “plus” should always be connected to the “B+” terminal of the generator.
Failure to turn the battery back on will immediately cause increased current through the generator valves and damage them.
It is not allowed to operate the generator with the battery disconnected. This will cause short-term overvoltages to occur at the “B+” terminal of the generator, which can damage the generator voltage regulator and electronic devices in the vehicle’s on-board network.
It is prohibited to check the functionality of the generator “for spark” even by briefly connecting the “B+” terminal of the generator to ground. In this case, significant current flows through the valves and they are damaged.
The generator can only be checked using an ammeter and voltmeter.
The generator valves are not allowed to be checked with a voltage of more than 12 V or with a megger, since it has a voltage too high for the valves, and they will be broken during testing (a short circuit will occur).
It is prohibited to check the vehicle's electrical wiring with a megger or a lamp powered by a voltage of more than 12 V. If such a check is necessary, you must first disconnect the wires from the generator.
The insulation resistance of the generator stator winding with increased voltage should be checked only on a stand and always with the terminals of the phase windings disconnected from the valves.
When electrically welding components and parts of the car body, you should disconnect the wires from all terminals of the generator and battery.
Reasons for generator failure
Without specialized equipment, it is not always possible to determine the exact cause of a unit failure. But most often the problem is caused by:
- Bearing jamming . Due to drying out of the lubricant and gradual wear, the bearings jam. First, the belt usually breaks, which necessitates rebuilding the assembly.
- Winding burnout . Most often, the winding burns out due to the penetration of chemicals and salts used to sprinkle the road in winter.
- Brush wear . Graphite brushes wear out gradually, so they need to be replaced periodically. If they are not replaced in time, the unit may fail completely.
- Relay malfunction . The device is designed to prevent battery overcharging. If it malfunctions, the generator does not start.
To prevent breakdowns, scheduled vehicle maintenance should be carried out in a timely manner.
Why is the battery not charging?
Before writing about the main reasons why the battery may not charge on VAZ 2109-2108 cars, I would like to warn all readers that the list I have given is not complete and is compiled only based on personal operating experience. So, during my short 10 years of driving experience, I had to operate a lot of cars and there were quite a lot of problems with charging the battery, and I will try to write about the main ones here.
It's no secret that the main device that is responsible for the normal operation of electrical appliances in a car is the generator. It is precisely because of the failure of some of its parts that charging may disappear completely or become weak. The main malfunctions of the generator, which entail a decrease in the charge current to the battery:
- Wear of generator brushes. This is a very common and most common reason. If they are worn down to the minimum permissible height, then the charge may disappear gradually, and then disappear altogether. To solve this problem, you just need to replace the brushes with new ones and that’s it.
- Failure of the diode bridge. The most reliable diode bridges are usually installed on VAZ 2109-2108 cars from the factory. And they are the ones who travel the most kilometers! This has already been tested not only by me, and any experienced auto electrician will confirm this. If one of the diodes or the entire rectifier unit burns out, then it also needs to be replaced. The procedure is not very fast and pleasant, but it will not cause much difficulty. Just below I’ll put a link to a page that describes the entire generator repair process.
- A more complex generator breakdown, such as a break in the rotor or stator winding. Of course, this is rare, but it still happens sometimes. The cost of these spare parts is quite low, so it is better to buy new ones and install the burned ones together than to buy a new generator.
- Poor charging may be due to slipping of the alternator belt. This becomes especially noticeable in damp or rainy weather, or when water gets on the belt. It begins to whistle, causing it to slip on the pulley, thereby preventing the generator from gaining sufficient speed to optimally charge the battery.
If you have problems with your car that are described above, then you can read all the maintenance procedures here: Repairing a generator on a VAZ 2109-2108 with your own hands. Everything is described there in quite detail and even for beginners the information will be very useful, and understanding it will not be difficult.
Check Features
When checking the generator of a VAZ 2110, 2107 and others for serviceability, the following conditions must be met:
- An accurate multimeter should be used for diagnosis.
- The normal voltage is 12 V.
- If it is necessary to replace the wiring, you must use wires with the same cross-section as the original.
- Before checking, you should check that all fasteners are connected correctly and the belt tension is correct. If necessary, the connections should be adjusted to normal, the belt should be loosened or tightened.
During the verification process it is prohibited:
- short circuit the wires;
- connect terminals that differ in purpose and parameters, connect terminal 30 or B+ to ground;
- diagnose a generator without connected consumers.
Reasons for replacement
Replacing generator brushes VAZ 2109
Generator brushes need to be changed in the following cases:
- They have worn out so much that they have ceased to perform their main function - to maintain battery charge.
- The battery drains quickly.
Note: there are many reasons why the battery discharges quickly. Therefore, this does not always signal bad brushes. But just in case, it is better to check them, since perhaps the reason is hidden precisely in them.
Diagnostics of the VAZ generator without removal and special tools
This is not the most reliable and reliable method, but it allows you to determine whether the generator is functioning or there are malfunctions. The use of any specialized tools, including a multimeter, is not required. There is no need to remove the generator.
To diagnose, start the engine and turn on the low beams. In operating condition, the negative terminal must be disconnected from the engine. The uniform light of the headlights and the stability of the engine stroke indicate normal operation of the generator. If malfunctions are observed or the brightness of the light changes, the VAZ generator is probably faulty; in-depth diagnostics need to be carried out.
Typical malfunctions and methods for their elimination
To prevent unit failure, it is necessary to ensure its high-quality and timely maintenance. As you can see from the photo of the diagram, the unit consists of many different components, so the likelihood of it breaking due to improper maintenance is quite high.
So, in what cases is a VAZ generator repaired:
- The indicator light on the dashboard does not turn on, although the unit and all equipment are working normally. Most likely, the problem is an open circuit or burnout of the indicator itself. In some cases, the reason is poor contact of the diode with the wiring; in this case, you only need to clean the contacts of the connection connector.
- The indicator on the tidy, as well as the instruments themselves on the control panel do not work. Apparently, the reason for this is the failure of the safety element, which will need to be replaced. Also, the reason may be a break or unsoldering of the wiring.
- The warning light comes on after the engine starts, but it disappears after the driver presses the gas. The essence of the problem lies in the fact that the generator unit is not excited at low engine speeds; in most cases, this is due to the desoldering of the resistor elements in the block. Conduct their diagnostics and, if necessary, solder them again.
- Another malfunction is that the indicator continues to light when the engine is turned on, while the voltmeter needle on the dashboard is in the red zone. In this case, there may be several reasons for the problem. First of all, it could be the strap slipping - you need to check it and, if necessary, tighten it. Also, the reason may be a short circuit or breakdown in the diode elements of the winding; much less often, a malfunction occurs when the voltage regulator fails.
- Another sign is that the indicator does not light up when the engine is running, but the voltmeter needle on the dashboard is in the red zone. In this case, you first need to diagnose the presence of contact between the regulator connector and the brushes. If the contact is normal, then check the brushes (they may freeze), as well as the slip rings; for the latter, the problem of oxidation is relevant. In addition, the cause of the problem may lie in the failure of the voltage regulator; usually we are talking about a break in the wiring between the contact and ground. The same symptoms appear in the event of a short circuit on the positive valves of the rectifier element.
- When the engine is running, the voltmeter needle is located in the red zone - this symptom indicates damage to the voltage regulator. In particular, we are talking about a short circuit that can occur between ground and also contact Ш. The problem can only be solved by replacing the regulator.
- If the unit is significantly louder than usual, there may be several reasons for this. First, you should check the functionality of the bearing elements, as well as the tightness of the pulley nut. In some cases, the loud operation of the unit is due to the creaking of the brushes. The brushes themselves may be of poor quality, but it is possible that the problem is dust getting on the slip rings.
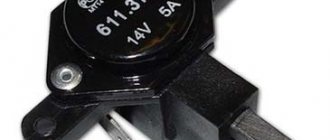
Voltage Regulator Diagnostics
To check the voltage regulator on a VAZ 2114, 2106 car, you should perform the following steps:
- Start and warm up the engine by turning on the headlights. Warm up the engine for about 15 minutes. For diagnostics, a multimeter or voltmeter capable of taking measurements in the voltage range 0-15 V is used.
- Measure the voltage between ground and terminal 30. For most cars in normal condition, the reading will be within 13.5-14.6 V. A value less than 13 V means the unit needs to be replaced.
Checking the generator on the car
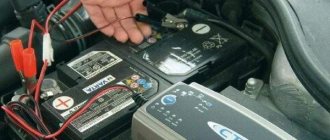
Measure the voltage at the terminals of the battery (battery). It must be within the specified range, typically 13.2 to 14.5 V. However, these limits may vary on modern vehicles. If there is an instruction manual, you can read it. Any deviation from the set values in any direction indicates a malfunction. These deviations can be of three types:
There is no charging current - the generator does not work.
- The charging current is present, but below the minimum value - the battery is not charging properly.
- The voltage is above the maximum value - the battery is overcharged.
- All three cases indicate a problem with the vehicle's electrical system.
But before that, make a visual inspection of all the wires and cables going from the generator to the battery. There should be no visible damage, breaks or oxidation on the electrical wires. Be sure to check the battery, starter and alternator terminals. They must be clean and dry. Any oxidation, rust and dirt should be removed. This often helps to restore the lost contact and the car begins to work properly. If this does not help, proceed with a detailed inspection.
It is better to remove the generator from the car for further inspection. First, remove the voltage regulator from the alternator and test it. To check the voltage regulator you will need a multimeter and a rectifier with a voltage regulator. It is better to use a power adapter instead of a charger. Voltage adjustment from 0 to 16 V is quite sufficient.
Using a Multimeter
Connect the positive end of the power supply to the regulator - usually a male connector. Connect the negative wire to the negative terminal, which usually ends with the relay mounting lug. Connect the red test lead to the positive lead of the power supply and the black lead to the negative lead. Connect two bare wires to the brushes, one for each brush. Connect the bulb to the other cleaned end (this can be removed from the car's taillights while you check). The test bench is ready.
Plug in the power adapter and carefully turn the knob to increase the voltage. At the same time, observe the readings of the multimeter. The bulb should be off at first, but as the voltage increases it should glow at first half a volt and then gradually brighter as the voltage increases.
Continuity of the relay regulator
When 14.5 V is reached, the regulator should operate, turning off the voltage. After this, the light should go out. Typically, the regulator is assumed to be working if it cuts current between 14.2 and 14.8 V. If this occurs at a lower or higher value, the voltage regulator is faulty. Also the relay is faulty unless there is a power outage.
If the relay is damaged, it must be replaced with a new one. If everything is ok, keep checking.
The alternator diode bridge can be tested using a multimeter, but you can also use the stand that was used to test the regulator.
Checking the return current
Diagnostics is carried out with the engine running at high speeds. It is necessary to measure the current consumed by the vehicle components. The probe is pressed against the wire from terminal 30 or B+.
It is necessary to turn on the electrical appliances of the car one by one and record the indicators. The resulting values should be summed. Then you need to turn on all the devices and measure the current indicator. The resulting indicator should be compared with the summed value of previous measurements. The final value should be approximately 5 A below the summed value. A higher value confirms that the node is faulty.
How to check the generator?
To check the functionality of the unit in your car, you need to follow these steps:
- Using a voltmeter, diagnose the voltage at the battery terminals. When the engine is running and the generator unit is operating normally, this parameter should be around 13.8-14.5 volts.
- Try placing your palm on the unit body with the engine running, you need to feel the vibration. If there is vibration, you will notice it immediately. Moreover, it may be due to wear of bearing parts.
- It is also necessary to diagnose the tension of the device strap, while the motor must be turned off. Press the strap with your finger - the deflection should be no more than 1.5 cm (video author - Vyacheslav Lyakhov).
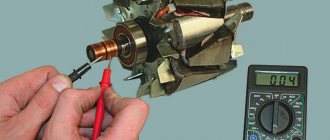
Checking the windings
First you need to visually inspect the windings. If there are no visible defects, you should use a multimeter. First you need to do the following:
- Remove the brush holder.
- Disconnect the voltage regulator.
- Clean the slip rings.
- Diagnose the winding for defects.
The resistance measurement function on the multimeter should be activated. The measurement is taken between the slip rings and the stator. In normal mode, the value will be from 5 to 10 ohms.
The practical part is removing the generator, disassembling it, repairing it and reinstalling it.
Due to the fact that the generator is located under the hood of the car, it is necessary to turn off the engine, turn the steering wheel to the right all the way and open the hood. The electric generator on VAZ 2108 - 15 cars is installed in front of the engine, in the lower left corner of the engine compartment, between the engine and the cooling radiator.
Before dismantling the generator, it is necessary to disconnect the ground from the battery, i.e. negative contact.
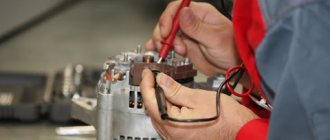
Replacing VAZ generator brushes
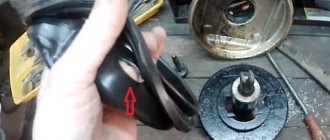
Before removing the generator itself, in order not to do unnecessary work, we remove the charging relay from the generator housing and check the production of the generator brushes.
The charging relay is installed in the rear of the generator housing, and is attached to it with two bolts. To unscrew them you will need a Phillips screwdriver. When unscrewing the bolts, be careful not to drop them on the crankcase guard, otherwise getting them out of there will be one big problem. To remove the relay, you need to disconnect the wire, the “female” contact. After removing the charging relay and visually inspecting the brushes, we decide to purchase a new generator voltage regulator relay or reinstall the dismantled one, depending on the wear of the brushes. For their normal operation, a brush length of at least 4 cm is required. Now we proceed directly to removing the electric generator from the engine.
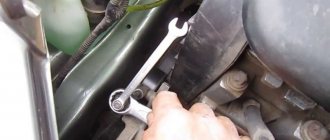
- We disconnect the wires from the generator - as a rule, they are red and consist of two groups of wires, red. One group consists of two wires and is attached with a nut to a bolt on the rear wall of the generator. The other group consists of one wire and is connected to the generator terminal via a male-female contact, also on the rear wall of the generator.
- To remove the generator from the engine, you need to unscrew two nuts and one bolt in the following sequence: unscrew the nut attached to the generator belt tensioner bar (at the top of the generator), unscrew the bolt securing the tensioner bar to the engine block and remove it. The last step is to unscrew the nut from the bolt securing the generator bracket to the engine block.
- The generator mounting bracket is located at the bottom of the engine block, directly below the generator. After unscrewing this nut, you need to remove the generator belt from the generator pulley itself.
- The generator mounting bolt should be pushed to the left, out of the bracket, until it stops against the body shell or the generator’s mud protection.
- On the right wheel side, you need to unscrew the two screws that secure the dust protection of the generator to the car body.
- If the generator mounting bolt still rests against any body parts, you should press on the engine with one hand, and at the same time pull out the bolt with the other hand.
Diagnostics of a removed generator
To check the generator removed from the VAZ 21, you should use a multimeter in ohmmeter mode. The probes are pressed against terminal 30 and the body of the unit. If there are contaminants and strong oxides on the case, they should be removed first, as they can affect the readings of the device.
You need to measure the resistance of each generator unit in turn. Parts that do not have the required resistance have become unusable. Most of them can be replaced at home using a minimal set of tools. To replace, you need to buy the same parts as those originally installed in the generator.
Didn't find the information you are looking for? on our forum.
Generator 2109: device and features
Let's start with the fact that alternating current generators are installed on the VAZ 2109: series -37.3701 (design using a V-belt drive) and series - 94.3701 (design using a poly-V-belt drive).
Let's take a closer look at the connection diagrams, methods of diagnosing and repairing the generator device on the VAZ 2109 (design features of automobile generators: series 37.3701 and 94.3701).
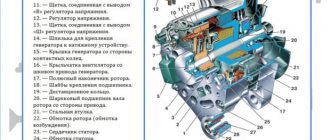
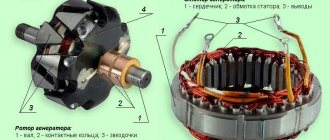
So, the generator is located in the front part and is mounted almost on the internal combustion engine of the car. Generators come in two types: traditional and compact. The main components of the generator on the VAZ 2109:
- frame;
- rotor;
- stator;
- brush assembly (VAZ generator brushes);
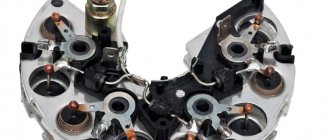
- rectifier block;
- voltage regulator.
The design of the generator series 37.3701 consists of more than 20 elements:
- bushing, clamping and buffer fittings;
- back cover of the unit, bolt fixing the rectifier device, rectifier unit with valve;
- capacitor component;
- pulley and rear bearing of the rotor shaft;
- impeller, shaft, brush connected to the output on the control mechanism, thrust ring;
- contacts for connecting electricity consumers;
- stator mechanism, rotor winding, etc.
Currently reading: DIY interior dry cleaning: what you need to know
Jul 4, 2021
Choice of car acoustics 2022: 16 cm speakers
Jul 4, 2021
A more complex design of the 94.3701 series generator, consisting of more than 30 elements, including:
- capacitor device, protective casing of the device;
- contact B+ and the common contact of additional diode elements with connection on the control device to output D+;
- fixing device for positive diodes of the rectifying mechanism and fixing for negative diode elements;
- shaft, coupling bolt, washers (regular, conical);
- bushing, brush assembly holder, etc.
In fact, the resource of the generator type 37.3701 is about 120 thousand kilometers; the generator 94.3701 has a slightly longer resource due to the slip rings (they are smaller in diameter).
The generator connection diagram will depend on its type. In general, the technical characteristics of generators for the VAZ 2109 are as follows:
- at a rated voltage of 14V, the highest output current for generators 37.3701 is 55A, for generators 94.3701 it is 80A;
- voltage is adjustable: 13.6-14.3V (37.3701) and 13.2-14.7V (94.3701);
- gear ratio – 1:2.04 (37.3701) and 1;2.4 (94.3701).
If we consider a generator, the general circuit includes the following elements:
- alternating current generator for VAZ 2109;
- negative and positive diode;
- car dashboard and warning light for generator and battery discharge;
- voltmeter device;
- fuse box installed in the engine compartment, under the windshield on the driver's side;
- additional resistor elements built into the fuse mounting block;
- vehicle ignition switch and relay;
- capacitor device, winding and car battery;
- generator voltage regulator relay installed in the engine compartment.
As for how to connect the VAZ 2109 generator, it will depend on the device model:
- generator model 37.370 - when you turn the ignition key, voltage is connected through the control light on the instrument panel and resistors. When the internal combustion engine is running, the voltage is supplied to the excitation winding of the valves on the rectifier block (the main voltage is supplied to the output of the regulator, the current does not pass through the control lamp and it does not light up)
- generator model 94.3701 - the connection circuit is similar to the previous one (after turning on the ignition, voltage is supplied to the regulator output through the control light).
Please note that the device works properly if the lamp lights up when you turn the key in the ignition switch, and then goes out after starting the engine. If the lamp does not go out immediately, but with some delay, this means that the generator is faulty