Replacing axle bearings
Hi all!
In principle, everything is clear from the title of the post) I’m preparing for winter and slowly finalizing it. But more on that another time. In the meantime, on to the subject. It’s not that the axle bearings are bothered or there are serious leaks, it’s just that an inner voice said that it was time to replace them. Moreover, with such a mileage. The following were purchased: - axle bearing VBF 2101-2403080, 2 pcs; — axle shaft seal 2101-2401034, 2 pcs; — axle shaft sealing ring 2101-2401065, 2 pcs; — axle shaft locking ring 2101-2403084, 2 pcs; — gear oil Shell SPIRAX S5 75W90, 2 l. It was possible to simply buy assembled axle shafts, but this is not our method. Having secured the car, I drained the oil from the axle housing. Next, after jacking up one side (I started on the right side, it doesn’t matter), I removed the wheel and drum. If the drum for some reason (unless, of course, it is a tightened handbrake and the guides are unscrewed)) does not want to be removed, you can use the old-fashioned method: start the engine, switch to first or reverse gear and slightly “slip” (i.e. spin the hanging wheel ), we slow down. The drum should move. If not, repeat the procedure. The main thing is not to overdo it. Otherwise, there is a risk of the drum flying out. And yet, this method may not work if there is a self-block in the rear axle. If the drum is not too stuck, you can simply screw in the disk guides. But there is no fanaticism here. Otherwise the drum may burst. So, the drum is removed, let's continue. We remove the axle shaft itself. To do this, you need to unscrew four nuts (socket wrench size 17) through special holes.
Unscrew and tighten during assembly, preferably crosswise and gradually. Those. First we loosen it, and then we unscrew it completely. We take out the axle shaft. If the axle shaft does not want to come out, and there is no reverse hammer (such a device) at hand, then we screw the wheel (or disk) with a gap of two or three turns, with the outer side inward. The shortfall when tightening the bolts is needed to create a shock jerk, let's call it that) And we pull. It is advisable to clear the space behind your back in advance))
So, the axle shaft is removed, you need to replace the bearing and retaining ring.
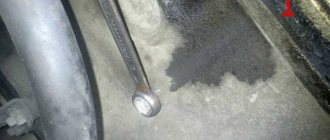
I didn’t stand on ceremony with them, I cut them off with a small grinder.
You shouldn’t cut too much or deeply, otherwise you can damage the axle shaft itself. The bearing also cracks from a light blow with a hammer. You should also be careful here, there is a risk of fragments flying away. Next, we wipe everything thoroughly. At the same time, we clean the drain hole (marked in the figure below) of the oil deflector (2101-2403072) if it is clogged.
We install a new bearing. There are several ways. Someone is knocking on the bearing, which in my opinion is wrong, someone is knocking on the inner ring of the same bearing through a pipe. I did it a little differently. I selected a pipe according to the diameter of the inner ring of the bearing and the length of the axle shaft. Then I put the bearing on the axle shaft and inserted the axle shaft into the pipe. The free end of the pipe rested against a fence post, and on the other side of the axle shaft, a screw jack was inserted and the jack rested against another post of the same fence. And he slowly pressed it in. Unfortunately, I didn’t take a photo; the axle shaft kept trying to fall off. In principle, it seems clear. Then you need to install the locking ring. But you can’t just dress him, you need to put him on the “hot” seat. But if the cold ring is put on without resistance, there is a reason to buy a new axle shaft. You need to heat the ring to about 200°C, until it turns dark red (or burgundy, depending on your preference) color, when ash begins to form on the ring. My blowtorch successfully died, so I used a gas stove.
Next you need to act quickly, otherwise the ring will cool down and get stuck. We rush outside and put the red-hot ring on the axle shaft. If, however, the ring does not reach the bearing, we quickly “help” it with the same pipe. And immediately after installation, cool the ring with oil (I used the same oil drained from the bridge), otherwise the plastic oil deflector on the bearing will melt. Actually, that's it with the axle shaft, let's return to the bridge. We take out the old oil seals and seals and replace them with new ones. Removing the axle shaft seal is not entirely easy. You can use two legs of a universal puller...
...or with adjustable pliers, like these:
We clean everything and install the seals in place. The axle shaft seal can be pressed into place with a block of diameter equal to or slightly smaller than the outer diameter of the seal. Well, or a 32 (or 30, I don’t remember exactly) socket head as a last resort. Lubricate the working surface of the oil seal and install everything in the reverse order of removal. Repeat the same with the opposite side and add oil. That's basically it. The work was carried out slowly, mostly on weekend evenings for an hour and a half per axle. If something is not clear or not described, I will answer/correct. Unfortunately, there aren't many photos. During the work, I noticed uncritical “sweating” in the area of the differential shank. It will also be necessary to check. But I’ll combine this with the installation of a self-block. I'll just decide on the brand and the preload value. Well, on a budget, of course) Thank you for your attention!
What are axle shafts, why are they needed and how are they designed?
In rear-wheel drive cars, which the “seven” actually belongs to, the rear wheels are driving. It is they, rotating, that make the car move. The torque is transmitted to them from the gearbox through the drive (cardan) shaft, gearbox and axle shafts. There are only two axle shafts: one for each rear wheel. Their role is to transmit torque from the corresponding gear of the gearbox to the wheel rim.
Fracture
The result of a wheel hitting a pothole or a strong impact on a bump can be a fracture of the axle shaft. In this case, the car loses control because one of the drive wheels stops rotating. If the axle shaft is broken, the gears of the gearbox may also fail, so if such a malfunction occurs, it must be checked.
Axle shaft design
The axle shaft is an all-metal shaft made of steel. At one end there is a flange for attaching the wheel disk, and at the other there are splines for engagement with the gearbox gear. If we consider the axle shaft assembly, then in addition to the shaft, its design also includes:
- oil deflector;
- sealing gasket;
- oil seal (cuff);
- bearing.
Each of the axle shafts is installed in the corresponding (left or right) rear axle housing. An oil deflector with a gasket and an oil seal are used to prevent lubricant from leaking out of the casing. The bearing is designed to ensure uniform rotation of the axle shaft and distribute shock loads coming from the wheel to the rear axle of the vehicle.
Installing the axle shaft
Once the bearing and seal are installed, you can install the axle shaft. Installation is carried out in the following order:
- We install the sealing gasket.
- Insert the axle shaft
into the housing until it stops. Check how the splines engage with the gear teeth by turning the axle shaft in different directions. - Apply a few gentle blows with a hammer to the axle shaft flange to make sure it is seated correctly.
- Install spring washers onto the axle shaft studs. Install and tighten the nuts securing the axle shaft with a 17 mm socket wrench.
- Place the drum on the shoes and secure it with guide pins.
- Mount the wheel.
- Check to see if there is any play in the axle shaft or bearing by trying to shake the wheel along the vertical and horizontal axes.
- Lower the body and remove the chocks from under the front wheels.
- Tighten the wheel bolts.
- Check whether the signs of axle shaft malfunction have disappeared by driving on a flat section of the road.
READ How to install a window lift cable on a VAZ 2107
Replacing an axle shaft or its bearing on a VAZ 2101-VAZ 2107
Welcome! The axle shaft meshes with the gears in the gearbox, thanks to this, when the driveshaft rotates, the gears in the gearbox also begin to move, and the car starts to move. But the axle shaft, like any other part, has its own service life; axle shafts wear out especially badly when they are under heavy load: when you sharply take turns, for example, when you let the rear axle skid, etc. Therefore, take care of the axle shafts: when driving a car carefully, do not make sudden maneuvers - then they will live a long life. Severely worn axle shafts can cause one of the rear wheels of the car to fly out (see photo below), take this into account.
Note! To replace the axle shaft or its bearing, you will need the following: wrenches, a jack, a wrench for loosening the bolts that secure the wheel, and various other keys (socket wrenches, etc.). These tools are needed to remove the axle shaft from the vehicle; To replace the bearing you will also need a grinder, a vice, a new bearing, a new retaining ring and a blowtorch!
Summary:
- How to replace rear axle shafts or their bearings on a VAZ 2101-VAZ 2107?
- Additional video clip
Where are the axle shafts on a car?
The rear axle is an expression understandable to most car enthusiasts; to clarify, let’s say: it is a single whole that includes the gearbox, axle shafts and their housing (see photo below). The arrow in the photo indicates the axle shaft, which comes from the rear axle gearbox and onto which the rear wheel of the car is placed.
When do you need to change axle shafts?
- The axle shafts are replaced if the threads on them are damaged (see photo on the right): the bolts that secure the wheel cannot be tightened and are twisted. The other end of the axle shaft is inserted into the rear axle gearbox (see photo on the left), at the other end there are splines (they are indicated by an arrow), if they come together, the axle shaft will stop rotating altogether, since it will not engage with the gears. Then one wheel will stand still and the other will spin.
- There is another case in which the axle shaft must be replaced - this is wear of the bearing or peeling off of the retaining ring. If the ring has come off its seat, then the rear wheel will have play (by swinging it is easy to understand whether there is this play or not). If there is a problem with the bearing, then noise will appear at one of the rear wheels (play may also be present). For more details about this, watch the video below:
How to replace rear axle shafts or their bearings on a VAZ 2101-VAZ 2107?
Note! In general, it is better not to change the bearing separately, but to buy a new axle shaft assembled with it. You can press the bearing unsuccessfully: drive a few kilometers, and it will fly out of its seat, and the wheel will fly off the car. If you are sure that you will do everything correctly: seat the bearing well in place and check after a while that everything is in order, change the bearing separately. If you keep an eye on it, you can be sure that nothing critical will happen to the axle shaft while driving. And after 2000 km, you can completely forget about it, because if nothing happened during this time, it is already clear that the bearing is properly seated in its place and everything is working!
- At the very beginning of the operation, you need to remove the desired axle shaft or both at once. Even if you do not change them, but only the bearings on them, the axle shafts still need to be removed from the car. For more details on the process of removing the axle shaft from a car, see the article “Replacing axle shaft seals on a classic car.”
Note! When the axle shaft is removed, you need to check whether it needs to be replaced. The first step is to check the threads and splined part on the axle shaft. We have already mentioned where all this is located on it and even showed it in the picture just above. If the threads are not broken and the spline part is intact, move on to the bearing and the retaining ring. First, the bearing: it should sit well, grab it with your hand and move it left and right (as shown by the red arrows in the photo below), it should not move (let's say an axial clearance of 0.7 mm). Next, rotate the bearing: its upper part should spin, but the middle part should stand clearly on the shaft and not move. Otherwise, the bearing is faulty and requires replacement. Now there is a retaining ring (indicated by a blue arrow), thanks to which the bearing stays in its seat and does not move out (if the bearing moves out, the axle shaft will simply fly out of the gearbox), the retaining ring does not perform any other functions. You can tell by eye that the retaining ring has slipped by shaking the bearing, as we said earlier, you can determine one hundred percent whether the retaining ring is seated properly. Sometimes it happens that the axle shaft cracks or bends in some place (usually in the middle part), in this case the axle shaft must be completely replaced!
- When the axle shaft is removed from the car, clamp it in a vice, put on a special suit that is used to work with an angle grinder (it protects the body and eyes from burning chips), and start sawing off the retaining ring. When cutting, do not damage the axle shaft itself so that you do not have to replace it later. Once finished, knock down the bearing with a hammer and some kind of attachment (for example, a chisel) - removal of the old bearing is complete. Next, pick up a new one, if necessary, put more lubricant in it: to do this, use a small screwdriver to pry off the protective cover of the bearing rollers (indicated by an arrow in the small photo), fill it with lubricant, and do the same operation on the other side. Then place the bearing on the axle shaft. The bearing should seat reluctantly; in order for it to fit into its seat, it will have to be hammered in using an adjustable wrench or wrench (see large photo). If this does not happen and the bearing fits onto the axle shaft very easily, then either you selected the bearing of the wrong size, or the axle shaft is already worn out and needs to be replaced. You can’t drive like this, because the axle shaft will fly out immediately, be careful with this.
- What remains is the retaining ring; this is the one you will have to tinker with the most. Take a blowtorch, put a locking ring there, fix it and start heating it. Be careful, because if the retaining ring does not heat up to the required temperatures, it will not seat completely and will have to be cut off and reinstalled. Once heated, use pliers or something else to hook the ring and put it on the axle shaft. It should fall and rest against the bearing (see small photo below). Next, take an adjustable wrench (or wrench) and, as with the bearing, push the retaining ring down until it cools. Only after this can the operation be considered complete and the axle shaft can be installed in the reverse order. Before installation, let the retaining ring cool down, do not rush, otherwise it may come off its seat and the whole operation will have to be repeated from the very beginning.
Additional video clip:
You can see the process of installing bearings and retaining rings on the axle shaft in more detail in one of the videos below. It also tells you how to understand that the bearing has become unusable or the retaining ring has come off its seat.
Auto repair school - Do-it-yourself car repair
Apr 1, 2016 VAZ 2101, VAZ 2102, VAZ 2105, VAZ 2106, VAZ 2107, Zhiguli, Classic by admin
In the previously published article “ It’s time to replace the rear axle bearing or... ” a way to eliminate knocking in the rear axle axle in VAZ 2101, VAZ 2105, VAZ 2106, VAZ 2107 , and it also said, I quote: “I would like to note right away that independently you can remove or change the axle shaft, as well as eliminate the bearing play in the seat. But replacing the bearing itself requires special tools and certain skills.” To this we can add that in all repair and maintenance manuals for the VAZ 2101 car and their modifications you will not be able to find a detailed description of how to replace the axle bearing with your own hands. Instead of instructions in these manuals, you will only find recommendations, such as: “replacing the axle bearing must be carried out at a specialized service station” or “replacing the lock ring and bearing on your own is not recommended.” And, of course, all this is true. But if you are on this site and reading these lines, it means that you have a great desire to carry out repairs on your own. And this article will be not only useful for you, but also necessary. Since the whole process of replacing an axle bearing is quite complex and time-consuming, and it won’t be possible to cope with it “quickly”! I would really like to know if you decided to repair the axle shaft after reading the article or left this work to specialists.
I will not describe in detail the process of removing the wheel, drum and axle shaft in this article (you can get information on this topic by clicking on the link). In short, just the important points:
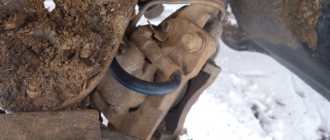
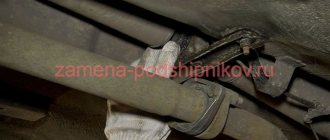
Release the handbrake cable (necessary to facilitate removal of the brake drum). The brake drum itself can “stick” to the axle shaft and can be knocked down using a wooden attachment (see photo 1). Precisely wooden, since using a metal attachment can damage the brake drum.
If there is no impact , you can pull out the axle shaft using the removed wheel . We screw the back side of the wheel to the axle shaft (two bolts will be enough) and knock out the axle shaft with sharp blows.
In photographs 2 and 3 you can see examples of a “dead” bearing and axle shaft seal. Next, we collect the necessary tools and equipment to replace the bearing.
1. Hammer, chisel and it’s very good if you have an angle grinder.
2. Metal pipe with an internal diameter of 32 mm and a length of at least 80 cm.
3. Socket head at “32”.
4. 50-100 grams of engine or transmission oil, “working off” is also suitable. Litol-24 will also come in handy.
5. Gas or gasoline burner, in general, we think of a fire source on which you will have to heat the locking ring. There is no way to do without the fifth point, since the locking ring is pressed onto the axle shaft only after heating.
Remove the locking ring and bearing:
Using a chisel, cut the locking ring (photo 4) or, if you have a grinder, cut off part of the ring (photo 5). It is advisable to cut the ring, as shown in the photo. And the axle shaft will remain intact and the weakened ring can be easily knocked off.
When the locking ring is removed, you can try to remove the bearing using the method shown in photo 6. If you can’t knock down the bearing this way, you will have to pick up the grinder again and use it to remove the bearing (do n’t forget about safety glasses ): cut the outer one on both sides The bearing ring, balls and separator are then removed without problems, after which we make shallow cuts (cutting to the end is dangerous, because you can damage the axle shaft) on both sides on the inner ring of the bearing and using a chisel, strike the cuts and split the ring. Ready. Mission accomplished. The main thing, I repeat, is not to forget about eye protection, both when working with an angle grinder and with a chisel.
After removing the bearing, remove traces of dirt and oil from the axle shaft.
Install the bearing and locking ring:
Before installing the bearing, you must carefully remove the boot from it and check for the presence of lubricant (unscrupulous manufacturers often leave bearings without lubricant). If necessary, lubricate the bearing with lithol (photo 7).
Using a pre-prepared metal pipe, we press the bearing onto the axle shaft (photo 8).
And we proceed to heating the locking ring (photo 9), in my case it is a gasoline stove. We heat the ring to an even ash color (try not to overheat), take it with pliers and put it on the axle shaft (the enlarged part of the ring faces up). Using a pipe, we place the ring close to the bearing and quickly cool it with oil (photo 10), if this is not done, the bearing boot may become deformed from heating . And fall into disrepair. And a bearing without a boot is money down the drain!
While the axle shaft is “cooling”, we replace the oil seal. Using a pry bar, push the oil seal out of the seat (photo 11). You can install the oil seal using a hammer and a socket head at “32” (in photo 12 I use a special mandrel). The axle shaft has cooled down and the oil seal is in place, which means you can begin assembly! That's it, replacing the axle bearing on a VAZ 2101, VAZ 2105, VAZ 2106, VAZ 2107 was successful!
If after reading the article you still have questions or have any questions, perhaps something didn’t work out for you or, on the contrary, everything turned out great, don’t hesitate to write and ask. I will try to answer as quickly as possible.
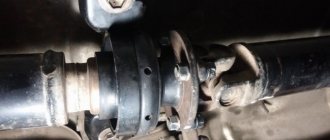
There are times when it is impossible to pull the axle shaft out of the rear axle. The bearing in seat has become stuck or rusted . And in order to knock it out, you can use the removed wheel (I already wrote about this method above), but if this option does not suit you, then the last and most reliable method remains - an impact axle puller ! See picture below:
When using an article or photographs, an active direct hyperlink to the website www.avtorem.info is required!
Did you like the article? Share it on your page!
Replacing the axle bearing of VAZ 2107 - 2105
In any car, the main driving element of movement is the axle shaft with a bearing. The bearing on the axle shaft ensures equal rotation of the rear and front wheels, and, accordingly, minimizes shock and other mechanical loads on them. The axle bearing is located in the rear axle, behind the brake drum. Like any other mechanical part, a bearing has a certain working life, after which it fails and requires replacement. If the bearing is not replaced, this can lead to serious consequences for the vehicle owner. A deformed bearing can very quickly destroy its cell from excessive friction in the rear axle. Accordingly, the bridge itself will have to be replaced. And this will result in financial losses much more expensive than replacing only one bearing.
Removing the old bearing
To replace the old bearing with a new one, you need to remove it from the axle shaft. How to do it? Take a chisel and a hammer, with which you remove the locking ring. Manipulations are carried out on an anvil, this makes it easier to create a rigid impact. If it was not possible to remove the stopper in this way, you can carefully cut off part of it with a disk using a grinder. The axle shaft is placed on the anvil so that its flange does not touch the steel surface.
Remove the unusable bearing using a chisel and hammer. To begin with, knock down the clip, knock out the separator and remove the bushing. If this cannot be done, you will have to cut everything off with a grinder. Before installing a new part, you need to thoroughly clean the “operating field” from any remaining dirt, dust, etc. You should check that the landing area is not deformed or damaged.
Characteristics of the axle bearing for VAZ 2107 classic
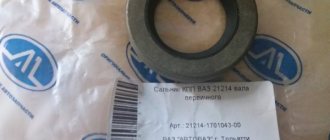
Russian-made bearings for VAZ are produced with article numbers 2101-2403080 and 180306. And foreign-made parts have article number 6306 2 RS.
The main characteristics of axle bearings include:
- part type. The bearing belongs to the group of ball, single row;
- radial two-way direction of loads. The value shows which bearing can withstand the load perpendicular to the axes of rotation;
- outer diameter of the bearing – 72 mm;
- internal diameter – 30 mm;
- product width is 19 mm;
- dynamic load capacity, or possible service life - 28100 N;
- static load capacity for residual deformation – 14600 N;
- its weight is 0.35 kg.
What bearings to put
When a wheel bearing requires replacement, the question immediately arises of which part to install. Many people advise using original components. However, today the quality of parts leaves much to be desired and the issue of choice remains quite relevant.
Table: type, installation location, and size of bearings
| Installation location | Bearing type | Size, mm | Quantity |
| Front wheel hub (outer support) | Roller, conical, single row | 19,5*45,3*15,5 | 2 |
| Front wheel hub (inner support) | Roller, conical, single row | 26*57,2*17,5 | 2 |
| Rear axle shaft | Ball, radial, single row | 30*72*19 | 2 |
Manufacturer's choice
When choosing a manufacturer of a wheel bearing for a VAZ “Seven”, we can recommend SKF , SNR, FAG, NTN, Koyo, INA, NSK. The companies listed have many locations around the world. These products are of high quality and meet the most stringent requirements.
Among the domestic manufacturers that supply bearings for cars of the Togliatti plant, we can highlight:
- CJSC "LADA Image" - manufactures and sells original Lada wheel bearings through secondary markets;
- Saratov plant - produces parts under the SPZ brand;
- Volzhsky Plant - uses the Volzhsky Standard brand;
- Vologda plant - sells products under the VBF brand;
- Samara plant SPZ-9.
List of faults
The total service life of an axle bearing in domestic cars can range from 50 to 150 thousand kilometers. However, the bearing wears out faster when the car is driven on uneven roads, and vice versa, if the car is driven on roads with good coverage, its service life can be significantly longer. Most often, the initial signs of axle bearing wear, which a car enthusiast can notice, appear after the car has covered a mileage of 100 thousand or more km.
Mechanical deformations and material wear of the bearing lead to its malfunction and should be replaced. Without disassembling the axle shaft, it is not possible to determine wear or damage to the part. There are factors by which bearing failure can be determined:
- Noise, hum when turning the wheels.
At the initial stage of bearing wear, a hum or metallic grinding noise can be heard when the wheels are turned. These sounds may increase or decrease depending on the speed of the car. This factor is not critical when the car is moving. But at the same time, you should not put off replacing the bearing for too long.
- Drum heating.
When moving, a faulty bearing increases the friction force of the axle shaft and flange, and the excessively generated heat is transferred to the central part of the drum. This factor can be noticed if you drive the car a little and then touch the central part of the drum with the back of your hand.
- The grinding of wheels.
After a hum appears during the turning movements of the wheels and the drum heats up, and the grinding of the wheels also becomes audible, then it’s time to sound the alarm. Most likely, the axle bearing has failed or is completely destroyed. Given the combination of these three factors, you should not continue further movement, but immediately look for a service center to replace the bearing. Otherwise, it will lead to irreparable consequences.
- The appearance of a gap on the wheels.
If the wheel has a gap or play, this may indicate a faulty axle bearing. To detect this, you need to shake the wheel using your hands and a jack. If the bearing is normal, the wheel will not wobble.
Some advice from experienced motorists
Very often we are faced with the fact that the brake drum cannot be removed by any effort. There is a way to dismantle it, but it is a little dangerous and requires special care and attention.
- Make sure the car is securely immobilized and secured.
- Depress the clutch pedal and engage 2nd gear.
- Start the engine, gently accelerating for a while.
- Press the brake pedal periodically.
- The inertial force should cause the drum to move out of place, making it easier to remove.
To protect your eyes, cover the bearing being removed with auxiliary material, such as rags, soft rags, etc. Or wear special safety glasses.
When the locking sleeve heats up, wrap the bearing in a rag or rag. This manipulation will help avoid overheating, which can cause the lubricant to leak from the part.
In parallel with replacing the bearing, the car enthusiast is able to inspect some important components of the car: brake pads and cylinders, axle shafts, etc.
Selecting a bearing to replace
The bearing for a VAZ is a single piece and cannot be repaired if completely worn out. Even if you try to lubricate it, it still won’t last long. During the operation of the car, it will be destroyed.
Since Russian-made bearings fully comply with regulatory documentation and are manufactured in accordance with GOST, preference should be given to them when purchasing. Russian bearings are fully intended for vehicle movement on Russian roads, so their wear life will be more optimal for the owner.
Bearings are produced at factories in Vologda and Samara. The average cost of one unit is about 250 rubles. Do not forget that along with the bearing you must also purchase a locking ring and an oil seal. Their cost varies 220 rubles and 25 rubles, respectively.
Experienced car enthusiasts advise changing the bearing head right away, since they have approximately the same mileage and if one fails, then most likely in a few days the second one will also fail.
How to make repairs
To begin, remove the gearbox from the machine, and then clamp it into a clamp. Unscrew both bolts for the locking plates and remove them.
Next, the bearing caps are marked for their future assembly. To do this, you will need a center punch and use a hammer to make marks. Use wrench No. 14 to unscrew the bolts and remove the covers.
It is important to immediately inspect the bearings for wear and serviceability. The outer races of each bearing are marked, since they are selected in pairs and cannot be disassembled. The radial play located on the axle gears is checked
If its size exceeds 0.5 mm, then the box is replaced. In normal condition, the bearing is removed and the planetary gear is unscrewed
The radial play located on the axle gears is checked. If its size exceeds 0.5 mm, then the box is replaced. In normal condition, the bearing is removed and the planetary gear is unscrewed.
Next, you need to knock out the satellite axis using the adapter and pull them out.
You need to remove the drive shaft and gear from the gearbox housing. A soft metal punch is perfect for this. The inner wheel of the roller bearing is knocked out.
It is also necessary to replace the adjusting sleeve with a new one.
After knocking down the bearing, you need to remove the adjustment ring.
Next, use a drift to knock out the outer rings of the bearings.
Now you can wash all parts in kerosene or diesel fuel. After the washing is done, all parts are diagnosed. There should be no chips or cracks
If these defects are present, it is important to replace the parts. If there are small scratches, they can be polished with sandpaper.
Replacing the axle bearing
It is quite difficult to replace a bearing yourself, but it is possible. This process is very labor-intensive and time-consuming. To replace the bearing you will need about two hours of free time. The most important point in this process will be the availability of all the necessary tools to carry out the replacement efficiently:
- Jack.
- Devices for strengthening the raised body. (can be replaced with a removed wheel)
- Balloon wrench.
- Wheel stops.
- Reverse hammer. (can replace removed brake drum)
- Keys for 8 and 12.
- Socket or socket wrench size 17.
- Vise, workbench. (working with a vice is safer)
- Slotted screwdriver.
- Blowtorch or gas torch
- Bulgarian.
- Hammer and chisel
- Pliers.
- Grease and rags.
Changing the oil in the rear axle of a VAZ 2106
Often, car enthusiasts who own a vehicle such as the VAZ 2106 ask the same question. They are interested in which oil fluid is best suited for the rear axle of their car. At the same time, they ask - what volume is needed and how to change the oil?
There are different opinions. But experts recommend filling the rear axle gearboxes of this machine with transmission oil, which is marked 80W90. For example, this is Lukoil 80W90 GL. This group of oils also includes TAD-17 80W-90 or the so-called TNK.
When we've sorted out the oil, it's time to answer another question. Perhaps he is one of the most important. Namely, how much oil is required? So, the oil volume is as follows - 1.3 liters. At the same time, it is possible to change the oil in the gearbox. True, in this case you will need 1.4 liters.
As for the interval, it is necessary to change the oil fluid after every 30,000 kilometers of the vehicle. If you convert the mileage into a time frame, you get 3 years of operation.
The oil fluid is replaced in accordance with the established procedure:
- First of all, you need to use a lift or inspection hole. You will also need a key for “seventeen” and a hexagon for “twelve”.
- Next, unscrew the drain plug in the bridge and place a special container designed for draining the oil fluid. At the same time, the filler plug is also unscrewed. This is necessary so that the oil fluid flows out faster.
We unscrew the drain and filler bolts. When the oil fluid is drained from the bridge, the drain plug is screwed in and new oil is poured. Here you need to use the filler hole. You will also need a special syringe or other suitable tool.
Fill with a watering can
How to change the oil in the rear gearbox of a VAZ. Video
It would be a good idea to treat all components with washing liquid.
1. Wheel brake drum mounting bolt, 2. Guide pin; 3. Oil deflector of the axle bearing; 4. Brake drum; 5. Cast iron brake drum ring; 6. Rear brake wheel cylinder; 7. Fitting for bleeding the brake drive; 8. Axle bearing; 9. Bearing lock ring; 10. Rear axle beam flange: 11. Axle shaft oil seal; 12. Suspension spring support cup; 13. Rear axle beam; 14. Bracket for attaching the upper suspension rod; 15. Axle guide; 16. Differential bearing nut; 17. Differential box bearing; 18. Differential box bearing cover; 19. Breather; 20. Differential satellite; 21. Main gear driven gear; 22. Left axle shaft; 23. Axle gear; 24. Rear axle gear housing; 25. Drive gear adjusting ring; 26. Bearing spacer; 27. Drive gear bearing; 28. Drive gear oil seal; 29. Oil seal mud deflector; 30. Flange-fork of the cardan joint; 31. Nut; 32. Oil deflector; 33. Main gear drive gear; 34. Axle of satellites; 35. Axle gear support washer; 36. Differential box; 37. Right axle shaft; 38. Brackets for fastening suspension parts; 39. Thrust plate of the axle bearing; 40. Rear brake shield; 41. Rear brake pad; 42. Friction lining: 43. Axle shaft flange; 44. Locking plate; 45. Bearing cover mounting bolt.
Sequence of actions when dismantling the axle shaft
To dismantle the axle shaft and get to the bearing, you must perform the following steps in strict sequence:
- For convenience, the vehicle is placed on a flat surface.
- Secure all the wheels of the car with stops or other devices.
- The wheel bolts must be turned with a wheel wrench until they are slightly loosened before removal.
Removing wheels.
- Use a wheel wrench to completely unscrew all the bolts on the wheels.
- Use a jack to raise the car body and secure the lifting with supports.
Removing the brake drum.
Unscrewing the axle shaft bolts.
Little by little, without using much effort, turn the axle shaft to get to the nuts. The axle shaft mounting bolts can be unscrewed using a 17mm socket wrench. They are used to loosen and remove 4 fastening nuts, which are closed with a special flange.
Removing the axle shaft.
We turn the removed brake drum over (with the inner side facing us), screw it to the axle shaft with a couple of bolts and sharply pull it towards ourselves, thus pulling out the axle shaft. (Instead of the brake drum, you can use a previously removed wheel)
But if you have a reverse hammer, you can remove the axle shaft with it. The hammer is attached to the axle shaft with wheel bolts. If you sharply place a load in the opposite direction, then due to the appearance of a shock load, the axle shaft begins to move towards the load. Thus, the axle shaft is removed. Then unscrew the hammer from the axle shaft and remove the rubber sealing ring.
Removing the lock bearing from the axle shaft.
The axle shaft is clamped in a vice and a small cut is made using a grinder on the outside of the locking ring.
The clamped locking ring is finally split by alternately striking the cut from the grinder with a hammer or chisel. Thus, the bearing is removed from the axle shaft. The axle shaft is checked after removing the bearing for surface deformations or chips or other damage. If there are any, then the axle shaft will have to be changed.
Installing a new bearing and lock ring on the axle shaft.
Replacing the axle shaft seal.
The oil seal to be replaced must be pulled out of its cell. To do this, lift its body with a screwdriver and remove the oil seal. The cell under the oil seal is wiped from the accumulation of dirt and dust, and grease is applied. The new oil seal is inserted into the seat with a spring to the beam. Use a special bushing and a hammer to drive the oil seal so that it is pressed tightly.
Installing the axle shaft.
Installation of the axle shaft is carried out in the reverse order from its removal. Put on the rubber sealing ring and bolt the axle shaft. Use small rotational movements to put it in place.
After installing the axle shaft, it is necessary to check it for the formation of gaps. They shouldn't exist. To do this, the wheels are rotated in all directions. If there are no gaps and no extraneous sounds appear during rotation, then the installation of the bearing and axle shaft was done correctly and correctly.
If necessary, replace the bearing on the second axle shaft in the same manner. Also, when carrying out these actions, you can immediately replace the brake pads and check the presence and level of lubricant in the axle housing.
Preparation
First of all, you will need to remove the rear wheels, brake drums and the axle shaft itself.
- Place the car on a level surface (in case there is no pit or truck crane).
- The front wheels must be securely supported by chocks. Don’t forget that the “seven” has a rear-wheel drive and you can’t control its immobility by engaging a gear, it just won’t work.
- Using a jack, raise the rear of the car.
- Protect against accidental falls. You can place removed wheels, a metal canister or a safety bar under the body.
- Unscrew the bolts and remove the wheels.
- Use a 10mm end to twist the guides and remove the brake drums. You can help with a hammer, but be careful: you can only strike through a piece of wood.
- Wrench No. 17 removes the bolts securing the axle shaft and then removes it.
Most often at this stage, most mechanics are faced with the fact that it sits tightly in place and cannot be moved even a millimeter. In such cases, the following techniques may help:
- Install the wheel on a couple of bolts and use it to twitch the axle shaft several times. You need to make movements sharply in order to loosen the part.
- Spin it left and right several times until it loses immobility.
At this stage, the axle is inspected for distortions or deformations. Their presence is unacceptable.
Step-by-step instruction
- Loosen the wheel bolts, jack up and remove the wheel.
- Remove the brake drum.
Using pliers, remove the “soldiers” and remove the tension springs of the pads.
Remove the rear brake pads and set them aside.
Unscrew the 4 nuts securing the axle shaft. Head nuts for seventeen.
Push the hub towards you using the mounting lever and remove the axle shaft. If the axle shaft cannot be removed, use a three-legged puller.
Use a grinder to cut the retaining ring. It is better to make the cut a little not completely and cut through the remaining rings with a chisel. In order not to damage the axle shaft, make the cut very carefully.
Use a chisel or drift to knock the bearing out of its seat on the axle shaft. In our case, only the bearing race remained.
Place the bearing on the drive and use a pipe and a hammer to press it into place. As a rule, seating a bearing is quite easy.
- The bearing retaining ring is hot pressed. Take the ring and secure it to a piece of wire. Next, light the gas burner and heat the ring almost to red.
- Have a helper hold the axle shaft upright and keep the pipe and hammer handy. Next, use pliers to put the hot ring on the drive, and then, without hesitation, an assistant puts it in place using a pipe and a hammer.
Using a slotted screwdriver, remove the oil seal from its seat.Using a piece of pipe along the outer diameter of the oil seal, press it into place.
Install the rubber O-ring.
- Fit the fastening nuts and tighten them in a cross pattern with a force of 50 Nm.
- Install the brake pads, drum and wheel.
Important points
The inner ring of the bearing is cut off with a chisel