The installation of this function in my car continued for several months. Slowly, little by little, and finally finished)).
I would like to note right away: This function is used at street temperatures down to -10, -15 degrees. In cold weather this function is not needed. It is needed in slushy weather. That's why the glass won't burst)))
Heating elements (HE) were purchased to heat the wiper area. At the first opportunity they were installed on glass. It stuck perfectly, but not as I would have liked. It turned out that they were visible from the street. The length of each NE is 55cm, when ordering I somehow didn’t think that it was worth taking one NE 55cm and the second 35cm, then I think everything would have stuck perfectly. In principle, they are not even noticeable and if you don’t look closely, they are not noticeable, so I don’t worry about it.
Then the connection issue arose. There were several options: 1. Connect together with the heated rear window. 2. Connect separately from everything else and display a separate button. 3. The most interesting. Connect it separately from everything else, make a small electronic control unit and use the same button as turning on the heated rear window. And to turn it on, for example: a short press turns on the heating of the vehicle, a long press turns on the heating of the vehicle, turn it off in the same way. Plus, make sure that after a certain time the heating turns off automatically.
In the end, I settled between the second and third options, since I myself am not good at programming and besides Stepan Palych
I have already designed a similar device. So all that remained was to assemble it.
The result is this device:
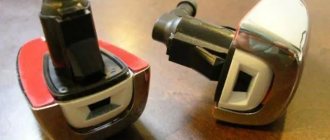
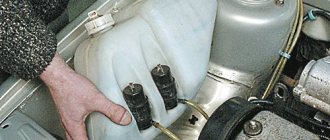
To turn on the heating, I bought a used PWR HEAT button, it is intended for an additional interior heater that is found on diesel cars. It is clear that I do not need it for these purposes, but this is the best option since there is a picture of heating and there is free space in my car for the housing of this button. I found the chip I needed to connect the button in my car in the area of the stove, since this chip was not used, I happily removed it))
This button has undergone a slight modernization to suit my wishes. The board was redesigned and the button fixation was removed.
Circuit board in the button.
And this is how the indicator lights up
When the engine was running, the current consumption was 4A (two heating elements), the fuse was set to 5A. I touched the heating of the glass with my hand, after about 1-1.5 minutes the heating was 40-45 degrees, but since I’m not a thermometer, I can’t say for sure))). In general, it doesn’t heat much, but at -10 degrees outside, I think it will stay about 5 degrees, and this should be enough to thaw the brushes. Accurate tests can only be carried out after 3 months.
One of the important components of safe and comfortable movement by car is good visibility of what is happening on the road, and this is especially true in the cold season. The process of clearing snow and ice from your windshield is not only physically tiring work, but also time consuming. Usually this work has to be done in the morning, at the moment when you urgently need to go somewhere. Recently, car enthusiasts have made this task a little easier for themselves by using a heated windshield. You can install it with your own hands at home without significant financial costs. This invention allows you to keep the glass surface unfrozen even during heavy snowfalls and frosts. This review shows the types of heating and how to install them on the windshield yourself.
Heating element design
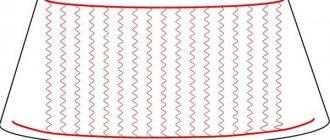
The glass heating system is a set of filaments for a specific purpose that are equipped with a windshield. This device is powered from the on-board network and the electronic control unit. Depending on the type of heating, the location of the filaments may be different. Often, only heating of the wiper zone is installed on cars. This is necessary to clean them from snow and ice crust, as well as to give elasticity to the rubber brushes. Everything else works using the standard system. Heating the windshield without filaments is also widely used. Often, such a device is installed by craftsmen on cars whose windows are not equipped with standard heating.
The second option is to place the thread around the perimeter of the window. In this situation, the entire glass warms up completely. The first time after installing electric heating, drivers feel some visual discomfort, since the stripes of the device are striking. But after some time, the eyes get used to it, and the driver simply does not notice them.
Strip heaters
However, if you put your hand on your heart, not all cars have such “lobovukov”, some cannot be found, even Chinese ones, for example, no matter how much I looked (for my Chevrolet AVEO ) I still couldn’t find it! Therefore, you need to be content with little.
By small, I mean heating the wiper area; if it is powerful enough, it contributes to the rapid thawing of the entire stele. So how to implement this?
Adhesive strips have been on the market for a long time, often transparent, but often not. We just glue them to the bottom near the panel, hide the wiring under the plastic, and again connect it to the rear heating.
Thus, the lower part, which is always covered in ice (snow), will quickly thaw, and then the rest of the canvas will be “finished off” by the car’s heater. Personally, I myself have seen this design many times, it works very effectively. It is also gratifying that our Russian manufacturers also produce, the strip does not take very much power - approximately 14 - 20 W, depending on the thickness and length. You can install it yourself, there is nothing complicated here, just glue it in the desired area and connect it.
The cost of a strip 350 mm long and 50 mm thick is 450 rubles, if the length is 550, the price is 600 rubles. I won’t give a link to the office, but our domestic manufacturer goes by the abbreviation “NSCHS”. Just type in the search - “heated wiper zone NShchS”, dozens of sites will come up where you can order.
Pros and cons of this heating
Like any device, heating the windshield in the windshield wiper parking area and around the entire perimeter has its advantages and disadvantages. Having compared these characteristics, motorists themselves have the right to decide whether to install them on their cars or not.
Advantages: the time it takes to prepare a vehicle before leaving is significantly reduced (snow, ice - all this disappears in a few minutes), excellent visual control of what is happening on public roads, the glass does not fog up on the inside and does not form frost even when idle.
Disadvantages: at first, the filaments are noticeable and distracting, sometimes you can’t get used to them. If the car’s battery is not fresh, it will discharge when the car is parked for a long time, so you need to watch and remember to turn off the heater unit.
4WHEELS
Well, guys, winter is in full swing, snow is falling, ice is on the roads, the car needs to be warmed up in the morning, in general the weather is uncomfortable. But probably each of us has been struggling with the icing of the car windshield since the morning. Personally, I will never forget the freezing rain that turned my car into just a big piece of ice! However, the neighbor in the parking lot came, started the engine, turned on the heated windows (front and rear), after 3 - 5 minutes they thawed out, and he calmly drove away. But I had to hang around in the parking lot for about 30 minutes and wait until the stove melted a 2-3 centimeter layer of ice.
Now many cars, so-called “ adapted for Russia ,” already come with threads in the windshield, which heat it up! It’s very convenient and very necessary, in my opinion, especially for our cold country. The problems of scraping ice with a brush disappear.
But many Japanese, German (and other) manufacturers simply do not have such elements! They are designed for a more or less mild climate, and therefore this does not even occur to engineers! Although we need it.
Installation of various heating elements
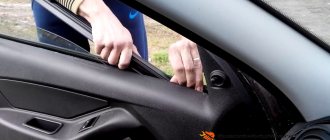
If you want to install a heated windshield on your car with your own hands in the plane of the windshield wipers, it is not necessary to completely remove the windshield from the car. You just need to purchase warming tapes from a car dealership and stick them on the inside of the glass opposite the original position of the wipers. The leads for the heating connection wires can be routed under the plastic elements of the interior, so they will not spoil the overall appearance of the interior. Powering this windshield heating from the cigarette lighter would be the best option, since it can simply be removed in the summer.
Principle of operation
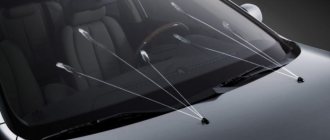
A special heating element is installed in the body of the structure. It transfers heat to the plate, which, in turn, heats the wiper body and wiper rubber. Heated brushes do not have a frame, which adds flexibility to them. They clean the glass surface better. The heated blade protects cleaning surfaces from freezing and eliminates the problem of unpleasant sounds when the wipers operate. To turn on the heating, just press the desired button.
Heated windshield wipers
The wiper area can also be equipped with another type of heating - this is heating of the elements themselves. With this option, they will clean themselves and help melt the snow. The control unit for the heating elements and the power supply must be connected to the vehicle's on-board electrical system or connected to the windshield heating from the cigarette lighter. This connection method is very convenient, since if the device fails, you do not need to tinker with the car’s wiring, but simply pull out the plug from the standard socket.
Heated elements are installed instead of the standard kit. Electrical wires from them can be routed through technological holes in the body. Then a wiper control unit is installed in the car interior under the dashboard, but it is better to place the power supply in the engine compartment. When installing wipers in the electrical circuit, it is important to install a safety element to avoid a possible short circuit.
What do we need?
We will need to create a heating element with our own hands. On the one hand it is difficult, on the other it is even exciting.
SO, what do we need:
- A new set of wipers (preferably frameless), however, I do not encourage you to practice on your workers, buy the cheapest ones.
- Nichrome thread or as many people call wire. The diameter is 0.3 - 0.35 mm, this is important, do not take less, it will burn, more will be a heavy load and long heating. This diameter is the best. You can buy it at any radio market, as well as in radio stores.
- Wire for main wiring. You need to take copper in good insulation, a cross-section of approximately 1.0 - 1.5 mm. The guys suggested that we could use a black wire for the acoustics; it would blend in with the wipers and not stand out in the interior.
You also need to prepare tools - a soldering iron (solder), wire cutters, a multimeter (we will measure resistance).
Factory heated glass
When it comes to installing a fully heated surface, the situation is different. Installing this heated windshield yourself is much more difficult. At the same time, the wind turbine itself is more expensive than the standard one. First, you should remove the standard one from the car and clean the seat from any remaining glue. Then on the heated glass you need to find the ends of the taps for connection. They are usually located at the end of the glass. Next, you need to connect electrical wires to these terminals by soldering. The connecting areas must be insulated using liquid insulating materials. After the work has been done, the glass is mounted on the car, like a standard one, and they begin to connect it to the on-board electrical network.
Do-it-yourself windshield heating on a VAZ
To carry out this work, you need to be able to work with a regular soldering iron and have an understanding of the structure and electrical equipment of a car. If you do not have such knowledge, then it is better to seek help from a specialist. There are two ways to equip glass with this system yourself: installing the tape in the plane of the windshield wipers and gluing it around the perimeter of the window. The heating zone for the wipers was described above, so we will talk about the method of installing the tape along the edges of the glass.
Unfortunately, domestically produced cars are not equipped with such glass from the factory. Therefore, car enthusiasts have found a way out of this situation. They buy self-adhesive tapes in stores and install them on the car themselves. This car add-on is a heated windshield without filaments. It is made in the form of a thin transparent film strip of various widths and lengths, depending on its application.
Purchasing special additional airflow
This is the cheapest and worst performing method. Many advertisements for these devices on the Internet and on TV say otherwise, but you shouldn’t believe them. The problem with such a windshield heater is that the heat will not spread evenly, but at a certain point. These heating fans themselves are low-power, so you will have to wait a long time for them to melt the glass. However, such additional airflow is very easy to install: just install it on the dashboard and plug it into the cigarette lighter. Additional electric blowing is good only if you warm up the car engine for a long time (you can also warm up the windshield at the same time).
Advantages: Easy installation, low cost
Disadvantages: Long warm-up time, uneven heating plane
Element installation
Before gluing the film, you first need to wipe the inside of the glass with a rag to remove stains and dust. The strips should be glued extremely carefully so as not to damage them and to make the installation as smooth as possible. After this, the heated windshield (VAZ) must be powered into the vehicle's power supply system. As was said earlier, we connect one terminal to the positive wire, and the second to the control unit.
For more convenient use of the car in the summer, the system can be equipped with additional controls. For example, an additional button for heating the windshield is installed in the dashboard, which can completely turn off the power supply to the device.
After installing this element, it must be checked. We start the car engine, turn on the heating for a few seconds and check its circuit using an electronic tester. If connected correctly, the device will show a value of 12 V at the output of the circuit. This means that the circuit has no breaks and the system is working.
Conclusion
Based on the presented review, you can make a choice - to clean the windshield manually and spend your time and energy on it every day, or not to be lazy one time and do the windshield heating yourself. Thanks to the availability of various accessories for cars in auto shops, you can make a “warm” windshield yourself without any special financial costs. After this, your car will be ready for winter use at any time, regardless of the vagaries of the weather.
Heating element for heating the windshield wiper blades. The element is installed from inside the car, from the inside of the windshield in the place where the windshield wiper blade stops. Price for one.
The wiper blade heating element is designed to heat the area where the wiper blade stops, which prevents wet snow from sticking to, freezing and icing of the wiper blade. In addition, wet snow does not accumulate where the blade stops and does not interfere with the operation of the windshield wiper. This significantly increases the safety of driving a car in difficult weather conditions. The heating element is a flexible transparent polyester film with a thin conductive track applied to it. The element has two output terminals for connecting power wires. A special adhesive layer is applied to the film, covered with protective paper tape.
Installation procedure: 1. Clean the installation site of the heating element from dust, dirt and grease. Degrease the windshield where the heating element is glued. 2. Separate the protective paper layer from the heating element. 3. Carefully glue the heating element from the inside to the car glass in the place where the windshield wiper blade stops. In this case, the place where the brush stops should be in the middle of the heating element. 4. Lay and connect the wires to the terminals of the heating element. 5. In any convenient place, connect one wire from the heater to the ground of the car. 6. Connect the second wire of the heater through the power button, relay and fuse to the wire on which “+ 12 Volts” appears when the ignition is turned on.
Manufacturing instructions
Well, let’s move on to production, I’ll list it point by point, it’s easier to digest.
- We are disassembling our frameless wipers, do it carefully so as not to break anything! Otherwise you won’t be able to collect it later.
- We will thread the thread into the elastic from both sides. It is IMPORTANT that it does not fall out, that is, we hide it inside. Also, be careful not to damage the elastic, because if it is torn, it will not clean.
- What else I would like to note is that we encountered such a difficulty - the design has two separate metal plates that hold the elastic. To insert it there, and even push the thread, you need to use all your dexterity. Therefore, without thinking twice, we simply glued the elastic band to the plates with a glue gun, so it did not fall out and sat in place. This is exactly how we managed to insert the nichrome thread.
- It's almost ready. However, we immediately measure the resistance. It should be 8 - 9 Ohms remember! So the thread will heat up evenly, if the resistance is 5 - 6 Ohms then this is bad, the thread will heat up quickly, which is not very good in the cold, the glass may burst. The large wiper was fine, about 8 - 9 ohms, but the small one was about “6”, so they added a little more wire, somewhere they made it like a herringbone under the rubber band. In general, after 15 minutes - 8.5 Ohms - you can assemble normally.
- Two holes were made in the mount for the outlet of heating wires. Our black speaker cable will go to it.
- After being assembled, we tried heating. In about 7 - 8 minutes the heating was about 49-51 degrees. Which is more than enough, given the cold weather, there will be no such heating, it will warm up to about 20 degrees outside, during the same time - that’s what you need.
- We put the wipers in their regular places. We take the mass from the body, plus we connect it with another cleaner in parallel! And to the salon. It should be noted that we connect it through a fuse, about 5A will be enough, and also, if desired, install a relay (so that it cuts off automatically when the resistance changes - after heating)! You can do it without it, but just press the button, then you need to monitor it yourself - which you don’t want to forget.
The result is great heat, even at minus 25 degrees, the wipers go off almost instantly. With a slight minus, especially when it snows, the ice does not linger on the brushes at all. Here are the instructions. The asking price is approximately 200 rubles per wire.
However, I repeat once again - if you cannot work with the car’s electrics yourself, DO NOT CLIMB, it’s dangerous!
I’ll finish this, I think my instructions helped you.
(
9 votes, average: 4.56 out of 5)
Information
Before placing an order, we recommend that you familiarize yourself with the general information on Payment and Delivery of goods in the online store.
Basic provisions of the online store: 1. All orders are placed through product order form located on the website. 2. Coordination of the completed order is carried out via the email specified by the client in the order form. The client can be advised over the phone on the choice of a particular product. The exception is orders from St. Petersburg - they are agreed upon with the client by phone. 3. Delivery to regions of the Russian Federation and CIS countries is carried out by Russian Post , cash on delivery or 100% prepayment. Estimated delivery times for orders to Russian regions are 5-15 working days. 4. The cost of delivery of goods is calculated individually for each order, based on the remoteness of the customer’s region, the weight of the parcel and the chosen payment method for the order. The final cost of order delivery is indicated in the letter confirming the order. Read more about delivery and payment here. 5. Courier delivery is available in St. Petersburg. The cost of courier delivery is 300 rubles, within the Ring Road. Payment for goods and delivery is made to the courier upon receipt of the order. Delivery times and days: daily, from Monday to Sunday, 09.00 - 23.00. Possible time intervals: 9-14.00, 14.00-19.00, 19.00-23.00. When placing an order, indicate your preferred time interval and delivery date. “Order comment” field. By individual agreement, it is possible to pick up goods from our warehouse. 6. Orders and delivery to the CIS countries and neighboring countries are carried out only on the terms of 100% prepayment. 7. Goods of good quality can be returned within 7 days from the date of receipt. 8. Product warranty - one year from the date of purchase.
| Overall dimension of the element, mm. | 550 x 50 |
| Heating layer size, mm. | 540 x 45 |
| Voltage, V | 12-14 |
| Power, W | 37,5 |
| Adhesive layer | single-sided to glass, 3M brand |
| Price | a piece |