AvtoVAZ strives to produce products that will be useful in cold weather. The engine starts working even at a temperature of -30 degrees, and the door locks are also adapted to the cold. The designers tried to include a heated Lada Vesta windshield in the package, as this is a product of very high comfort.
However, not all models are equipped with this feature. The heated windshield of Lada Vesta is designed to ensure that car owners do not experience discomfort when driving in cold weather. Previously, I had to fight ice and snow with my own hands, which took away my strength and patience.
Peculiarity
Owners of the sedan and crossover drew attention to a technological feature - the heated windshield of the Lada Vesta and Iks Rey cannot be turned on remotely, even if the engine starts automatically. For this reason, many, after remotely starting the engine, even when the power unit is warming up, have to wait until the windshield melts.
On models equipped with air conditioning, this problem is unlikely to occur, since the “climate” unit, after turning off the engine, remembers previously activated functions and also activates them the next time it is started. Therefore, in order not to wait until the glass melts, you just need to remember to turn on its heating, and at the same time the mirrors, before turning off the engine.
As for the versions equipped with air conditioning, there is no memory function. However, as practice shows, it is quite possible to independently connect the heated windshield of a Lada Vesta or X Ray to an additional alarm channel.
About heated seats
The heating works quite efficiently. The only drawback is the lack of heating sensitivity. That is, there is no option to select power (low, medium, high), as on some foreign cars. But it does not “fry” all the time, but automatically turns off/on while the indicator is on.
The heating works quite efficiently. The only drawback is the lack of heating sensitivity. That is, there is no option to select power (low, medium, high), as on some foreign cars. But it does not “fry” all the time, but automatically turns off/on while the indicator is on.
Advice from professionals
- For information on how to properly and effectively repair a windshield, read our article “A crack in the windshield, how to fix a crack with your own hands.”
- Never attempt to replace or install heated glass unless you have sufficient experience and knowledge.
- As an alternative to a heated windshield, there is a portable heated windshield that operates directly from the cigarette lighter, and a special washer fluid reservoir heater.
- A heated windshield allows you to cope well with the problem of icing, without the need to stir the windshield with all kinds of brushes and scrapers. Which often cause many small scratches.
- Despite all the advantages of heating the windshield. Heat often causes cracks in the windshield.
Heating of washer fluid
This type of heating not only helps to melt the layer on the glass in winter, but also to wash away dirt in summer, since warm water washes better than cold water. There are two ways to heat the washer fluid:
- Heating the washer barrel
- Heated washer nozzles
Keg heating
The washer is heated using special plates with a thermostat. You can purchase them at any radio electronics store.
Just like heating the brushes and windshield, these plates are connected via a 12 Volt wire. For example, you can take the wire from the heated mirrors. Since these elements have a built-in thermostat, they are able to turn off when the temperature reaches above 50 degrees.
It is not difficult to fix the plates on the barrel, since they are self-adhesive.
Heating of injectors
The heating of the nozzles washing the windshield is carried out due to the built-in resistance inside them. Under the influence of current, this resistance heats up and transfers heat to the washer fluid.
You can either buy such nozzles or make them yourself. The second option is preferable, since the first is expensive. You can buy ordinary cheap injectors and install a heating element in them. This element is a 300 ohm resistor, which can be purchased at a radio electronics store for 20 rubles. You will need 4 pieces.
To place the resistor inside, you need to drill a groove in the plastic body of the nozzle.
By inserting a resistor into the groove, we connect it.
We solder the wires to the ends of the resistor and connect them, for example, through the heated rear window. This windshield heater is characterized by the rapid heating of the liquid.
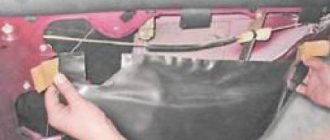
Dismantling
To connect, you first need to log in to the SAUKU, the heating and air conditioning control unit. On Vesta and X Ray the algorithm is different, so it’s worth taking a closer look at everything.
Lada Vesta
In a sedan, the SAUKU unit is traditionally located on the center console. To get there, you need to remove 3 elements:
- Panel coating (plastic);
- Lock;
- Cover of SAUKU.
The plastic cover is attached to the center console using plastic fasteners. To separate them, you need to pry the bottom and pull it towards you.
After this, the panel with the keys is disassembled, which is attached to the latch cover, including around the entire perimeter. They need to be disconnected.
The most difficult thing is to remove the SAUKU cover.
It is best to start working on the left side. First you need to get to the fuse box by removing the plastic cover that covers it. You need to tighten the 3 plastic handles that secure the lid from below, and then remove the lock from above.
In the end, all that's left is to pull the lid off from the bottom, undo the clips that secure it to the top of the order, and remove the lid. When the fuse box cover is removed, you will need to remove 2 mounting screws.
Then we move to the central part, where you also need to unscrew the 2 mounting screws, which are located directly under the panel with the keys.
Then it remains to unscrew 1 mounting screw on the right side, which is located under the glove box lid.
After this, access opens directly to the SAUKU lock, which is attached to the escutcheon with Torx screws. Unscrew them and disconnect the plug.
Lada X Ray
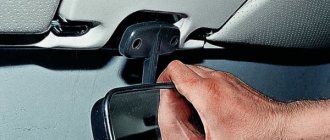
Independent connection of a heated windshield to the Lada X-Ray via an additional signal channel also begins with the removal of the SAUKU unit. Everything here is much simpler than on Vesta. The panel itself with the block is fixed with two hooks in the upper part and two iron guides equipped with springs in the lower part.
You need to carefully lift the panel at the bottom and carefully pull it towards you. This will release the top supports. In the end, all that remains is to disconnect the wires.
How to select and replace the fuse correctly?
When an insert fails or burns out, it must be replaced. But it should be understood that such protection does not work just like that. If, after replacing the fuse, it blows again, do not attempt to replace it again. Most likely, there is a malfunction in the vehicle's electrical system or the insert rating is incorrect.
There are several fuse ratings that are used to protect a wide variety of electrical circuits. For example:
- 15A – can protect the cigarette lighter circuit;
- 50A – designed for a powerful cooling fan;
- 5A – automatic transmission control unit;
The more powerful the device, the higher the current that the fuse can pass through. If you install a 40A insert instead of 5A, the protected device will burn out, since the speed of such an insert will be too slow. You cannot use fuses and vice versa - instead of 40A, 5A.
To change the fuse, you need to follow a few simple steps:
- Diagnose the malfunction. For example, the radio does not work.
- Open the fuse cover in the passenger compartment and find the desired insert. To do this, you need to unfasten the lower part of the panel located under the steering column by removing the clips and pulling the panel towards you.
- Using pliers, pull out the burnt fuse and install a new one in the same way.
- Replace the cover.
Attention! The use of wire is prohibited even as a temporary alternative to a fuse.
Before changing the insert, you must check it. To do this, you can use a multimeter in continuity check mode or look at it visually.
Types of damage
The windshield is made of triplex, an impact-resistant material that has two layers of glass and a thin film in the middle. This prevents the parts from falling apart upon impact.
Masters divide damage into two types:
- Fries. Only the top layer was damaged. No immediate replacement is required.
- Cracks. In this case, deliver new material as quickly as possible. The film holds the debris, but not as firmly as before, and with a hole, which is not uncommon on our roads, they will separate. This will lead to an accident.
If you can’t change it in the near future, you can resort to some tricks:
- Make perpendicular cuts along the edges of the “web”.
- Drill 5mm holes along the edges of the slot.
- “Brew” the damage.
All measures will have a temporary effect and the spare part will still have to be replaced.
Replacement
Do-it-yourself installation is carried out with a thermometer reading from 10 to 35°C.
In what order does the replacement take place:
- The door windows are lowered to eliminate pressure on the new part when they are closed.
- The hood, fenders, and front seats are covered with special material. Also protect the paintwork around the windshield with masking tape.
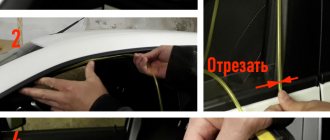
- Facing panels, molding, wipers, mirrors are dismantled.
- Using a special knife or cutting string, cut off the adhesive sealant and dismantle the old glass.
- Remove particles of debris and remnants of old adhesive-sealant from the opening.
- Clean and degrease the opening.
- Apply two coats of primer to areas with damaged paint.
- Trying on a new element. At this time, masking tape is glued in several places: one end on the glass, the other on the body. Cut it at the joints - these will be marks.
- The new part is treated around the perimeter with a degreaser.
- Apply a special primer without interruption at a time around the perimeter of the glass and allow to dry.
- The molding is installed and temporarily secured with tape. Apply sealant around the perimeter of the glass. The strip should be 10 mm wide, 12-16 mm high.
- Suction cups with handles carry the glass to the car.
- The part is applied to the installation site, aligning the marks.
- Press the glass and secure it with a special plastic tape.
How to turn on the heated windshield
The design of the heating visor on the Lada Vesta is identical to its foreign counterparts. The function is controlled by the ignition button in the car's interior, which is also responsible for the electrically heated mirrors and rear window. In maximum configurations, Lada Vesta is equipped with a “MAX Defrost” button. This function provides for the simultaneous activation of high speeds of the stove fan, which significantly reduces the heating time. The function instantly activates the air conditioning, which is necessary to eliminate the effect of fogging, as this causes poor visibility and causes unnecessary inconvenience to the driver.
Which Vesta configurations include heated car glass?
Unfortunately, in the basic configuration of the Lada Vesta, you are unlikely to find such an option as a heated windshield. The minimum configuration that includes heating is Comfort. The cost of Vesta with a set of Comfort options is at least 592,000 rubles (at the end of March 2022). If you compare it with the base, the difference in price is a little more than 75,000 rubles.
If you fundamentally need this option, but there is no way to overpay almost a hundred thousand rubles, then you can install a heated windshield on your car in the future - it will cost much less, especially if you do this work yourself.
In Luxe trim levels you will receive the “Defrost MAX” button, which was already mentioned above. This button comprehensively launches all possible systems to speed up the heating of all windows and side mirrors of the car.
How heating works on Vesta
The windshield is pierced with the finest transparent threads, which directly perform the main function of incandescence located in the layers of glass. They can be viewed in full sun and do not cause discomfort while driving. The mechanism also includes cables, relays, and a fuse located under the front panel of the car. When turned on, the relay closes the contacts of the cap grid, as a result, the current, spreading through the system, heats the windshield. An important part of the design is the electronic control unit, which regulates unnecessary energy costs and, if necessary, turns off the heating.
Why are relays needed in the Vesta mounting block?
They are used in the same mounting block as fuses and are needed for switching high-precision networks with low-current buttons.
Most of the buttons used inside the car have small contacts, otherwise they would be large and take up a lot of space on the panel. In order to close a circuit with such buttons, for example, a compressor clutch, it is necessary to use more powerful contacts.
Relays have such contacts. This device is an electromagnet with a contact and a core. The last two have a wider contact area, which means the switched current is greater. The button closes the relay coil and the magnet is activated, closing the contact and the core. In this way, control of a powerful consumer by a button with small contacts is achieved.
Relays do not have a protective function and do not blow out like fuses, but they can fail over time. When a car relay breaks down, it begins to crackle or its coil simply does not work. In this case, it is recommended to simply replace the faulty element. To do this, grasp the housing with your fingers and pull, rocking to the side, to pull it out of the socket.
Causes of heating malfunction on Lada Vesta
With the introduction of the heated glass function, complaints began about the non-functioning of the heated windshield. However, the reason may not be the failure of the thermal option. As noted earlier, heating efficiency is observed down to -10 ° C. If the thermometer drops below, be patient and wait.
Sudden changes in temperature can lead to warping, cracking, which will cause serious problems as replacing glass takes time/money. The optimal waiting time for the visor to warm up in severe frosts is 10-15 minutes.
Also, the reason why the front heating does not work may be a blown fuse, in which case it is necessary to replace the part.
How to use it correctly
Owners of Lada Vesta have already noticed the dependence of the heating operation on weather conditions and temperature conditions. The heating function is most effective when the air temperature is not higher than -10 degrees. When the snow flooring has slightly melted and moved, you can remove it using the wipers; hastily turning it on can lead to deformation of the brush drive mechanisms. At lower temperatures, it takes longer to warm up the glass. In this case, you should not expect an instant result from the function.
Necessary tool
To ensure that the replacement of the VAZ 2110 windshield goes smoothly, you should get a gluing kit. When purchased through an online store, the TEROSON PU kit will cost about 1,150 rubles, but will quickly recoup the costs. Its composition:
- instructions for use.
- applicator;
- cloth for cleaning surfaces;
- 8596 sealing adhesive;
- cartridge nozzle;
- primer;
- cutting wire;
In addition, you need to have other devices on hand:
- new consumable.
- several office knives;
- solvent for nitro paint;
- a set of flat screwdrivers and spatulas;
With an assistant, changing parts is easier and faster.
Price is not a guarantee of quality! But you shouldn’t take the cheapest materials either - fakes are not uncommon.
Installation of heated mirrors for Chevrolet Aveo
Probably, Chevrolet Aveo owners have repeatedly encountered a problem when, in winter, during heavy snowfall, the side rear view mirrors lost their functionality. I had to open the window and clear the snow and ice crust from the mirror elements with my hands. A solution to this problem can be installing heated mirrors on a Chevrolet Aveo. I would immediately like to warn those who want to install it themselves. If you do not have experience in repairing Chevrolets, then entrust this procedure to knowledgeable people. Otherwise, you risk damaging the mirror element or damaging the electrical equipment of your Chevrolet Aveo.
First of all, you need to purchase heated mirror elements. GM catalog numbers 96800779, 96800780.
Instructions for installing heated mirrors on a Chevrolet Aveo
- First, remove the plastic trim and trim from the door.
- Unscrew the three bolts securing the mirror and remove it.
- Using a thin screwdriver, carefully pry up the mirror element along the edges and remove it (the glass comes out very easily).
- After removing the mirror housing, we find and remove the plastic plug; it is through it that the connection for the heated mirrors of the Chevrolet Aveo will pass.
- We prepare the wires by first attaching terminals to them, and pull them through the hole where the side mirror position adjustment cables are located.
- We insert the second end of the wires into the inside of the door and lead them through the rubber corrugation to the bottom of the dashboard to the fuse box.
- To stretch the wires into the interior, you need elastic steel wire. We disconnect the block with wires, which is located in the body pillar. Using a screwdriver, press the locking tab and pull it out.
- We insert a steel wire and stick it out through the hole in the interior trim.
- Using electrical tape, we wrap the wires to it, after which we tighten the wires into the car interior and place them in the groove of the block.
- We bring the wound wires to the fuse block, while securing the ground wire with a nut to a screw near the fuse block box.
- Now let's connect to the rear window heating wire of the Chevrolet Aveo.
- We unscrew the plastic washer-nut in the area of the clutch pedal and pull out the threshold.
- Then at the bottom of the rack we find the blue block and find contact No. 4 with an orange thick wire.
Carefully cut off the insulation on it and connect the second wire, which goes to heating the Sherole Aveo mirrors, after which we carefully insulate the connection point.
Connecting the heated Chevrolet Aveo mirrors on the passenger side is similar to the description given.
Connection
Not all 2180 owners are satisfied with the heating of the windshield, rear windows and rear-view mirrors simultaneously with the heater fan and air conditioning. There is a way out of this situation - installing a separate button. Even on Vesta models that do not have a windshield heating function as standard, it is possible to activate this very convenient function in case of replacing a double-glazed window. If for technical reasons there is a need to replace the heated windshield, you must contact an official Lada dealer. Under warranty, the procedure is free, subject to examination. You need to make sure that replacing your defroster windshield is the only solution to the problem as no part will serve you better than your own. Careful operation and compliance with specialist recommendations will significantly extend the heating time. Avoid high water pressure on the windshield when visiting a car wash. Timely replacement of windshield wiper blades is required, as low-quality wipers will scratch the surface of the glass.
Heated windshield | page 7 | lada xray club :: forum lada xray, xray cross
Hmm, well, specifically on my dick this behavior is not observed. My temperature is usually set around 22-24 degrees, and the windshield heating still turns on when I press the MAX button. At the same time, our heating power is not regulated in any way, i.e. it can only be turned on or off, except that you can actually turn on the left and right sides alternately, but again, both of them turn on at once. The only thing that, in my opinion, can change the heating power is the voltage in the on-board network. In the topic about the battery, I already described my problem, but I’ll briefly retell it. They write on the Internet that a generator with a heated windshield should be equipped with a 150A generator, and without heating - 120A. And now I have heating, and the generator is 120A. After taking measurements, I calculated that if the car’s MAX heating, heated seats and lights are turned on, then the consumption from the on-board network rises to 110A, which is clearly too much for a generator at idle speed. Therefore, during heating, energy is consumed, including from the battery, and instead of the usual 13.8V, the voltage in the on-board network drops to 12V and lower.
Heating with threads consumes 55A, at a voltage of 12V it is 660W, and at a voltage of 13.8 it is already 760W. The difference is small, but it is there. And several times I noticed such an effect that if the car is warming up at idle, then the windshield may not have time to warm up with threads in one turn on. But if you start moving, the windshield heats up much faster, right before your eyes. But all this is very subjective, since it happened at different temperatures, and I didn’t keep any measurements, much less records, about this.
And they once caught a glitch when they started the car, turned on the MAX heating, and immediately drove off. And at the moment of starting to move, some kind of switch clicked, the windshield heating turned on, but the heater fan stopped working. And I didn’t want to turn on anything until I disconnected the terminal from the battery.
Rate the article!
Checking and replacing the heating relay
Typical VAZ heated glass relay
Over time, problems with the heated rear window are often associated with circuit faults, a blown fuse, and a blown defroster relay:
- The purpose of the relay is to turn off the heating when the engine is not running. The most important thing is that heating does not drain the battery
- On vehicles equipped with a relay, this system can be housed in a standard relay box or fuse box
- It is very important here that the coil of this relay is constantly connected to ground
- In VAZ model cars, the rear window heating relay is used to turn on the heating for a certain time for fifteen minutes
- This system works thanks to the built-in timer
- And instead of the standard relay, a new one is simply inserted and the heating is turned on with the standard button
Relay replacement
If the glass heating does not work due to a relay malfunction, the instructions prescribe the following actions:
- This heating function is very convenient and even necessary
- We connect the conclusions of the 4th and 6th
- The heater relay must be located in the fuse box, which is located inside the car
- Then remove the heater switch from the instrument panel and disconnect its connector
- Be sure to check the status of the heater timer
- The indicator lamp (test) of the switch lights up when turned on and goes out after 12 minutes
- Then we check the operation of the heating element
- We turn on the heating by pressing the power button, after twenty minutes of operation the heating automatically turns off
- First, disconnect the battery from the ground
- It lights up only when the ignition key is turned in the lock and continues to work when the engine is running
- You can install the relay in the rear window heating system yourself or at a service station if you are satisfied with their price
- If the switch fails, it must be replaced
- If something goes wrong, you will need to replace the switch
- Next, you should check the condition of the circuit between the ends (terminals) of the 1st and 3rd connectors located on the relay side
- Then the condition of the circuit on the side that goes to the switch connector is checked
- When the ignition key is in the off position, there will be no voltage
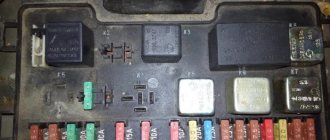
In the engine compartment
The mounting block is located next to the battery. It is closed with a protective cover. Photo is an example.
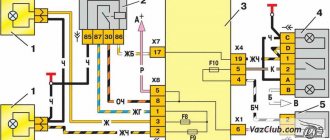
| Diagram of elements in the Vesta engine compartment | ||
| № | Decoding | Current, A |
| F60 | Electric power steering | 70 |
| F61 | Heated rear window | 30 |
| F62 | ESP stability control system | 40 |
| F63 | Air conditioner | 15 |
| F64 | – | 5 |
| F65 | ESP stability control system | 25 |
| F66 | Robotic gearbox | 2 |
| F67 | – | |
| F68 | Robotic gearbox | 70 |
| F69 | Air conditioner | 15 |
| F70 | Power supply circuits for fuses F4, F6, F7, F8, F12, F13, F14, F23, F26, F29, F31, F36, F37, F38, F42, F43, F44, F45, F47, F48, F49, F50 in the mounting block, located in the cabin | 60 |
| F71 | Generator | 60 |
| F72 | 60 | |
| F73 | Sound signal (beep) | 10 |
| F74 | Reversing light switch | 5 |
| F75 | Heated windshield | 60 |
| F76 | Anti-theft alarm | 10 |
| F77 | – | |
| F78 | Canister purge valve, engine control system sensors | 7,5 |
| F79 | Engine cooling fan | 40 |
| F80 | Heated windshield | 5 |
| F81 | – | 60 |
| F82 | – | 60 |
| K21 |
| |
| K22 | Heated windshield No. 2 | |
| K23 | Starter relay | |
| K24 | Horn relay | |
| K25 | Anti-theft relay | |
| K26 | Not used / '18-'21: Heated windshield No. 1 | |
| K27 | Engine control relay | |
| K28 | A/C compressor clutch relay | |
Operating principle, control unit
Lada Vesta in the “Comfort” configuration is equipped with a windshield heating system. Other modifications do not have this advantage; drivers are forced to use the oven heater to defrost the glass.
Sequence of actions when activating the mode:
- Shift to neutral.
- We insert the key and start the engine.
- After at least 1-2 minutes, press the MAX Defrost button on the windshield defroster.”
- Wait until the ice on the glass melts.
- If necessary, also turn on the heater.
- When finished, turn off the mode.
3_4
The photo shows the glass after 8 minutes of heating at an outside temperature of -13 degrees. The rear one has become transparent, but on the windshield there is only a narrow embrasure from the heater fan blowing. If you wave the wipers, they will not cause any damage to the ice on the glass. The photo shows the glass after 8 minutes of heating at an outside temperature of -13 degrees. The rear one has become transparent, but on the windshield there is only a narrow embrasure from the heater fan blowing. If you wave the wipers, they will not cause any damage to the ice on the glass.
The photo shows the glass after 8 minutes of heating at an outside temperature of -13 degrees. The rear one has become transparent, but on the windshield there is only a narrow embrasure from the heater fan blowing. If you wave the wipers, they will not cause any damage to the ice on the glass.
However, electronic diagnostics revealed some errors, and they were erased from memory. So far the frosts have receded, so I can’t say anything about changes in the heating operation yet. Taking this opportunity, I would like to ask the owners of Russian cars and foreign cars with a warm windshield: how efficiently does it heat up in yours?
Lada Vesta from ZR park: going for service
Control unit for ventilation and heating system with air conditioning (manual control)
- After turning on the air conditioner (separate button No. 18), the indicator lights up. Cooled air enters the car, and the humidity drops sharply.
- To cool the incoming air, press button No. 18.
- The minimum air temperature depends on the degree of air outside, the angle of solar radiation, fan speed, active recirculation mode and driving speed.
- The air supply mode is adjusted by pressing buttons numbered 11 – 16, the indicator light lights up.
Be sure to start the vehicle engine before activating the air conditioning system. Do not turn on the cooler when the outside air temperature is below 5 °C from approx.
- Do not direct the air flow towards the body, limbs of the driver or passengers.
- Before starting the air conditioning system (hereinafter - AC), make sure that at least one or more deflectors on the dashboard are in the open position. Otherwise, the air ducts will freeze and the SC will fail.
- It is strictly forbidden to direct a flow of cold air onto the windshield or side windows. This will lead to freezing and dulling.
- While the air conditioner is operating, moisture and condensation will accumulate under the bottom of the car on the asphalt. Don't worry, this is a natural process.
Active air conditioning consumes 5-7% of the power from the power unit and also increases fuel consumption by 3-5%. The indicator values are averaged; the higher the speed, the higher the consumption. When driving in mountainous areas, the SK coils can turn off automatically, as the load on the engine increases several times.
Air recirculation mode
Activation is carried out by button No. 19, the indicator light lights up. The air supply from outside is blocked, the climate control system takes the air flow inside the cabin.
The “Recirculation” mode is used to prevent smoke and exhaust gases from entering the cabin, as well as to accelerate the heating of the cabin during the first start after a long period of inactivity.
Do not overuse recirculation, as the lack of fresh air in the cabin causes drowsiness in the driver and passengers. Often this factor becomes the cause of accidents. To deactivate the mode, use the mechanical button (number No. 19). To start heating the rear and side windows, press button No. 15 once.
Flaws
Let us dwell on the negative aspects of the heating function:
- expensive replacement in case of breakdown. The slightest impact on the glass, for example, a pebble from under a wheel, leads to the appearance of cracks and huge cracks. Repairs can cost up to 100,000 rubles depending on the make of the car.
- temperature changes can lead to destruction of the glass surface (especially if the ambient temperature is -30 degrees). But it is worth saying that special relays are now used to solve this problem;
- the presence of thin threads forming a mesh interferes with the operation of radar detectors and other gadgets;
- high price for installing such an option (especially on German cars);
Malfunctions of the heating control unit
If after 5-7 minutes of operation the glass does not heat up, check the conditions:
- generator operation, measure the output current values.
- electrical wiring, in the area from the control unit to the generator, distributors;
- fuses (numbers 38, 44);
To carry out a complete diagnosis, seek help from a service station specialist. Only for prevention use a device such as a multimeter.
Conclusion
In the Lada Vesta Comfort, the glass heating can be turned on at the touch of a button. After a few minutes, the surface of the glass will be clear of ice and snow.
Of course, in critical frosts, when the temperature is below -17 - 18 ° C, the system is not so effective; it takes more time to “warm up”. To speed up the process, additionally turn on the heating element of the stove and turn off the air supply to the cabin through the dampers.
What are fuses used in cars?
Fuses are an indispensable part of any car, which is necessary in order to prevent short circuits in the electrical circuit that can lead to a fire. If the current exceeds the maximum permissible value, the fuse opens the electrical network.
Such an inexpensive part can save more expensive ones and save huge amounts of money on repairs. Agree that it is much more convenient to buy a fuse for a LADA Vesta that costs only a couple of tens of rubles. The cost of a fuse depends on the amperage for which it is designed.
The fuse consists of a working element, two contacts and a plastic housing.
If the fuses in the LADA Vesta fail for some reason, they should be replaced as soon as possible. It is recommended to avoid driving altogether until they are replaced. Without this element, you risk losing expensive parts and even more - creating an emergency situation on the road, because many of them affect the control of the car.
Self-installation
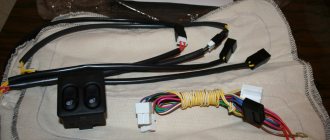
Autonomous installation of a heated windshield will require knowledge not only of electrical circuits, but also of installing the panel.
To integrate the option you will need:
- We remove the old windshield.
- Purchase and install a new one with heating threads.
- Connect the heater terminals to the power source.
- Install the relay and rear window heating button.
It is important to understand that not all models offer this feature. Therefore, installation is possible only if the system is provided for by the project and is installed in advanced configurations
To install the rear window, you will need to follow the same steps as for the front window.
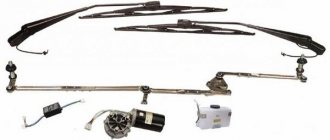
Heated injectors and wipers also require intervention in the car's wiring and the insertion of an additional button.
- connect complete blocks, relays and connectors.
- We carry out the wiring according to the diagram from the set of heated brushes;
- install the key into the console;
- remove old cleaning products;
Installation of injector wiring is no different from installation of heated brushes
it is important to select in advance a suitable part with a reliable fastening to the hood cover
Why do fuses blow?
If the insert burns out again, then there is some problem in the electrical circuit. This can happen for three reasons:
- Defective fuse. False alarms often occur with fuse links from cheap Chinese manufacturers. If the filament burns out, it is enough to simply replace the insert with a new one, but you should be prepared for the fact that replacing the fuse with a similar one after some time will lead to a similar result.
- Overload in the circuit. For example, the use of too powerful devices in the cigarette lighter creates an overload - the current in the electrical circuit exceeds the fuse rating. You should be careful with such devices as they can cause a fire.
- Short circuit. The car wiring may be interrupted by metal parts. For example, if the headlight circuit with plus and minus rubs against some metal mount or bracket in the engine compartment, a short circuit will occur: the current in the circuit will increase sharply, and the fuse-link will burn out. Often, short circuits in circuits occur as a result of unprofessional intervention when installing additional equipment, for example, a car alarm.
Reviews
| № | Positive |
| one. | Stepana, 44 (www.otzovik.com): the heating system (hereinafter referred to as СО) of the Lada Vesta is in working order; it takes no more than 5 minutes to completely clean the glass. |
| 2. | Fedora, 40 (www.zr.ru): In severe frosts, heating elements take longer to heat up, on average 7-10 minutes. If the temperature outside is below -15°C, this will only take a few minutes. |
| 3. | Vladimir, 22 (www.autobann.su): I’m happy with the machine, functionality, no comments. |
| 4. | Sergey, 33 (www.lada-vesta.net): The Defrost MAX system works well in cold weather, no comments. |
| 5. | Semyon, 43 (www.otzovik.com): 3-4 minutes after starting the CO, the glass heats up and the ice melts. |
| 6. | Svyatoslava, 44 (www.zr.ru): the car is two years old, the central heating works stably, without any problems. |
| 7. | Mikhailovicha, 20 (www.autobann.su): in winter the central heating unit worked at all “100”, the glass heats up in a matter of seconds. |
| eight. | Anatoly, 43 years old (www.lada-vesta.net): My positive feedback about the Defrost MAX system. In twenty-degree frost there were no problems with warming up. |
| nine. | Gennadievich, 39 (www.otzovik.com): the car is two years old, the systems are working fine, there are no comments. |
| 10. | Dmitrievicha, 43 (www.zr.ru): I recommend the Lada Vesta in the maximum configuration, a decent domestic car, good quality, affordable price. |
| eleven. | Konstantin, 35 (www.autobann.su): the heating system is good, I use it infrequently. |
| Negative | |
| 12. | Victora, 44 (www.zr.ru): CO does not help in severe frosts, insufficient heating, or icy areas. |
| 13. | Alexey, 37 (www.otzovik.com): The system worked for six months, after which the heating element burned out, I went to the service station for a warranty replacement. |
| 14. | Stepan Ignatievich, 46 years old (www.autobann.su): The implementation of CO in the second generation Renault Logan and Megan is better organized. |
Results
In severe frost (at -20 degrees), the defrosting procedure will be something like this:
- 7-8 minutes: heating has melted the ice from the main part of all glasses, you are good to go.
- 4 minutes – the mirror elements are completely dry, the snow melts on the rear window wires;
- 5-6 minutes: the windshield and areas on the side windows near the mirrors move significantly away from the ice;
- 1 minute: the ice on the mirrors begins to melt;
- 2.5 minutes - the ice on the mirrors has almost melted, the bottom of the windshield (stove) begins to melt);
In warmer climates, you can start driving earlier, once the engine speed drops to operating speed. There are no comments on the operation of Vesta’s heaters; one can only criticize the fact that the seat heating is not adjustable.
Do-it-yourself modification
Attention! You perform all actions at your own peril and risk. The author is not responsible.
You will need: install an additional non-locking button in the car panel (or buy a block with five buttons), a relay with two groups of switching contacts, 1N4007 diodes and a transistor.
Description of the circuit: When the button is pressed, the low level at pin S1-14 activates the standard heating of the entire CBKE and at the same time the relay is activated due to the pickup by the transistor for a time determined by the capacitance of the capacitor. After 3-4 seconds, a low level appears at pin S1-34 and fixes the relay in the on state for the time specified in the CBKE (6 minutes). The relay turns off the heated mirrors and rear window, leaving only the windshield.
As a result, when you press the additional button, the indicator of the standard button lights up and only the heated windshield turns on. After 6 minutes it turns off on its own.