I made a powerful steamship whistle from plastic pipes with my own hands. Using various plumbing components you can assemble interesting crafts. For example, a steamship whistle (typhon in English). Moreover, to make a cool signal, I don’t need to weld, solder or glue anything. Read and see below about how to make a beep - a typhon with your own hands. The money spent will be repaid by the results obtained. It is impossible to buy such a beep anywhere - you can only make it yourself. I show you the diagram and secrets of assembling a steamship whistle with your own hands.
Making a pneumatic signal with your own hands
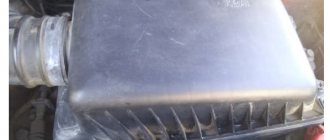
Three powerful pipes You will definitely need to purchase the following elements to create a pneumatic signal with your own hands:
Compressor. Most car enthusiasts in Russia and neighboring countries use products under the Berkut brand. It has several models, the power of the R15 will be enough for you. Solenoid valve. With its help, air is discharged from the receiver into the pipes. It can come with them. For convenience, we recommend purchasing these
However, you can buy the valve separately - then pay attention to the voltage and diameter. Check valve. It is installed at the outlet of the compressor and should not allow air to flow back from the receiver. Pressure switch
Used for this. So that the compressor turns off when the required pressure is reached and turns on again when it drops. Receiver. A 4-liter model with a pressure of 12.5 bar is suitable. It should have two holes - one for connecting the compressor and blower, the other for draining condensate. Pipes.
Also useful are pneumatic connectors (according to the thread size and the size of the holes of the receiver, compressor and pipe) and fittings.
Components for assembling a steamship whistle
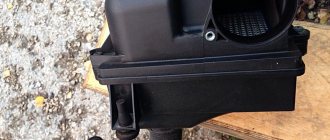
The following parts were purchased from a plumbing store:
1. Bend 40 mm - 90° - 4 pieces;
2. Siphon for sink included - 1 piece;
3. Transition 50 mm - 40 mm - 1 piece;
4. Bend 110mm - 87° - 1 piece;
5. Transition 110 mm - 50 mm.
I used a swimming cap as a membrane. Even a piece from a torn cap is enough. Let's start assembling the Typhon.
Sound signal device for VAZ 2107
VAZ 2107 cars are equipped, depending on the year of manufacture, with two versions of the sound alarm. On models since 2000, a sound signal is installed on the VAZ 2107, consisting of two separate devices. One source produces low tones, and the second high. The devices are fixed directly to special brackets and are located on the left side of the radiator, under the grille.
Early models of VAZ 2107 cars are equipped with non-separable sound emission sources that produce only one tone. The product is also mounted on the front part near the radiator. The connection diagram of the element is simple, and in case of failure, eliminating the damage will not be difficult.
The sound signal device for 2 sources has the following form:
The contacts are located on the steering wheel, and when you press the button, they close. Springs with a slip ring are used as contacts. The contact ring is located on the back of the steering wheel and provides high-quality contact when pressing the button. In addition to sources and a button, the design of the VAZ 2107 sound alarm also includes a relay and a fuse. The relay is designed to reduce the amount of current flowing to the device button.
The current level is also monitored by fuse F7, located in the circuit. The size of the fusible link is 20A for injection sevens, as well as 16A for carburetor old versions of the VAZ 2107.
Advantages and disadvantages of a pneumatic signal
We have already listed the advantages of pneumatic signals, but it is not difficult for us to repeat them. A very loud sound level will allow you to become “noticeable” among other motorists on the road, which can prevent an accident. In addition to the pneumatic signal, you also get a standard compressor on the body of your car, which is also not bad at all. The disadvantages of a pneumatic signal include the high cost of the equipment, as well as the complexity of its connection. In addition, working with pneumatics requires high tightness of the connections, otherwise the compressor will be turned on from time to time to pump into the receiver. Such inclusions can significantly drain your battery, especially during long-term parking. In this case, it is better to connect power to the system through a relay that turns on when power appears in the ignition system circuit. In any case, the tightness of such a system will be lost much earlier than the functionality of the standard signal, which will lead to the need to replace the sealing elements and valves in it. That is, we can say about more expensive maintenance. In any case, weighing all the pros and cons and making a choice based on what is a priority for you is only your prerogative.
Side rubber floor mats for Lada Priora, VAZ 2110, 2111, 2112
with 14% discount
Pencil for removing small scratches fix it pro
with 16% discount
Reflectors at the door
How to install Volga signals on a LADA car
All cars have a device for producing sound signals (horn), but its sound does not always suit the owner. This is the main reason for replacing the standard horn with alternative options (for example, with a sound signal from the Volga). Let's look at this improvement in detail.
Nowadays, horns are usually used in pairs. One with a high tone, the other with a low tone. This provides strength and beauty of sound.
You will need to buy:
Installation and connection of a sound signal from the Volga is shown using the example of the Lada Vesta sedan. On other cars (for example, Lada Largus, Granta, Kalina, Priora, Niva 2121 or XRAY) all actions are performed in a similar way.
Pneumatic signal connection
It is turned on separately from the standard horn, by a button on the control panel. To start a powerful compressor, a relay is installed (in the diagram: No. 4). The signal itself is attached to a frame element or underbody protection.
The wiring is neatly laid out in the engine compartment.
The corrugation is lowered to the installation site, the supply wire is connected to the pneumatic compressor.
Why through a relay? A direct connection will melt the signal button after 10 presses: the pneumatic compressor current is about 15 amperes.
Important: Direct power connection (using the car's standard fuses) is not recommended. In the event of a short circuit, you can de-energize important components of the electrical circuit
Any additional device is connected through its own fuse.
Many car enthusiasts are not satisfied with the sound of the factory signal and want to install a pneumatic signal. Nowadays, there is a large selection of signals for a car, and here the choice remains with the consumer. From many listened signals, such as Volgovsky, HELLA, etc. The pneumatic signal still sounds louder.
Installing a pneumatic signal on a VAZ is quite simple, or rather, you can simply connect plus and minus to the compressor from the factory terminals. Next, we connect the “pipe” to the compressor and everything is ready. You can choose the location of the signal at your discretion, both behind the bumper and in the engine compartment, fortunately there is enough space.
Of course, there are some nuances in installing the “pipe”, or rather, these are blown fuses. A standard 10 A fuse usually does not cope with its purpose and, in violation of the vehicle operating rules, it is necessary to install a fuse with a higher rating, at least 15 A. Below is a video example of installing a pneumatic signal.
Also, if you want to get an even louder sound from a pneumatic signal, you can take a compressor for 2 - 3 pipes separately and put it with an adapter on one large pipe. The result will be an even shriller beep.
Diesel horn for a car: how to “blow” it correctly while driving?
Community of fans of diesel locomotive Typhons on cars - who are these people? This is a kind of small elite club of lovers of giving their car truly unusual properties, causing shock even among seasoned tuners, whose cars would be difficult to recognize inside and out by the development engineers themselves...
Background
The pneumatic horn was the first warning device on automobiles in the early days of motor vehicles. Remember? “Balaganov pressed the pear, and old-fashioned, cheerful, suddenly ending sounds burst out of the brass horn: “Matchish is a lovely dance, ta-ra-ta, matchish is a lovely dance, ta-ra-ta...”.
The notes of matchish, an ancient Portuguese melody that became popular throughout the world in the first decade of the twentieth century, were produced by a hand-held pneumatic signal (apparently polyphonic, with several horns) on the famous “Antelope-Wildebeest” - Lauren-Dietrich by Adam Kozlewicz from Ilf’s “The Golden Calf” and Petrova...
Today, the pneumatic signal has ceased to be widespread on cars, having been preserved as a standard factory unit mainly on trucks, and even then no longer out of necessity, but as a design prank of development engineers. However, the technology, which is gradually becoming a thing of the past, has given rise to a unique and very interesting hobby movement - lovers of super-powerful air horns on ordinary passenger cars.
Manual pneumatic horn of an English Commer bus from 1906. "Antelope-Wildebeest" had about the same. Photo: Les Chatfield.
Applied pneumatic technologies
Actually, true “pneumatic signal specialists” recognize only real diesel locomotive typhons - powerful “horns” that can only be pumped with good air pressure under high pressure. These guys don’t waste their time on all sorts of Chinese chrome pipes with pumps the size of a cola can, offered by Chinese cellars. Train Typhon – period! Russian-made, or even better, American-made. Even one typhon will make the driver of the car you honk on the road “put down bricks”! What if there are several of them installed?!
But in order for Typhon to make the longed-for roar of a wounded elephant, the entire system must first be prepared and installed. A diesel locomotive pipe needs a high-intensity air flow - this cannot be provided by any pump powered from an on-board 12-volt network, even the most powerful one, designed for the wheels of SUVs and trucks.
The fact is that such a piston compressor produces high pressure at low output, but the opposite is needed. Therefore, the pump is combined with a receiver - an intermediate air storage tank with a volume of 10 liters or more. After starting the engine, the auto pump fills the receiver through an electrovalve with a pressure regulator. The required atmospheres are pumped - the system turns off the pump and the receiver stores the required supply of air under pressure. You need to signal - press the button, the working electric valve opens and releases a stream of air into the typhon's pipe.
The pneumatic system, installed in the American style, under the bottom of the SUV (no need to be afraid of moisture and dirt in sunny California!) - you can see a compressor, a receiver with a pressure gauge and a bleed valve, and four different-toned horns.
In general, a pneumatic horn with accompanying components is a fairly simple thing. But installing it on a car is not an easy task. In fact, in each case it is an individual work. Fasteners are made specifically on site, body elements are trimmed, if something does not fit, power wiring is pulled - after all, compressors are voracious and demanding of current! Sometimes commercially available barrel-shaped receivers are used. And often an individual air tank is made - shaped to fit it into the niches of the car.
Your humble servant, the author of this article, at one time installed two half-meter Chinese pipes on a Kia Rio - and, I must say, he spent almost the whole day! The system had to be distributed under the hood, for which 3 individual brackets of a rather fancy shape were made by welding from a steel strip with a cross-section of 25x4 - one for each pipe and another one for the electric compressors. And this is for a system that is trivial by the standards of true pneumatic alarm systems, without a receiver and with poor diaphragm pumps! A serious system is an order of magnitude more labor-intensive.
All this greatly limits the distribution of truly powerful typhons on cars - people either do not have enough qualifications and tools, or funds for installer services, or they are simply afraid to lose the warranty due to interference in the design of the car so noticeable to official servicemen...
Pneumatic signallers in the USA
Manny, the owner of a California air horn shop known in narrow circles, told Kolesa.ru about the overseas community of fans who love to “blow” from the heart.
– Who is the average American buyer of pneumatic signals?
– This is a white male between 16 and 50 years old, usually the owner of a large SUV or pickup truck. For the sake of appearances, they all say that they install air systems for safety, but, let's be honest - in reality - to have fun and scare unsuspecting people!
– What do your laws say about pneumatic signals - about installation and use?
– There are no laws specifically prohibiting pneumatic horns on cars. But most cities have their own ordinances to control loud noise. This includes pneumatic signals, loud exhaust, music, and the like. If you use pneumatic alarms responsibly - that is, only to prevent a dangerous situation - there will be no complaints against you. But, of course, they can be prosecuted for hooliganism!
– Is the market for components for pneumatic signals large?
– Since we started working in 2002, it has only grown. But in general, it is quite niche, there is no need to talk about mass production.
– The YouTube video does not fully reflect the volume of the beep. If a client comes to you and can’t decide what he needs, how do you act in such a situation?
– For this we have a table-stand with pipes, a pump and a receiver. We roll it out into the yard and clearly demonstrate the superiority of the pneumatic horn over any other!
– How much did the most expensive system created with your components cost?
– The most expensive and powerful “horn” that we have is the Nathan AirChime K5LA, it costs $1,849.99. This is a whistle used on high-speed trains, it is very powerful and incredibly loud. The man built a system on two of these horns - he used large 10-gallon receivers, high-performance industrial compressors and a bunch of other switching components, and as a result his system became the most expensive we have ever sold - over $4,000.
Pneumosignalers in Russia
Kolesa.ru talked about the same thing with Victor, the owner of perhaps the only store in Russia that sells components for giving a car a pneumatic voice.
– What kind of cars do buyers of Typhons and pumps come to you in?
– Most often these are large SUVs, but it is not uncommon to be installed on budget sedans and VAZs. There are cases when a pneumatic signal with components and installation costs almost as much as the car itself - people just want to give the car originality in such an extravagant way.
– Is there any practical aspect involved in installing a pneumatic horn?
– Based on the experience of communicating with people who created powerful signaling systems on Typhons, we don’t particularly like to have fun, as in numerous videos about American owners of pneumatic horns in cars, who deliberately scare people while having fun. In Russia, there is a danger of getting hit with a brick against glass for something like this... Our people want to have more, according to the principle “to have it” and “not like everyone else.”
– Do you remember interesting episodes from installation practice?
– I remember a client from somewhere in the north who purchased a set of pneumatic alarms for a boat to scare away bears along the banks of the river. There was another interesting case - a client arrived in a brand new LC Prado and wanted to control the Typhon manually - in the sense, not to connect the solenoid valve parallel to the standard horn, as is usually done, but to honk with the manual valve, opening the air line from the receiver to the horn. They installed a manual valve from a train for him - next to the gearshift handle; a person did not spare the interior of a new car for the sake of the desire to feel like a driver to the fullest...
Source
Installing a new sound signal on VAZ 2112, 2111, 2110
The standard factory signal is often very weak and is not enough for other road users to notice the car. It is for this reason that a different signal will be installed, which used to be on the Volga car. Before installation, you must make sure that the noise level is no more than 120 dB, because otherwise there will be problems with maintenance. How to make the beep louder? Should you completely replace the standard system or simply install additional signals in the car's engine compartment?
There are several ways to install a signal from the Volga on a VAZ 2112, 2111, 2110. Simply replacing is not an option. The problem is that two wires are connected to the standard sound signal - positive and negative: ground is supplied through the case, and the positive wire gives direct current and in this case it also powers the radiator fan. In order for the new signal from the Volga to work, only one positive wire is needed. The minus is supplied through the body.
In this case, different current consumptions are also realized here. The standard signal consumes only 5 amperes, and the signal from the Volga consumes 8 amperes. For this reason, you will need to install a 4-pin relay. The relay can be installed in the fuse box or in the engine compartment of the car. To install a relay inside the cabin, you need the sound signal itself, a single-core wire, a wide female terminal, a 4-pin 30 ampere relay and a relay socket to operate. The sound signal is much larger than the standard signal, so in this case it is necessary to install it on the bracket so that the standard sound is not lost. It is best to install the relay in a free fuse block cell.
Pin 85 is used to connect a 13-pin relay (signal switch on the steering wheel). If you look at the diagram, it is indicated in gray-black color, but in the photograph it is white. You need to connect the wire of the 87th contact of the relay to the free space. To supply the positive wire, you must first route the wire of the 'Ш5-6' connector to the 30th contact of the relay and, using a jumper, to contact 86. The plus is supplied when the signal is pressed through contact 87. There is no need to use the red-white wire for the signals, but current is supplied to it and in this case it is better to install insulation on it. There are many advantages to this method: the relay is located in the mounting block and moisture or water will not get there, the factory wiring is located in the engine compartment and in this case the wire will be taken separately and not from the fan.
Now we need to consider the case of installing a relay in the engine compartment. There are many differences here from the first option, because all the work will be carried out in the engine compartment. All the same materials are used, only in this case you will also need to purchase: a hanging fuse, 8 pieces of female terminals, a two-meter plastic tube. The horn can be installed wherever it is convenient and you need to connect it according to one of the circuits. In the first scheme, the current is taken from the fuse block through its own fuse, and in the second scheme, the plus must be taken directly from the battery and through a separate 20 ampere fuse. Many recommend installing Volgov signals on VAZ according to the second scheme.
The relay must be placed where it will not be exposed to moisture or water. It is best to wrap the relay with insulating tape. Using a size 8 wrench, you need to unscrew the 2 bolts securing the radiator grille and unclip the 2 lower latches, remove the grille completely. We remove the standard sound signal and lay the wiring according to a new diagram. All connections must be carefully insulated, and the wire that connects the wires from the signal must be inserted into the corrugation. We install the relay in the desired position and install the radiator grill back.
Instructions for installing an alarm device
Installing this system on your car is carried out in several basic steps.
- First you need to find a place for the compressor. This may not be so simple. Most cars have a space under the bumper where you can place it.
- Remove the compressor from the frame, it is not needed and interferes with installation.
- The pipes can be installed on the radiator cooling system. They and other elements should not interfere with the heat transfer of all elements of the car.
- Now lay the pipes, fittings and valves. To connect the threads of pneumatic tubes, you can use FUM tape.
- Take the wires from the standard power button into the interior.
- Now you need to connect the system to the battery. It is best to do this through an additional relay, so that power is supplied only after the car is ignited.
- Lay air lines up to the air signal.
- You can make a connection through a relay, which will close the contacts of the system toggle switch and control it. It will also be activated from the standard button on the steering wheel.
- Before assembling the car body, check how everything works. Place the air intake fittings higher in the engine compartment. Check how the pressure is maintained.
Removing the Frame from the Compressor
Remember that you can always remove the air hose. It is long enough that you can use it to inflate the tires of any wheel. This is an additional advantage of installing such a signal.
Price issue
Video “Do-it-yourself pneumatic signal”
This video talks about how to install a pneumatic signal with your own hands (the author of the video is dimonchik445).
The all-pervasive horn of a locomotive or heavy-duty truck, warning us of incredible danger, cannot go unnoticed. He instills in us not only a clear warning, but also respect. A kind of reflexive instinct. Every time we hear the sound of a pneumatic signal, we have a desire to be away from the source of its radiation. Nevertheless, we sometimes feel awkward when, glancing at a vehicle emitting this incredible howl, we notice only an ordinary sedan, unremarkable among other cars, or even an SUV
So, it is already clear to everyone that the pneumatic signal is not only a certain element that attracts the attention of onlookers, but also, more importantly, a certain guarantee of your visibility in the event of preventing an accident on the road. Our article will be devoted to the topic of installing a pneumatic signal on a car. It is also worth mentioning that along with the pneumatic signal you will also receive a standardly installed wheel inflation station, because the compressed air receiver is used for the pneumatic signal
The pump and receiver will provide not only the operation of the pneumatic signal, but also, if necessary, inflation of the wheels
It is also worth mentioning that along with the pneumatic signal you will also receive a standardly installed wheel inflation station, because a compressed air receiver is used for the pneumatic signal. The pump and receiver will ensure the operation of not only the pneumatic signal, but also, if necessary, inflating the wheels.
The process of installing a pneumatic signal on a car with your own hands
The pneumatic signal will be installed on a KIA Sorento 3.5. In fact, a set of ready-made solutions from . This way a station capable of delivering up to 7.5 a will be used (BERKUT) SA-03)
Let’s say right away that the use of a more productive station and a station with increased pressure is not justified; for a pneumatic signal, a pressure of 5 atmospheres and an air supply of 2.85 liters, which corresponds to the volume of the station’s receiver, is quite enough. In addition, the BERKUT TG59 installation kit is used, which is actually a set of valves and adapters. An audible pneumatic signal from Cicada was also used during installation. One of the main problems is choosing a place to install the pneumatic compressor, because free space on the car is extremely limited; to understand this, just look into the engine compartment of most modern cars. As a result, the optimal installation option for the compressor turned out to be the space under the bumper.
But first, in order to compactly install the compressor, it must be removed from the frame. In this case, the compressor and receiver can be installed locally.
So, after disassembling the compressor for its further installation, we select only all the essentials that are necessary for the functional operation of our pneumatic signal. The frame on which everything was installed earlier will not be useful to us for installation.
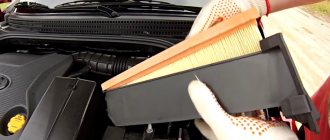
We try on the components of the pneumatic signal. Everything will be pre-installed on the power elements of the “TV”. Here it is necessary to pay attention to the fact that the mounted elements do not interfere with the heat transfer of the radiators of the air conditioner and cooling system.
The air pneumatic signal “pipes” were installed “against the background” of the cooling radiator.
Next, service, control and regulatory equipment is installed. This is how pipelines are laid, fittings and valves are installed. When installing pneumatic pipelines, it is necessary to use FUM tape to connect the threads. This is despite the fact that the threads are, in most cases, conical, and therefore self-sealing. Control wires are routed from the standard system activation button, which will go into the cabin.
Sound signal VAZ 2107
The manufacturer of the VAZ 2107 equipped the car with two versions of the sound signal (S). In the first case, two sound elements (SE) of low and high tonality were installed (signal types S-304 and S-305), which made it possible to obtain a loud and surround sound. These elements were mounted on a metal bracket in the engine compartment near the radiator of the cooling system.
The second option involved installing one ZE type 20.3721–01, also located on a bracket in front of the cooling radiator. All sound elements are non-separable and cannot be repaired.
Purpose of the sound signal
The sound signal is designed to warn road users of danger and prevent accidents. The signal is given by pressing the ZS button, which is located on the steering wheel.
Traffic rules limit the use of ES to two situations.
– to warn other drivers about the intention to overtake outside populated areas;
– in cases where it is necessary to prevent a traffic accident.
Traffic rules of the Russian Federation
https://www.pdd24.com/
In the first case, the vehicle informs the driver of the car being led before the start of the maneuver. The situations that fall under the second paragraph of the traffic rules are more varied. The following options are possible.
There are many such cases. Timely and reasonable use of traffic signals will allow road users to avoid big troubles.
Sound signal device VAZ 2107
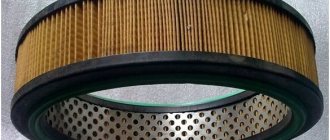
The housing of the electronic device contains a metal membrane, which oscillates due to the movements of the metal armature. These vibrations are the source of sound. The armature itself is driven by a magnetic field created by a coil and winding.
The principle of operation of the ZS VAZ 2107 is as follows. The electromagnetic field that occurs when voltage is applied to the coil pushes out the membrane armature, which, in turn, opens the breaker and turns off the coil. As a result, the membrane returns to its original position, and the armature again closes the breaker contacts. As a result of repetition of such cycles, the membrane vibrates, producing sound.
The principle of operation of the VAZ 2107 sound signal
Voltage is supplied to the terminals of the sound elements through a relay designed to close and open an electrical circuit with a high load. This low current controlled relay avoids overloading some controls. Its malfunction can lead to overheating of control buttons and toggle switches and their failure.
When the contacts of the signal activation button are closed, terminal 85 of the relay is connected to ground (the negative terminal of the battery). In this case, positive is constantly supplied from the generator to terminals 86 and 30 of the ZS relay. Terminals 85 and 86 are the negative and positive of the relay coil. When voltage is applied to them, the contact between terminals 30 and 87 is closed. A plus is supplied to the last terminal, which is connected to the positive contact, through the normally open contact. As a result, when the negative contact of the protective element is constantly connected to ground, an audible signal is triggered.
Step-by-step manufacturing instructions
Many drivers are not satisfied with the standard signal, as it is sometimes hard to hear in heavy traffic. Therefore, car enthusiasts install additional horns on their cars. You can buy a ready-made device, but it will not be cheap. You can install a simple “quack” with your own hands.
Tools and materials
To make an air signal for a passenger car with your own hands, you need to prepare the following tools and materials:
- the housing in which the device will be placed;
- speaker for playing a signal;
- set of tools;
- transistors Kt 805 or Kt 819, the latter are preferable since they have more power;
- capacitors;
- switch;
- chip TDA 2005;
- resistors;
- LEDs to increase the load;
- electronic alarm system for a bicycle or an asymmetrical multivibrator.
A rechargeable battery is used as a power source, which provides a voltage of 12 V, sufficient to power the alarm device.
Stages
If you use an asymmetrical multivibrator to make a quack, it is assembled according to the following scheme:
Power is supplied to the multivibrator from the car battery. To increase the sound power, you need to make an amplifier. To do this, you need to assemble a bridge circuit, the basis of which is the TDA 2005 chip.
After the amplifier is assembled, it, together with the multivibrator, is placed in a metal case, which is placed on the radiator using fasteners. To reproduce sound, you can use a regular 25 Hz dynamic head or its equivalent. It is placed in the engine compartment and connected to the amplifier output. To turn on the horn, you need to place the switch button in a convenient place.
To generate a signal simulating quacking, you need to press a button. When you press a button, the multivibrator begins to produce alternating pulses, which generate sounds reminiscent of the quack of a duck. The amplifier makes the sound choppy and more powerful. To increase the volume, you can use a metal pipe about 20-30 cm long and place a speaker in it. An air horn, assembled with your own hands and placed under the hood, will produce quite powerful sounds that will attract the attention of road users.
Installation of a pneumatic sound signal on a VAZ 2107
Some car owners install a powerful pneumatic sound signal on the VAZ 2107. Installation of such a device is quite simple. You will need a grinder, a drill and a standard set of plumbing tools.
First you need to determine where the horn and compressor will be located, and then make brackets to mount them. Typically, the pneumatic signal is installed behind a decorative grille in front of the radiator.
Installation is carried out in the following order:
- We make brackets from a suitable material (metal corner or strip).
- We install the brackets on the top panel in front of the cooling radiator in accordance with the dimensions of the pneumatic claxon and the design of its fastenings.
We install the pneumoklaxon on the brackets.
We mount the compressor on the standard signal brackets or on the panel near the radiator.
We connect the horn and the compressor with a hose from the pneumatic signal kit.
We connect power to the pneumoklaxon from the standard AP.
Making a 12 Volt air horn for a car with your own hands: from theory to practice
An air horn on a car serves to attract the attention of road users, especially pedestrians. If the standard signal is not satisfactory, you can replace it or install an additional one. The article discusses the device, the operating principle of the signaling device, and also gives instructions on how to make a 12 Volt air signal for a car with your own hands.
Causes
Let's look at the main reasons why you may need to repair the VAZ 2110 sound signal
- the most common is that the safety device is broken. The breakdown is easy to repair, since the horn itself is not affected;
- short circuit in the vehicle's on-board network;
- Horn malfunction. If the situation has not changed after changing the safety unit, check the operation of the horn by connecting it to the battery. If the structure is not broken, it will indicate this when it receives a signal;
- Perhaps oxidation of the steering wheel elements has occurred. This can cause deposits to appear and the impossibility of transmitting impulse for the harmonious operation of the horn;
- failure (wear) of the contact ring on the steering wheel. Wear is a problem from which no one is immune, so try to maximize the service life by lubricating with graphite lubricant.
The problem may be with the clamping contacts that are worn out. They are located on the steering column. The breakdown is common in domestically produced cars. Graphite lubricant will come to the rescue: if you use it to lubricate parts that are most susceptible to demolition, you can significantly reduce the need to go to a service station.
Sound signal 20.3721 is a device in a car that converts direct current flowing through it into high-power sound radiation of an audible frequency spectrum. It is installed primarily to improve the safety of road users.
Sound signal connection diagram 2110
The vehicle is equipped with a type 20.3721 horn, which is mounted on the radiator frame panel amplifier in the engine compartment of the vehicle. It is activated by the contacts of the central button of the steering wheel. There is a slip ring that is mounted on the steering wheel, and spring-loaded contacts on the steering column switch connector. It is recommended to change the sound signal if it does not produce a sound signal at all or if it cannot be adjusted. Adjustment is made using a screw located on the signal housing, turning the screw in one direction or another.
Before purchasing alternative sound signals, make sure that the signal level is not higher than 120dB, otherwise you will not pass MOT. How to make the sound signal of a VAZ 2110 louder? Well, of course, replace the standard sound signals with louder ones or install additional horns under the hood.
Design and principle of operation of an air signal
The first klaxons began to be produced in 1908. Translated from Greek, the word klaxon means “howl.” The first sound signals were a structure that consisted of a plate with a spring secured with a rivet in the middle.
When the gear wheel rotated, it came into contact with a spring plate, and a specific sound was produced. To amplify the sound and direct it in a certain direction, a speaker was installed. Later, a horn appeared in which the gear rotated thanks to electricity.
Thanks to technological progress, signaling devices have improved. A modern sound alarm system includes sound signals (one or more), a switch, a sound signal relay and wires for connection.
- by device: with and without a speaker;
- by sound: tonal and noise;
- according to the principle of operation: pneumonic, electronic and electromagnetic.
Signaling devices receive power from the vehicle's on-board electrical network.
Let's consider the design and principle of operation of signaling devices.
Pneumonic
The principle of operation is similar to the “horns” that were installed on the first cars and horse-drawn carriages. Air is supplied under pressure from the compressor, which moves through a special pipe, creating vibrations and causing it to make specific sounds. Such devices are quite expensive, regardless of the shape and design of the product.
Pneumatic devices differ in signal strength and pipe shape. Their frequency range is created by pipes of different tones. To ensure their sound, it is necessary to install a compressor that can provide a pressure of at least 6-10 atmospheres. The number of horns can be different; the melody of the signal depends on their number. When installing a pneumatic signal on a car, you additionally need to install a relay with a program that will control the opening and closing of the solenoid valves.
Electromagnetic
These devices are based on an electromagnet. It is attached to the main part of the signal - the membrane. The winding of the electromagnet core is connected to the battery through a breaker. The horn is connected to the vehicle ground using a button. When the driver presses the signal button, the core rod begins to move, causing the membrane to vibrate. As a result, a powerful sound is heard (the author of the video is tora 18).
Klaxons of the electromagnetic type differ in the sound emitter:
- Disc (“pancakes”). They can be collapsible or non-collapsible. The second type is more compact and therefore takes up less space in the car. In addition, disk signals can be closed or open. Disc horns are installed either under the hood or in plain sight. It is possible to install several beeps of different frequencies and tones.
- "Snails" These devices are difficult to install because the bell is curved and must be pointed with the open end facing forward. The signal power is very high. They make a sound so loud that it puts pressure on the eardrums. The beeps are produced in two-tone mode, but you can install a relay, thanks to which the voltage will be supplied to the windings alternately, as a result the specified melody will sound.
- "Horns". The bell of these horns resembles a “straightened snail” in shape and looks like a bugle or trumpet. They produce worse sound, but are more convenient to place under the hood.
Electronic horns are designed using a sound generator and a speaker.
VIP signals that are installed on special vehicles require special attention. They are often called "quacks" because the sound they make resembles the cry of a duck. Although their use is prohibited, drivers install “quacks” on their cars.
On modern vehicles, signaling systems are often used in pairs. One horn is set with a high tone, and the second with a low tone. Together they produce beautiful and powerful sounds.
Signaling devices are used in security systems. In this case, they are used as guards to protect vehicles. A signal is sent in the event of an attempted theft or unauthorized entry into the car. The signal is controlled remotely from the key fob.