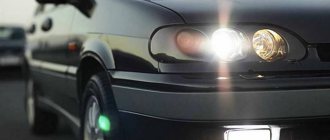
If you install fog lights on a VAZ 2110, you can kill two birds with one stone. Namely, to transform the appearance of the car, and increase the level of your own safety, and add comfort to driving at night.
Kirzhach with lamp H1
Therefore, today we will talk about how to connect fog lights on a VAZ 2110, what is required for this and what result you will ultimately be able to achieve.
Additional block
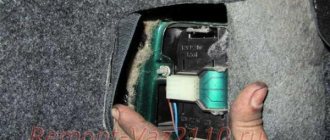
Additional relays are mounted on a bar and located under the dashboard, near the front passenger's feet. To get to them, you need to remove the right tunnel lining. Next to the additional relays is the electronic engine control unit (ECU).
If its connector interferes with access to the relay, disconnect it by first removing the negative terminal from the battery.
Basic Rules
To ensure good visibility in thick fog, it is important to follow these rules:
- Adjust the edge of the light beam so that the light beam is above the horizontal plane.
- Place the flashlight as close to the road as possible. This is necessary to make it easier to adjust the edge of the light beam.
Correctly adjusted headlights guarantee excellent visibility on the road, even in difficult road conditions. To prevent deterioration in the quality of the glow, it is important to monitor the condition of the ceiling. If necessary, polish the surface and remove scratches, as they impair light transmission.
Location
Since AvtoVAZ engineers tried to do everything so that car owners would not have problems replacing relays and fuses, it would be stupid to come up with a clever arrangement. Therefore, finding them is not difficult.
- The main unit is located to the left of the steering wheel;
- You will find the first additional block in the dashboard inside the niche, directly behind the main mounting block;
- The second additional block is located in the same place, only on the opposite side.
We will get acquainted with each block separately so that you do not have any confusion when searching for one or another fuse.
On injection engines with 16 and 8 valves, the location of the MB is identical, so the instructions are equally relevant for owners of both versions of the dozen.
Main MB
Relays and fuses are located here. Let's look at their descriptions in more detail and separately.
Let's start with the relay.
| Designation | What is he responsible for? |
| Car lamp operation | |
| Electric windshield wipers | |
| Special relay that interrupts the turning lights when the hazard warning lights are activated | |
| Turning on the low beam | |
| Turning on the high beam | |
| Area for installation of additional device | |
| Rear window heating operation |
Each fuse is indicated with a current rating and designation. This allows you to use a new fuse with parameters that meet the requirements of the equipment connected to it.
| Designation | Rated current | What is he responsible for? |
| Lamps for license plate illumination, instrument panel illumination, indicator lights on the instrument panel, left side position lights, luggage compartment illumination | ||
| Low beam left headlight | ||
| Left high beam | ||
| Right front fog lamp | ||
| Electric door windows | ||
| Carrying lamp, cigarette lighter | ||
| Radiator fan, horn (horn) | ||
| Heated rear window | ||
| Windshield wipers and washer | ||
| Backup fuse | ||
| Right dimensions | ||
| Low beams in the right headlight | ||
| High beams in the right headlight | ||
| Left fog lamp | ||
| Heated seats in the cabin | ||
| Hazard signal, turn signals | ||
| Stop signal, ignition switch illumination, interior lighting | ||
| Interior heater, glove compartment light, cigarette lighter | ||
| Reversing light, brake light monitoring | ||
| Rear fog lights |
First additional block
Inside the central panel there is the first of two additional blocks provided for the VAZ 2110. You can find it at the bottom left on the front passenger side.
This block provides three fuses. Each of them has the same power rating - 15A.
- The first fuse is responsible for your vehicle's ignition and controller module.
- The second protects the mass air flow sensor, heating sensor, speed sensor and purge valve.
- The third is necessary to ensure protection of the injectors, as well as the fuel pump. So if problems arise with the fuel pump, the first thing we recommend is to check the condition of the fuse responsible for it.
Plus, the same block includes three relays:
- Relay number 4 is responsible for the electric fan;
- Relay number five is the electric fuel pump;
- The third relay is part of the ignition protection group on your VAZ 2110.
Second additional block
The second additional block should be looked for already in the driver’s feet, on the right. Behind the protective cover on the console you will find the required board.
There are three more components on it. They are responsible for:
- Immobilizer operation;
- Additional optics (mostly fog lights);
- For the operation of the car's central locking control.
Identifying problems with fog lights
The car owner can begin the check in the order that is most convenient for him. But as practice shows, it is better to check the fuse first - a rather vulnerable part of any electrical circuit.
Fuse
Each of the installed “foglights” is served by its own fuse, rated 7.5A, marked F8 and F9, and which is located in the central unit. Initially, its integrity is visually assessed, then it can be checked with a multimeter. It often happens that the car was purchased second-hand, and there are simply no fuses in the block. In this case, you should look for them in the engine compartment, and most often they are located next to the headlights themselves. When both fog lights do not light up at once, you should not waste time on fuses, since there are few cases when both fuses light up at once.
Materials and tools
You can easily buy a ready-made PTF kit with all the wires, and then you won’t have to figure out where the fog light relay is located on a VAZ 2110. However, if you purchase spare parts separately, this will diversify the installation options, plus it will allow you to save money.
Connection kit
Therefore, you need to purchase the following:
- Two sets of headlights;
- Plastic pads;
- Headlight frames;
- A key with a yellow indicator for it;
- Relay;
- Wiring. Choose an option with two copper conductors and double insulation, for example ShVVP2. A cross section of 0.5 mm is suitable, but if the lamps are powerful, 0.75 mm is better;
- Ground terminals;
- Female/male terminals - wide and narrow terminals.
It is not worth taking the mother-father complete with wires. It is better to crimp them using pliers when the wiring is already connected.
Pay attention to what kind of dashboard you have. If it is an old model, buy a set of fog lights for the VAZ 2110, and if it is a Euro dashboard, then it is better to use the PTF for the VAZ 2115.
As for the light bulb, 55V is more than enough power. We strongly do not recommend buying cheap fog lights, since their service life is very short.
Unexpected reasons for non-working PTFs on the VAZ-2110
But we will return to it later. There is still a lot that is still unknown in the design of foglights, relays, switches and lamps. For example, a possible reason for the failure of fog lights could be a completely unexpected breakdown.
First of all, we check the bulbs themselves; you can get to the left one through the hood.
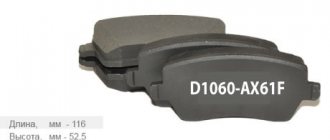
On some versions of the VAZ-2110, a PTF from the Avtosvet plant (Kirzhach) was installed with a socket for the H1 lamp. Stock lamps are not the best quality and they do not like sudden changes in temperature.
It is quite difficult to get to the right fog lamp through the hood; it is easier to remove the headlight itself by unscrewing the screws.
During sudden cooling, when leaving the garage in winter, for example, or after turning off the headlights, the contact leg of the lamp bulb simply fell off the conductor. At the same time, visually the halogen lamp looked absolutely intact. It was enough to apply a plus directly to the leg itself, and the lamp would light up. The fault was due to poor-quality resistance welding, and it is almost impossible to detect the cause without a detailed examination of the lamp itself and its dismantling.
Of course, it is impossible to provide for all failure options, but we will consider the most common ones.
One fog light on VAZ-2110 does not light up
Scheme of work.
There may be plenty of options here. Apart from damage to the lamp itself or its filament, the picture is as follows:
- Fuse. When correctly installing PTF on the ten, as a rule, they use the scheme presented above. As can be seen from the diagram, a separate fuse, F4 or F14, is responsible for the operation of each lamp. They are located in the mounting block, which is located in the niche of the front panel to the left of the driver. When replacing a fuse, we do not use bugs or jumpers, but only new fuses.
- Ground contacts. In the case when, when installing the PTF, each of the headlights was connected to the negative separately, the loss of ground contact for each of the headlights threatens failure. We diagnose the lack of contact with ground either with a multimeter or by visually inspecting each of the contacts. If it is oxidized, we clean it and the place where it is attached and restore contact.
- Lamp power contacts. In this case, you will have to check the integrity and condition of the contacts on the connection block both to the lamp itself and in the Ш1 connector on pins 6 or 1.
Two fog lights do not light up at once
If this happens, it is impossible to allow two lamps or two fuses to burn out at once. Most likely, the reason should be looked for elsewhere:
- Oxidation of contacts on connector Ш1 in the mounting block. We remove the connector and evaluate the condition of the contacts. Just in case, check fuses F1, F14, F4.
- PTF switching relay. We check the relay by pressing the fog light switch button. If we hear a click, the relay is working properly. If the relay does not click, it has failed or contacts 85, 86, 87 or 30 have oxidized. The relay can be installed normally in the mounting block, or in another place, at the discretion of the owner or the electrician who carried out the installation.
- PTF power button. You can simply check it by closing contacts 6 and 7. If the relay works, the warning light and fog lights come on, change the button.
- Oxidation of the ground contact of the PTF relay or the lights themselves.
General recommendations
And the power can be taken either from the ignition switch or from the side lights switch, which is undesirable, since you can leave the PTF on along with the lights on, and this will lead to battery discharge. Good luck with your search, bright and smooth roads!
Installation
A diagram for connecting fog lights on a VAZ 2110 is always offered with the purchased kit, so there shouldn’t be any special problems. But keep in mind that something may need to be corrected or adjusted to ensure effective operation.
Before installing fog lights on a VAZ 2110, you need to decide on their location. If the design of the car does not provide space for them, then they will be mounted under the front bumper.
The PTF connection diagram is as follows.
- We install the wiring for fog lights on your car. This is done through the left side under the hood along the fender. The main wiring is approximately the same.
- Now you need to connect power to the button, which is located on the dashboard. According to the factory diagram, power is installed from the fuse on the right dimensions. But you can use the light switch button or the lead from the ignition switch to turn on the head optics. That is, in such a situation, the fog lights will turn on when the ignition is on. Some take power from the output to the dimensions. This can be done, but is not recommended. If you forget to turn off the PTF, the battery will soon run out.
- We connect the plugs to the headlights. If after this the fog lights on the VAZ 2110 do not light up, an error was made in the circuit. Check every element of the circuit. It is not difficult to determine where the fog lamp relay is located on a VAZ 2110, so make sure that the relay clicks. If it is present, then the coil will activate it. It is not uncommon to have to change a relay.
The last stage of installation begins after all the wires have been connected, the power has been turned on, and the light from the fog lights has spilled out. It's about adjustment.
Checking whether the PTF lights are shining correctly is quite simple. Get out on the road and see how the fog lights work. If the light is directed slightly downwards, the luminous flux touches both the road surface and the side of the road, then everything is working perfectly, and you don’t have to worry about the wrath of oncoming drivers whom you will blind.
If there are deviations from the norm, be sure to make adjustments. This work can be done independently, but ideal room conditions will be required. Therefore, it is better to trust the specialists from the car service center, who have a special stand, a flat area, and equipment for adjustment.
When the headlights on any car simply do not work, this is an ordinary case. The cause could be the light switch, fuses, or other common things. The “ten” has a feature, without knowing which you can check everything you can to the point of stupor, but still not find the fault.
Replacement example
Since all fuses are located in a common block, the replacement principle is the same for all. Therefore, we can consider an example of only one element that needs replacement. Let this be the cigarette lighter. It is designated F6 and F18 (see table).
The first priority before replacing a fuse is to check its functionality. Many people immediately change the element without even considering whether the problem of the unit failure really lies in it.
To check the fuse, you should perform several step-by-step operations:
- Start the car by turning the key in the ignition;
- Make sure that the cigarette lighter is inside its socket, where it should be;
- Wait about 20 seconds;
- Take out the cigarette lighter and check if it is warm. If the temperature remains the same, that is, the element is cold, then the fuse needs to be changed.
How to do it? Pretty easy.
- Get to the panel on which the board with the relays and cigarette lighters is located. The mounting block is located, as you remember, to the left of the steering wheel, at the bottom of the dashboard.
- By pressing the special latches, the cover will move away from its seat. Be careful not to break the latches.
- The mounting block has now opened in front of you.
- If you look at it carefully, you will see special tweezers on the edge. It is provided by the factory in order to carefully remove fuses and insert new elements in their place.
- Remove the affected fuse. In this particular situation, we are talking about the cigarette lighter fuse, so you need an element designated F6 or F18.
- This component burns out due to the fact that modern motorists need additional electrical equipment, such as vacuum cleaners and electric pumps. All this is connected to the fuse and overloads it. Hence the frequent breakdowns.
- Using the same tweezers, insert a new fuse with the same parameters indicated on the mounting block.
If for some reason you don't have tweezers inside your black box, small pliers can serve as an alternative to this tool. Never try to remove the elements with your fingers. The nests are quite fragile, and with your hands you can only loosen it and damage it.
Replacing relays and fuses is a simple and inexpensive repair. But if you damage the block itself, then you will have to spend more, and you will definitely have to work hard.
Are fuses repairable? No. These are fusible elements that simply become deformed when burned. Therefore, repair is possible only in one option - replacing blown fuses.
The car is equipped with lighting devices, which are necessary for safe movement on the road and driving in the dark. Turn signals are one of the most important light signals. Serves to indicate when changing lanes, as well as to turn on the hazard warning lights. Quite often the VAZ-2110 fails. This happens for various reasons, which we will discuss in this article.
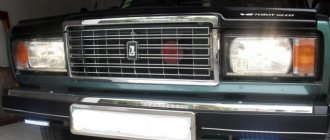
Why VAZ-2112 headlights do not work and repairs
On VAZ-2112 model vehicles, left and right headlights are mounted on the front. This design combines both low and high beam. Manufacturers can be Bosch or Avtosvet, respectively, and the products have minor differences. However, the mounts are always located in the same places, which allows you to easily install headlights made in different factories. The light bulbs used are also absolutely identical. Their characteristic feature is the presence of only one filament coil.
What to do if for some reason the headlights installed on the VAZ-2112 do not work? We'll talk about this further.
VAZ 2114 where is the rear fog light relay located?
Lada 2106 new life Logbook Ground wire from battery body
Dear visitors of the “Cars” website! We will be very grateful for your comments on the video clip “VAZ 2114 where is the rear fog light relay located”, registration is not required for this. We also ask you to let us know if you have any problems playing the video.
Thanks, I'll put this tape on tomorrow. all that's left to do is find him
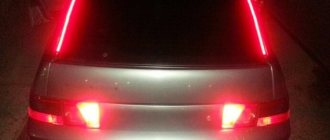
It will be unlucky for someone who follows the trail in a traffic jam and will burn their eyes.
Thanks for the idea with aluminum tape. I'll use it when the opportunity arises. I consider paralleling lamps to be a useless exercise; a bright additional stop—a light on the rear window—would be more effective. You can see better further, and not only to the back of the head, and closer to the driver’s main line of sight, and therefore more informative.
Well done, handsome guy, he did everything well, cheaply and cheerfully. I’ll do the same too, otherwise these fogs will be of no use.
and when the fogs are turned on, the stop lights will be constantly on.
At first I thought he was giving nonsense advice, but it’s not bad, but how can I do it on 10k?
people, I will answer any question about repairing a vase, I am a specialist
Don't the cops give a damn about this? Previously, it was impossible to pass inspection with such tuning.
I did this on 14, only I changed the light control relay 2 times because it was on and then the rear fog lights disappeared
I don’t know what to do, but at first it was fun, so I don’t recommend paralleling it, the switch is on
I don’t know if I’ll do this for myself or not, but I don’t understand people’s arguments about whether fog lights will burn your eyes out. You put 2109 and a couple of foreign cars, turn on the 2109 fog lights and just a bunch of foreign cars. It’s just that the feet of foreign cars are much brighter than the PTF of the VAZ 2109. So nothing bad will happen in this situation.
It was necessary to make a jumper through the diode with the fog lamp. so that when the fog lamp is turned on, the brake light does not light up. and whoever says that your eyes will be blinded in a traffic jam, they are mistaken; modern cars with diode lamps are very blinding compared to conventional incandescent lamps
good video, made it on nine, it turned out well
Is it possible to make sure that all 4 lights are on, and when braking, so that they light up even brighter?
I have a VAZ 21099, I soldered a jumper, I turn on the brake light, my headlights immediately turn on, why is that???
HAS NO ONE GIVEN YOU PUSSY FOR THIS???
Deprivation of rights
thanks for the advice
You need to put a diode on the jumper and the fogs will work separately from the stoplights. and when you press the brake, both the stops and fogs will work
It is prohibited to use fog lights as a brake light. You will not pass the official inspection