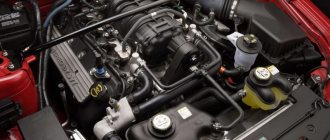
The task of the fuel pump is to pump gasoline from the car tank to the engine injection parts - the injectors. By moving fuel, the unit creates the necessary pressure in the fuel line. The failure of this equipment affects the entire machine control system.
Many Lada Kalina car owners face problems with fuel pump malfunction. If the situation is serious, then you should immediately contact a specialized service. But you also need to know what you can do on your own in this case.
Lada Kalina - the fuel pump does not pump
The task of the fuel pump is to pump gasoline from the car tank to the engine injection parts - the injectors. By moving fuel, the unit creates the necessary pressure in the fuel line. The failure of this equipment affects the entire machine control system.
Many Lada Kalina car owners face problems with fuel pump malfunction. If the situation is serious, then you should immediately contact a specialized service. But you also need to know what you can do on your own in this case.
What can cause "triple"?
The causes of the described malfunction can be very different.
To reliably install them, you must first find the faulty cylinder. It is recommended to start such a search from the very moment when it was discovered that the check engine light was on. At least, such recommendations are given by the manufacturer who installed an automatic fault warning system on the car.
The search procedure is quite simple. To do this, it is enough to disconnect the power tips from the spark plugs one by one. As a result of this alternate shutdown, it is possible to determine the inoperative cylinder by the sound of the engine. If the sound of the engine has changed, this means that the culprit of the “triple” has been detected.
If the check light on Kalina is on and computer diagnostics of the engine is carried out, the faulty cylinder will be indicated by the computer. At the same time, this diagnostic method can also help to establish the initial causes that led to its malfunction. They could be the following:
- incorrectly set ignition timing;
- presence of air leaks in the vacuum brake booster;
- defective spark plugs;
- breakdown of electrical wiring and capacitor wires;
- presence of air in the exhaust manifold;
- wear or breakage of piston rings;
- burnout of pistons and valves;
- incorrect valve timing;
- cylinder head defects;
- severe wear of the valve stem seals;
- poor carburetor adjustment;
- air filter contamination;
- use of spark plugs incompatible with this engine.
In this case, the main malfunction leading to the fact that one of the cylinders becomes inoperable is considered to be the failure of the spark plugs. A sign of this may be the fact that Kalina’s engine does not warm up well, especially in the morning.
Signs of a fuel pump malfunction
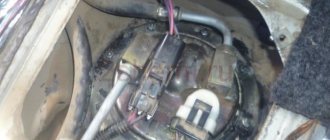
The fuel pump on the Lada Kalina car is quite simple in design and quite reliable. It is capable of supplying the required volume of gasoline from a tank located at a considerable distance to the car engine. The operation of the unit stops immediately after stopping the motor, which makes it safe to use. At the same time, the equipment is very demanding on the quality of gasoline. The pump requires periodic cooling. And if the fuel pump of the Lada Kalina does not pump, then the reasons can be found both in the device itself and in other systems of the car.
Signs of a fuel pump failure may include:
- When the engine is cold, starting is difficult.
- The car moves unevenly, with jerks and dips in the gas pedal.
- The engine cannot be started.
- The indicator of insufficient pressure in the fuel line is on.
- During starting, you can't hear the pump running.
The equipment may also fail while the vehicle is moving. In this situation, the car will move until the system runs out of fuel. The motor runs intermittently and stops completely. Such problems may occur periodically or be constant. When any of these signs are present, it is worth diagnosing the car's systems.
Prevention of car engine tripping
Prevention of such a phenomenon as engine “triplication” is that the car owner needs to promptly eliminate the most common malfunctions of the engine, as well as other related systems. To do this, it is necessary to strictly adhere to the periodic maintenance schedules established by the manufacturer for the vehicle. At the same time, if you have little experience in owning a car, it is better not to engage in serious technical work yourself, but to entrust their implementation to experienced specialists.
In addition, it makes sense not to delay carrying out prevention at the first deterioration in engine performance, attributing them, for example, to low-quality gasoline. At the same time, all preventive measures should be carried out only in those auto repair shops where experienced craftsmen work. For example, incorrectly set ignition timing can lead to the appearance of “triple”. Unqualified service station employees very often sin with this, especially if the car owner is a novice behind the wheel and has little understanding of the technical side of the matter.
In the same case, when all systems and components of Kalina work correctly, the “triple” effect should not occur. In this case, the service life of the engine should be significantly reduced, since the power unit, in which one of the cylinders is inoperative, may experience increased loads, leading to its accelerated failure.
It is worth mentioning the Traffic Rules, which directly prohibit the operation of a vehicle with a faulty engine. Therefore, it is better not to risk either money or rights, and if a “triple” effect occurs, immediately send the car for repairs.
Problems with cars are always unpleasant, and when the 8-valve engine on a Kalina, which has not yet driven 50,000 kilometers, fails, it is also insulting. But this problem does not appear immediately, but only when the engine warms up a little. Then the “engine malfunction” light starts flashing.
Turning off the ignition and restarting the car immediately solves the problem. Or rather, it stops for a minute, but then the games with nerves begin again.
Causes of gasoline pump malfunction
If Kalina’s fuel pump does not pump, then the reasons will be in the equipment itself or in other parts of the system. First, you should make sure that there is fuel in the tank, a spark in the spark plugs, the battery is charged, and the starter is working. If everything is in order, then you need to continue checking. If the cause of the malfunction is identified, for questions regarding the purchase of auto parts to eliminate it, you can contact the specialized online store automechanika38.rf.
Electromechanical equipment may not function correctly or stop working due to a malfunction in either the mechanical or electrical components of the system.
- The fuel pump fuse has blown - you should remove the element from the fuse box (located in the engine compartment). If the contact has visible damage, the part needs to be replaced.
- The equipment relay is faulty - check the electrical wiring, contacts between the unit and the diagnostic block, as well as the relay. Using a test lamp or multimeter, check the presence of voltage at the pump chip. A correctly operating relay makes clicks when the ignition is turned on, after the required pressure has been reached in the fuel line.
- There is no contact of the equipment with “ground” - it is necessary to apply ground to the part chip. The wire is located under the instrument panel and runs through the interior of the car. It is worth checking it, cleaning the contacts, and fixing them securely on the pump.
- The electronic control unit is faulty - the ECU needs to be repaired or replaced.
- A breakdown in the car alarm, poor installation of the security system - electrical wires may be mixed up, errors may have been made when connecting the alarm.
- Insufficient pressure in the fuel line may be the result of contamination of the gasoline filter or the filter mesh of the pump itself.
Many car owners prefer to drive with a half-empty fuel tank. However, the fuel pump in this case often overheats, which will ultimately lead to equipment malfunction. The reasons why the fuel pump on Kalina does not turn on may be the breakdown of individual parts of the unit. To determine the problem, it is necessary to remove the equipment and diagnose it.
IAC cleaning
Do-it-yourself troubleshooting of the idle air regulator consists of simply washing it to remove carbon deposits. To do this you need to follow the instructions:
- disconnect the wire plug from the sensor;
- Unscrew the two fastening screws with a small shaped screwdriver and remove the sensor from the mounting socket;
- Clean the needle cone using WD-40 or carburetor cleaner.
The same means can be used to wipe the regulator contacts and the entire throttle assembly.
Throttle valve
When the driver presses the gas pedal, the throttle valve opens, allowing more air into the combustion chambers. Oxygen is mixed with fuel, after which the prepared mixture burns. The more the driver presses the gas pedal, the wider the throttle opens and the more air flows in. But often carbon deposits accumulate on the walls of the damper, and its loose closure causes disturbances in the operation of the power plant.
The throttle assembly is located behind the engine air filter. This arrangement is typical not only for the Lada Kalina, but also for many other cars. Depending on the engine type, the damper operation can be controlled by an electronic gas pedal or a cable drive.
Many car enthusiasts have come across the concept of floating engine idle speed. For the Lada Kalina, as practice shows, this is a common malfunction that can be fixed with your own hands, but sometimes you will need to use a car service.
RPM fluctuates at idle
This may be due to many factors.
Let's consider the main reasons for the occurrence of floating engine speeds:
- Fuel system malfunction
.Malfunction of fuel system elements
- Ignition problems
.Problems with the ignition switch or wiring
- ECU errors
.Troubleshooting ECU errors
- Poor quality fuel
.Low-quality gasoline directly affects the operation of the power unit
All these reasons contribute to the appearance of such an effect. The most common reason is problems with injection.
Treatment methods
So, let's consider the sequence of actions to eliminate the causes of floating engine speed.
Fuel system
As practice and experience show, floating speeds appear in the event of an uneven supply of fuel to the combustion chambers, or a constant change in the amount of the fuel mixture.
Cleaning a removed injector
First of all, this is due to the injectors, which may be dirty. At the same time, this may not be felt when driving, but at idle the tachometer will immediately show it. Therefore, it is necessary to dismantle and check the injectors on a special stand.
Clean fuel pump mesh
Also, the malfunction may be caused by a breakdown of the gasoline pump, which does not supply fuel evenly or a clogged fuel filter. If necessary, you need to replace the filter element and check the fuel pump.
Cleaning the throttle body
A change in the amount of fuel mixture may be due to a clogged throttle or worn air filter. Therefore, the filter element changes, and...
Removed throttle before and after cleaning
Ignition problems
Problems with idle speed may occur due to incorrect operation of the ignition system. Namely, it may be related to the lock or wiring. So, it is worth checking and, if necessary, replacing damaged elements. It is best to change the ignition switch assembly and test the wires that go from it to ensure they are working properly.
ECU errors
Often, a car malfunction is associated with, as well as a malfunction of the controllers on the board. Of course, another reason could be the firmware that is out of order. Many car enthusiasts change the operating system, but this does not always help.
ECU removed from the vehicle
As practice shows, an ECU malfunction can pose a problem for the performance of many systems. Therefore, if the fault cannot be eliminated using the previous methods, it is necessary to replace the control unit. Of course, installing the operating system from the Lada Kalina Sport K-Line can help, but the problem does not always disappear completely.
Poor quality fuel
In many cases, poor quality of the fill can cause clogging of the fuel pipeline and injection system, which in turn gives the effect of uneven fuel supply. To eliminate the malfunction, you should drain the old fuel, clean the fuel system and fill in with new high-quality gasoline.
It is worth understanding that not only the operation of the engine, but also its durability depends on the quality of the fuel.
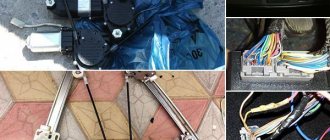
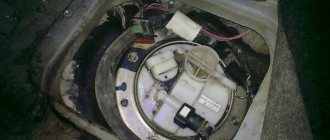
Self-removal of equipment
When the fuel pump on the Lada Kalina does not turn on, you can dismantle it yourself. The unit is located in the rear half of the machine. To remove it, you need to have a Phillips screwdriver and pliers on hand.
- The negative cable is removed from the battery.
- The pressure in the fuel system is relieved.
- The rear seat of the car is removed.
- Under the carpet on the floor there is an access cover to the equipment.
- The four bolts holding the cover are unscrewed.
- The wires are disconnected from the part connector.
- The petrol hoses are disconnected by pressing the screwdriver on the block.
- The plate securing the fuel pump housing is unscrewed (clockwise).
- The equipment is removed from the gas tank.
After removal, the part can be diagnosed.
Pinout BN VAZ 2113, 2114, 2115
— block the headlights; — gear motors for headlight washers*; — fog lights*; — ambient temperature sensor; - sound signals; — engine compartment lighting switch; — electric motor of the engine cooling system fan; — Generator; — low oil level indicator sensor; — washer fluid level sensor; — front brake pad wear sensor; — cable lugs connected to a common windshield washer pump**; — windshield washer pump; — headlight washer pump*; — end of the cable for connecting to the washer pump on VAZ-2113 and VAZ-2114 cars; — low oil pressure indicator sensor; — engine compartment lighting lamp; — a tip for connecting to the wiring of the engine control system; — windshield wiper gear motor; — starter; — a unit connected to the wiring of the ignition system on carburetor cars; — coolant temperature sensor; — reversing light switch; — low brake fluid level indicator sensor; - accumulator battery; — low coolant level indicator sensor; — relay for turning on fog lights; - mounting block; — brake light switch; — socket for a portable lamp; — hydrocorrector scale illumination lamp; — parking brake warning lamp switch; — block for connecting a backlight lamp; — switch for instrument lighting lamps; — Change in understeer; - hazard warning switch; — front seat resistance relay; — ignition switch; — rear fog lamp circuit fuse; — front seat resistance fuse; — lock circuit fuse; — front ashtray lighting lamp; — ignition relay; - Easier; — glove compartment lighting lamp; - glove compartment light switch; — heater fan electric motor; — additional resistance of the heater electric motor; — heater fan switch; - heater switch illumination lamp; — lamp for illuminating the heater levers; — gear motors for front door windows; — front right door power window switch (located in the right door); — gear motors for entrance door locks; — cables for connecting to the front right speaker; — gear motors for locking the rear doors; — cables for connecting to the rear right speaker; — door lock control unit; — wires for connecting to radio equipment; — windshield wiper switch*; — rear window resistance switch; — relay for turning on the rear fog lights; — connection block to the resistance of the right front seat; — rear fog light switch; — resistance switch of the right front seat; — fog light switch*; — switch for external lighting lamps; — left front seat resistance switch; — connection block to the resistance of the left front seat; — cables for connecting to the front left speaker; — left front door power window switch (located in the left door); — front right door power window switch (located in the left door); — cables for connecting to the rear left speaker; — side direction indicators; — light switches on the front door baskets; — Light switches on the rear door pillars; - ceiling; — ceiling for individual interior lighting; — a block for connecting to the electrical wiring of the fuel pump; — trunk light switch; — combination of devices; — Luggage compartment lighting lamp; — display unit of the on-board monitoring system; - on-board computer*; — block for connecting the wiring of the engine control system; — external rear lights; — rear interior lights; — pads for connecting to the rear window resistor; — dish lights; — an additional brake signal located on the spoiler.
Repair parts
It is worth carrying out independent equipment repairs if you are completely sure that the malfunction lies precisely in it. A large number of plastic elements make the pump very fragile. For this reason, care must be taken when disassembling.
- Using a screwdriver, you need to pry up and remove the drain module of the part.
- The ground wire will be disconnected from the equipment.
- The intermediate wire connector is disconnected (from the inside).
- The pressure regulator is removed.
- The gasoline element module is removed by pressing the plastic retainer.
- The filter mesh is removed from the housing. If it is dirty, it can be cleaned. But it is more advisable to install a new mesh.
Damaged elements must be repaired or replaced with new parts. At the same time, it is advisable to replace the fine fuel filter. It is located near the jack cup in the right rear wheel arch. The equipment is assembled in the reverse order.
If Kalina's fuel pump does not work, the reasons often lie in a malfunction of the part itself. This equipment is inexpensive. It is quite possible to remove the unit and replace it with a working one yourself. It is better to purchase original spare parts.
Source
About work culture and regulations
The fuel system of LADA Kalina (and not only) requires cleanliness of both the gasoline itself and the components involved in its supply to the engine. All dismantled parts of the system must be perfectly cleaned and washed before reinstallation. When replacing the mesh, we also recommend replacing the filter used for fine fuel purification. Where is this filter located? It is located inside the right stern wheel arch near the jack stand cup. According to the regulations, this element requires replacement no less than after 30 thousand kilometers.
How to check if the fuel pump is working properly
1200 rub. for the photo report
We pay for photo reports on car repairs. Earnings from 10,000 rubles/month.
Write:
The causes of fuel pump failure are not always the same, and the devices themselves can be electrical or mechanical. Diagnostics of the performance of these types has differences, so we will consider ways to check the operation of gasoline pumps separately. However, the operation of the fuel pump can be checked in a maximum of 7 stages.
The need to check the fuel pump appears when the following signs of malfunction occur:
- the engine stalled;
- the car moves unevenly, jerkily;
- the engine idles unstable and does not start;
- there are “floating” speeds;
- increasing noise, whistling when the car is moving.
Checking the serviceability of the fuel pump on the injector
When, when you turn the ignition key, you hear a slight buzzing, a slight hum, this is how the fuel pump works, pumping gasoline creates pressure in the system. If, when you try to start, there are no such signs of the fuel pump working, then you can assume a malfunction of the electrics, the pump itself or its individual parts. Therefore, let’s look at how you can check the operation of a gas pump using a step-by-step logical chain. Starting from whether power is supplied to the fuel pump and ending with whether the fuel pump pumps at all, and if so, what pressure is created in the fuel rail.
Step 1: Checking the fuse
Checking the fuel pump fuse involves inspecting the integrity of the conductive plate and, if broken, replacing it. But if there is no new fuse, then wind one strand of copper wire around the fuse contacts. If it burns out again, it means the problem may be in the wiring.
Stage 2: Checking the relay
To check the fuel pump relay, remove it from the socket and connect a 12 volt light bulb according to the diagram. If the light bulb works, the relay itself is also working properly. An alternative is to use a multimeter in ohmmeter mode to measure the resistance of the relay coil winding. One probe is connected to terminal 85, and the other to 86. The device will show a break if the relay has failed.
Make sure that the terminals are not oxidized - this will negatively affect the power supply to the fuel pump engine!
Stage 3. Checking the power supply to the BN
Checking the fuel pump voltage is done using a multimeter . The probes of the measuring device in voltmeter (from 0-20 volts) must be connected to the power terminals of the fuel pump. Turn on the ignition and take readings on the device. 12-12.5 volts is normal operating voltage. If there is voltage, but the pump does not work, check the electric motor.
Stage 4. Checking the fuel pump motor
To prevent damage to the electric motor, we supply 12 volts directly from the battery to the fuel pump terminals. It works - we check its performance, check valve, measure the pressure with a pressure gauge. If it doesn’t work, check the coil for a break.
When voltage is applied to the terminals of the gasoline pump, does it not work? Let's check the stator winding: take a tester (multimeter) and switch it to ohmmeter mode, it should show resistance, otherwise there is a problem with the winding and it needs to be replaced. If there is a resistance reading, the problem may be that there is a short winding on the fuel pump body. The tester probe goes to the positive terminal, the second one goes to the body. If it shorts, there will be no break.
Step 5. Checking the coarse filter
By removing the coarse filter (see vehicle technical documentation) from the fuel pump, you can even visually determine how dirty it is. If there is a large amount of deposits, it is recommended to replace the filters; if the problem occurs on the road, use a brush and gasoline to clean it.
Step 6: Check the check valve
The check valve must constantly prevent the movement of liquid in the opposite direction. During operation, its performance decreases, which reduces its technical characteristics.
1 way . Checking the check valve involves measuring the pressure with a pressure gauge. It needs to be connected to that part of the system that is directly involved in supplying fuel to the internal combustion engine. Pressure readings should not exceed 3 kg/sq.m. see (true for passenger cars). And when the engine is stopped, the pressure should not drop sharply.
Checking and cleaning the check valve
Method 2 . To check the operation of the fuel pump check valve without a pressure gauge, you need to clamp the return line and watch how the engine operates. If the check valve is faulty, the internal combustion engine will operate at higher speeds (provided there are no other problems).
3 way . Combines diagnostics and cleaning of the check valve at the same time. Remove and inspect it—clogging that requires cleaning can be seen with the naked eye. You can blow out the valve with a dense stream of air, but it is better to pass water through it under pressure. This way you combine checking the valve with cleaning it. If after this the valve does not work, it needs to be replaced.
Step 7. Pressure check
In order for diagnostics to correctly determine pressure readings, you need to reset the initial fuel pressure by turning off the fuel pump fuse.
Checking with a pressure gauge how the fuel pump pumps
How to check a fuel pump with a pressure gauge
You can check the fuel pump with a pressure gauge for serviceability as follows: connect the device to the fuel rail. The output is through the edge of the hood onto the windshield, where we install the device securely.
Static position . Turn the ignition key and look at the pressure gauge readings, they should not exceed 3.7 atm .
Dynamics . We turn on third gear (speed about 50 km/h), observing the pressure gauge data. When driving, if the problem is pressure, the readings will be either below 3 atm. , or above 3.7 atm .
Low pressure in the fuel system may be due to a fuel leak. The passage of fuel will show a decrease in pressure below 1.6 atm. Fault location: injector or fuel regulator.
It should be noted that, despite all the similarities (principle of operation, purpose), the methods for diagnosing a mechanical fuel pump differ, and in what way we will consider in more detail below.
Replacing the idle speed sensor on Kalina
The operation of installing or removing the product is not particularly difficult and is accessible to any car owner, regardless of the level of training, under almost any conditions. Replacement is carried out in the following sequence: 1. First step. During any work related to the vehicle's electrical system, the on-board system is de-energized (to do this, simply disconnect the battery terminal). 2. Second step. We find the regulator and disconnect the contact block with the supply wires from its body. 3. Third step. Using a long Phillips screwdriver, unscrew the mounting screws (2 pieces) and remove the product from the car’s throttle body. 4. We install the new product, the procedure is similar to the removal process only in reverse order. The new sensor does not require adjustment or configuration.
Measures to extend the service life of IACs
It should be noted that it is not always necessary to immediately replace the idle air regulator for an 8-valve Kalina with a new device. Quite often, its proper operation is prevented by banal contamination with oils and tar deposits contained in crankcase gases. Therefore, to restore the performance of the IAC and extend its service life, it is necessary to periodically clean the cone needle and the spring of the product from contamination. In addition, the installation hole itself in the throttle assembly must be cleaned. If you follow the above recommendations, the device will not fail at the most crucial moment and will last for a long time.
In the morning at -1, the revs on the tachometer are first 500, and after 1-2-3 seconds the warm-up speed is 1100. I changed the wires, changed the idle, changed the TPS, changed the spark plugs, changed the coil, called with a multimeter. I checked the DMRV readings 0.98. I installed a new air filter. I changed the idle sensor, removed the throttle, it was clean.
And still the relay makes one click and from 500 it is set to 1100, as it warms up everything is fine, then it is set to 900 and it starts without any hang-ups. I don’t know where to dig, what to look for?
The firmware has not changed, original Bosch. I don’t really know what the numbers are, just if you can write something. I’m already thinking, maybe there’s something wrong with the firmware during a cold start? So the main thing is that it warms up for 1 minute, I turn it off, start it again, this is no longer the case. It’s just some kind of trouble, and if the frost hits -30, it will completely shut down, well, in general, such things.
- At XX, the engine runs intermittently in the Lada Kalina - 7 answers
- VAZ Kalina stalls 2-4 seconds after starting – 6 answers
- It revs itself in the morning at idle, Kalina – 6 answers
- The idle speed on the VAZ Kalina jumped up - 6 answers
- VAZ Kalina stalls when cold or in the cold - 5 answers
If the engine is already running and produces 500 rpm. Then for some reason the relay clicks, right? There the IAC can only click, then yes, the speed will change if it is faulty. Do you have an IAC or a throttle assembly without it? As for changes in the weather and the dependence of engine operation - this could be due to a faulty mass air flow sensor or just because of the “wrong” air filter.
Which relay clicks? Which relay makes the click?
There in the engine only the IAC can click when starting. And these Russian regulators are of disgusting quality (I bought a new remote control, it was clogged and the heating did not work, and on the new IAC it jammed, replaced it, installed the old IAC and the motor worked fine).
You can read about the same story (about the wrong IAC) here.
You don’t have to bother with the firmware, you have a normal controller. And you can’t fix this question with firmware.
Checking the fuel pump of a carburetor car (mechanical)
Mechanical fuel pump - diagram
To check the operation of the fuel pump, you should:
- Remove the fuel hose from the carburetor inlet fitting.
- Immerse the hose in a specially prepared transparent bottle. By actively using the pumping lever manually, we notice how strong and dense the fuel is supplied. Air impurities should not be visually noticeable.
Delayed jet output is not a sign of a breakdown, especially if the car has been parked for a long time. As a rule, diaphragms eight and nine are the main cause of malfunction.
Be that as it may, you need to inspect both the strainer and the inlet/outlet valve.
Even if the gaskets are replaced, fuel may leak. In this case, the problem lies in the tightness of the fuel pump housing due to deformation during repairs.
Let's summarize:
The causes of fuel pump problems, both electrical and mechanical, are varied, and the need to find/fix a breakdown may take you by surprise along the way. By following the above recommendations, you will be able to independently carry out the entire necessary set of measures to diagnose this device. And you should start with the power supply (if it is an electric fuel pump) and the operation of the diaphragm when checking a mechanical fuel pump. Very often, the unstable operation of a fuel pump is not due to its breakdown, but to related parts - a filter, check valve or injectors.
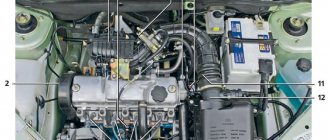
Pinout BN VAZ 2108, 2109, 21099
The fuel pump relay (2) is shown by the arrow.
1 — nozzles; 2 - candles; 3 — ignition module; 4 — diagnostic block; 5 - controller; 6 — connection block to the electrical wiring of the instrument panel; 7 - main relay; 8 - main relay fuse; 9 — electric fan relay; 10 — controller power supply fuse; 11- electric fuel pump relay; 12 — fuel pump power supply circuit fuse; 13 — mass air flow sensor; 14 — throttle position sensor; 15 — coolant temperature sensor; 16 — idle speed regulator; 17 — knock sensor; 18 — crankshaft position sensor; 19 - oxygen sensor; 20- APS control unit; 21 — APS status indicator; 22 — speed sensor; 23 — electric fuel pump with fuel level sensor; 24 — solenoid valve for purge of the adsorber; 25 - lock connected to the ignition system wiring; 26 — instrument panel; 27 — ignition relay; 28 — ignition switch; 29 — mounting block; 30 — electric fan of the cooling system;
A - to terminal “B +” of the generator; B - block connected to block K of the ignition system wiring; C - block connected to block L of the ignition system wiring; D - wire connected to the interior lighting switch; A - wire connected to the black and white wires disconnected from the interior lighting switch; F - to the “+” terminal of the battery; G1, G2 - grounding points; K - block connected to block B of the front wiring; L - block connected to block C of the front wiring.
On “nines” with a mechanical fuel pump, the most common malfunction is wear of the fuel pump diaphragm, which causes gasoline to flow out through the drain hole in the housing during operation. The second reason for the failure of such a fuel pump is wear of the pusher, which transmits force from the camshaft cam to the fuel pump control lever.
How to check without dismantling? Signs
There are several symptoms by which you can determine the malfunction of this unit:
- Jerking while moving.
- Difficulty starting the car.
- Deterioration in acceleration dynamics. The car picks up speed slowly, even if the trigger is pressed fully.
Also note that similar symptoms can occur due to malfunctions of the mass fuel flow sensor or throttle position. It would be a good idea to check and replace the filter, both gasoline and air. The resource of the latter is 10 thousand kilometers. You can determine its wear visually.
Elimination methods
To eliminate the tripping effect on a vehicle, you need to have enough time, since it may take a whole day, as well as tools. To work, you will need a set of wrenches, screwdrivers and heads, as well as a multimeter. So, let's look at how to troubleshoot problems that have arisen.
The on-board computer recognizes a poor-quality mixture by the combustion process. But that's not the worst thing. Poor quality gasoline can clog elements throughout the system. The consequence of long-term use of this type of fluid can lead to the valve mechanism, as well as the pistons, burning out. In this case, major repairs become inevitable, since parts wear out at an accelerated rate.
If it is discovered that the gasoline is of poor quality, the motorist will face a whole range of repair operations, namely:
- Cleaning the fuel tank and replacing the filter.
- Cleaning or changing spark plugs.
- Dismantling and checking injectors.
- And finally, disassembling the cylinder head.
After cleaning, you need to fill it with high-quality gasoline and drive it. The CHECK icon should turn off on its own when high-quality fuel enters the system.
How to check fuel pump pressure? Methods
It happens that the element works, but does not produce the required pressure. In injection systems, injectors are very demanding on this indicator. Due to low pressure, difficulties may arise in starting the engine and failures in dynamics. How to check the fuel pump? This can be done in several ways. The first is a check at a service station. The price of such a service is about 300 rubles. However, you can check the pressure yourself. Now there are special pressure gauges for the pump on sale. But their cost reaches two thousand rubles. You can also use the ordinary one, which is used for car wheels. Every motorist has such a pressure gauge.
Replace with a new one or not
If the malfunction concerns a mechanical part, the motorist has two ways to solve the problem. The first is purchasing a repair kit. It includes all the necessary parts that may break in the pump. The second is replacing the entire element with a new one. This is a more accurate and reliable method. But it is worth considering that submersible pumps are very expensive. Among the manufacturers on the market there are both originals and analogues.