A characteristic feature of domestically produced cars is that their repair and maintenance can be carried out on their own. The main thing is to have the necessary knowledge, instructions and the desire to cope with the task on your own. But still, in the case of replacing valve guides, which has a number of its own specific features, it is better to carry it out at a service station. However, many motorists cope well with this task in their own garage.
Why do you need a guide bushing?
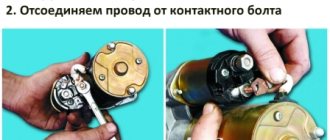
The guide bushing can quite rightly be considered the main element on which the resource and proper operation of the “seat - valve plate” tandem depends. The material from which the part is made and its design itself are primarily aimed at working under conditions of high speeds of the valve stem fixed in it, constant high-temperature loads and the almost complete absence of lubrication in the valve-bushing pair.
Causes and consequences of deformation
The described conditions lead to the fact that during engine operation, the valve guide bushing also wears out, which is why, over time, its alignment with the valve stem may be disrupted. Subsequently, the part breaks even more and the valve begins to “walk” and does not fit tightly to its seat, and this, in turn, leads to the chamfer of the seat breaking over time. As a consequence, you can get a burnout of the valve and have to replace the seat.
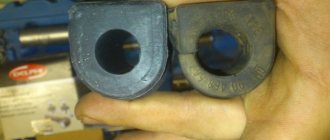
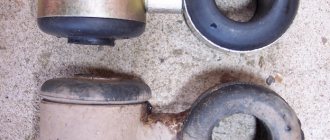
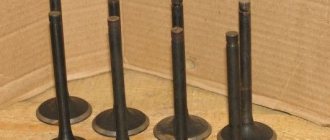
Appearance of bronze guide bushings for VAZ 2108–2109 models
Also, due to the “walking” of the valve in a broken guide, the oil seals can quickly become unusable. They simply will not be able to hold oil with increased angular displacement of the valve stem. The result will be oil getting into the engine, and if you also take into account that more oil will pass through the broken bushing than usual, then the situation will not be pleasant. Carbon deposits on valves and other parts around the combustion chamber will increase, the level of harmful exhaust emissions will increase, and you may end up with a prematurely failed catalytic converter. And simply replacing the valve stem seals is not enough, as the problem will soon return again.
Why you shouldn't neglect checking
When repairing an engine, it is better to pay special attention to its head. Often it is this part of the engine that is to blame for the fact that the level of compression in the cylinders is far from the desired level. When repairing cylinder heads, motorists sometimes limit themselves to only grinding the valves to their seats, believing that there is nothing particularly wearable in all-metal bushings. At the same time, checking how large the gap between the part and its valve is will be completely worthwhile. When the obtained clearance figures go beyond those recommended by the car manufacturer, then no amount of grinding in the valves or replacing the valve stem seals will protect against problems in the future.
Materials used to make bushings
For the manufacture of bushings, materials with good wear resistance and thermal conductivity are used. Among these you can find:
- special cast iron alloys;
- bronze;
- brass;
- metal ceramics.
In terms of thermal conductivity and cost, brass, along with bronze, are among the leaders, so the vast majority of bushings are made from alloys of these metals.
Nuances to consider
Most bushings have a special support collar on the outside, designed to ensure proper fixation of the part vertically in the cylinder head. If the part is smooth, then installation is carried out using a special mandrel.
For intake valves, the guide bushings should not protrude so as not to increase the aerodynamic drag of the intake channel. Exhaust valve bushings are designed to “hide” the valve stem as much as possible to protect the latter from high temperatures and better heat dissipation.
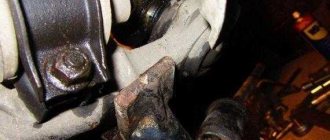
Appearance and location of the valve guide in the cylinder head
The manufacturing precision of the bushings is very high. This is necessary to obtain the most accurate alignment and the best fit of the valve plate and seat during engine operation. The outside of the body of the part that is to be pressed into the cylinder head must be processed as cleanly as possible; there should be no scratches or marks on it. This ensures optimal heat removal from this accessory to the block head.
Video: review of valve guides for VAZ 2108–2109
What materials are used to make bushings?
Let's talk about what materials are used to make high-quality bushings. On sale you can find the following items made from:
- bronze;
- brass;
- special cast iron alloys;
- metal ceramics.
When it comes to thermal conductivity and cost, bronze and brass are ahead of all others. That is why most of the bushings that are found on sale are made from these metals. When replacing valve guides, pay attention to what metal they are made of.
Wear detection
The nature of the operation of the valve stem-bushing pair causes increased wear on the inner surface of the latter. It becomes noticeable when the vehicle is driven for a long time (about 150 thousand km). At the same time, the use of low quality oils can significantly speed up the life of the bushings. Therefore, it is always advisable to determine the degree of wear before replacing them. There are two methods for this:
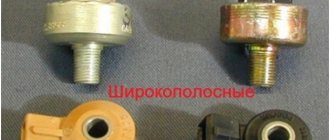
- Using a micrometer paired with a bore gauge. These tools measure the minimum internal diameter of the bushing, as well as the maximum diameter of the valve stem travel area. The difference between the obtained diameters will give us the width of the required gap. When taking measurements, one should not forget about the conical and barrel-shaped nature of the wear of the rod, as well as the fact that the diameter of the bushing changes with height. All surfaces must be thoroughly cleaned of dust and dirt before starting measurements.
Set of bore gauge and micrometer for determining bushing wear - Using a dial indicator with a special stand (micrometric bore gauge or indicator-type bore gauge). If the resulting gap value goes beyond the limits indicated in the manual, then a new valve is taken and the measurement procedure is repeated. If in the second case the gap is beyond the permissible limits, it means that the spare parts need to be replaced.
Bore gauge with dial indicator for measuring clearances between the bushing and the valve
What nuances need to be taken into account
Almost all bushings have a special thrust collar, which is located on the outside. It allows you to fix the element as accurately as possible in a vertical plane on the cylinder head. If the bushing is smooth, then installation must be carried out using a mandrel. As for the intake valves, the guides should not protrude on them. Otherwise, their aerodynamic drag will increase.
The bushings installed on the exhaust valves hide the stem as much as possible in order to protect it from high temperatures. It also allows for very good heat dissipation.
Replacing valve guides
Extraction
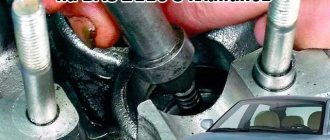
- Here it is strongly recommended to warm up the cylinder head to about 100 degrees Celsius before the procedure. The aluminum from which the cylinder head is made has a higher expansion coefficient than the material of the guide sleeve. Due to heating, the tension of the bushing-cylinder head connection is significantly reduced and the guides can be easily pressed out without damaging the seat with light blows of a hammer or sledgehammer.
- A special drift tool (mandrel) is used for extraction. Despite its highly specialized nature and high cost, this tool makes it possible to press out exactly along the axis of the guide sleeve. For such procedures, experienced car mechanics often acquire pneumatic hammers and special drift attachments for them.
Tool for pressing out and pressing in guide bushings - It happens that a part does not want to come out. In such cases, it is drilled out. And it’s better to use a drilling machine. If you use a conventional drill for work, there is a risk of damaging the socket and creating a misalignment. You may not have to completely drill it out. With thin walls it will be much easier to knock it out.
- The inner surface of the seat after removal should be as smooth as possible and perfectly clean. There should be no scratches, roughness or other, even the slightest, defects. To obtain a similar result, it must be further processed after pressing.
Pressing video
Installing new
- Before installing new spare parts, you need to determine the value of the actual tension. To do this, the diameter of the seat in the cylinder head and the diameter of the bushing are measured. The difference between the first and second should not exceed 0.03–0.05 mm.
- If the socket is noticeably larger than the bushing chosen for it, then you should look for a part with a larger diameter. If the diameter of the socket is insufficient, then you can use the services of a drilling machine to increase it.
- Before pressing in new bushings, the cylinder head must also be heated. But it is generally recommended to cool new spare parts in liquid nitrogen, which will greatly reduce their outer diameter and make it easier to enter into the housings that have expanded from heating, and will also reduce the risk of damage during pressing.
- But since not everyone has liquid nitrogen in their garage, you can first place the new bushings in the freezer. Again, if the latter is available in the accessibility zone. For simplicity, we can take as the required temperature difference between the cylinder head and the guide bushing equal to 150 degrees Celsius. Even when pressing bushings, it is recommended to lubricate the rubbing surfaces with liquid machine oil, especially if the parts have not been heated/cooled.
- The pressing process itself follows the same scenario as pressing out. As a tool, a mandrel and a hammer (or an air hammer with an attachment). Next, using a series of successive blows, we hammer the part into the seat.
Video on pressing
Tools and materials
Replacement of guide bushings is carried out using the following tools:
- hammer;
- sweeps at 8.022 and 8.028;
- mandrel for pressing out and pressing in bushings.
The bushings are changed using a stepped mandrel - a brass or bronze tool. It rests against the guide sleeve, after which it is knocked out with a hammer blow. This method of pressing out does not harm the cylinder head as much as using a regular hammer and chisel. A special puller is used not only to remove bushings, but also to replace them.
Stepped mandrel used for pressing out VAZ 2106 guide bushings
The best tool for replacing guide bushings is a push-out puller. Such devices allow you to remove valve bushings without damaging the seating plane on the cylinder head. The presence of this tool allows you to avoid scoring and other cylinder head defects that may appear when using a mandrel and hammer.
Puller-extruder for guide bushings VAZ 2106 - universal tool
guides from VAZ 2108
I wanted to install valve guide bushings from the eight, but yesterday in the store I saw long German ones and our clumsy and short ones. Which one is better to install? please advise
Put long ones, find cermets. Just give it to a turner, let him grind the sill for you lower for the retaining ring - to what length - don’t be a fool, try it yourself.. Or clamp it into a drill yourself, and use improvised means such as a hacksaw - but this is already a jamb, you understand. Here.
Also take a set of springs and plates from eight. Before pressing the guides, use a drill to chamfer the mounting hole on the side where the springs are, so that the retaining ring goes flush with the plane where the plate sits, then it will sit evenly, and the ring will have nowhere to go. Just make sure that the top plate does not hit the guide when opening the valve - for this you need to ensure that the guide sticks out (IMHO Dnepr - 20 mm) and you can file the top plate where the crackers sit. Take the Dnieper crackers, they hold up fine, just be sure to put in the spots.
In my experience, the valves turn out to be simply eternal - due to stiffer springs, the camshaft smoothly lowers them onto the seats, rather than inertia wobbling them with all its might. Again, the revs will increase.
and I hammered it in without retaining rings, just roughly look at how and why
u menia byla remontirovana odna golova, tak vazovskije (cugunyje) napravliajusce neviderzali i 10 000km vileteli vmeste s klapanomv cilindr. lucse iz spec splava ,kak originalnyje, libo metalokeramiceskije. a ot cego byvajut metalokeramiceskije?
for ziurke
: You're fucking, you're fucking. How did they fly into your combustion chamber? What about the retaining ring? How about the crackers? In the sense of the springs, on the contrary, they should not have been allowed into the combustion chamber.
Metal ceramics seem to be similar to classics. Personally, I took it at the store - they said that they were from eight.
But if I install a vase from a classic, can I immediately install a set of springs from it without modifications?
Scan
Sometimes it happens that the valves do not fit into the new bushings. This is due to the fact that when pressed in, the guides change their diameter slightly. To get rid of this problem, you need to use a sweep. It allows you to bore the element to the desired diameter. It is recommended to use diamond reamers as they will last longer than steel ones. Replacing valve guides with your own hands can be done quickly if you have experience. If you don’t have it, you need to see how an experienced craftsman performs this work.
Source